- How To Use SSH to Connect to a Remote Server
- Introduction
- Basic Syntax
- How Does SSH Work?
- How To Configure SSH
- How To Log Into SSH with Keys
- How Does Key-based Authentication Work?
- How To Create SSH Keys
- How To Transfer Your Public Key to the Server
- Client-Side Options
- Disabling Password Authentication
- Conclusion
- How to Use SSH to Connect to a Remote Server in Linux or Windows
- What is SSH?
- How Does SSH Work?
- How to Enable an SSH Connection
- How to Install an OpenSSH Client
- How to Install an OpenSSH Server
- How to Connect via SSH
- SSH Further Steps
- VNC Over SSH
- What is RDP?
- How Does Remote Desktop Protocol Work?
- How to Enable an RDP Connection
- Enabling Remote Access in Windows 7, 8, 10 and Windows Server Versions
- Step 1: Allow Remote Connections
- Step 2: Add Users to the List of Remote Users
- How to Use the Remove Desktop Connection Client
- Step 1: Launch the Destkop Connection Unit
- Step 2: Enter the Remote Hosts IP Address or Name
- How to Find the IP Address and Host Name
- Step 3: Entering the RDP Credentials and Finalizing the Connection
How To Use SSH to Connect to a Remote Server
Last Validated on November 11, 2020 Originally Published on September 10, 2013
Introduction
One essential tool to master as a system administrator is SSH.
SSH, or Secure Shell, is a protocol used to securely log onto remote systems. It is the most common way to access remote Linux servers.
In this guide, we will discuss how to use SSH to connect to a remote system.
Basic Syntax
To connect to a remote system using SSH, we’ll use the ssh command. The most basic form of the command is:
The remote_host in this example is the IP address or domain name that you are trying to connect to.
This command assumes that your username on the remote system is the same as your username on your local system.
If your username is different on the remote system, you can specify it by using this syntax:
Once you have connected to the server, you may be asked to verify your identity by providing a password. Later, we will cover how to generate keys to use instead of passwords.
To exit the ssh session and return back into your local shell session, type:
How Does SSH Work?
SSH works by connecting a client program to an ssh server, called sshd .
In the previous section, ssh was the client program. The ssh server is already running on the remote_host that we specified.
On your server, the sshd server should already be running. If this is not the case, you may need to access your server through a web-based console, or local serial console.
The process needed to start an ssh server depends on the distribution of Linux that you are using.
On Ubuntu, you can start the ssh server by typing:
That should start the sshd server and you can then log in remotely.
How To Configure SSH
When you change the configuration of SSH, you are changing the settings of the sshd server.
In Ubuntu, the main sshd configuration file is located at /etc/ssh/sshd_config .
Back up the current version of this file before editing:
Open it with a text editor:
You will want to leave most of the options in this file alone. However, there are a few you may want to take a look at:
The port declaration specifies which port the sshd server will listen on for connections. By default, this is 22 . You should probably leave this setting alone, unless you have specific reasons to do otherwise. If you do change your port, we will show you how to connect to the new port later on.
The host keys declarations specify where to look for global host keys. We will discuss what a host key is later.
These two items indicate the level of logging that should occur.
If you are having difficulties with SSH, increasing the amount of logging may be a good way to discover what the issue is.
These parameters specify some of the login information.
LoginGraceTime specifies how many seconds to keep the connection alive without successfully logging in.
It may be a good idea to set this time just a little bit higher than the amount of time it takes you to log in normally.
PermitRootLogin selects whether the root user is allowed to log in.
In most cases, this should be changed to no when you have created a user account that has access to elevated privileges (through su or sudo ) and can log in through ssh.
strictModes is a safety guard that will refuse a login attempt if the authentication files are readable by everyone.
This prevents login attempts when the configuration files are not secure.
These parameters configure an ability called X11 Forwarding. This allows you to view a remote system’s graphical user interface (GUI) on the local system.
This option must be enabled on the server and given with the SSH client during connection with the -X option.
After making your changes, save and close the file by typing CTRL+X and Y , followed by ENTER .
If you changed any settings in /etc/ssh/sshd_config , make sure you reload your sshd server to implement your modifications:
You should thoroughly test your changes to ensure that they operate in the way you expect.
It may be a good idea to have a few sessions active when you are making changes. This will allow you to revert the configuration if necessary.
How To Log Into SSH with Keys
While it is helpful to be able to log in to a remote system using passwords, it’s a much better idea to set up key-based authentication.
How Does Key-based Authentication Work?
Key-based authentication works by creating a pair of keys: a private key and a public key.
The private key is located on the client machine and is secured and kept secret.
The public key can be given to anyone or placed on any server you wish to access.
When you attempt to connect using a key-pair, the server will use the public key to create a message for the client computer that can only be read with the private key.
The client computer then sends the appropriate response back to the server and the server will know that the client is legitimate.
This entire process is done automatically after you set up keys.
How To Create SSH Keys
SSH keys should be generated on the computer you wish to log in from. This is usually your local machine.
Enter the following into the command line:
Press enter to accept the defaults. Your keys will be created at
Change into the .ssh directory by typing:
Look at the permissions of the files:
As you can see, the id_rsa file is readable and writable only to the owner. This is how it should be to keep it secret.
The id_rsa.pub file, however, can be shared and has permissions appropriate for this activity.
How To Transfer Your Public Key to the Server
If you currently have password-based access to a server, you can copy your public key to it by issuing this command:
This will start an SSH session. After you enter your password, it will copy your public key to the server’s authorized keys file, which will allow you to log in without the password next time.
Client-Side Options
There are a number of optional flags that you can select when connecting through SSH.
Some of these may be necessary to match the settings in the remote host’s sshd configuration.
For instance, if you changed the port number in your sshd configuration, you will need to match that port on the client-side by typing:
If you only wish to execute a single command on a remote system, you can specify it after the host like so:
You will connect to the remote machine, authenticate, and the command will be executed.
As we said before, if X11 forwarding is enabled on both computers, you can access that functionality by typing:
Providing you have the appropriate tools on your computer, GUI programs that you use on the remote system will now open their window on your local system.
Disabling Password Authentication
If you have created SSH keys, you can enhance your server’s security by disabling password-only authentication. Apart from the console, the only way to log into your server will be through the private key that pairs with the public key you have installed on the server.
Warning: Before you proceed with this step, be sure you have installed a public key to your server. Otherwise, you will be locked out!
As root or user with sudo privileges, open the sshd configuration file:
Locate the line that reads Password Authentication , and uncomment it by removing the leading # . You can then change its value to no :
Two more settings that should not need to be modified (provided you have not modified this file before) are PubkeyAuthentication and ChallengeResponseAuthentication . They are set by default, and should read as follows:
After making your changes, save and close the file.
You can now reload the SSH daemon:
Password authentication should now be disabled, and your server should be accessible only through SSH key authentication.
Conclusion
Learning your way around SSH is a worthwhile pursuit, if only because it is such a common activity.
As you use the various options, you will discover more advanced functionality that can make your life easier. SSH has remained popular because it is secure, light-weight, and useful in diverse situations.
Источник
How to Use SSH to Connect to a Remote Server in Linux or Windows
Home » Web Servers » How to Use SSH to Connect to a Remote Server in Linux or Windows
Introduction
Accessing machines remotely became a necessity a long time ago and we can barely imagine how it would be if we couldn’t control computers from remote locations. There are many ways to establish a connection with a remote machine depending on the operating system you are running, but the two most used protocols are:
- Secure Shell (SSH) for Linux-based machines
- Remote Desktop Protocol (RDP) for Windows-based machines
The two protocols use the client and server applications to establish a remote connection. These tools allow you to gain access and remotely manage other computers, transfer files, and do virtually anything you can do while physically sitting in front of the machine.
Prerequisites
Before you can establish a secure remote desktop protocol with a remote machine, there are a few basic requirements to meet:
- The remote computer must be turned on at all times and have a network connection.
- The client and server applications need to be installed and enabled.
- You need the IP address or the name of the remote machine you want to connect to.
- You need to have the necessary permissions to access the remote computer.
- Firewall settings need to allow the remote connection.
What is SSH?
Secure Shell, sometimes referred to as Secure Socket Shell, is a protocol which allows you to connect securely to a remote computer or a server by using a text-based interface.
When a secure SSH connection is established, a shell session will be started, and you will be able to manipulate the server by typing commands within the client on your local computer.
System and network administrators use this protocol the most, as well as anyone who needs to manage a computer remotely in a highly secure manner.
How Does SSH Work?
In order to establish an SSH connection, you need two components: a client and the corresponding server-side component. An SSH client is an application you install on the computer which you will use to connect to another computer or a server. The client uses the provided remote host information to initiate the connection and if the credentials are verified, establishes the encrypted connection.
On the server’s side, there is a component called an SSH daemon that is constantly listening to a specific TCP/IP port for possible client connection requests. Once a client initiates a connection, the SSH daemon will respond with the software and the protocol versions it supports and the two will exchange their identification data. If the provided credentials are correct, SSH creates a new session for the appropriate environment.
The default SSH protocol version for SSH server and SSH client communication is version 2.
How to Enable an SSH Connection
Since creating an SSH connection requires both a client and a server component, you need to make sure they are installed on the local and the remote machine, respectively. An open source SSH tool—widely used for Linux distributions— is OpenSSH. Installing OpenSSH is relatively easy. It requires access to the terminal on the server and the computer that you use for connecting. Note that Ubuntu does not have SSH server installed by default.
How to Install an OpenSSH Client
Before you proceed with installing an SSH client, make sure it is not already installed. Many Linux distributions already have an SSH client. For Windows machines, you can install PuTTY or any other client of your choice to gain access to a server.
To check if the client is available on your Linux-based system, you will need to:
- Load an SSH terminal. You can either search for “terminal” or press CTRL + ALT + T on your keyboard.
- Type in ssh and press Enter in the terminal.
- If the client is installed, you will receive a response that looks like this:
This means that you are ready to remotely connect to a physical or virtual machine. Otherwise, you will have to install the OpenSSH client:
- Run the following command to install the OpenSSH client on your computer:
sudo apt-get install openssh-client - Type in your superuser password when asked.
- Hit Enter to complete the installation.
You are now able to SSH into any machine with the server-side application on it, provided that you have the necessary privileges to gain access, as well as the hostname or IP address.
How to Install an OpenSSH Server
In order to accept SSH connections, a machine needs to have the server-side part of the SSH software toolkit.
If you first want to check if OpenSSH server is available on the Ubuntu system of the remote computer that needs to accept SSH connections, you can try to connect to the local host:
- Open the terminal on the server machine. You can either search for “terminal” or press CTRL + ALT + T on your keyboard.
- Type in ssh localhost and hit enter.
- For the systems without the SSH server installed the response will look similar to this:
If the above is the case, you will need to install the OpenSSH server. Leave the terminal open and:
- Run the following command to install the SSH server:
- Type in your superuser password when asked.
- Enter and Y to allow the installation to continue after the disk space prompt.
The required support files will be installed, and then you can check if the SSH server is running on the machine by typing this command:
The response in the terminal should look similar to this if the SSH service is now running properly:
Another way to test if the OpenSSH server is installed properly and will accept connections is to try running the ssh localhost command again in your terminal prompt. The response will look similar to this screen when you run the command for the first time:
Enter yes or y to continue.
Congratulations! You have set up your server to accept SSH connection requests from a different
computer using an SSH client.
TIP
You can now edit the SSH daemon configuration file, for example, you can change the default port for SSH connections. In the terminal prompt, run this command:
The configuration file will open in the editor of your choice. In this case, we used Nano.
If you need to install Nano, run this command:
Please note that you need to restart SSH service every time you make any changes to the sshd_config file by running this command:
How to Connect via SSH
Now that you have the OpenSSH client and server installed on every machine you need, you can establish a secure remote connection with your servers. To do so:
- Open the SSH terminal on your machine and run the following command: ssh your_username@host_ip_address
If the username on your local machine matches the one on the server you are trying to connect to, you can just type: ssh host_ip_address And hit Enter.
If the computer you are trying to remotely connect to is on the same network, then it is best to use the private IP address instead of the public IP address. Otherwise, you will have to use the public IP address only. Additionally, make sure that you know the correct TCP port OpenSSH is listening to for connection requests and that the port forwarding settings are correct. The default port is 22 if nobody changed configuration in the sshd_config file. You may also just append the port number after the host IP address.
Here is the example of a connection request using the OpenSSH client. We will specify the port number as well:
You are now able to manage and control a remote machine using your terminal. If you have trouble connecting to a remote server, make sure that:
- The IP address of the remote machine is correct.
- The port SSH daemon is listening to is not blocked by a firewall or forwarded incorrectly.
- Your username and password are correct.
- The SSH software is installed properly.
Note: If SSH responds with a message “Connection refused”, please refer to our article How To Fix The SSH “Connection Refused” Error for possible reasons and solutions.
SSH Further Steps
Now that you are able to establish a connection to your server using SSH, we highly recommend a few further steps to improve SSH security. When you leave the setup with the default values, it is more likely to be hacked and your server can easily become a target of scripted attacks.
Some of the suggestions for hardening SSH by editing the sshd configuration file include:
- Change the default TCP port where SSH daemon is listening. Change it from 22 to something much higher, for example 24596. Make sure you do not use a port number that is easy to guess, such as 222, 2222 or 22222.
- Use SSH key pairs for authentication for passwordless SSH login. They are both safer and also allow logging in without the need to use your password (which is faster and more convenient).
- Disable password-based logins on your server. If your password gets cracked, this will eliminate the possibility of using it to log into your servers. Before you disable the option to log in using passwords, it is important to make sure that authentication using key pairs is working properly.
- Disable root access to your server and use a regular account with the su – command to switch to a root user.
You can also use TCP wrappers to restrict access to certain IP addresses or hostnames. Configure which host can connect using TCP wrappers by editing the /etc/hosts.allow and etc/hosts.deny files.
Note that allowed hosts supersede the denied hosts. For example, to allow SSH access to a single host you will first deny all hosts by adding these two lines in the etc/hosts.deny :
sshd : ALL
ALL : ALL
Then, in the etc/hosts.allow add a line with the allowed hosts for the SSH service. That can be a single IP address, an IP range, or a hostname: sshd : 10.10.0.5, LOCAL .
Make sure to keep your log in information secure at all times and to apply security at multiple layers. Use different methods to limit SSH access to your servers, or use services that will block anyone who tries to use brute force to gain access to your servers. Fail2ban is one example of such service.
VNC Over SSH
For users who are used to working in a graphical desktop environment with Virtual Network Computing (VNC), it is possible to completely encrypt connections using SSH tunneling. In order to tunnel VNC connections over SSH, you will need to run this command in the terminal on your Linux or UNIX machine:
Here is the breakdown of the command above:
- ssh : this starts the SSH client program on your local machine and enables secure connection to the SSH server on a remote computer.
- -L 5901:localhost:5901 : states that the local port for the client on the local machine is to be forwarded to the specified host and port of the remote machine. In this case, local port 5901 on the local client is being forwarded to the same port of the given remote server.
- -N : instructs to only forward ports, and not to execute a remote command.
- -f : sends SSH to background after the password is provided, just before the command is executed. Then, you can freely use the terminal to type commands on the local machine.
- -l username : the username you insert here will be used for logging in to the remote server you specified.
- hostname_or_IP : this is the remote system with a VNC server. An example of an IP address would be 172.16.0.5 and the example of a hostname would be myserver.somedomain.com.
You can also connect to a remote server via SSH tunnel from a Windows machine by using PuTTY. In the PuTTY configuration window:
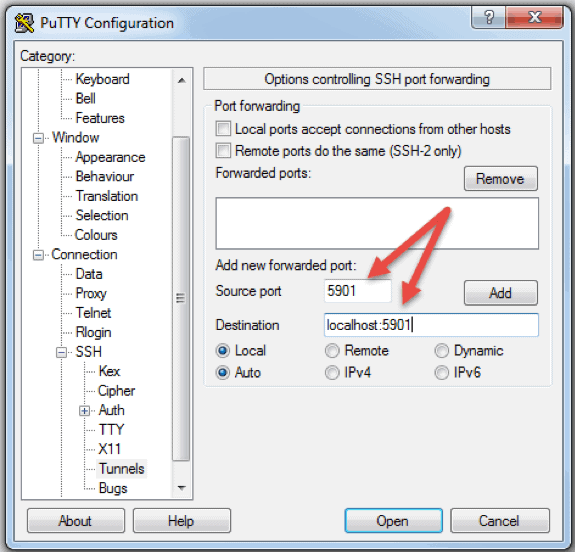
- Go to Connection -> SSH -> Tunnels
- In the Source port field type in 5901
- In the Destination field type in localhost:5901
- Start the SSH session as you normally would.
- Connect to your server with a VNC client of your choice.
Note: If you are using Ubuntu, refer to our installation guide How to Install PuTTY on Ubuntu.
What is RDP?
Remote Desktop Protocol (RDP) is a protocol developed by Microsoft. It is used to control and manage machines with a Windows operating system remotely.
Unlike Secure Shell, connections established using an RDP client provide a user with a graphical interface through which they can gain access to a remote computer and control it in the same manner as their local computer.
Using Remote Desktop services, formerly known as terminal services, allows network and system engineers to easily manipulate remote computers connected to a local network or the Internet.
This comes with a price. If you do not use a virtual private network (VPN), connecting via RDP is far less secure than SSH because you are directly exposed to the internet. There are many automated scripts constantly looking for weaknesses in your connection, especially for open ports that Windows Remote Desktop connections use. In that case, it is highly recommended to have strong, secure passwords and change them regularly. This does not make RDP connections safe, but less vulnerable.
How Does Remote Desktop Protocol Work?
Windows Remote Desktop connection is based on a rather simple client-server model using Remote Desktop Protocol (RDP). After you enable it, the Windows Remote Desktop server-side service starts listening for connection requests on port 3389. Whenever you try to connect to a Windows server, you will need to provide a valid username for the account you are using to gain access remotely. Once you gain access to the server, you will be able to manage applications, transfer files between the two computers, and virtually perform any task you can perform locally with the account in question.
No matter what version of the Windows operating system you have, you will be able to establish a secure remote connection to another computer since the Remote Desktop client is available by default. On the other hand, a computer can be remotely accessible only if it runs on a Pro, Enterprise, or Server edition of a Windows operating system. So, we can conclude that RDP connections are possible only between computers with a Windows OS on them.
How to Enable an RDP Connection
Establishing a Remote Desktop connection to another computer over network requires you to enable the Windows Remote Desktop server service. The Remote Desktop client is integrated into Windows systems, ready out of the box, and does not need any special setup before you can connect to another Windows-based machine. However, accepting Remote Desktop connections from another machines is disabled by default on all version of Windows OS.
If you want to remotely connect to a server over the Internet and not through the local network, you need to take a few things into consideration before you enable this service:
- Port forwarding. If you are not using a VPN you need to make sure the ports are forwarded properly to the remote host’s IP address. Check the router settings to see if the traffic on the default TCP port for Remote Desktop Protocol (port 3389) is going to the IP of the server with which you want to establish a Remote Desktop connection. Note that your Windows server is in this case directly exposed to the Internet and vulnerable.
- Using a VPN. This is a much safer option for Remote Desktop connection. When you create a virtual private network on a client computer, you will be able to access all services that are available only when you use local connection.
- Firewall settings. Make sure that the firewall you are using for the remote machine is not blocking Remote Desktop connection. You need to open the local port for RDP, whether it is the default or custom port number.
Enabling Remote Access in Windows 7, 8, 10 and Windows Server Versions
The procedure to configure remote desktop and allow secure remote connections to a server or a PC from a different computer is similar for all versions of Windows operating systems. I will list the basic steps to enable remote access to a desired machine. Before you begin, please make sure that you have taken into consideration the notes listed above concerning port forwarding, VPN, and firewall settings.
Step 1: Allow Remote Connections
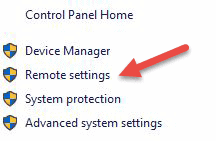
Go to the computer information on the machine where you want to allow remote connections:
- Right Click on Computer or This PC depending on the Windows OS version.
- Click on Properties.
- Click on Remote settings on the left side of the window.
- Click on Allow remote connections to this computer. This should automatically add Remote Desktop Firewall exception. Additionally, you can check off the box that says “Allow connections only from computers running Remote Desktop with Network Level Authentication (recommended)” for additional security of your RDP sessions.
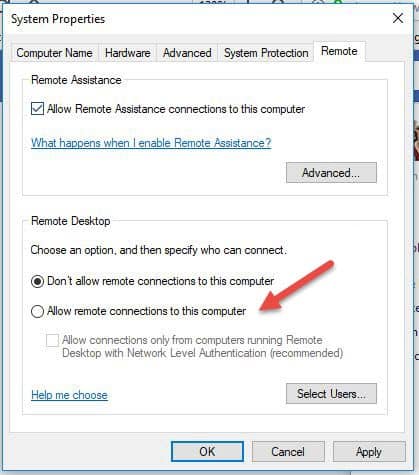
- Click Apply if you want to stay in the tab or OK to close it.
Step 2: Add Users to the List of Remote Users
You need to perform this step only if you want to allow users other than administrators to access the machine in question. If you are an administrator, your account is automatically included in the list of allowed users but you will not see it. To select more users:
- On the Remote settings screen shown above, click Select Users…
- Click on Add in the Remote Desktop Users box.
- The Select Users box will appear. You can select the location you want to search by clicking on Locations.
- In the Enter the Object Names to Select field, type a name of a user and click on Check Names.
- When you find a match, select the user account and click OK.
- Close the System Properties window by clicking OK again.
There are not many other options to change in order to configure Remote Desktop. Provided that other settings do not interfere with your Remote Desktop connection, you are now able to remotely connect and control this computer.
How to Use the Remove Desktop Connection Client
Using the Remote Desktop client is straightforward and you do not need to specifically configure Remote Desktop on the local computer. The steps below will work for all versions of Windows starting from Windows 7.
Step 1: Launch the Destkop Connection Unit
On your local Windows computer, locate the Remote Desktop Connection application. You can find it in a couple of different ways:
- For Windows 7, click on Start -> All Programs, go to the ‘Accessories’ folder and click on Remote Desktop Connection. For Windows 10, Click on Start and locate the ‘Windows Accessories’ folder where you can also find the Remote Desktop Connection app.

- Click on Start and type in Remote Desktop Connection in the search bar. You will receive search results as soon as you start typing. Click on the application when it shows up on the list.

- Press Windows + R keys on your keyboard to get the “Run” box. Type in mstsc and hit Enter in the ‘Open:’ field to run the Remote Desktop client.

Step 2: Enter the Remote Hosts IP Address or Name
Once you launch the Remote Desktop Connection application, you will get a window where you can enter the name or the IP address of a remote machine you want to access.
In the Computer field, type in the corresponding name or IP address and click Connect.
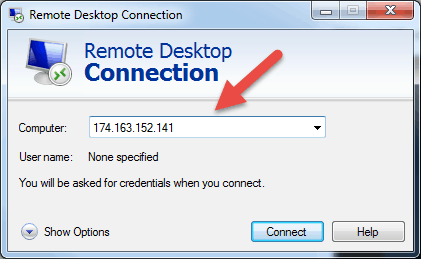
Note: If the default listening port for Remote Desktop connection (port 3389) has been changed on the remote host to a different value, you will have to specify it after the IP address.
Example: 174.163.152.141:6200
Depending on your circumstances, you will either need to enter the private or public IP address of the remote host. Here are the possible scenarios:
- If the client computer and the remote host connect to the same Local Area Network, you will use the host’s private IP address for Remote Desktop Connection.
- If you are using a virtual private network (VPN) on the client computer to access the remote host, you will use the host’s private IP address for Remote Desktop Connection.
- If the client computer is connecting to the remote host from another network over the Internet without a VPN, you will use the public IP address.
How to Find the IP Address and Host Name
There are many ways to locate the name, public or private IP address of a computer where you want to configure Remote Desktop service. Here are the quickest and easiest methods:
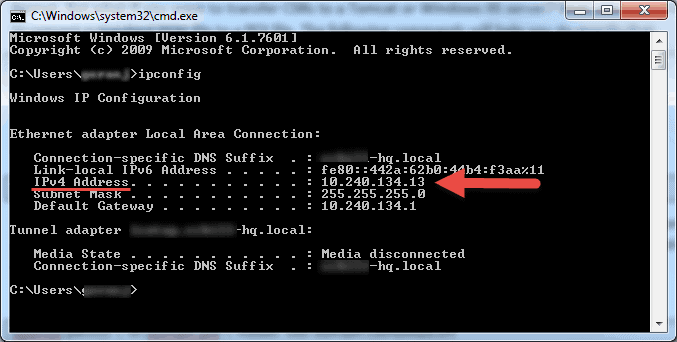
To determine a computer’s private IP address:
- Search for CMD from the start menu or press Windows+R on your keyboard, type in CMD and hit Enter to run the command prompt.
- Type ipconfig in the command prompt and hit Enter.
- Your will see your computer’s private IP address under the IPv4 Address line.
To determine which public IP address a computer is using:
- From your web browser, go to com or use its search bar.
- Type in “what is my IP” or simply “my IP” and hit Enter.
- At the top of the page, Google will show you the public IP address your computer is using. If this is not working for your region, you can visit the first webpage in the search results and it will show you the IP address. Some websites such as www.whatismyip.com will even show you your private (local) IP address.
To find a computer’s name:
- Right Click on Computer, or This PC, depending on the Windows OS version you are using.
- Click on
- You will find your full computer name under the “Computer name, domain, and workgroup settings” section.
Step 3: Entering the RDP Credentials and Finalizing the Connection
After you hit connect, the loading bar will appear. When it finishes initiating and configuring the remote session you will get a pop-up window that will look similar to this:
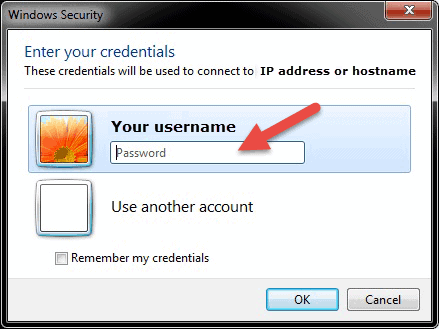
- Enter the password for the selected username. You can use another account, if needed, and provide a different username and password.
- Click OK when ready and you will get the security certificate warning.
- Click Yes to continue.
Note: Only one user can be logged in at the same time on a Windows computer. If someone else is using the machine you are trying to remotely access, that user has to disconnect. The warning logon message will appear in such cases.
You will not see the desktop of the remote machine. Depending on the user account permission settings, you can now perform any operation that you can while working directly in front of it.
Remote Desktop Protocol Further Steps
When setting up your remote server or machine to accept remote desktop connections, it is important to take precautions concerning securing RDP. Your server is especially vulnerable if you are accessing it over the Internet.
Here are a few pieces of advice to keep in mind if you are using remote desktop protocol to remotely connect to your machines:
- Use the built in VPN server on your Windows machine to additionally secure your traffic. This will provide more secure access to your Windows server and services.
- Set client connection encryption level. This option is set to “Not configured” by default. You can enable it and force high encryption level settings for all communications between clients and Remote Desktop Session Host servers. We do not recommended using the “Client Compatible” encryption level setting. Leaving the default “High” encryption level setting will force strong 128-bit encryption for data sent from the client to server and vice versa. You can edit this configuration using the Local Group Policy editor.
- Employ two-factor authentication using a third-party tool, such as Duo Security. By installing Duo Authentication for Windows Logon, you can add two-factor authentication to all Windows login attempts, or only for RDP sessions.
- Enforce firewall rules to limit exposure of open RDP ports to the Internet, especially if you are using the default RDP TCP port 3389. Windows has a built-in firewall which you can access from Control Panel and further configure it to restrict traffic to specific ports and IP addresses
These best practices for additionally securing RDP will help you tighten down remote desktop access. You will avoid most of the unauthorized login attempts without spending too much time making configuration changes to your machines.
Note: Learn how to use SSHFS to mount remote file systems over SSH.
Conclusion
The steps and processes listed in this guide will work for most users and most versions of Linux and Windows operating systems.
You should now be able to Connect to a Remote Server with Linux or Windows.
There are of course many other methods to establish a connection between two remote computers, but the ones covered here are most common.
Источник


