- Управляем сетевыми подключениями в Linux с помощью консольной утилиты nmcli
- Синтаксис команд nmcli
- Простые примеры
- Управление подключениями
- Добавление сетевых соединений
- Настройка подключений
- Работа с устройствами
- Проверка статуса устройств
- Запрос информации об устройстве
- Интерактивный редактор nmcli
- И это далеко не всё
- На правах рекламы
- How to Connect to the Internet Using the Linux Command Line
- Troubleshoot a broken network install through a series of shell commands
- Determine Your Wireless Network Interface
- Turn On the Wireless Interface
- Scan for Wireless Access Points
- Create a WPA Supplicant Configuration File
- Find the Name of Your Wireless Driver
- Connect to the Internet
- How to fix your Internet connection in Ubuntu Linux
- Check the basics first
- Configure your connection settings in NetworkManager
- Skip the NetworkManager alternatives
- Make sure you’re using the right Wi-Fi drivers
- Diagnose the problem
- Maybe it’s someone else’s fault
Управляем сетевыми подключениями в Linux с помощью консольной утилиты nmcli
Используйте все возможности инструмента управления сетевыми подключениями NetworkManager в командной строке Linux c помощью утилиты nmcli.

Утилита nmcli напрямую обращается к API для доступа к функциям NetworkManager.
Она появилась в 2010 году и для многих стала альтернативным способом настройки сетевых интерфейсов и соединений. Хотя кто-то до сих пор использует ifconfig. Так как nmcli — это инструмент интерфейса командной строки (CLI), предназначенный для использования в окнах терминалов и скриптах, он идеально подходит для системных администраторов, работающих без GUI.
Синтаксис команд nmcli
В общем виде синтаксис выглядит так:
- options — это параметры, которые определяют тонкости работы nmcli,
- section (секция) — определяет, какими возможностями утилиты пользоваться,
- action (действие) — позволяет указать, что, собственно, нужно сделать.
Всего существует 8 секций, каждая из которых связана с каким-то набором команд (действий):
- Help выдаёт справку о командах ncmcli и их использовании.
- General возвращает статус NetworkManager и глобальную конфигурацию.
- Networking включает команды для запроса состояния сетевого подключения и включения / отключения подключений.
- Radio включает команды для запроса состояния подключения к сети WiFi и включения / отключения подключений.
- Monitor включает команды для мониторинга активности NetworkManager и наблюдения за изменениями состояния сетевых подключений.
- Connection включает команды для управления сетевыми интерфейсами, для добавления новых соединений и удаления существующих.
- Device в основном используется для изменения параметров, связанных с устройствами (например, имени интерфейса) или для подключения устройств с использованием существующего соединения.
- Secret регистрирует nmcli в качестве «секретного агента» NetworkManager, который прослушивает тайные сообщения. Эта секция используется редко, потому что nmcli при подключении к сетям по дефолту работает именно так.
Простые примеры
Перед началом работы убедитесь, что NetworkManager запущен и nmcli может общаться с ним:
Часто работу начинают с просмотра всех профилей сетевых подключений:
Это команда использует действие show для секции Connection.
На тестовой машине крутится Ubuntu 20.04. В данном случае мы нашли три проводных подключения: enp0s3, enp0s8, and enp0s9.
Управление подключениями
Важно понимать, что в nmcli под термином Connection мы подразумеваем сущность, которая содержит всю информацию о соединении. Другими словами, это конфигурация сети. Connection инкапсулирует всю информацию, связанную с соединениями, включая канальный уровень и информацию об IP-адресации. Это уровень 2 и уровень 3 в сетевой модели OSI.
Когда вы настраиваете сеть в Linux, вы обычно настраиваете соединения, которые в конечном итоге будут привязаны к сетевым устройствам, которые в свою очередь являются сетевыми интерфейсами, установленными на компьютере. Когда устройство использует соединение, оно считается активным или поднятым. Если соединение не используется, то оно неактивно или сброшено.
Добавление сетевых соединений
Утилита nmcli позволяет быстро добавлять и сразу же настраивать соединения. Например, чтобы добавить Wired connection 2 (с enp0s8), нужно от имени суперпользователя запустить следующую команду:
В опции type мы указываем, что это будет Ethernet-соединение, а в опции ifname (interface name) указываем сетевой интерфейс, который хотим использовать.
Вот что будет после запуска команды:
Создано новое соединение, ethernet-enp0s8. Ему был назначен UUID, тип подключения — Ethernet. Поднимем его с помощью команды up:
Ещё раз проверяем список активных соединений:
Добавлено новое соединение ethernet-enp0s8, оно активно и использует сетевой интерфейс enp0s8.
Настройка подключений
Утилита nmcli позволяет легко менять параметры уже существующих подключений. Например, вам нужно сменить динамический (DHCP) на статический IP-адрес.
Пусть нам нужно установить IP-адрес равным 192.168.4.26. Для этого используем две команды. Первая непосредственно установит IP-адрес, а вторая переключит метод установки IP-адреса на значение «вручную» (manual):
Не забудьте также задать маску подсети. Для нашего тестового подключения это 255.255.255.0, или с /24 для бесклассовой маршрутизации (CIDR).
Чтобы изменения вступили в силу, нужно деактивировать и затем активировать соединение вновь:
Если вам наоборот нужно установить DHCP, вместо manual используйте auto:
Работа с устройствами
Для этого мы используем секцию Device.
Проверка статуса устройств
Запрос информации об устройстве
Для этого используем действие show из секции Device (нужно обязательно указать имя устройства). Утилита показывает достаточно много информации, часто на нескольких страницах.
Давайте посмотрим на интерфейс enp0s8, который использует наше новое соединение. Убедимся, что оно использует ровно тот IP-адрес, который мы установили ранее:
Информации достаточно много. Выделим главное:
- Имя сетевого интерфейса: enp0s8.
- Тип соединения: проводное Ethernet-соединение.
- Мы видим MAC-адрес устройства.
- Указан Maximum transmission unit (MTU) — максимальный размер полезного блока данных одного пакета, который может быть передан протоколом без фрагментации.
- Устройство в данный момент подключено.
- Имя соединения, которое использует устройство: ethernet-enp0s8.
- Устройство использует тот IP-адрес, который мы установили ранее: 192.168.4.26/24.
Другая информация относится к дефолтным параметрам маршрутизации и шлюза соединения. Они зависят от конкретной сети.
Интерактивный редактор nmcli
У nmcli также имеется простенький интерактивный редактор, в котором кому-то работать может быть комфортнее. Чтобы запустить его, например, для соединения ethernet-enp0s8, используйте действие edit:
У него также есть небольшая справка, которая, правда, уступает по размеру консольной версии:
Если вы введёте команду print и нажмёте Enter, nmcli отобразит все свойства соединения:
Например, чтобы задать для подключения свойство DHCP, введите goto ipv4 и нажмите Enter:
Затем пропишите set method auto и нажмите Enter:
Если вы хотите очистить статический IP-адрес, нажмите Enter. В противном случае введите no и нажмите Enter. Вы можете сохранить его, если думаете, что он понадобится вам в будущем. Но даже с сохраненным статическим IP-адресом будет использован DHCP, если method установлен в значение auto.
Используйте команду save, чтобы сохранить изменения:
Введите quit, чтобы выйти из Интерактивного редактора nmcli. Если передумали выходить — используйте команду back.
И это далеко не всё
Откройте Интерактивный редактор nmcli и посмотрите, сколько существует настроек и сколько свойств имеет каждая настройка. Интерактивный редактор — отличный инструмент, но, если вы хотите использовать nmcli в однострочниках или скриптах, вам понадобится обычная версия для командной строки.
Теперь, когда у вас есть основы, ознакомьтесь со справочной страницей nmcli, чтобы узнать, чем ещё она может вам помочь.
На правах рекламы
Эпичные серверы — это виртуальные серверы на Windows или Linux с мощными процессорами семейства AMD EPYC и очень быстрыми NVMe дисками Intel. Спешите заказать!
Источник
How to Connect to the Internet Using the Linux Command Line
Troubleshoot a broken network install through a series of shell commands
:max_bytes(150000):strip_icc()/image-5e6611aebe974bb7886a24b5070c834f.jpg)
If you installed a headless distribution—a distribution that doesn’t run a graphical desktop—then you won’t have network management tools to help you connect to the internet using a Wi-Fi network. Likewise, if you accidentally deleted key components from your desktop or installed a buggy distribution, the only way to connect to the internet requires using the Linux terminal.
The instructions in this article apply generally to all Linux distributions, however, it’s possible that some distributions won’t act exactly as described here.
:max_bytes(150000):strip_icc()/GettyImages-1167012061-7bde4af690ae4890a124468df91486b0.jpg)
Determine Your Wireless Network Interface
From within the terminal enter the following command:
The command outputs a list of active network interfaces.
The most common wireless network interface is wlan0 but can be other things as well, depending on the nature of your hardware and how well optimized your distributions wireless drivers are.
Turn On the Wireless Interface
Ensure that the wireless interface is turned on. Use the following command:
Replace the wlan0 with the name of your network interface.
Scan for Wireless Access Points
Search for networks. Type the following command:
A list of available wireless access points appears. The results look something like this:
Look at the ESSID, which is the name of a wireless network. Find open networks by looking for items that have the Encryption Key set to off.
It’s best to look for a trusted Wi-Fi network ESSID that you know the password to, rather than looking for open ones when possible. Open wi-fi networks generally have no encryption and data transferred could be transmitted insecurely.
Create a WPA Supplicant Configuration File
The most common tool for connecting to WPA-secured wireless networks is WPA Supplicant. Most distributions come with this tool installed by default. Type the following into the shell:
If you see an error that the command cannot be found, then it isn’t installed. You are now in a chicken-and-egg scenario whereby you need this tool to connect to the internet but can’t connect to the internet because you don’t have this tool.
Use an Ethernet connection instead to install wpasupplicant. Without this tool, you cannot proceed.
To create the configuration file for wpa_supplicant, run the following command:
The ESSID will be the ESSID you noted from the iwlist scan command. This command stops without coming back to the shell prompt. Enter the security required for the network and press Enter. To check that the command worked, open the .config folder using the cd and tail commands:
Type the following:
You should see something like this:
Find the Name of Your Wireless Driver
There is one more piece of information you need before connecting to the internet—the driver for your wireless network card.
To find it, run the following command:
The output lists a section called drivers. The list will look something like this:
Generally, wext is a catchall driver if nothing else is available. In this sample listing, the appropriate driver is the nl80211. The listing appears in priority order.
Connect to the Internet
The first step to getting connected is running the wpa_supplicant command:
Replace driver with the driver that you found in the previous section and interface with the device name (e.g., wlan0).
This command runs wpa_supplicant with the specified driver, using the targeted network interface and the configuration file. The -B switch runs the command in the background so the shell prompt returns to the foreground.
Run this one final command:
The DCHP client—dhclient—establishes networking routing on the local network. When it’s active, you’re free to use the internet as normal.
Источник
How to fix your Internet connection in Ubuntu Linux

Ubuntu’s included NetworkManager software aims to make your network connections “just work.” Nevertheless, sometimes thing go awry. There are times you have to adjust or change your connection settings, especially when using a laptop—just like in Windows.
Luckily, you won’t have to pull up the terminal and type any arcane commands to make your Internet connection work.
Check the basics first
Before you blame Ubuntu, try connecting to the Internet on other devices. If they’re experiencing the same problem, it isn’t with Ubuntu—it’s with something else. For example, you may need to reboot your router, modem, or both. It’s always worth checking these fundamentals before delving into further troubleshooting.
Some laptops have hardware switches that can be toggled to quickly enable or disable Wi-Fi. If your Wi-Fi doesn’t seem to be working at all, check your laptop’s hardware Wi-Fi switch.
If you’re using a wired connection, ensure the ethernet cable is plugged firmly into both the computer’s ethernet port and the router’s ethernet port. Sure, this may seem a bit obvious, but it’s easy to miss a bumped switch or loose cable.
To fix signal strength problems with Wi-Fi networks, arrange your router, computer, and other objects in your house for the best possible Wi-Fi signal strength.
Configure your connection settings in NetworkManager
NetworkManager connects to Wi-Fi networks and automatically configures wired network connections when you plug in an ethernet cable. Before NetworkManager, you’d have to do this with terminal commands.
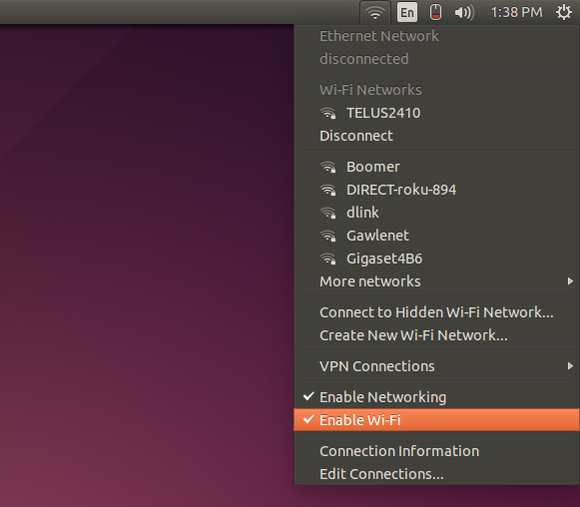
The popup menu for NetworkManager appears when you click on the connection icon (either wired or wireless) in Ubuntu’s notification area.
If something isn’t working properly, you may still have to configure NetworkManager. Click the network connection or Wi-Fi icon on the panel at the top-right corner of your screen to access the NetworkManager menu, then choose a network. If you need to view information about your connection for troubleshooting purposes—your computer’s IP address, for example—click Connection Information.
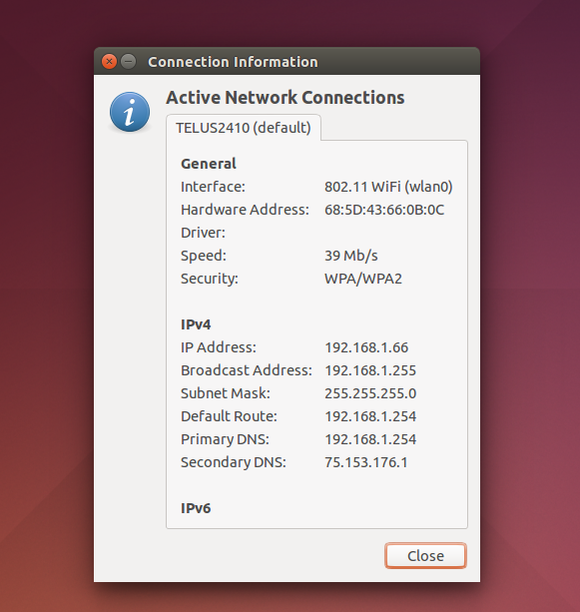
NetworkManager’s Connection Information windows shows all the details about your active connections, including network interface, security, and connection speed as well as your MAC and IP addresses.
If your local network connection isn’t working, ensure the Enable Networking and Enable Wi-Fi options are selected here in the menu. These options let you quickly disable and enable your connections, which is useful for putting your laptop into airplane mode. If you accidentally disabled either, you won’t have an Internet connection until you re-enable them.
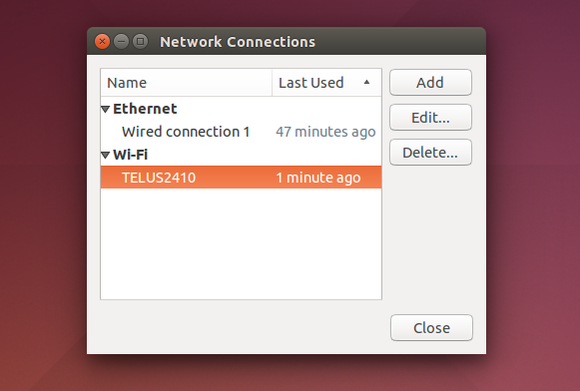
NetworkManager allows you manage several network connections and use different settings for each.
Configure your connections by clicking Edit Connections. You’ll see a window with one or more connections, depending on how many network adapters you have in your computer. Select a connection and click Edit to modify its settings.
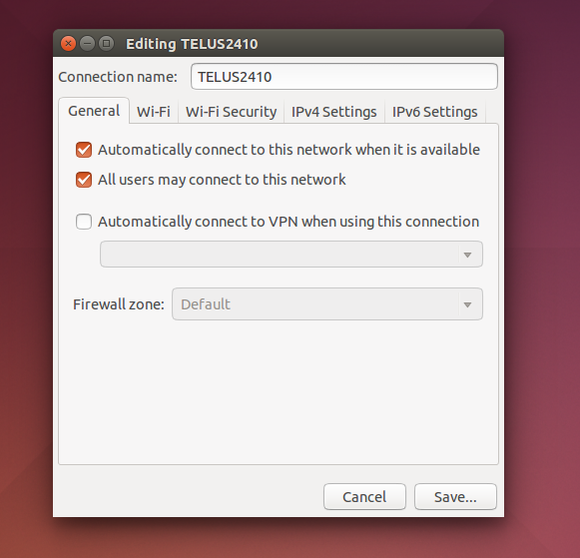
NetworkManager’s Edit Connection dialog lets you set or change all the details about your wired or WiFi connection.
Ensure the ‘Automatically connect to this network when it is available’ option is enabled on the General tab. If it’s disabled, NetworkManager won’t automatically connect to a wired or wireless network when you boot your computer.
NetworkManager uses Dynamic Host Configuration Protocol (DHCP) by default, so your computer will attempt to get connection settings—IP address, DNS servers, and default gateway—automatically from your router or Internet service provider.
For networks that require a static IP configuration, you’ll need to visit either the IPv4 Settings or the IPv6 Settings pane and select the “Manual” method. (If you’re not sure which you’re using, you’re probably still using IPv4.) Enter the details your connection requires here—your ISP or network administrator can tell you what to enter if you don’t know.
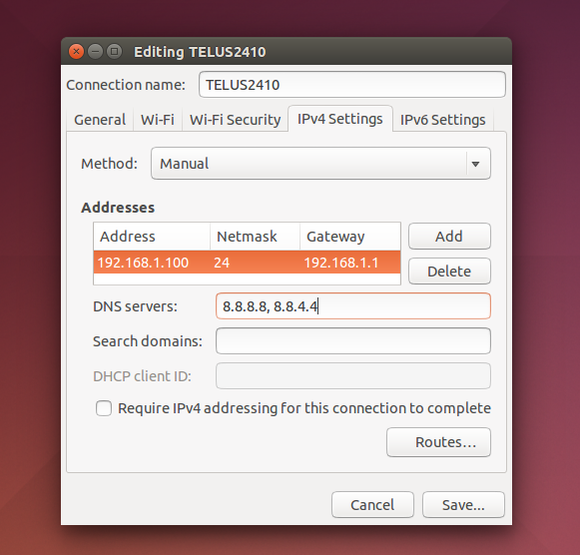
You can easily configure your connection to use manual settings and enter those settings in NetworkManager.
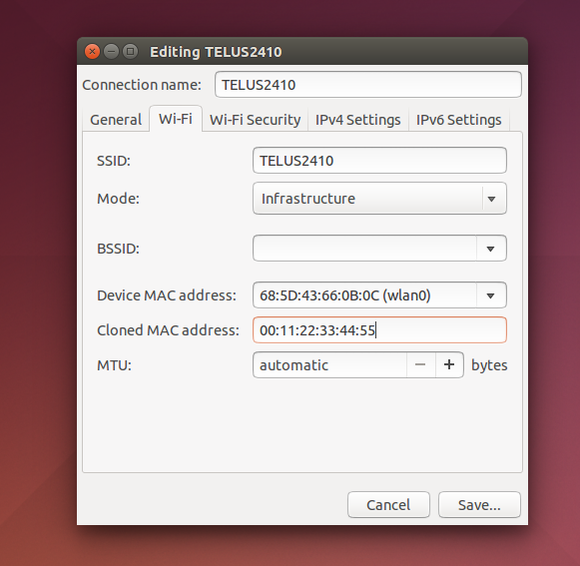
If, for some reason, your network only allows devices with a specific MAC address to connect, click the ethernet tab and enter that information into the ‘Cloned MAC address’ box.
Keep reading for more on checking Wi-Fi drivers and wielding diagnostic tools.
Skip the NetworkManager alternatives
You may be tempted to blame network problems on NetworkManager itself and seek alternative connection tools like Wicd. Wicd was reasonably popular a few years ago, but it hasn’t seen an update since April, 2012. If you’ve gone out of your way to install Wicd or another tool and are experiencing problems with it, you may want to uninstall it and re-enable NetworkManager.
Hardcore Linux geeks may want to ditch NetworkManager and go back to the old-fashioned way of configuring network connections by hand. But even a hardcore, penguin-loving Linux geek can save time with the automatic configuration NetworkManager provides.
Make sure you’re using the right Wi-Fi drivers
Ubuntu and other Linux distributions include a variety of open-source drivers that support most Wi-Fi and wired ethernet hardware built into laptops and desktop PCs. You shouldn’t have to install any drivers in most cases. After installing Ubuntu or even booting up an Ubuntu live CD or USB drive, your hardware should be detected automatically.
Some wireless network hardware still requires a proprietary, closed-source driver provided by its manufacturer, or a special firmware file you’ll have to install. You can check to see if your hardware is supported by the Linux kernel before looking for proprietary drivers. Ubuntu tries to make this easy by providing a driver installation tool that will quickly install and enable these third-party drivers.
If Wi-Fi isn’t working in Ubuntu, click the gear icon at the top-right corner of the desktop, select System Settings, click the Software & Updates icon, and click the Additional Drivers tab.
Ubuntu will scan your system’s hardware and show any alternate drivers you can use. Many of these files come on Ubuntu’s installation media, so they can be installed even if you don’t have an Internet connection.
If that doesn’t work, perform a web search for your computer’s name and model number or your Wi-Fi hardware’s name and “Wi-Fi Ubuntu,” or something similar. You can often find fixes for specific hardware in forums.
USB modems and Wi-Fi dongles can be harder to set up. You may have to search for your specific USB device and see if there are any tweaks or drivers available.
If your computer has both wired ethernet and Wi-Fi, plug an ethernet cable into your computer so you can download any specific drivers you may need. The wired ethernet connection is much more likely to work with the built-in drivers.
Diagnose the problem
Ubuntu includes many standard network troubleshooting tools you can access from the command line, like ping and traceroute. These tools are very useful on Windows, too, where they must be run from a Command Prompt window.
The ping command is probably the most useful. Open a terminal, type the following command, and press Enter:

The tried and true console diagnostic for connectivity is the ping command.
This command will send five ICMP echo request packets to google.com. You should see five responses. If you see zero responses, your computer can’t reach google.com—this means Google.com is down or, more likely, your Internet connection isn’t working at all. If you get fewer than five responses, you know that you’re experiencing “packet loss,” which can indicate there’s a problem with Google, your router, your modem, or your Internet service provider.
The ping command can help you see what the problem is—whether you have no Internet connection at all, packet loss, or just extreme latency. Ping is also essential for diagnosing Internet connection problems in Windows.
If you’re new to Ubuntu, don’t want to mess with terminal commands and can get online at another location, you may want to skip the terminal and use a graphical tool instead. Ubuntu used to include this tool, but now you have to install it from the Ubuntu Software Center.
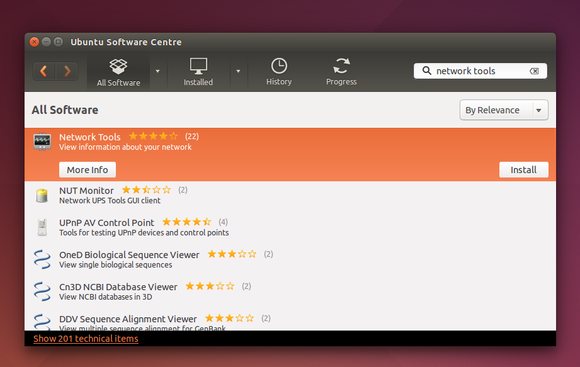
Use Ubuntu’s Software Center to look for Network Tools.
Open the Ubuntu Software Center, search for “Network Tools,” install the Network Tools application, and launch it. The program provides a graphical interface for ping, traceroute, and other network diagnostic commands.

Network Tools offers a GUI for common console network diagnostic tools like ping and traceroute.
Maybe it’s someone else’s fault
Remember, you can’t always solve every Internet connection problem on your own. The problem may be with a remote website, a switch somewhere in the route between you and that website, or your Internet service provider. Ask your neighbors if they’re having problems, or you check with your ISP.
Источник


