- How to Remotely Manage Ubuntu Server with SSH
- Establishing the SSH connection
- Installation of OpenSSH server
- Configuring SSH Server
- Accessing Ubuntu Linux server through SSH client
- Connect to Ubuntu from Windows using Putty SSH client
- Karim Buzdar
- How to login into Ubuntu using SSH from Windows 10/8/7?
- How do I SSH into Ubuntu from Windows?
- Step 1: OpenSSH-server on Ubuntu Linux machine
- Step 2: Enable the SSH server service
- Step 3: Check the SSH status
- Step 4: Download the Putty on Windows 10/9/7
- Step 5: Install Putty SSH client on Windows
- Step 6: Run and configure Putty
- Step 7: Login to Ubuntu server via Putty SSH client
- How to connect to Ubuntu from Windows
- Connect to Ubuntu from Windows over the command-line
- Connect to Ubuntu from Windows via GUI
- Access FTP without adding a network location
How to Remotely Manage Ubuntu Server with SSH
You may often have to access remote servers to administer, manage, and troubleshoot and there are several ways to do this. You may use telnet to login to remote servers; FTP allows transferring files between different servers. However, these programs are not secure enough for connecting to critical servers. SSH, secure shell is a cryptographic network protocol using which you can securely access network services over an unsecured network. SSH allows you to access servers through Terminal and various command line functions. It is helpful if you want to access and administer a server remotely using a secure way.
In this article, I am going to describe how you can remotely manage a Linux server with SSH.
For this article, I am using the following machines:
- For SSH Server – Ubuntu 18.04 TLS
- For SSH Client – Terminal (Ubuntu) & Putty (Windows)
Establishing the SSH connection
Prior to establishing a secure remote connection with a Ubuntu server using SSH, you have to meet some basic requirements.
Prerequisites
Following are some prerequisites:
- The remote server must be powered on and have a stable network connection.
- You will require an IP address of the server.
- The remote server must be accessible through that IP. You can test it using a Ping command.
- SSH server and SSH client tools must be installed in both server and client OS respectively.
- You will require a remote server’s user name and password.
- A Firewall should not be blocking the connection.
Installation of OpenSSH server
To manage a Ubuntu server remotely via SSH, you will need the SSH server software. However, before proceeding for installation of OpenSSH, first, update and upgrade the list of packages to get the most up-to-date repositories.
Update package database
Press Ctrl + Alt + T to launch Terminal in Ubuntu. Enter the following command in Terminal to update package database.

Upgrade installed packages
After updating repositories, run this command in Terminal to check for an upgrade for installed packages.
 Advertisement
Once you have updated and upgraded the packages, run the following command in Terminal:

Configuring SSH Server
Now you will need to do some basic and necessary configuration of SSH server in ssh_config file. For this, run the following command in Terminal to open ssh_config:

You can do various configuration settings here. For now, we will do only basic and starting configuration as shown in the below screenshot. Uncomment the below line in ssh_config file:
#Port 22
Under port number, add the line MaxAuthTries. You can enter here any number that will allow a maximum number of login attempts.
MaxAuthTries 4

Once done with the basic configuration, save the file and exit the Nano editor.
Check SSH service status
To check the status of the SSH server, if it is running or not, you can run the following command in Terminal:

Above command confirms that SSH service is active and running.
Now SSH server is set up to accept remote connections from different computers using a SSH client.
If the SSH service is not running you can run it manually by running the following command in Terminal:
You can also stop SSH service by running the following command in Terminal:
Accessing Ubuntu Linux server through SSH client
You can access a Linux server through SSH client in Linux or Windows based OS:
- Through Terminal ( Linux )
- Through Putty (Windows )
If you are using a Linux operating system, you can access SSH server using the Terminal program.
Press Ctrl+Alt+T to launch Terminal. Run the command in the below syntax to access a remote server:
$ ssh [remote server] [Port Number]
Where [remote server] is the remote server name or IP and [Port Number] is the remote port for SSH connections.
Or you can also type the command along with the username of the remote server in the following syntax:
$ ssh [username]@[remote server] [Port Number]
Where [username] is the name of the remote server user.
Type yes when it prompts the message asking if you want to continue connectivity. It will add the user to the list of known hosts. Next time you connect, it will not prompt the message again.

When prompted for the password, type the remote user’s password.

Now you are connected to the remote server. You can run any command and use it the same way as you access a local server.
Connect to Ubuntu from Windows using Putty SSH client
If you are using a Windows operating system, you can use putty as an SSH client.
Install putty in your Window OS. To launch Putty, Type putty in the search bar of Windows, and select putty.exe from the best match results.
In the putty configuration window, under session category, type IP address of the remote server in the box labeled as Hostname (or IP address).
From connection type, select SSH radio button. If you are using a port other than default port 22, make sure to change it otherwise leave the default port 22. Then click on Open to allow the connection.

A Terminal will open with a login prompt. Enter the username and password of the remote server user.

After you have successfully logged in to the remote server, you can run any command to manage it.
This is how you can easily connect the Linux servers using SSH. Now you are able to manage and administer the server remotely. SSH is not only a secure method of connecting to a server but also convenient.
Karim Buzdar
About the Author: Karim Buzdar holds a degree in telecommunication engineering and holds several sysadmin certifications. As an IT engineer and technical author, he writes for various web sites. You can reach Karim on LinkedIn
How to login into Ubuntu using SSH from Windows 10/8/7?
SSH which is a Secure shell protocol allows the users to connect the Unix and Linux based operating systems running on servers or desktops remotely. We can run all commands on remote servers like Ubuntu, Debian, Centos, RedHat etc. using the lightweight piece of SSH software. To know more about it see our article: What is SSH (Secure Shell)?
Well, running SSH on Linux using SSH server to connect and login some other Linux system is pretty easy but how to do it between Ubuntu (Linux) and Windows 10/8/7. In this article, we focus on this and let you know the simple way to SSH into Ubuntu from Windows 10.
Note: This method will be the same for Ubuntu 18.04,170.4, 16.04, 14,04… to log in using Windows 7, Windows 8 or Windows 10.
How do I SSH into Ubuntu from Windows?
Step 1: OpenSSH-server on Ubuntu Linux machine
To connect & login the Ubuntu using the SSH first of all we need to install the same on Ubuntu. For this purpose use the command:
Step 2: Enable the SSH server service
After installing the SSH server, enable it on Ubuntu by using the command:
Step 3: Check the SSH status
Once you enabled the SSH service, its time to check whether it is running in the background or not. Use this command:
If you output for above command is * sshd is running then everything is fine and move to the next step.
Step 4: Download the Putty on Windows 10/9/7
To connect or log in the Ubuntu via SSH, we need an SSH client for Windows. The Putty is a free and easy way to login Ubuntu and other Linux servers remotely from Windows using SSH. However, there are numbers of other free SSH clients available online those ones can be used too. Here is the Putty Download Link.
Step 5: Install Putty SSH client on Windows
We can install the Putty.exe downloaded file just like any other software with few clicks. There is no special configuration or setup. Double click on it and follow the guided steps.
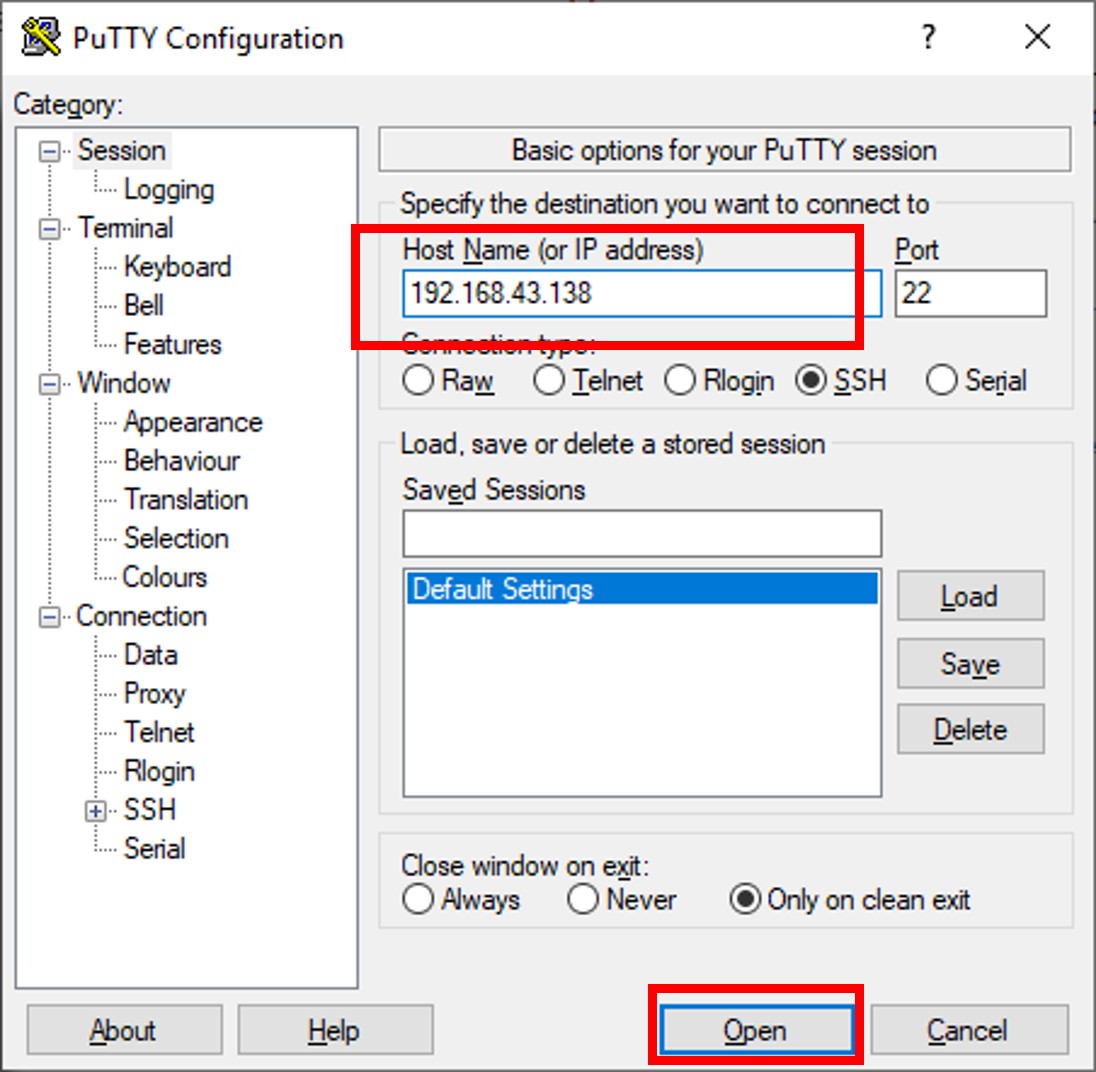
Step 6: Run and configure Putty
As we open the Putty, the first screen will be something like shown in the below screen. Now in the Host Name (or IP address) box type the Ip address of the remote Ubuntu server which you want to connect using the SSH protocol.
After adding the right IP address just click on the Open button.
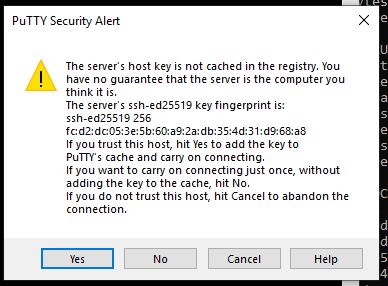
Step 7: Login to Ubuntu server via Putty SSH client
As we click on the Open button, the putty will ask whether you trust the server you about to connect or not, click on YES button.
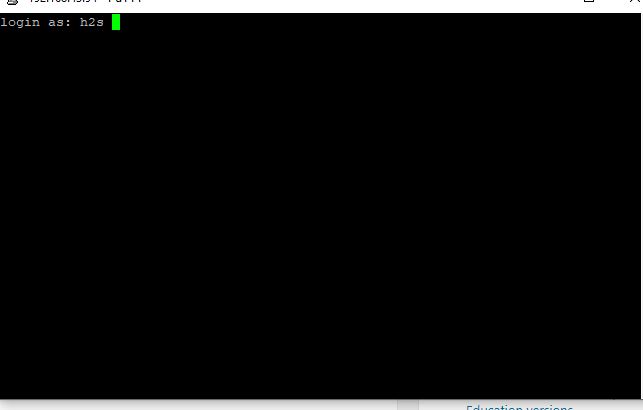
The black colour command terminal window of the Putty will appear along with login as: text. Enter the username and password of the remote server you want to login. That’s it.
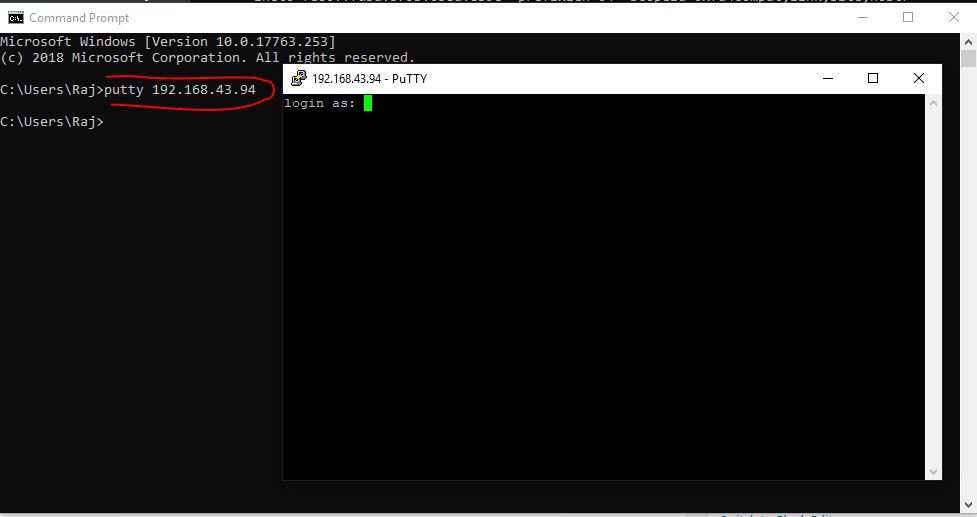
You can also use the command prompt to use the SSH after installing the Putty. Go to Command prompt or PowerShell on Windows 10 and type: putty [ipaddres] and hit the enter button.
For example– putty 192.168.43.94
In this way, we can connect and login remote Ubuntu server or any other Linux or Unix machine over SSH from Windows 10/8/7.
Other Resources to read:
How to connect to Ubuntu from Windows
Dec 29, 2019
Comment
Do you need to access a remote Ubuntu PC or Server from your Microsoft Windows PC? Unsure about how to do it? Follow along with this guide as we show you how to connect to Ubuntu from Windows!
Note: this guide covers Windows 10. If you are not using Windows 10, the instructions below may not work.
Connect to Ubuntu from Windows over the command-line

If you’re trying to connect to Ubuntu to access the command-line from Microsoft Windows, your best bet is to use SSH. Why? At this point, SSH is a universal protocol, and every operating system, from Linux to Windows, and even Mac OS have native support for it.
In the past, in Microsoft Windows, if you wanted to access your Ubuntu operating system, you needed to install a third-party SSH tool like Putty. Well, thanks to changes in Windows 10, you can now do it by launching Windows Powershell.
To connect to your Ubuntu computer from Windows over the command-line, follow the step-by-step instructions below.
Step 1: Head over to the Ubuntu PC or Ubuntu Server, and launch a terminal window. Then, with the terminal window open, update the system.
Step 2: After updating the system, use the apt install command below to install the OpenSSH server, which will automatically set up SSH on Ubuntu.
Having issues with OpenSSH Server? Follow our guide on how to set it up.
Step 3: After setting up OpenSSH server on your Ubuntu system, leave it be and go to the Windows PC.
Step 4: On the Windows PC, launch the PowerShell terminal. Unsure on how to start the Powershell terminal window? Do the following.
First, press the Win key on the keyboard to bring open the search box. Then, type in “PowerShell.” Look through the search results and launch PowerShell.
Step 5: Click on the PowerShell prompt with the mouse, and type in the Ubuntu PC’s username. Then, after the username, add an @ symbol, and the Ubuntu computer’s hostname. Or, if you don’t want to use the hostname, use the computer’s IP address. The command should look like the example below.
Step 6: After writing in the SSH command in PowerShell, press the Enter key on the keyboard to initiate an outbound connection to the remote Ubuntu PC.
Step 7: Once you’ve successfully made a connection to the Ubuntu PC for the first time, you will see a message in the PowerShell terminal prompt. It states that you must accept the SSH connection, trust it, and add it to your known hosts. Do so.

Assuming the SSH connection to the Ubuntu PC is successful, you will now have full command-line access to your remote Ubuntu PC from Microsoft PowerShell. Feel free to use the terminal as if you were sitting right in front of it.
Need to exit the SSH session? Type in the exit command.
Connect to Ubuntu from Windows via GUI
You may need to access the file system of your remote Ubuntu PC via the Windows Explorer UI. FTP is the easiest way to remotely access the Ubuntu PC’s files from the Windows Explorer UI, as FTP is easily integrated within windows.
Note: you must set up an FTP server on your remote Ubuntu PC or Server. Please follow this guide here to learn how to get it set up.
To access your Ubuntu PC’s files on Windows through the Explorer UI, do the following.
Step 1: Open up Windows Explorer.
Step 2: Look to the sidebar in Windows Explorer for “This PC” and click on it with the mouse.
Step 3: Inside “This PC,” select “Add a network location” in the top bar.

Step 4: Go through the network wizard, till you get to, “Where do you want to create this network location?” Then, select “Choose a custom network location” and select “Next.”
Step 5: In the location box, type in ftp:// followed by the hostname (or IP address) of the remote Ubuntu PC.

Step 6: Click through to add the FTP server attached to the system.
Step 7: After adding the FTP server as a network location, you will see the remote FTP server location available in “This PC” under the “Network locations” section — double-click on the network location to access the Ubuntu PC’s files remotely.

Access FTP without adding a network location
You may want to access the Ubuntu PC’s files without adding a network location. Follow the step-by-step instructions below.
Step 1: Open up File Explorer, and click on the address bar with the mouse.
Step 2: Clear the location data from the address bar with the Backspace button.
Step 3: Write in the FTP server address in the address bar. It should look like the example below.
Step 4: Press the Enter key on the keyboard to access the FTP server.


