- How to share files between a Linux and Windows computer
- Create a shared folder on Windows
- Access a Windows shared folder from Linux, using Konqueror
- Access a Windows shared folder from Linux, using Nautilus
- Access a Windows shared folder from Linux, using the command line
- How To Connect To Windows Shared Folders From Linux Mint/Ubuntu Desktop
- How to share files between a Linux and Windows computer
- Create a shared folder on Windows
- Access a Windows shared folder from Linux, using Konqueror
- Access a Windows shared folder from Linux, using Nautilus
- Access a Windows shared folder from Linux, using the command line
- Ubuntu Documentation
- Introduction
- GUI Method via Network Manager (Ubuntu 14.04, 16.04)
- GUI Method via Network Manager (Ubuntu 12.04)
- GUI Method via Network Manager (Ubuntu 11.10)
- GUI Method via Network Manager (Ubuntu 9.10 and up)
- Wireless Ad-Hoc connection sharing scenario
- Ubuntu Internet Gateway Method (iptables)
- Gateway set up
- Configure internal network card
- Enable routing
- Client set up
- Disable networking
- Give the client a static IP address
- Configure routing
- Configure DNS servers
- Restart networking
- Advanced Gateway Configuration
- DHCP/DNS server
- Other approaches
- Alternate server software (CLI)
- Alternate NAT
- Dedicated DHCP server
- Dedicated DNS server
- Alternate gateway software (GUI)
- Simple iptables example
How to share files between a Linux and Windows computer
The easiest and most reliable way to share files between a Linux and Windows computer on the same local area network is to use the Samba file sharing protocol. All modern versions of Windows come with Samba installed, and Samba is installed by default on most distributions of Linux.
Create a shared folder on Windows
First, create a shared folder on your Windows machine.
- Open the Control Panel.
- Go to Network and Sharing Options.
- Go to Change Advanced Sharing Settings.
- Select Turn on Network Discovery and Turn on File and Print Sharing.
Now, create a new folder to share or choose an existing folder that you’d like to share.
- Right-click the folder and select Properties.
- Go to the Sharing tab.
- Above the Share button is the network name of the share you are creating. It should look like \\YOURCOMPUTERNAME\Users\YourUserName\ShareFolderName. Make a note of this network name to use later on your Linux machine.
- Click Share.
Access a Windows shared folder from Linux, using Konqueror
Many Linux distributions use the KDE desktop environment and the Konqueror file manager/browser. If this is what you are using, you can follow these steps to access your Windows shared folder:
- Click the K menu icon.
- Select Internet ->Konqueror.
- In the Konqueror window that opens, click the Network Folders link, or type remote:/ in the address bar and press Enter .
- Click the Samba Shares icon.
- Click the icon of your Windows Home workgroup.
- Click the Workgroup icon.
- Click the icon for your computer.
- When prompted, enter the username and password for the Windows account that created the share.
- Click OK.
Access a Windows shared folder from Linux, using Nautilus
Many Linux distributions, especially those that use the GNOME desktop environment, use the Nautilus file manager. If this is what you’re using, you can follow these steps to access your Windows shared folder:
- Open Nautilus.
- From the File menu, select Connect to Server.
- In the Service type drop-down box, select Windows share.
- In the Server field, enter the name of your computer.
- Click Connect.
Alternatively, in the Nautilus address bar, you can type smb://ComputerName/ShareName and press Enter . For instance, when you created your Windows Share, if the share name was listed as:
Type smb://YOURCOMPUTERNAME/Users/YourUserName/ShareFolderName and press Enter . Note the smb: at the beginning; in Linux, use forward slashes instead of backslashes.
Access a Windows shared folder from Linux, using the command line
You can also access your Windows share from the Linux command line using the smbclient program.
- Open a terminal.
- Type smbclient at the command prompt.
- If you receive a «Usage:» message, this means smbclient is installed, and you can skip to the next step. If the command is not found, however, you need to install smbclient. Follow these steps to install it.
How To Connect To Windows Shared Folders From Linux Mint/Ubuntu Desktop
One of the earlier posts described how to connect to a Windows share directly from the Linux Mint / Ubuntu Terminal.
To do this from the Linux Mint / Ubuntu desktop without using Terminal :
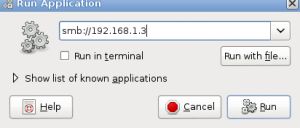
1. Press Alt + F2 and enter the IP address or the Windows system where the shared folders are hosted after the “smb://“. (This is similar to opening up “Run” box in Windows and typing \\serverip\ to access it).
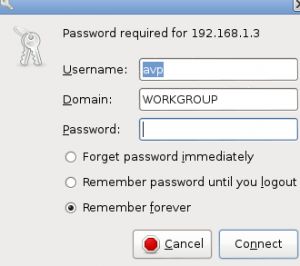
2. Enter the required credentials that are needed : the user name and password who can access these Windows shared folders.(This sharing permissions need to be first set on the Windows system for each of the folders that are shared.)
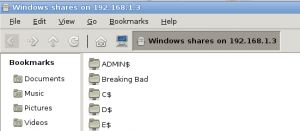
3. Once authentication is successful, the available shared folders will now be listed and can be accessed as desired.
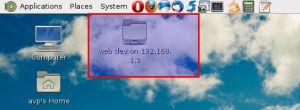
4. The accessed shared folders will now also automatically be mounted and be present on Linux Mint/ Ubuntu desktop as a shortcut.
Doesnt work at all with Linux Mint 14
The folders should be set to sharing from Windows, also make sure to enter same credentials (user name and password) to connect to them as defined in Windows sharing. The example used here is Linux Mint 14 by the way.
I can’t enter any credentials. It doesn’t even let me get that far. I’ve just discovered that I can browse to the folders using smb://pc_name_/shared folder_name with Thunar though (or whatever the default file manager is called in xfce?) I’m a bit disappointed because I had Mint 13 on this netbook and I could browse the network automatically with that. However, that was the 64-bit version so maybe I’ll try installing that.
Thanks for your reply in any case. I use this netbook as a kind of mini music player with some speakers in my bedroom so it has to be able to access my Windows PC downstairs where all my files are stored. You might think that installing Windows on it would be the way to go but Win7 doesn’t like the wireless card at all and XP drops the connection too often. Only Linux distros seem to like it (Aspire One 532h) Sorry to ramble on – thought I’d explain what I was doing, in case you thought I was just being annoying! Cheers
Try the IP address of Windows system you are connecting to so that it will be like smb://192.168.0.10. Use ipconfig from Windows command prompt to get the IP address first and make sure it is pingable from Linux Mint.
The Run command in Linux Mint (Alt + F2) can then be used for accessing samba share through this IP if the file manager throws up errors.
I did try it with the IP address as you suggested at first. I got that little red icon with a cross in it when I entered the address and when I hit enter, it did nothing. I’m just in the middle of installing 64-bit Xfce so I’ll try again when it’s done (or maybe in the morning if I don’t have time). I remembered that the 32-bit version had a disappearing battery indicator that I could never fix on version 13 and it seems to still be the case on 14 so there were a couple of reasons I thought I’d try the 64-bit flavour. Thanks again.
Just tried it again on 64-bit Mint 14 (Xfce) – no joy. My dialog box looks a little different to yours – it says Application Finder at the top and only has two buttons underneath the text box – Close and Launch. I double checked the IP address and I can ping it from a terminal no problem.
The actual error message that pops up when I hover over the little red x is: Failed to execute child process “smb://192.168.1.4” (No such file or directory)
Try mounting the Windows share from Linux Terminal directly, here is how
Other option is to go to Places >Connect to server, select Windows share, entering the credentials and having domain name set as Workgroup. Hope this helps.
I think you must be using Cinnamon or Mate, I don’t have connect to server option under places on my desktop. Re. the Linux terminal method, smbfs seems to have been superseded by cifs-utils package so I installed that instead. The way to mount shares seems to be fairly similar though, so I managed to get them mounted in the end. I also added entries to fstab so that I don’t have to keep doing the same thing every time I boot up (had to set my Windows machine to use fixed internal IP address).
Thanks for your suggestions – they got me going in the right direction. I guess it would be easier to buy a stereo but where would be the fun in that! Cheers
How to share files between a Linux and Windows computer
The easiest and most reliable way to share files between a Linux and Windows computer on the same local area network is to use the Samba file sharing protocol. All modern versions of Windows come with Samba installed, and Samba is installed by default on most distributions of Linux.
Create a shared folder on Windows
First, create a shared folder on your Windows machine.
- Open the Control Panel.
- Go to Network and Sharing Options.
- Go to Change Advanced Sharing Settings.
- Select Turn on Network Discovery and Turn on File and Print Sharing.
Now, create a new folder to share or choose an existing folder that you’d like to share.
- Right-click the folder and select Properties.
- Go to the Sharing tab.
- Above the Share button is the network name of the share you are creating. It should look like \\YOURCOMPUTERNAME\Users\YourUserName\ShareFolderName. Make a note of this network name to use later on your Linux machine.
- Click Share.
Access a Windows shared folder from Linux, using Konqueror
Many Linux distributions use the KDE desktop environment and the Konqueror file manager/browser. If this is what you are using, you can follow these steps to access your Windows shared folder:
- Click the K menu icon.
- Select Internet ->Konqueror.
- In the Konqueror window that opens, click the Network Folders link, or type remote:/ in the address bar and press Enter .
- Click the Samba Shares icon.
- Click the icon of your Windows Home workgroup.
- Click the Workgroup icon.
- Click the icon for your computer.
- When prompted, enter the username and password for the Windows account that created the share.
- Click OK.
Access a Windows shared folder from Linux, using Nautilus
Many Linux distributions, especially those that use the GNOME desktop environment, use the Nautilus file manager. If this is what you’re using, you can follow these steps to access your Windows shared folder:
- Open Nautilus.
- From the File menu, select Connect to Server.
- In the Service type drop-down box, select Windows share.
- In the Server field, enter the name of your computer.
- Click Connect.
Alternatively, in the Nautilus address bar, you can type smb://ComputerName/ShareName and press Enter . For instance, when you created your Windows Share, if the share name was listed as:
Type smb://YOURCOMPUTERNAME/Users/YourUserName/ShareFolderName and press Enter . Note the smb: at the beginning; in Linux, use forward slashes instead of backslashes.
Access a Windows shared folder from Linux, using the command line
You can also access your Windows share from the Linux command line using the smbclient program.
- Open a terminal.
- Type smbclient at the command prompt.
- If you receive a «Usage:» message, this means smbclient is installed, and you can skip to the next step. If the command is not found, however, you need to install smbclient. Follow these steps to install it.
Ubuntu Documentation

Style Cleanup Required
This article does not follow the style standards in the Wiki Guide. More info.
Introduction
Internet Connection Sharing (ICS) provides the ability for one computer to share its Internet connection with another computer. To do this, a computer with an Internet connection must be configured to function as an Internet gateway. A second computer (or network of computers) connects to the Internet indirectly via the gateway computer.
Situations in which ICS may be necessary include:
- Dial-up connection.
- Authenticated (PPPoA/E) connection.
- Wireless connection.
- When it is impractical (such as with distance) to run multiple network cables to each computer.
GUI Method via Network Manager (Ubuntu 14.04, 16.04)
Assuming your Internet connection is on Wi-Fi, and you want to share via cable. On Ubuntu 14.04 open Network connections from the applet or via commandline nm-connection-editor, then add a connection, select type ethernet, create, then on tab IPv4 Settings select Method Shared to other computers. That should be all for connection sharing.
Assuming you have a cable connection and want to create a hotspot for other Wi-Fi devices. For Wi-Fi you need to set an SSID and Method Hotspot on tab Wi-Fi, as well as Security WPA and a password on Wi-Fi Security tab.
On 16.04 start the nm-connection-editor via commandline, configure as before, then the created connection appears and works from gnome3-shell network settings.
GUI Method via Network Manager (Ubuntu 12.04)
Open Settings->Network->Wireless and create a new Ad Hoc network. To use a common denominator for all devices choose WEP for security and create a 5 letters password from 0..9A..F. Note that this a least secure encryption standard.
GUI Method via Network Manager (Ubuntu 11.10)
Follow the GUI Method via Network Manager (Ubuntu 9.10 and up) below but there is a bug which turn off and on the share connection. The workaround for now is to set IPv6 options to Ignore and then sudo killall dnsmasq. Reconnect and it should work.
GUI Method via Network Manager (Ubuntu 9.10 and up)
In order to share an Internet connection, the computer that will do the sharing must have two network cards or ports. This assumes that you are using at least one Ethernet port and that it is identified as «eth0». eth0 will be the port that other computers will connect to you on.
When you are logged in:
- Go to «System» on your top bar.
- Navigate to «Preferences» and select «Network Connections».
- When that window opens, select «Auto eth0», and press «Edit» (This assumes that you are connected to the Internet on some other port, for example wlan0 using wireless).
A new window will open. Navigate to the tab titled «IPv4 Settings», and change the Method to «Shared to other computers». After restarting the computer, you should now be able to plug in any computer into your other Ethernet port or share through your wireless card.
Note: To clarify the above example, here is an example configuration that will work:
- You are already connected to the Internet using your wireless on port wlan0.
- The Ethernet port eth0 is connected to the PC that needs to share your Internet connection (or you could wire eth0 to a router for multiple machines).
Note: In the case of connecting a router, especially one with wireless, where you want the users to share your connection:
Check before you start (in Synaptic or with dpkg-query -l dnsmasq*) that dnsmasq-base is installed and that dnsmasq is not installed. Install or uninstall as appropriate (see next section).
Wireless Ad-Hoc connection sharing scenario
Step-by-step guide:
- dnsmasq-base has to be installed:
Remove dnsmasq because it conflicts with NetworkManager:
Add a new wireless network with NetworkManager (left-click on NetworkManager icon, then select «Create New Wireless Network»).
Call the new network «UbuntuAdhoc» (Note: If you choose another name, you will have to turn on connection sharing later by editing the network that you just created).
Set encryption to «WEP40. » (Note: You may have to experiment here according to what type of encryption with ad-hoc the device supports. WPA is not supported).
NetworkManager now should connect to itself (which means it creates the ad-hoc wireless network and routes any Internet traffic to your wired network interface). Now, connect with the client(s), and you should have a working Internet connection.
Ubuntu Internet Gateway Method (iptables)
You will need two network cards in the gateway computer, or a PPP interface and a network card. One network card (or PPP interface) connects to the Internet. We will call this card eth0. The other card connects to your internal network. We will call this eth1. It is also possible to do ICS with a single network card. In this case, use eth0 for the Internet and eth0:0 for the internal network.
Internet > eth0 <> Ubuntu gateway <> eth1 > Client PC
Internet > ppp0 <> Ubuntu gateway <> eth1 > Client PC
Internet > eth0 <> Ubuntu gateway <> eth0:0 > Client PC
Gateway set up
The following example will focus on the most common gateway setup: an Ubuntu computer with two wired network adapters (eth0 and eth1) hosting ICS to a static internal network configured for the 192.168.0.x subnet.
For this example, eth0 is used to represent the network card connected to the Internet, and eth1 represents the network card connected to a client PC. You can replace eth0 and eth1 as needed for your situation. Also, any private IP subnet can be used for the internal network IP addresses.
eth0 = the network adapter with internet (external or WAN).
eth1 = the network adapter to which a second computer is attached (internal or LAN).
192.168.0.x = IP subnet for eth1
Your setup may be different. If so, make sure to change them accordingly in the following commands.
Configure internal network card
Configure your internal network card (eth1) for static IP like so:
The external and internal network cards cannot be on the same subnet.
Configure NAT
Configure iptables for NAT translation so that packets can be correctly routed through the Ubuntu gateway.
The first rule allows forwarded packets (initial ones). The second rule allows forwarding of established connection packets (and those related to ones that started). The third rule does the NAT.
IPtables settings need to be set-up at each boot (they are not saved automatically), with the following commands:
- Save the iptables:
Edit /etc/rc.local and add the following lines before the «exit 0» line:
Enable routing
- Configure the gateway for routing between two interfaces by enabling IP forwarding:
Edit /etc/sysctl.conf, and (up to 10.04) add these lines:
The /etc/sysctl.conf edit is required because of the following bug in Hardy and later releases:Launchpad Bug Report
From 10.10 onwards, it suffices to edit /etc/sysctl.conf and uncomment:
. so that it reads:
Client set up
Any OS can connect to the Internet as an ICS client as long as networking has been configured correctly. The following example will focus on how to set up an Ubuntu ICS client. For this example, it is assumed that the client is connected to an Ubuntu gateway, which has been configured to share ICS on the 192.168.0.x subnet according to the gateway set up outlined above.
For this example, eth0 is the network card on the client which is connected (by crossover cable) to eth1 on the Ubuntu gateway. You can replace eth0 as needed for your situation. Also, any private IP subnet can be used for the internal network IP address, as long as it matches the subnet on the gateway.
Disable networking
Give the client a static IP address
This IP address can be anything within the gateway’s private IP range.
Configure routing
This address should match the IP address on the gateway’s internal network card (eth1 in the above example).
Configure DNS servers
Unless your ICS gateway can also perform DNS, you must manually configure the client with your ISP DNS servers. If you do not know your ISP’s DNS servers, you can use OpenDNS servers instead.
Backup your current /etc/resolve.conf file:
Open /etc/dhcp3/dhclient.conf with your favorite text editor:
- Search for the line that starts «prepend domain-name-servers», and change it to look like this:
208.67.222.222 and 208.67.220.220 are OpenDNS DNS servers. If you wish to use your ISP’s DNS servers, use them here instead of the OpenDNS servers.
Restart networking
Once this is finished, your client will now have access to the Internet via ICS. Please direct any questions/comments to the Internet Connection Sharing Documentation thread.
A beginner’s working example of a Ubuntu Desktop with 2 NIC cards, sharing Internet connection: http://ubuntuforums.org/showthread.php?p=3713684
Advanced Gateway Configuration
The above example outlines how to do basic ICS on a static IP network. Once you have configured your Ubuntu computers for ICS and confirmed that everything works across your static network, there are a few advanced routing configurations which can make it much easier to set up the ICS client.
Advanced configurations include DHCP server and DNS server. A DHCP server allows the client to get an IP address automatically without having to manually configure a static IP. A DNS server allows the client to resolve Internet host names without manually configuring DNS addresses.
DHCP/DNS server
This is deceptively easy, and will be acceptable for most situations. However, it will not allow the ICS client to see computers on different subnets.
- Install software.
- Stop the server. After dnsmasq has been installed, it is automatically started, so it will need to be stopped before changes can be made.
- Make a backup of the well-commented configuration file (we won’t use any of this, but it’s handy to have a copy of for reference later).
Edit /etc/dnsmasq.conf with your favorite text editor, and add the following two lines:
Note: The «interface» should match the interface that your clients are connected to, and the «dhcp-range» should be within the gateway’s private IP subnet that you configured according with the «Gateway set up» directions above.
- Start the DHCP/DNS server.
Now, your clients should be able to pull an automatic ip address and resolve host names.
Other approaches
The following section includes a rough outline of some alternative methods for configuring an ICS gateway. They are incomplete and untested. They are included simply for the sake of information.
Alternate server software (CLI)
There are other ways to host ICS, but they are outside the scope of this article.
Alternate NAT
The ipmasq daemon does NAT routing so you don’t have to configure iptables. The following directions are incomplete and should not be considered a full description of what needs to be done to configure ipmasq.
Configure ipmasq to allow dhcp requests. Otherwise, you need to stop ipmasq to make a connection. You need to copy a .rul from the documentation directory into the /etc config and edit the interface name. Then, reconfigure ipmasq to start after networking has been started.
Dedicated DHCP server
dhcp3 is an easy to configure and scalable true DHCP server that can be configured for many different aplications. dhcp3 configuration is more complex, but it can be useful in many situations:
Dedicated DNS server
BIND9 is a popular and well-supported local DNS server. It is very versatile and very powerful, but difficult to configure correctly:
Alternate gateway software (GUI)
Another approach is to set up Firestarter, to run connection sharing, to set up dhcp3-server, and to set its configuration to listen to the correct eth*. To change this later, run sudo dpkg-reconfigure dhcp3-server.
Basically, you need to have Firestarter active/turned on/protecting, to have the connection shared.
When you install dhcp3-server, it will place a sample config file in your /etc/dhcp3 folder, called dhcpd.conf. I suggest that you install dhcp3-server first and then Firestarter because if you are lucky, Firestarter will set up a new dhcp3 config file for you.
At any time that changes are made to your dhcpd.conf file, restart the server by typing sudo /etc/init.d/dhcp3-server restart. Alternatively, every time you run the sudo dpkg-reconfigure dhcp3-server command, at the end, your server will restart.
There are several issues that I had. First of all, the Firestarter firewall won’t even start if you don’t have it configured to listen to the right interface. You can change which one it listens to in Preferences —> Network Settings. The Local-network-connected device must be the same as you have dhcp3-server listening to. Of course, both checkboxes under that need to be checked. The Internet-connected network device will be the one that is configured for Internet. Now, I have two NICs, but I have PPPoE configured on eth0, and I have Internet connection sharing configured on the same one, because eth0 is also configured for a static 192.168 internal IP for my internal network.
Simple iptables example
In a simple example, wlan0 has the Internet connection, and eth0 is being used to share the connection. It could be connected directly with a single computer via a crossover cable or switch, or you could have a router with a cable from eth0 to the WAN port and a whole LAN setup behind this. Interestingly, the Internet connection could be ppp0, a 3G, or mobile Internet modem.
#!/bin/sh
#
# internet connection sharing wlan0 is the gate way
# eth0 is the lan port this might use a straight ethernet cable to a router wan port or a switch or a single PC
# 192.168.2.2 is the port that is being used by the lan for access I changed it to 192.168.2.254 and set fixed addresses for the wan and router
#
# change wlan0 to ppp0 and you can use this for mobile broadband connection sharing
#
ip link set dev eth0 up
ip addr add 192.168.2.1/24 dev eth0
sysctl net.ipv4.ip_forward=1
iptables -t nat -A POSTROUTING -o wlan0 -s 192.168.2.0/24 -j MASQUERADE
iptables -t nat -A PREROUTING -i wlan0 -p tcp —dport 3074 -j DNAT —to-destination 192.168.2.2
iptables -t nat -A PREROUTING -i wlan0 -p udp -m multiport —dports 88,3074 -j DNAT —to-destination 192.168.2.2
iptables -A FORWARD -i wlan0 -d 192.168.2.2 -p tcp —dport 3074 -j ACCEPT
iptables -A FORWARD -i wlan0 -d 192.168.2.2 -p udp -m multiport —dports 88,3074 -j ACCEPT
You could use the above as a bash script changing things to suit your needs.
- If things go wrong, the following script should save you when things get badly messed up.


