- Where are my contacts in Mail for Windows 10?
- Send an email to a contact stored in the People app
- Send an email to a contact from the People app
- How to Export Contacts From Windows Mail
- Don’t leave your contacts behind when you change email services
- Export Contacts and Email Addresses From Windows Mail
- Exporting Contacts From the Windows 10 People App
- Manage mail contacts
- What do you need to know before you begin?
- Create a mail contact
- Use the EAC to create a mail contact
- Use the Exchange Management Shell to create a mail contact
- How do you know this worked?
- Change mail contact properties
- Use the EAC to change mail contact properties
- General
- Contact Information
- Organization
- Email Options
- MailTip
- Use the Exchange Management Shell to change mail contact properties
- How do you know this worked?
- Bulk edit mail contacts
- Use the EAC to bulk edit mail contacts
- How do you know this worked?
Where are my contacts in Mail for Windows 10?
Are you looking for Contacts in the Mail app for Windows 10?
The Mail app uses the People app for Windows 10 to store contact information. When you open a new message in Mail for Windows 10, start typing a contact’s name or email address and Mail for Windows 10 will search the People app and display a list of suggestions for you to choose from. If the program can’t find the right person, you can choose Search Directory.
If you add an Outlook.com account to Mail for Windows 10, your Outlook.com contacts are automatically stored in the People app.
Send an email to a contact stored in the People app
If you know the contact’s name or email address, you can start typing the first few letters of their name or email address and Mail for Windows 10 will suggest matching contacts.
Note: You can’t remove contacts from the list of suggested contacts.
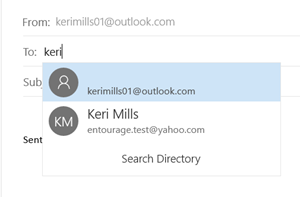
Choose a contact to add their email address to the To line of your email. If no match is found or the suggestions don’t include the address you need, choose Search Directory.
Send an email to a contact from the People app
You can also send an email directly from the People app.
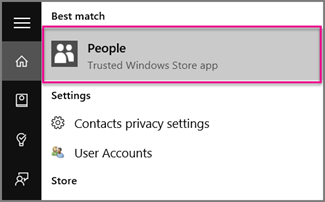
In the lower left corner of Windows 10, choose the Start button  .
.
Begin typing People, and in the left pane, when Windows suggests the People app, choose the app to open it.
In the top left Search box, type the name of the person you want to send an email message to.
Windows will suggest one or more matches. Choose the one you want to send the email message to.
In the person’s contact profile, click their email address.

Note: The contact name you choose must have a valid email address.
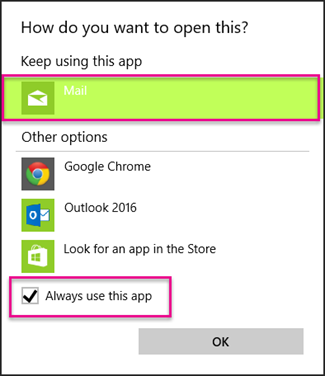
When you are prompted to choose an email app, click Mail. If it applies, check the Always use this app box.
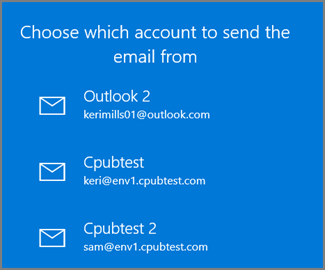
If you have several accounts associated with your Mail app, select the account you want to send the email message from.
In Mail, fill in the Subject line and the body of the message, and click Send.
How to Export Contacts From Windows Mail
Don’t leave your contacts behind when you change email services
:max_bytes(150000):strip_icc()/Heinz-Tschabitsche-c6d01096ad5f47b8800846cebc7d99b1.jpg)
:max_bytes(150000):strip_icc()/young-woman-using-laptop-in-cafe-489096003-5a3a8caf89eacc00379c02d8.jpg)
Atsushi Yamada / Getty Images
If you’ve built one address book in Windows Mail, you shouldn’t have to build that same address book again, even if you switch email programs or email services.
You can export Windows contacts to a file format called CSV (comma-separated values), from which most other email programs and email services can import your contacts.
This procedure works for Windows 8 and Windows 8.1. In Windows 10, the People app contains the mail list; you cannot export contacts from the Windows 10 Mail app.
Export Contacts and Email Addresses From Windows Mail
To save your Windows Mail 8 and earlier contacts to a CSV file, select Tools > Windows Contacts from the menu in Windows Mail. Select Export in the toolbar. Make sure CSV (Comma Separated Values) is highlighted.
Select Export. Pick a folder to receive the exported contacts or open a new folder. Type a folder name such as «Windows Mail contacts» under the File name. Click Save then Next.
Make sure all address book fields you want to be included are checked. Note that Windows Mail does not export first and last names separately, even though there are First Name and Last Name fields. Choose Name instead. Click Finish. Close out of the remaining windows.
Exporting Contacts From the Windows 10 People App
You can’t export your contacts located in the People app of a Windows 10 computer to a CSV file. However, you can do this from your online Microsoft account and the online People app. From there you choose Manage | Export Contacts to export the contacts to a CSV file. Go to the other email service and use the Import command to import your contacts to that service.
Manage mail contacts
Mail contacts are essentially contacts for people outside your Exchange or organization. Each mail contact has an external email address. For more information about mail contacts, see Recipients.
What do you need to know before you begin?
Estimated time to complete: 2 minutes.
You need to be assigned permissions before you can perform this procedure or procedures. To see what permissions you need, see the «Recipient Provisioning Permissions» section in the Recipients Permissions topic.
For information about keyboard shortcuts that may apply to the procedures in this topic, see Keyboard shortcuts in the Exchange admin center.
Having problems? Ask for help in the Exchange forums. Visit the forums at: Exchange Server, Exchange Online, or Exchange Online Protection.
Create a mail contact
Use the EAC to create a mail contact
In the EAC, navigate to Recipients > Contacts.
Click New > Mail contact.
Complete the following boxes on the New mail contact page:
First name: Use this box to type the contact’s first name.
Initials: Use this box to type the contact’s initials.
Last name: Use this box to type the contact’s last name.
* Display name: Use this box to type a display name for the contact. This is the name that’s listed in the contacts list in the EAC and in your organization’s address book. By default, this box is populated with the names you enter in the First name, Initials, and Last name boxes. If you didn’t use those boxes, you must still type a name in this box because it’s required. The name can’t exceed 64 characters.
* Name: Use this box to type a name for the contact. This is the name that’s listed in the directory service. Like the display name, this box is populated by default with the names you enter in the First name, Initials, and Last name boxes. If you didn’t use those boxes, you must still type a name in this box because it’s required. The name can’t exceed 64 characters.
* Alias: Use this box to type an alias (64 characters or less) for the contact. This box is required.
* External email address: Use this box to type the outside email account of the contact. This box is required. Email sent to this contact is forwarded to this email address.
Organizational unit: You can select an organizational unit (OU) other than the default, which is the recipient scope. If the recipient scope is set to the forest, the default value is set to the Users container in the domain that contains the computer on which the EAC is running. If the recipient scope is set to a specific domain, the Users container in that domain is selected by default. If the recipient scope is set to a specific OU, that OU is selected by default.
To select a different OU, click Browse. The dialog box displays all OUs in the forest that are within the specified scope. Select the OU you want, and then click OK.
When you’ve finished, click Save.
Use the Exchange Management Shell to create a mail contact
This example creates a mail contact for Debra Garcia in Exchange Server 2016.
This example mail-enables an existing contact named Karen Toh in Exchange Server 2016.
How do you know this worked?
To verify that you’ve successfully created a mail contact, do one of the following:
In the EAC, navigate to Recipients > Contacts. The new mail contact is displayed in the contact list. Under Contact Type, the type is Mail contact.
In the Exchange Management Shell, run the following command to display information about the new mail contact.
Change mail contact properties
Use the EAC to change mail contact properties
In the EAC, navigate to Recipients > Contacts.
In the list of mail contacts and mail users, click the mail contact that you want to change the properties for, and then click Edit .
On the mail contact properties page, click one of the following sections to view or change properties.
General
Use the General section to view or change basic information about the mail contact.
First name, Initials, Last name
* Name: This is the name that’s listed in Active Directory. If you change this name, it can’t exceed 64 characters.
* Display name: This name appears in your organization’s address book, on the To and From lines in email, and in the Mailbox list. This name can’t contain empty spaces before or after the display name.
* Alias: This is the mail contact’s alias. If you change it, it must be unique in the organization and must be 64 characters or less.
* External email address: This is mail contact’s primary SMTP address and their outside email account. Email sent to this contact is forwarded to this email address.
Click More options to display the OU that contains the mail contact account. You have to use Active Directory Users and Computers to move the contact to a different OU.
Contact Information
Use the Contact Information section to view or change the recipient’s contact information, such as mailing address and telephone numbers. This information is displayed in the address book.
Organization
Use the Organization section to record detailed information about the mail contact’s role in the organization. This information is displayed in the address book. Also, you can create a virtual organization chart that’s accessible from email clients such as Outlook.
Title: Use this box to view or change the contact’s title.
Department: Use this box to view or change the department in which the contact works. You can use this box to create recipient conditions for dynamic distribution groups and address lists.
Company: Use this box to view or change the company for which the contact works. You can also use this box to create recipient conditions for dynamic distribution groups.
Manager: To add a manager, click Browse. In Select Manager, select a person, and then click OK.
Direct reports: You can’t modify this box. A direct report is a recipient who reports to a specific manager. If you’ve specified a manager for the recipient, that recipient appears as a direct report in the details of the manager’s mailbox. For example, Toby manages Ann and Spencer, who are mail contacts, so Toby is specified in the Manager box in the organization properties for Ann and Spencer, and Ann and Spencer appear in the Direct reports box in the properties of Toby’s mailbox.
Email Options
Use the Email Options section to add or remove proxy addresses for the mail contact or edit existing proxy addresses. The mail contact’s primary SMTP address is also displayed in this section, but you can’t change it. To change it, you have to change the contact’s external email address in the General section.
MailTip
Use the MailTip section to add a MailTip to alert users of potential issues before they send a message to this recipient. A MailTip is text that’s displayed in the InfoBar when this recipient is added to the To, Cc, or Bcc lines of a new email message.
MailTips can include HTML tags, but scripts aren’t allowed. The length of a custom MailTip can’t exceed 175 displayed characters. HTML tags aren’t counted in the limit.
Use the Exchange Management Shell to change mail contact properties
Properties for a mail contact are stored in both Active Directory and Exchange. In general, use the Get-Contact and Set-Contact cmdlets to view and change organization and contact information properties. Use the Get-MailContact and Set-MailContact cmdlets to view or change mail-related properties, such as email addresses, the MailTip, custom attributes, and whether the contact is hidden from address lists.
For more information, see the following topics:
Here are some examples of using the Exchange Management Shell to change mail contact properties.
This example configures the Title, Department, Company, and Manager properties for the mail contact Kai Axford.
This example sets the CustomAttribute1 property to a value of PartTime for all mail contacts and hides them from the organization’s address book.
This example sets the CustomAttribute15 property to a value of TemporaryEmployee for all mail contacts in the Public Relations department.
How do you know this worked?
To verify that you’ve successfully changed properties for a mail contact, do the following:
In the EAC, select the mail contact, and then click Edit to view the property that you changed.
In the Exchange Management Shell, use the Get-Contact and Get-MailContact cmdlets to verify the changes. One advantage of using the Exchange Management Shell is that you can view multiple properties for multiple mail contacts. In the example above where all mail contacts had the CustomAttribute1 property set to PartTime and were hidden from the address book, run the following command to verify the changes.
In the example above where the CustomAttribute15 was set for all mail contacts in the Public Relations department, run the following command to verify the changes.
Bulk edit mail contacts
You can use the EAC to change selected properties for multiple mail contacts. When you select two or more mail contacts from the contacts list in the EAC, the properties that can be bulk edited are displayed in the Details pane. When you change one of these properties, the change is applied to all selected recipients.
When you bulk edit mail contacts, you can change the following property areas:
Contact Information: Change shared properties such as street, postal code, and city name.
Organization: Change shared properties such as department name, company name, and the manager that the selected mail contacts or mail users report to.
Use the EAC to bulk edit mail contacts
In the EAC, navigate to Recipients > Contacts.
In the list of contacts, select two or more mail contacts. You can’t bulk edit a combination of mail contacts and mail users.
You can select multiple adjacent mail contacts by holding down the Shift key and clicking the first mail contact, and then clicking the last mail contact you want to edit. You can also select multiple mail contacts by holding down the Ctrl key and clicking each one that you want to edit.
In the Details pane, under Bulk Edit, click Update under Contact Information or Organization.
Make the changes on the properties page and then save your changes.
How do you know this worked?
To verify that you’ve successfully bulk edited mail contacts, do one of the following:
In the EAC, select each of the mail contacts that you bulk edited, and then click Edit to view the properties that you changed.
In the Exchange Management Shell, use the Get-Contact cmdlet to verify the changes. For example, say you used the bulk edit feature in the EAC to change the manager and the office for all mail contacts from a vendor company named A. Datum Corporation. To verify these changes, you could run the following command in the Exchange Management Shell.


