- Control linux from mac
- Установка и использование GNU/Linux как дополнительной системы на iMac/Macbook (Dual Boot)
- Введение
- Установка
- 1. Выберите дистрибутив
- 2. Установите программу для подготовки флешки
- 3. Сделайте бэкап (можно пропустить, но это важно)
- 4. Поделите диск на три части: macOS, Linux, Swap
- 5. Загрузите операционную систему с флешки
- 6. Следуйте указаниям установщика
- 7. Установите rEFInd
- 8. Вход в rEFInd Boot Manager и завершение установки
- Macs Fan Control on Linux
- startergo
- More options
- Peadogie
- Control linux from mac
- About
Control linux from mac

This is an enhanced version of Allan McRae mbpfan
mbpfan is a daemon that uses input from coretemp module and sets the fan speed using the applesmc module. This enhanced version assumes any number of processors and fans (max. 10).
- It only uses the temperatures from the processors as input.
- It requires coretemp and applesmc kernel modules to be loaded.
- It requires root use
- It daemonizes or stays in foreground
- Verbose mode for both syslog and stdout
- Users can configure it using the file /etc/mbpfan.conf
Table Of Contents
Supported GNU/Linux Distributions
We provide scripts to to load mbpfan daemon at system boot for many distros. Please note that the support is provided by volunteers. mbpfan needs tests and bug reports.
Tested Mac Models
Be sure to load the kernel modules applesmc and coretemp.
These modules are often automatically loaded when booting up GNU/Linux on a MacBook. If that is not the case, you should make sure to load them at system startup.
How do I know if applesmc and coretemp are loaded?
In most distributions, you can run the following command:
If you see coretemp and applesmc listed, you are all set.
If you do not see coretemp and applesmc listed, you must load them.
This is usually achieved by inserting the following two lines in the file /etc/modules
Please check the relevant documentation of your GNU/Linux distribution.
See mbpfan-git at AUR. Otherwise, please refer to the Generic Instructions.
Follow the instructions on jolupalabs REPO for installation.
On Debian 10 or later install via:
On Fedora 30 or later:
Install the mbpfan package with:
On Solus, install the package with:
then enable the service.
On Ubuntu 18.04 or later install via:
Generic Install Instructions (All Other Operating Systems)
It copies mbpfan to /usr/sbin, mbpfan.conf to /etc (and overwrites existing files), README.md to /usr/share/doc/mbpfan, and mbpfan.8.gz to /usr/share/man/man8
If you would like to compile with Clang instead of GCC, simply set your system’s default compiler to be Clang. Tested with Clang 3.8 and 3.9. Tested with Clang 4.0 along with llvm-lld (The LLVM Linker).
Run The Tests (Optional)
Users may run the tests after building the program. Please run the following command from within the source directory.
Note that this only works on MacBook and not desktop computers due to different environment expectations.
If not installed, run with
If installed, manually run with
If installed and using the init file, run with (Ubuntu example)
Starting at boot
Ubuntu
For systemd based init systems (Ubuntu 16.04+), see the systemd section below.
For upstart based init systems (Ubuntu before 16.04), an example upstart job has been provided. For using it, execute:
Debian An init file suitable for /lib/lsb/init-functions (Debian) is located in the main folder of the source files, called mbpfan.init.debian Rename it to mbpfan, give it execution permissions (chmod +x mbpfan) and move it to /etc/init.d Then, add it to the default runlevels with (as root):
Redhat, CentOS, Fedora An init file suitable for /etc/rc.d/init.d/functions (RHEL/CentOS & Fedora) is also located at the same place, this file is called mbpfan.init.redhat. Also rename it to mbpfan, give it execution permissions and move it to /etc/init.d To add the script to the default runlevels, run the following as root:
Gentoo
To automatically run mbpfan at boot, run as root:
systemd As a special bonus, a service file for systemd is also included. To use it, execute the following (as root):
Источник
Установка и использование GNU/Linux как дополнительной системы на iMac/Macbook (Dual Boot)

Введение
macOS — довольно интересная система, красивая, удобная, стабильная. Но продукт Apple имеет серьезные минусы: закрытый исходный код, не самое большое количество стороннего софта, слежка за пользователями (ну в Windows она тоже есть). Расставаться с macOS не хочу — например, конкурента для Final Cut Pro даже на Windows не найти. Я не нашел понятных, актуальных и универсальных инструкций даже на английском, поэтому я написал данный туториал, основанный на личном опыте.
ВНИМАНИЕ! 1. На компьютерах Apple, выпущенных в 2018 году и позднее, присутствует специальный защитный чип, который запрещает ставить ОС методом, описанным в статье (вы сможете воспользоваться лишь Bootcamp для установки Windows). 2. На компьютерах с macOS Big Sur имеется проблема с утилитой, которая обязательна для установки. Поэтому во всех этих случаях выполняйте следующие действия на свой страх и риск. Если ваша техника и ОС подходит под эти условия: для вас пункт 3 особенно важен — делайте бэкапы!
Вам понадобится: флешка, внешний диск, смартфон/другое устройство для просмотра туториала.
Установка
1. Выберите дистрибутив
Выберите дистрибутив, который подходит под архитектуру вашего процессора. Я выбирал на сайте distrowatch.com. Скачайте необходимый .iso образ вашего дистрибутива.
2. Установите программу для подготовки флешки
Установите Balena Etcher (macOS, Linux, Windows) или Rufus (Windows). К сожалению, мне пришлось воспользоваться Rufus на другом компьютере, с Balena Etcher возникли некоторые проблемы. Вставьте флешку, её объем должен быть больше размера дистрибутива примерно на 1 ГБ (на всякий случай).
В случае с Rufus: загрузите дистрибутив в программу, никакие настройки не изменяйте, нажмите «СТАРТ». Программа сообщит вам, когда выполнит работу.
Если же вы решили воспользоваться Balena Etcher: интерфейс интуитивно понятный, так что проблем не должно быть.
 Balena Etcher
3. Сделайте бэкап (можно пропустить, но это важно)
Я особенно понял, что бэкап важен, когда написал этот туториал и он пропал. И когда забыл сделать бэкап для смартфона. Делайте бэкапы.
Запустите Time Machine, подключите внешний диск для бэкапа (его объем должен быть равен объему занятого места на диске ± 15-20 ГБ). Обратите внимание, что в среднем на передачу 1 ТБ с жесткого диска на внешний жесткий диск требуется 7 часов (по личным наблюдениям с iMac, если вы пользуетесь SSD — процесс будет быстрее). Отключите внешний диск для бэкапа после завершения передачи данных.
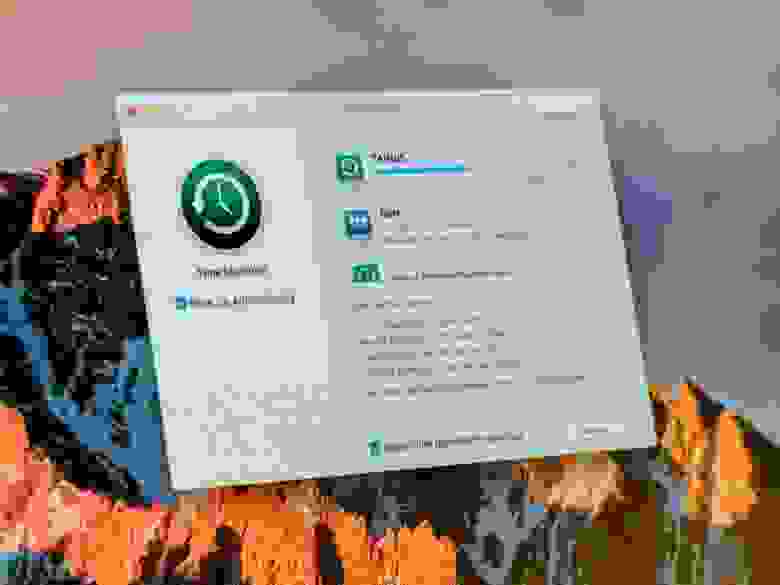 Time Machine
4. Поделите диск на три части: macOS, Linux, Swap
Откройте Дисковую утилиту, нажмите на диск, относящийся к Macintosh HD (он может называться по-другому, например Macintosh SSD и т. п.).
Нажмите «Разбить на разделы», создайте раздел «Swap», выберите формат MS-DOS (FAT), выделите данному разделу количество дискового объема, равное количеству оперативной памяти на компьютере (я выделил 8 ГБ). Создайте следующий раздел «Linux» (тоже MS-DOS FAT), выделите ему желаемое (и обязательно свободное) место на диске (оптимально будет 50 ГБ, но можно и меньше/больше).
5. Загрузите операционную систему с флешки
Перезагрузите компьютер. Сразу же после появления логотипа Apple зажмите клавишу alt (option) до тех пор, пока не появится меню выбора диска для загрузки. Выберите первый EFI Boot. Появится меню: вы можете попробовать (try), установить (install). Советую сначала попробовать (если такая возможность имеется), так как не все дистрибутивы хорошо работают на «железе» Apple.
6. Следуйте указаниям установщика
Попробовали и все нравится? Движемся дальше. Запустите установщик (обычно на рабочем столе есть иконка «Install *название_ОС и версия*»), следуйте указаниям установщика, но когда вас спросят, в каком месте установить — сразу же переходите в расширенные настройки. Выберите раздел, объем которого равен объему раздела «Linux» как главный и отформатируйте его в EXT4. Раздел, объем которого равен объему раздела «Swap», пометьте как «swap-area» или подобное. В качестве раздела для bootloader используйте главный раздел («Linux»).
7. Установите rEFInd
Если вы решили использовать Ubuntu как второй дистрибутив, запустите в терминале следующие команды:
Для других ОС подробная информация на официальном сайте.
8. Вход в rEFInd Boot Manager и завершение установки
Перезагрузите компьютер, и снова зажмите alt (option). Откройте EFI Boot, и немного подождите. Появится меню, выберите систему, которую вы хотите запустить. В дальнейшем, rEFInd Boot Manager будет запускаться самостоятельно.
Кстати, все, за исключением macOS, Time Machine и EFI, что я использовал в туториале — open-source.
Если у вас остались какие-либо вопросы, например, насчет драйверов, спрашивайте. Всем спасибо, что прочитали — ведь это мой первый опыт написания статей/туториалов на Хабре.
Источник
Macs Fan Control on Linux

startergo
macrumors 68040
Do you need Macs Fan Control functionality on Linux? Developers may consider creating an application for Linux if there is enough interest, which for now they think there isn’t. Are you willing to support such a project or pay for a license? Please share your opinions and concerns.
For all non-T2 Macs:
Linux is fully functional on your hardware and security patches will be available for your hardware unlike OSX where support for High Sierra might soon end and as you may know all you precious Nvidia cards (except Kepler based), will have to find another place to do business. In Linux you will have other possibilities to run your cards including, but not limited to hardware virtualization (KVM) GPU and NVMe pass-through etc. For protecting your hardware in this environment it is essential to have good control over your temperatures.
Please cast your vote!
More options

Peadogie
macrumors regular
Do you need Macs Fan Control functionality on Linux? Developers may consider creating an application for Linux if there is enough interest, which for now they think there isn’t. Are you willing to support such a project or pay for a license? Please share your opinions and concerns.
For all non-T2 Macs:
Linux is fully functional on your hardware and security patches will be available for your hardware unlike OSX where support for High Sierra might soon end and as you may know all you precious Nvidia cards (except Kepler based), will have to find another place to do business. In Linux you will have other possibilities to run your cards including, but not limited to hardware virtualization (KVM) GPU and NVMe pass-through etc. For protecting your hardware in this environment it is essential to have good control over your temperatures.
Please cast your vote!
FYI: There is an application available for Debian distros (Kubuntu in my case) that I have used on my 2012 MBP with great success. I don’t know if it will work on MP’s. Info for anyone interested is available here: macfanctld — Fan control for MacBook .
Note: I haven’t used Linux for the last couple of years.
Anyway, maybe this will help some folks out.
Источник
Control linux from mac
Lima: Linux virtual machines (on macOS, in most cases)
Lima launches Linux virtual machines with automatic file sharing, port forwarding, and containerd.
Lima can be considered as a some sort of unofficial «macOS subsystem for Linux», or «containerd for Mac».
Lima is expected to be used on macOS hosts, but can be used on Linux hosts as well.
✅ Automatic file sharing
✅ Automatic port forwarding
The goal of Lima is to promote containerd including nerdctl (contaiNERD ctl) to Mac users, but Lima can be used for non-container applications as well.
- Rancher Desktop: Kubernetes and container management to the desktop
- Colima: Docker (and Kubernetes) on macOS with minimal setup
- Lima xbar plugin — xbar plugin to start/stop VMs from the menu bar and see their running status.
Sharing files across macOS and Linux
Running containerd containers (compatible with Docker containers)
http://127.0.0.1:8080 is accessible from both macOS and Linux.
Install recent version of QEMU. v6.1.0 or later is recommended.
On ARM hosts, a patched version of QEMU has to be installed for enabling -accel hvf support.
The patch was merged into the master branch on 2021-09-21 and will be included in QEMU v6.2.0.
The patch is already cherry-picked in the Homebrew package of QEMU since 6.1.0_1 bottle.
- Download the binary archive of Lima from https://github.com/lima-vm/lima/releases , and extract it under /usr/local (or somewhere else). For instance:
- To install Lima from the source, run make && make install .
NOTE Lima is not regularly tested on ARM Mac (due to lack of CI).
Run limactl start to start the Linux instance. The default instance name is «default». Lima automatically opens an editor ( vi ) for reviewing and modifying the configuration. Wait until «READY» to be printed on the host terminal.
Run limactl shell to launch on Linux. For the «default» instance, this command can be shortened as lima . The lima command also accepts the instance name as the environment variable $LIMA_INSTANCE .
Run limactl copy . to copy files between instances, or between instances and the host. Use : to specify a source or target inside an instance.
Run limactl list [—json] to show the instances.
Run limactl stop [—force] to stop the instance.
Run limactl delete [—force] to delete the instance.
To enable bash completion, add source to
⚠️ CAUTION: make sure to back up your data
Lima may have bugs that result in loss of data.
Make sure to back up your data before running Lima.
Especially, the following data might be easily lost:
- Data in the shared writable directories ( /tmp/lima by default), probably after hibernation of the host machine (e.g., after closing and reopening the laptop lid)
- Data in the VM image, mostly when upgrading the version of lima
The current default spec:
- OS: Ubuntu 21.04 (Hirsute Hippo)
- CPU: 4 cores
- Memory: 4 GiB
- Disk: 100 GiB
- Mounts:
(read-only), /tmp/lima (writable)
- Hypervisor: QEMU with HVF accelerator
- Filesystem sharing: reverse sshfs (planned to be replaced with 9p soon)
- Port forwarding: ssh -L , automated by watching /proc/net/tcp and iptables events in the guest
Contributing to Lima
Please certify your Developer Certificate of Origin (DCO), by signing off your commit with git commit -s and with your real name.
Please squash commits.
- Test on ARM Mac
- Performance optimization
- More guest distros
- Windows hosts
- GUI with system tray icon (Qt or Electron, for portability)
- VirtFS to replace the current reverse sshfs (work has to be done on QEMU repo)
- vsock to replace SSH (work has to be done on QEMU repo)
«What’s my login password?»
Password is disabled and locked by default. You have to use limactl shell bash (or lima bash ) to open a shell.
Alternatively, you may also directly ssh into the guest: ssh -p 60022 -i
/.lima/_config/user -o NoHostAuthenticationForLocalhost=yes 127.0.0.1 .
«Does Lima work on ARM Mac?»
Yes, it should work, but not regularly tested on ARM (due to lack of CI).
«Can I run non-Ubuntu guests?»
Debian, Fedora, Alpine, Arch Linux, and openSUSE are also known to work. See ./examples/ .
An image has to satisfy the following requirements:
- systemd or OpenRC
- cloud-init
- The following binaries to be preinstalled:
- sudo
- The following binaries to be preinstalled, or installable via the package manager:
- sshfs
- newuidmap and newgidmap
- apt-get , dnf , apk , pacman , or zypper (if you want to contribute support for another package manager, run git grep apt-get to find out where to modify)
«Can I run other container engines such as Docker and Podman?»
Yes, any container engine should work with Lima.
The default Ubuntu image also contains LXD. Run lima sudo lxc init to set up LXD.
«Can I run Lima with a remote Linux machine?»
Lima itself does not support connecting to a remote Linux machine, but sshocker, the predecessor or Lima, provides similar features for remote Linux machines.
e.g., run sshocker -v /Users/foo:/home/foo/mnt -p 8080:80 @ to expose /Users/foo to the remote machine as /home/foo/mnt , and forward localhost:8080 to the port 80 of the remote machine.
«Advantages compared to Docker for Mac?»
Lima is free software (Apache License 2.0), while Docker for Mac is not. Their EULA even prohibits disclosure of benchmarking result.
On the other hand, Moby, aka Docker for Linux, is free software, but Moby/Docker lacks several novel features of containerd, such as:
«QEMU crashes with HV_ERROR «
If you have installed QEMU v6.0.0 or later on macOS 11 via homebrew, your QEMU binary should have been already automatically signed to enable HVF acceleration.
However, if you see HV_ERROR , you might need to sign the binary manually.
EOF codesign -s — —entitlements entitlements.xml —force /usr/local/bin/qemu-system-x86_64 «>
Note: Only on macOS versions before 10.15.7 you might need to add this entitlement in addition:
- Make sure that HVF is enabled with com.apple.security.hypervisor entitlement. See «QEMU crashes with HV_ERROR «.
- Emulating non-native machines (ARM-on-Intel, Intel-on-ARM) is slow by design.
- make sure qemu is codesigned, See «QEMU crashes with HV_ERROR «.
- if you are on macOS 10.15.7 or 11.0 or later make sure the entitlement com.apple.vm.hypervisor is not added. It only works on older macOS versions. You can clear the codesigning with codesign —remove-signature /usr/local/bin/qemu-system-x86_64 and start over.
«Port forwarding does not work»
Prior to Lima v0.7.0, Lima did not support forwarding privileged ports (1-1023). e.g., you had to use 8080, not 80.
Lima v0.7.0 and later supports forwarding privileged ports on macOS hosts.
On Linux hosts, you might have to set sysctl value net.ipv4.ip_unprivileged_port_start=0 .
stuck on «Waiting for the essential requirement 1 of X: «ssh»
libslirp v4.6.0 used by QEMU is known to be broken. If you have libslirp v4.6.0 in /usr/local/Cellar/libslirp , you have to upgrade it to v4.6.1 or later ( brew upgrade ).
«permission denied» for limactl cp command
The copy command only works for instances that have been created by lima 0.5.0 or later. You can manually install the required identity on older instances with (replace INSTANCE with actual instance name):
«Cannot access the guest IP 192.168.5.15 from the host»
The default guest IP 192.168.5.15 is not accessible from the host and other guests.
To add another IP address that is accessible from the host and other virtual machines, enable vde_vmnet .
«Hints for debugging other problems?»
- Inspect logs:
- limactl —debug start
- $HOME/.lima/ /serial.log
- /var/log/cloud-init-output.log (inside the guest)
- /var/log/cloud-init.log (inside the guest)
- Make sure that you aren’t mixing up tabs and spaces in the YAML.
About
Linux virtual machines, on macOS (aka «Linux-on-Mac», «macOS subsystem for Linux», «containerd for Mac», unofficially)
Источник


