- Управление кулерами компьютера Windows 10
- Программы для регулировки скорости кулеров
- SpeedFan
- MSI Afterburner
- AMD Radeon Software
- MSI Dragon & Creator Center
- How to set custom fan speed on a Windows 10 PC
- Fan control on Windows 10
- Set custom fan speed
- 1. CPU fan speed control with SpeedFan
- 2. HWiNFO PC fan speed controller
- Parting words
- 1 Comment
- Leave a Reply Cancel reply
- How to Control Fan Speed on Windows 10
- How fans work to cool a PC
- How to control fan speed
- 1. Control fan speed on Windows 10 with SpeedFan
- Response curve
- 2. Control fan speed on Windows 10 with HWiNFo
- Did this work for you?
- How To Increase Fan Speed on Laptop and PC Windows 10
- How to increase fan speed on laptop having Windows 10 OS
- Method 1 – Change fan settings on Windows 10 using the control panel
- Methods 2 – Download laptop fan control software
- How to change fan speed on Windows 10 desktop PC
- Method 1 – Change fan speed using BIOS
- Method 2 – Buy an external fan speed controller for PC
- Increase CPU Fan Speed – FAQ
Управление кулерами компьютера Windows 10
Для управления кулерами компьютера можно использовать стороннее программное обеспечение. Под кулером имеют ввиду совокупности вентилятора с радиатором, установленные для охлаждения комплектующих (как минимум процессора и видеокарты).
Эта статья расскажет об управлении кулерами компьютера в Windows 10. Будем использовать только лучшие программы для регулировки скорости вентиляторов. Некоторый софт позволяет настроить скорость всех кулеров, а другое только отдельно видеокарты или процессора.
Программы для регулировки скорости кулеров
В зависимости от рабочих температур можно изменить скорость кулеров (имеется в виду каждого из вентиляторов). Можно выбрать на свой вкус программу для регулировки. Не стоит в список добавлять малоизвестные неудобные в использовании утилиты. Хотя всё на вкус и цвет.
Сейчас производители для управления выпускают своё ПО. Например, AMD Ryzen Master или Intel Extreme Tuning Utility. Или MSI Dragon Center, Gigabyte Aorus Engine, Smart Fan 5 и Sapphire TriXX. Именно с его помощью можно с лёгкостью настроить скорость кулеров (вентиляторов).
SpeedFan
В программе отображаются все подключённые к материнской плате вентиляторы. Можно изменить скорость кулера процессора или видеокарты и корпусных вентиляторов. Отображает температуры комплектующих с датчиков и при необходимости позволяет их контролировать.
Бесплатное приложение SpeedFan доступно к использованию. Перейдите в расположение Configure > Options и в пункте Language измените язык интерфейса на Russian. Теперь можно в разделе Показатели изменять скорость кулера или задать своё значение в процентах.

С помощью SpeedFan можно посмотреть данные с датчиков комплектующих и настроить скорости вращения кулеров под себя. Всё зависит от комнатной температуры и Вашего компьютера. Приложение автоматически определяет всю информацию о Вашем железе.
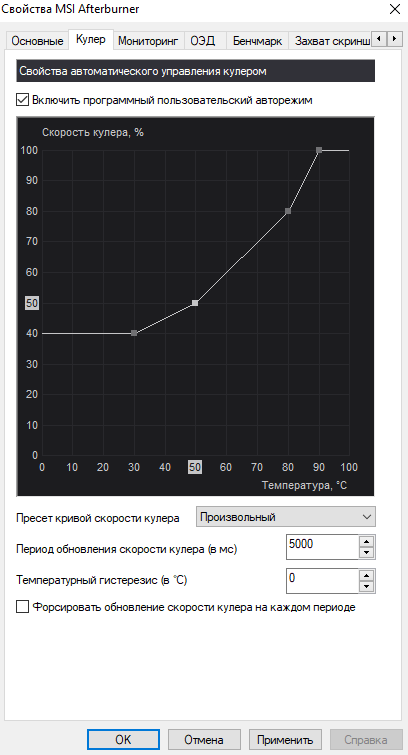
MSI Afterburner
Программное обеспечение используется для настройки производительности видеокарты. С его помощью можно тонко настроить и скорость вентиляторов. Найдите параметр Fan Speed (%) и отключите авторежим кнопкой Авто. Теперь можно вручную выставить нужное значение.
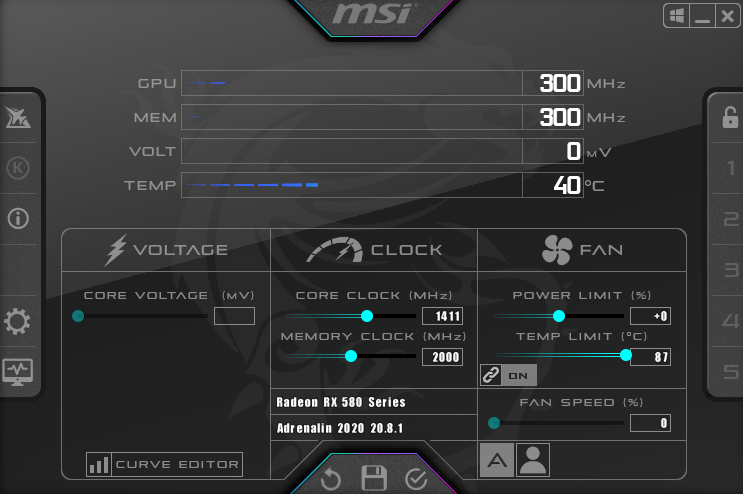
Перейдите в раздел Настройки > Кулер и отметьте Включить программный пользовательский авторежим. Выберите несколько значений скоростей кулера и температуры. Тонкая настройка заключается в ручной коррекции графика температуры.
AMD Radeon Software
Обновлённые драйвера AMD Radeon Software Adrenalin 2020 Edition заслуживают внимания пользователей. Конечно же, работает только с видеокартами красного бренда. Их программное обеспечение заменяет множество сторонних программ (записи, мониторинга и разгона).
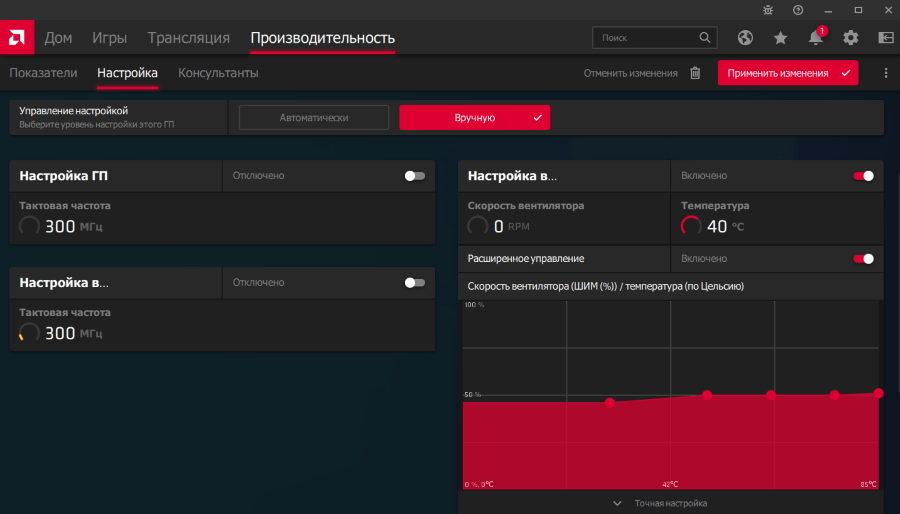
Перейдите в раздел Производительность > Настройка. Теперь параметр Управление настройкой измените на Вручную. Дальше включите настройку вентиляторов. Выбрав расширенное управление, настройте отношение Скорости вентиляторов / Температуры.
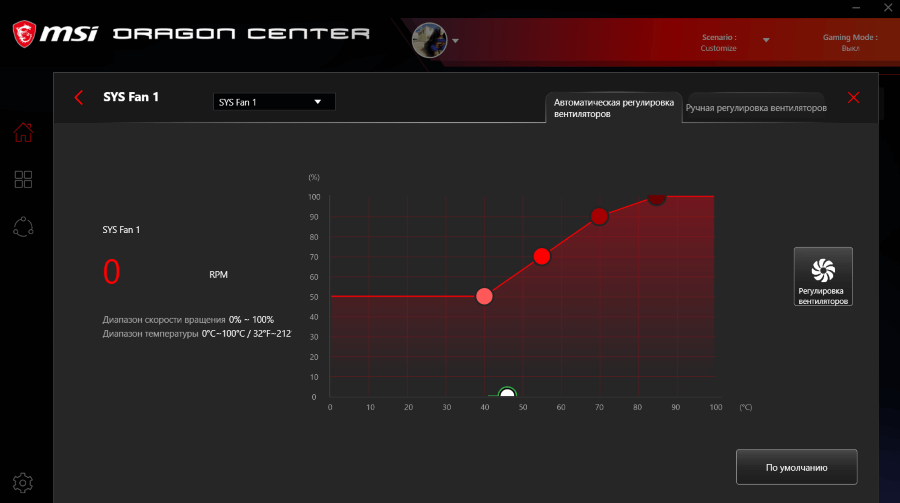
MSI Dragon & Creator Center
Все уважающие себя производители выпускают ПО для управления своими комплектующими. Материнские платы, видеокарты и даже ноутбуки получают возможность использовать MSI Dragon Center. С его помощью уже можно настроить производительность системы в целом.
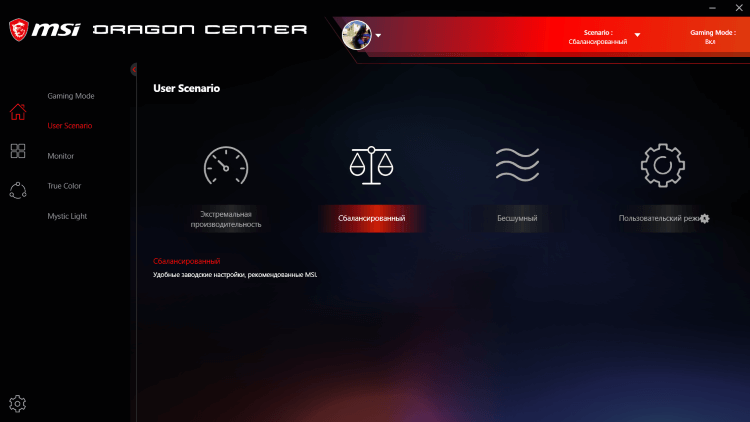
Откройте User Scenario > Пользовательский режим. Выберите, например, Системный вентилятор и укажите значение Ручной регулировки или настройте график Автоматической регулировки вентиляторов. В зависимости от версии ПО и железа интерфейс отличается.
Действительно, нормальных программ для регулировки скорости кулеров немного. Старые и плохо себя зарекомендовавшие утилиты даже стоит рассматривать. Например, даже сейчас SpeedFan лидер, хотя давно уже не обновлялся. Смотрите, как пользоваться SpeedFan 4.52.
В большинстве приложений используется процентная шкала выставления скоростей или график соответствия скорости и температуры. Пользователь указывает конкретное значение скорости при достижении определённой температуры. Ещё присмотритесь к фирменному ПО.
How to set custom fan speed on a Windows 10 PC
Nov 28, 2018
Comment
Your laptop and your desktop both have fans built into it to keep your system cool. If your system overheats, it might damage your hardware. In the event your system overheats, it will normally shut down but that doesn’t guarantee your hardware won’t be damaged.
So if you want to take your system’s cooling into your own hands, you can set a custom fan speed for your system.
Fan control on Windows 10
Before you decide to set a custom fan speed for your system, you should know that this isn’t something you should tinker with if you don’t know what you’re doing.
Setting the speed too low, or too high might damage your system, or cause it to use more power than it normally does.
Set custom fan speed
1. CPU fan speed control with SpeedFan
The go-to app for setting a custom fan speed on Windows 10 is SpeedFan. It’s a pretty great app but in some cases your system’s fans may not show up in the Fan tab.

Download and install the app. On the Readings tab, click the Configure button. Make sure you heed every single warning the app gives you. In the Configure window, go to the Fans tab. Your fans ought to be listed there, and you can then set a custom speed for them.
Editor’s note: As you can see in the screenshot below, my fans aren’t showing up. If you’re in the same boat, there’s another app you can try.
2. HWiNFO PC fan speed controller
Download and install HWiNFO. Select the Sensors Only option, and run the app. It will warn you that running the app will impact your system.

You may not see it for all systems. I got it for mine because it has an Embedded Controller sensor and it may also be the reason why SpeedFan didn’t work for me. Regardless, be mindful about your system’s resources and how they’re being used.
Once the app is running, click the fan button at the bottom. This will open the HWiNFO Fan Control window. It will list the fans that are installed on your system.
If the controls for a fan are inactive, it means you don’t have that particular fan installed. For example, in the screenshot below, Fan 3 is inactive because my system only has two fans.

To set a custom fan speed enter the maximum speed, and click Set Manual. If you want to set a custom auto speed click Custom Auto.
Select the PCH sensor in order to get the temperature of your system for triggering the fan speed and then enter the temperature and the speed that the fan should run when your system reaches that temperature.

Click Ok, to exit the window. On the main app window, click the blue cross button at the bottom right to save the changes.
If your system starts experiencing unexpected shut downs, reset your fan to default.
Parting words
Did any of these work out for you? Or do you have other recommendations for setting fan speed on Win 10?
We’d like to hear from you in the comments below.
1 Comment
fanspeed doesnt recognize any of my hardware and this doesnt have that fan control button at the bottom.
Leave a Reply Cancel reply
This site uses Akismet to reduce spam. Learn how your comment data is processed.
How to Control Fan Speed on Windows 10
Apr 21, 2020
Comment
Every laptop and PC has fans built-into it. You do not have to own a high-end gaming rig or gaming laptop to have fans on your system since all of them heat up.
The fans normally run faster when you boot up a system and then quiet down when startup completes. They will start running again, or running faster if you start using your system’s resources more — for example, if you have a lot of tabs open in Chrome.
How fans work to cool a PC
The fans know when to start running faster, and when to slow down. They have sensors built-in that periodically monitor the temperature of your system, and when it reaches a certain threshold, they start to spin to cool it down.
The chassis of your laptop or your PC are designed so that air will flow out which is why it is very important you never block the vents. If your PC continues to run system heavy tasks, the fans will also run to stabilize the temperature.
 The temperature sensors, and the limits set for them, as well as the various fan speeds, are not accessible by users. This is because most users will not be able to judge how hot their system is, and when it’s time to run fans slower or faster.
If you have fans running constantly, your PC is consuming more energy than it needs to and that will likely heat up the adapter. It’s a delicate balance that has to be maintained between keeping a system cool but not overloading it.
How to control fan speed
If you want to control the fan speed on Windows 10, you have to do so at your own risk. Remember that if your PC or laptop overheats, you might permanently damage hardware to the point where it has to be replaced.
In order to control fan speed, you have to download a third-party app. The app that you use depends on your hardware.
We’re recommending two apps here, and between the two, you ought to be able to find an app that can detect your fans, and allow you to change their speed.
Install the app and follow the instructions below to control the fan speed on Windows 10.
1. Control fan speed on Windows 10 with SpeedFan
- Install SpeedFan and run it.
- On the app’s main window, click the ‘Configure’ button.
- A new window will open. Go to the Fans tab.
- Wait for the app to find and list your fans.
- Select the fan you want to control.
- Use the response curve to control the fan speed.

Response curve
Fans turn on when your system heats up. The response curve maps heat with fan speed. The hotter the system runs, the faster the fans will run.
2. Control fan speed on Windows 10 with HWiNFo
Follow these steps to control the fan speed using HWiNFo.
- Run the app and click Sensors on the main window.
- Confirm the pop-up message.
- A new window will open listing the various sensors on your system. At the bottom there is a fan button. Click it.
- A new window will open listing up to three fans. Select one of the active fans.
- Click ‘Set manual’ to manually set the speed for the fan.

HWiNFO doesn’t map the speed to the temperature of your PC so be extra careful with it. Find a way to monitor the temperature of your CPU and GPU so that it doesn’t heat up.
Did this work for you?
We like to hear from our readers if we were able to fix their problem, so let us know in the comments below if any of the above worked for you.
How To Increase Fan Speed on Laptop and PC Windows 10
Be it a laptop or desktop PC, maintaining normal CPU temperature isn’t an easy task. At the same time preventing your PC from overheating is very crucial. The CPU fan plays a very important task to cool your PC down. The problem only starts when the Laptop PC fan doesn’t work or unable to run at an ideal RPM speed.
For better understanding, we have divided this post into two main parts. First, we will explain how you can adjust, control, or increase the fan speed on Laptop then we will explain how you can increase or turn fan speed on a desktop PC.
How to increase fan speed on laptop having Windows 10 OS
You can apply the methods mentioned below to change the fan speed on a laptop that has Windows 10 OS. If you have a gaming laptop then you should definitely keep a close eye on your fan RPM.
Method 1 – Change fan settings on Windows 10 using the control panel
Windows 10 has a built-in feature to change the laptop fan speed. All you have to access is your control panel and follow these steps;

- Open “Control Panel” and click on “Hardware and Sound,” and then “Power Options.” A new window will appear.
- Click “Change Plan Settings,” and then “Change Advanced Power Settings.” The “Power Options” dialog box will appear.
- In the “Advanced Settings” tab click on the “Processor Power Management” associated with a plus symbol to open an options submenu.
- Select “System Cooling Policy” from the submenu.
- Click the down arrow under “System Cooling Policy” to reveal a drop-down menu.
- Select “Active” from the drop-down menu to increase the speed of your CPU’s cooling fan.
- Click “Apply” and then “OK.”
Methods 2 – Download laptop fan control software

If you want to change the CPU fan speed on a laptop without tweaking any laptop fan control settings then download fan speed controller software. There are plenty of CPU fan controller tools but SpeedFan is the best choice among them.
It very easy to use, didn’t have any malware or unwanted files attached to it. The installation process is very easy. This fan control software gives you total control over CPU fan speed.
SpeedFan is the best third-party solution to control the fan speed on Windows 10 PC. While Mac users can download smcFanControl software to monitor their mac fan speed.
This CPU fan controller software gives you accurate readings about your current CPU and GPU temperature plus you can also see your current fan RPM. You can manually control and increase the fan speed on a laptop with these tools.
Note: Speedfan supports a wide variety of computer motherboards and sensor chips but for laptop users, this tool lacks a fan control option. Laptop users can use Argus monitor or MSI Afterburner.
Another disadvantage of this fan speed control for windows 10 is that it only supports built-in CPU and Case fans.
If SpeedFan not detecting fans then you might have additional PC fans in your system. This fan control software doesn’t control them.
If PC fan controller software doesn’t let you control, change, or increase the fan speed on laptop PC then don’t worry you have a plan B.
How to change fan speed on Windows 10 desktop PC
If you have a gaming PC then managing its fan profile is more important for you. Follow the below-mentioned steps to control fan speed on PC.
Method 1 – Change fan speed using BIOS

Desktop PC users can also use SpeedFan and the like software to change CPU fan speed. In some cases, these fan control software prove to be useless due to lack of motherboard support.
Don’t worry you can change fan speed using BIOS on Windows 10 PC. No matter which manufacturer motherboard you have they always have BIOS fan control settings. First, you have to dive into the BIOS, so there are two ways to do that.
Method 2 – Buy an external fan speed controller for PC

Most of the software that increases fan speed only support built-in CPU fan and case fans. What if you have installed additional aftermarket PC fans. Buying an external fan controller for the PC will be the best option in this case.
Of course, this method is only applicable on a desktop computer because the laptop doesn’t support fan speed controllers. For laptops, buy the best laptop cooling pads.
You can easily find the best PC fan controller device on the internet. These hardware components fit in the computer drive bay and have knobs that allow you to manually control the fan speed on the PC. You can increase the fan speed up to 100% or lower.
You can also see the current PC fan RPM but you can’t monitor CPU temperature or GPU temperature on these devices. For that, you should download the best CPU temperature monitor. The reliable and best CPU temp monitors are Core Temp, Rainmeter, or Real Temp.
This is how you adjust fan speed in BIOS on Windows 10 laptop and PC.
Increase CPU Fan Speed – FAQ
There are sensors placed on motherboard when the CPU or GPU generate heat these sensors turn on the computer fan. The only purpose is to maintain ideal PC temperature.
You can use BIOS settings to change the fan speed on a laptop because of most fan control software lack support for laptop fans.
Yes, laptop fans always run during normal use. The idea is to cool down internal hardware and prevent overheating. But when your laptop fan runs loudly it’s nor normal.
To check at what speed your CPU fan is running download SpeedFan or Argus Monitor. These tools will show you the exact RPM of your PC fans.
To decrease your laptop fan speed then you can download HWInfo64. This tool support most laptop fan settings. Use HWiNFO fan control option to manually decrease or increase laptop fan speed.
If you don’t know how to change fan settings using BIOS then download third party fan control software.
The ideal CPU fan speed of a laptop depends on a host of things but if you run it at 70% then it’s good. If you want to know What RPM is normal for laptop fans then 3000 to 4000 RPM is considered to be the best range.
If your computer fan is constantly loud then it may be a problem with your fan bearing or your PC is full of dust. Try to clean your PC intakes that are clogging fresh air.
With these four methods, you can increase fan speed Windows 10 laptops or PC. Now tell us which method to solve your problem.


