- How to convert DOS/Windows newline (CRLF) to Unix newline (LF) in a Bash script
- 22 Answers 22
- Conversion of files from Windows to Unix format
- Notes:
- dos2unix and unix2dos
- NEWS CONTENTS
- Old News 😉
- Ubuntu Genius’s Blog
- HowTo UNIX — Linux Convert DOS Newlines CR-LF to Unix-Linux Format
- Conversion from DOS to UNIX
- Connect to your Linux instance from Windows using PuTTY
- Prerequisites
- Convert your private key using PuTTYgen
- Connect to your Linux instance
- Transfer files to your Linux instance using the PuTTY Secure Copy client
- Transfer files to your Linux instance using WinSCP
How to convert DOS/Windows newline (CRLF) to Unix newline (LF) in a Bash script
How can I programmatically (i.e., not using vi ) convert DOS/Windows newlines to Unix?
The dos2unix and unix2dos commands are not available on certain systems. How can I emulate these with commands like sed , awk , and tr ?

22 Answers 22
You can use tr to convert from DOS to Unix; however, you can only do this safely if CR appears in your file only as the first byte of a CRLF byte pair. This is usually the case. You then use:
Note that the name DOS-file is different from the name UNIX-file ; if you try to use the same name twice, you will end up with no data in the file.
You can’t do it the other way round (with standard ‘tr’).
If you know how to enter carriage return into a script ( control-V , control-M to enter control-M), then:
where the ‘^M’ is the control-M character. You can also use the bash ANSI-C Quoting mechanism to specify the carriage return:
However, if you’re going to have to do this very often (more than once, roughly speaking), it is far more sensible to install the conversion programs (e.g. dos2unix and unix2dos , or perhaps dtou and utod ) and use them.
If you need to process entire directories and subdirectories, you can use zip :
This will create a zip archive with line endings changed from CRLF to CR. unzip will then put the converted files back in place (and ask you file by file — you can answer: Yes-to-all). Credits to @vmsnomad for pointing this out.
Conversion of files from Windows to Unix format
Note: The following information is provided in part by the Extreme Science and Engineering Discovery Environment ( XSEDE ), a National Science Foundation (NSF) project that provides researchers with advanced digital resources and services that facilitate scientific discovery. For more, see the XSEDE web site.
The format of Windows and Unix text files differs. In Windows, lines end with both the line feed and carriage return ASCII characters, but Unix uses only a line feed.
There are several utility software to convert text files from UNIX or Linux to DOS operating systems and vice-versa; however, it always helps to know the manual conversion. In shell programming languages like UNIX or Linux the text files conclude with a new line operator»\n» also known as the line feed and its ASCII code is 0A. A DOS Text file concludes a line by the carriage return or the entry key «\r»: its ASCII code is 0D. The lines in the DOS end with CRLF or with «\r\n». To convert DOS text into UNIX or Linux erase the «\r»; you can also use ASCII codes if you are using GNU-sed version.
As a consequence, some Windows applications will not show the line breaks in Unix-format files. Likewise, Unix programs may display the carriage returns in Windows text files with Ctrl-m ( ^M ) characters at the end of each line.
Notes:
- Sometimes when you edit files in Windows and Unix you get a file that have fragments in «Unix style» and fragments in Windows style. dos2unix does not convert such files. Sometime there are even fragments that have only ^M at the end. See How do I convert between Unix an
In this case you can use multiple Perl one liners along the following lines
For simple conversion you can use FTP, screen capture, unix2dos and dos2unix, tr , awk, Perl, and vi to do the conversion. You can also use CYGWIN.
When using an FTP program to move a text file between Unix and Windows, be sure the file is transferred in ASCII format, so the document is transformed into a text format appropriate for the host. Some FTP programs, especially graphical applications (e.g., Hummingbird FTP), do this automatically. If you are using command line FTP, before you begin the transfer, enter:
Note: You need to use a client that supports secure FTP to transfer files to and from Indiana University’s central systems. For more, see At IU, what SSH/SFTP clients are supported and where can I get them?
dos2unix and unix2dos
The utilities dos2unix and unix2dos are available for converting files from the Unix command line.
To convert a Windows file to a Unix file, enter:
To convert a Unix file to Windows, enter:
You can use tr to remove all carriage returns and Ctrl-z ( ^Z ) characters from a Windows file:
However, you cannot use tr to convert a document from Unix format to Windows.
To use awk to convert a Windows file to Unix, enter:
To convert a Unix file to Windows, enter:
Older versions of awk do not include the sub function. In such cases, use the same command, but replace awk with gawk or nawk .
To convert a Windows text file to a Unix text file using Perl, enter:
To convert from a Unix text file to a Windows text file, enter:
You must use single quotation marks in either command line. This prevents your shell from trying to evaluate anything inside.
In vi, you can remove carriage return ( ^M ) characters with the following command:
Note: To input the ^M character, press Ctrl-v , and then press Enter or return .
In vim, use :set ff=unix to convert to Unix; use :set ff=dos to convert to Windows.
This document was developed with support from National Science Foundation (NSF) grant OCI-1053575. Any opinions, findings, and conclusions or recommendations expressed in this material are those of the author(s) and do not necessarily reflect the views of the NSF.
| Top updates Your browser does not support iframes. | ||||
| Bulletin | Latest | Past week | Past month | Google Search |
NEWS CONTENTS
- 200218 : Ubuntu Genius’s Blog ( October 26, 2010 , Ubuntu Genius )
- 200218 : HowTo UNIX — Linux Convert DOS Newlines CR-LF to Unix-Linux Format ( HowTo UNIX — Linux Convert DOS Newlines CR-LF to Unix-Linux Format, )
Old News 😉
Ubuntu Genius’s Blog
October 26, 2010 | Ubuntu Genius
Most people don’t realise that when they hit the Enter key to create a new paragraph in a text file, something very different is going on behind the scenes in the three major operating systems: Windows, Macintosh and Linux. The «end-of-line delimiter» (often expressed as «End-Of-Line«, «End of Line«, or just «EOL«) – which some of you know as the «line break» or «newline» – is a special character used to designate the end of a line within a text file.
UNIX-based operating systems (like all Linux distros and BSD derivatives) use the line feed character (\n or ), «classic» Mac OS uses a carriage return (\r or ), while DOS/Windows uses a carriage return followed by a line feed (\r\n or ). Now that Mac OS X is based on FreeBSD‘s file system, it follows the UNIX convention.
Now, the reason most people don’t know about all this is because nobody really should have to. But while users of Linux distros and Mac OS can open Windows text files in basically any available editor and not even know the difference, the same can’t be said for Windows users opening files created in one of the other operating systems.
If you type up a simple text file in Ubuntu and save it in the default «Unix/Linux» format, in Windows it will appear as one continuous paragraph, with black squares where the line breaks (or new paragraphs) should be. While you can open the file in a more advanced text editor (or proper word processor) to view it as it should look, others you’ve sent it to are just likely to double-click it and let it open in Notepad (which can only handle MS-DOS EOL).
Occasionally, the reverse is the issue, but you can convert Windows text files to UNIX easily with Gedit, as well as convert them via the terminal, so hopefully the following guide will be of use.
For more detailed info on End-Of-Line, go to the Wikipedia page.
Converting Windows EOL to Linux via the Terminal
If you find the text editor you’re using to display Windows files in Ubuntu shows ^M instead of a line break (not very likely with even the most lightweight text editors, but something you’ll probably come across if you display the text in a terminal), don’t worry – just convert them to Unix/Linux format.
While you can actually open them in Gedit and use Save As… to save over them (or to create copies) in the correct format, for more than a couple of files this would be the long, complicated solution.
By far the quickest and easiest approach is to convert the offending files via the command-line. This way, you could batch-convert hundreds of such files at once, not have to do them individually.
There are actually quite a few ways to do this, but we’ll look at a couple of tiny packages you can install, and the related commands to use.
The first – the tofrodos package – is undoubtedly the most widely-used, so we’ll look at that in detail – especially since many of the guides out there are outdated, since the commands it contains have been renamed.
The second is a little package called flip, and since it’s tiny and won’t cause any issues, it’s worth installing as a backup (just in case. I found it useful after trying to get tofrodos going on a new system, before I found out the commands were changed).
There is no actual command tofrodos, as it is just the package that contains the commands todos and fromdos. Currently, the vast majority of online guides will list the commands as unix2dos and dos2unix, but as the developer states:
With this release the symlinks «unix2dos» and «dos2unix» are dropped from the package. This will allow the introduction of the original dos2unix package, which also supports conversion to MacOS style files.
So now you can choose to use either todos (to convert to Windows) and fromdos (to convert to Linux), or just fromdos with options (fromdos -u to convert to DOS, and fromdos -d to convert to UNIX, though obviously the -d option really isn’t needed, as it is the default behaviour for the fromdos command).
We’ll use fromdos, as it is easier to remember, and show how to alter a single file, or all text files in a given folder. When you’re ready to proceed, open a terminal in the folder containing the text file(s) and use one of the following commands (note that for the purpose of illustration, the .txt suffix is used, but you can specify any other extension for your text files).
To Convert to UNIX/Linux via Terminal:
Single file (remember to replace filename.txt with the actual name of the file)
fromdos filename.txt
All text files in a folder (if the extension differs to .txt, simply replace it in the command)
fromdos *.txt
Similarly, flip is easy to use:
flip -u filename.txt (or flip -u *.txt for multiple files)
HowTo UNIX — Linux Convert DOS Newlines CR-LF to Unix-Linux Format
Task: Convert Dos TO Unix Using tr Command
Type the following command:
Task: Convert Dos TO Unix Using Perl One Liner
Type the following command:
Task: Convert UNIX to DOS format using sed command
Type the following command:
Task: Convert DOS newlines (CR/LF) to Unix format using sed command
If you are using BASH shell type the following command (press Ctrl-V then Ctrl-M to get pattern or special symbol)
Note: sed version may not work under different UNIX/Linux variant, refer your local sed man page for more info.
The text files under Unix end their line with the symbol «\n» (called Line Feed and noted LF, ASCII code = 0A).
Text files under DOS by a «line», end their line with the symbol «\r»(called Carriage Return and noted CR, ASCII 0D).
Thus, every line in a DOS file ends with a CRLF sequence, or \r\n.
Conversion from DOS to UNIX
With the GNU-sed(gsed 3.02.80) version, we can use the ASCII notation:
Conversion from UNIX to DOS
Just do the opposite of the previous command, namely (the «^M» being entered in the same way (CTRL-V + CTRL-M)): Note:
With the GNU-sed(gsed 3.02.80) version, we can use the symbolic notation «\r»:
Connect to your Linux instance from Windows using PuTTY
After you launch your instance, you can connect to it and use it the way that you’d use a computer sitting in front of you.
The following instructions explain how to connect to your instance using PuTTY, a free SSH client for Windows. If you receive an error while attempting to connect to your instance, see Troubleshoot connecting to your instance.
Prerequisites
Before you connect to your Linux instance using PuTTY, complete the following prerequisites.
After you launch an instance, it can take a few minutes for the instance to be ready so that you can connect to it. Check that your instance has passed its status checks. You can view this information in the Status check column on the Instances page.
Verify the general prerequisites for connecting to your instance
To find the public DNS name or IP address of your instance and the user name that you should use to connect to your instance, see General prerequisites for connecting to your instance.
Install PuTTY on your local computer
Convert your private key using PuTTYgen
Locate the private key (.pem file) for the key pair that you specified when you launched the instance. Convert the .pem file to a .ppk file for use with PuTTY. For more information, follow the steps in the next section.
Convert your private key using PuTTYgen
PuTTY does not natively support the private key format for SSH keys. PuTTY provides a tool named PuTTYgen, which converts keys to the required format for PuTTY. You must convert your private key (.pem file) into this format (.ppk file) as follows in order to connect to your instance using PuTTY.
To convert your private key
From the Start menu, choose All Programs, PuTTY, PuTTYgen.
Under Type of key to generate, choose RSA. If your version of PuTTYgen does not include this option, choose SSH-2 RSA.

Choose Load. By default, PuTTYgen displays only files with the extension .ppk . To locate your .pem file, choose the option to display files of all types.

Select your .pem file for the key pair that you specified when you launched your instance and choose Open. PuTTYgen displays a notice that the .pem file was successfully imported. Choose OK.
To save the key in the format that PuTTY can use, choose Save private key. PuTTYgen displays a warning about saving the key without a passphrase. Choose Yes.
A passphrase on a private key is an extra layer of protection. Even if your private key is discovered, it can’t be used without the passphrase. The downside to using a passphrase is that it makes automation harder because human intervention is needed to log on to an instance, or to copy files to an instance.
Specify the same name for the key that you used for the key pair (for example, my-key-pair ) and choose Save. PuTTY automatically adds the .ppk file extension.
Your private key is now in the correct format for use with PuTTY. You can now connect to your instance using PuTTY’s SSH client.
Connect to your Linux instance
Use the following procedure to connect to your Linux instance using PuTTY. You need the .ppk file that you created for your private key. For more information, see Convert your private key using PuTTYgen in the preceding section. If you receive an error while attempting to connect to your instance, see Troubleshoot connecting to your instance.
To connect to your instance using PuTTY
Start PuTTY (from the Start menu, choose All Programs, PuTTY, PuTTY).
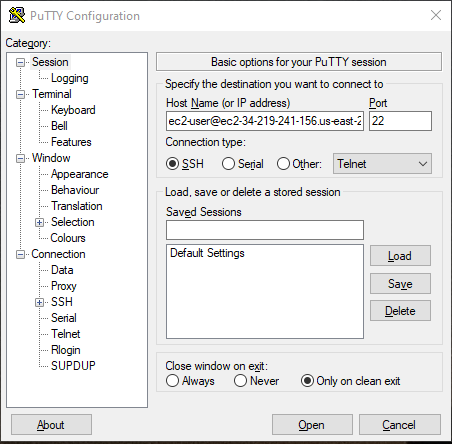
In the Category pane, choose Session and complete the following fields:
In the Host Name box, do one of the following:
(Public DNS) To connect using your instance’s public DNS name, enter my-instance-user-name @ my-instance-public-dns-name .
(IPv6) Alternatively, if your instance has an IPv6 address, to connect using your instance’s IPv6 address, enter my-instance-user-name @ my-instance-IPv6-address .
For information about how to get the user name for your instance, and the public DNS name or IPv6 address of your instance, see Get information about your instance.
Ensure that the Port value is 22.
Under Connection type, select SSH.
(Optional) You can configure PuTTY to automatically send ‘keepalive’ data at regular intervals to keep the session active. This is useful to avoid disconnecting from your instance due to session inactivity. In the Category pane, choose Connection, and then enter the required interval in the Seconds between keepalives field. For example, if your session disconnects after 10 minutes of inactivity, enter 180 to configure PuTTY to send keepalive data every 3 minutes.
In the Category pane, expand Connection, expand SSH, and then choose Auth. Complete the following:
Select the .ppk file that you generated for your key pair and choose Open.
(Optional) If you plan to start this session again later, you can save the session information for future use. Under Category, choose Session, enter a name for the session in Saved Sessions, and then choose Save.
If this is the first time you have connected to this instance, PuTTY displays a security alert dialog box that asks whether you trust the host to which you are connecting.
(Optional) Verify that the fingerprint in the security alert dialog box matches the fingerprint that you previously obtained in (Optional) Get the instance fingerprint. If these fingerprints don’t match, someone might be attempting a «man-in-the-middle» attack. If they match, continue to the next step.
Choose Yes. A window opens and you are connected to your instance.
If you specified a passphrase when you converted your private key to PuTTY’s format, you must provide that passphrase when you log in to the instance.
If you receive an error while attempting to connect to your instance, see Troubleshoot connecting to your instance.
Transfer files to your Linux instance using the PuTTY Secure Copy client
The PuTTY Secure Copy client (PSCP) is a command line tool that you can use to transfer files between your Windows computer and your Linux instance. If you prefer a graphical user interface (GUI), you can use an open source GUI tool named WinSCP. For more information, see Transfer files to your Linux instance using WinSCP.
To use PSCP, you need the private key you generated in Convert your private key using PuTTYgen. You also need the public DNS name of your Linux instance, or the IPv6 address if your instance has one.
The following example transfers the file Sample_file.txt from the C:\ drive on a Windows computer to the my-instance-user-name home directory on an Amazon Linux instance. To transfer a file, use one of the following commands.
(Public DNS) To transfer a file using your instance’s public DNS name, enter the following command.
(IPv6) Alternatively, if your instance has an IPv6 address, to transfer a file using your instance’s IPv6 address, enter the following command. The IPv6 address must be enclosed in square brackets ( [ ] ).
Transfer files to your Linux instance using WinSCP
WinSCP is a GUI-based file manager for Windows that allows you to upload and transfer files to a remote computer using the SFTP, SCP, FTP, and FTPS protocols. WinSCP allows you to drag and drop files from your Windows computer to your Linux instance or synchronize entire directory structures between the two systems.
You must have the private key that you generated in Convert your private key using PuTTYgen.
You must have the public DNS name of your Linux instance.
Your Linux instance must have scp installed. For some operating systems, you install the openssh-clients package. For others, such as the Amazon ECS-optimized AMI, you install the scp package. Check the documentation for your Linux distribution.
To connect to your instance using WinSCP
At the WinSCP login screen, for Host name, enter one of the following:
(Public DNS or IPv4 address) To log in using your instance’s public DNS name or public IPv4 address, enter the public DNS name or public IPv4 address for your instance.
(IPv6) Alternatively, if your instance has an IPv6 address, to log in using your instance’s IPv6 address, enter the IPv6 address for your instance.
For User name, enter the default user name for your AMI.
For Amazon Linux 2 or the Amazon Linux AMI, the user name is ec2-user .
For a CentOS AMI, the user name is centos .
For a Debian AMI, the user name is admin .
For a Fedora AMI, the user name is ec2-user or fedora .
For a RHEL AMI, the user name is ec2-user or root .
For a SUSE AMI, the user name is ec2-user or root .
For an Ubuntu AMI, the user name is ubuntu .
Otherwise, if ec2-user and root don’t work, check with the AMI provider.
Specify the private key for your instance. For Private key, enter the path to your private key, or choose the «. » button to browse for the file. To open the advanced site settings, for newer versions of WinSCP, choose Advanced. To find the Private key file setting, under SSH, choose Authentication.
Here is a screenshot from WinSCP version 5.9.4:
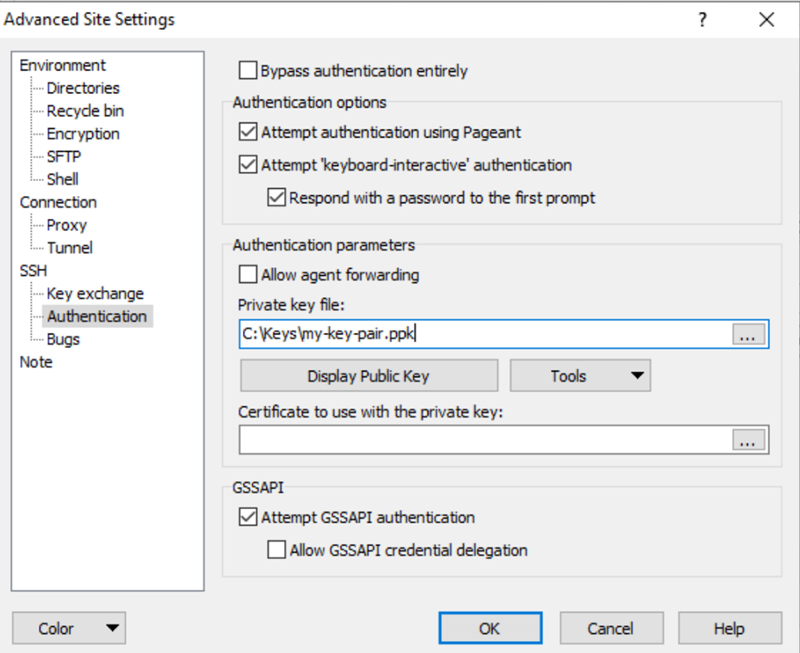
WinSCP requires a PuTTY private key file ( .ppk ). You can convert a .pem security key file to the .ppk format using PuTTYgen. For more information, see Convert your private key using PuTTYgen.
(Optional) In the left panel, choose Directories. For Remote directory, enter the path for the directory to which to add files. To open the advanced site settings for newer versions of WinSCP, choose Advanced. To find the Remote directory setting, under Environment, choose Directories.
Choose Login. To add the host fingerprint to the host cache, choose Yes.

After the connection is established, in the connection window your Linux instance is on the right and your local machine is on the left. You can drag and drop files between the remote file system and your local machine. For more information on WinSCP, see the project documentation at http://winscp.net/eng/docs/start .
If you receive an error that you cannot run SCP to start the transfer, verify that you installed scp on the Linux instance.


