- Use the System File Checker tool to repair missing or corrupted system files
- Run the System File Checker tool (SFC.exe)
- More Information
- How to repair corrupted files in Windows 10
- How do I fix corrupted files in Windows 10?
- 1. Use the SFC tool
- 2. Use the DISM tool
- 3. Run SFC scan from Safe Mode
- 4. Perform the SFC scan before Windows 10 starts
- Fix corrupt archive files using these 6 tools
- How to fix corrupt archive files on Windows 10
- WinZip (recommended)
- WinZip
- WinRAR
- PowerArchiver
Use the System File Checker tool to repair missing or corrupted system files
If some Windows functions aren’t working or Windows crashes, use the System File Checker to scan Windows and restore your files.
Though the steps below might look complicated at first glance, just follow them in order, step-by-step, and we’ll try to get you back on track.
Run the System File Checker tool (SFC.exe)
To do this, follow these steps:
Open an elevated command prompt. To do this, do the following as your appropriate:
If you are running Windows 10, Windows 8.1 or Windows 8, first run the inbox Deployment Image Servicing and Management (DISM) tool prior to running the System File Checker. (If you are running Windows 7 or Windows Vista, skip to Step 3.)
Type the following command, and then press Enter. It may take several minutes for the command operation to be completed.
DISM.exe /Online /Cleanup-image /Restorehealth
Important: When you run this command, DISM uses Windows Update to provide the files that are required to fix corruptions. However, if your Windows Update client is already broken, use a running Windows installation as the repair source, or use a Windows side-by-side folder from a network share or from a removable media, such as the Windows DVD, as the source of the files. To do this, run the following command instead:
DISM.exe /Online /Cleanup-Image /RestoreHealth /Source: C:\RepairSource\Windows /LimitAccess
Note: Replace the C:\RepairSource\Windows placeholder with the location of your repair source. For more information about using the DISM tool to repair Windows, reference Repair a Windows Image.
At the command prompt, type the following command, and then press ENTER:
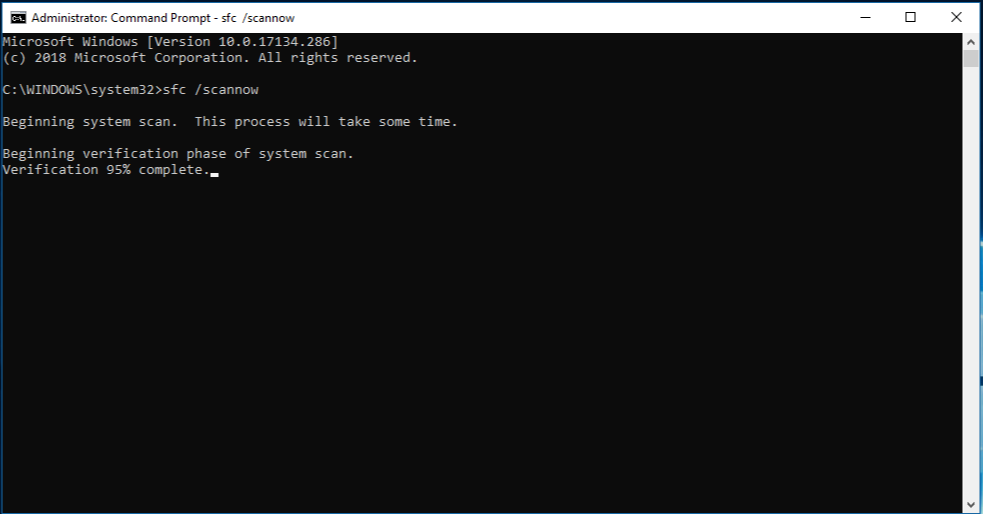
The sfc /scannow command will scan all protected system files, and replace corrupted files with a cached copy that is located in a compressed folder at %WinDir%\System32\dllcache.
The %WinDir% placeholder represents the Windows operating system folder. For example, C:\Windows.
Note Do not close this Command Prompt window until the verification is 100% complete. The scan results will be shown after this process is finished.
After the process is finished, you may receive one of the following messages:
Windows Resource Protection did not find any integrity violations.
This means that you do not have any missing or corrupted system files.
Windows Resource Protection could not perform the requested operation.
To resolve this problem, perform the System File Checker scan in safe mode, and make sure that the PendingDeletes and PendingRenames folders exist under %WinDir%\WinSxS\Temp.
Windows Resource Protection found corrupt files and successfully repaired them. Details are included in the CBS.Log %WinDir%\Logs\CBS\CBS.log.
To view the detail information about the system file scan and restoration, go to How to view details of the System File Checker process.
Windows Resource Protection found corrupt files but was unable to fix some of them. Details are included in the CBS.Log %WinDir%\Logs\CBS\CBS.log.
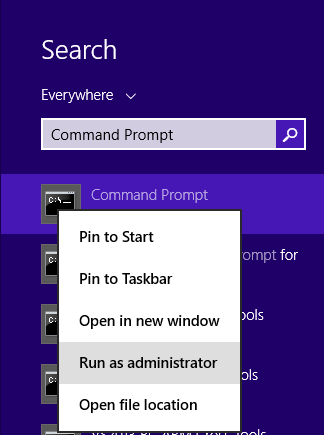
Swipe in from the right edge of the screen, and then tap Search. Or, if you are using a mouse, point to the lower-right corner of the screen, and then click Search. Type Command Prompt in the Search box, right-click Command Prompt, and then click Run as administrator. If you are prompted for an administrator password or for a confirmation, type the password, or click Allow.
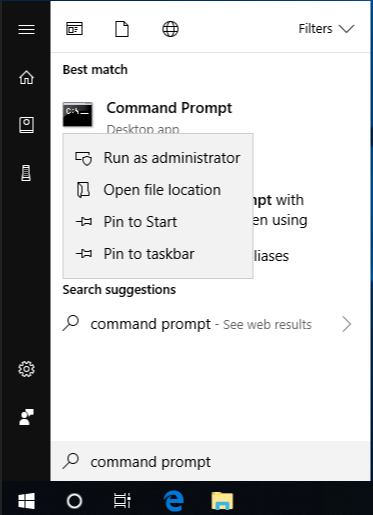
To do this, click Start, type Command Prompt or cmd in the Search box, right-click Command Prompt, and then click Run as administrator. If you are prompted for an administrator password or for a confirmation, type the password, or click Allow.
More Information
To view the details that included in the CBS.Log file, you can copy the information to the Sfcdetails.txt file by using the Findstr command, and then view the details in the Sfcdetails.txt. To do this, follow these steps:
Open an elevated command prompt as described in the previous step 1.
At the command prompt, type the following command, and then press ENTER:
Note The Sfcdetails.txt file contains details from every time that the System File Checker tool has been run on the computer. The file includes information about files that were not repaired by the System File Checker tool. Verify the date and time entries to determine the problem files that were found the last time that you ran the System File Checker tool.
Open the Sfcdetails.txt file from your desktop.
The Sfcdetails.txt file uses the following format:
Date/Time SFC detail The following sample log file contains an entry for a file that could not be repaired: 2007-01-12 12:10:42, Info CSI 00000008 [SR] Cannot repair member file [l:34<17>]»Accessibility.dll» of Accessibility, Version = 6.0.6000.16386, pA = PROCESSOR_ARCHITECTURE_MSIL (8), Culture neutral, VersionScope neutral, PublicKeyToken =
How to manually replace a corrupted system file with a known good copy of the file
After you determine which system file was corrupted and could not be repaired through the detail information in the Sfcdetails.txt file, find where the corrupted file located, and then manually replace the corrupted file with a known good copy of the file. To do this, follow these steps:
Note You may be able to get a known good copy of the system file from another computer that is running the same version of Windows with your computer. You may perform a System File Checker process on that computer to make sure the system file that you intend to copy is a good copy.
Take administrative ownership of the corrupted system file. To do this, at an elevated command prompt, copy and then paste (or type) the following command, and then press ENTER:
takeown /f Path_And_File_Name Note The Path_And_File_Name placeholder represents the path and the file name of the corrupted file. For example, type takeown /f C:\windows\system32\jscript.dll. 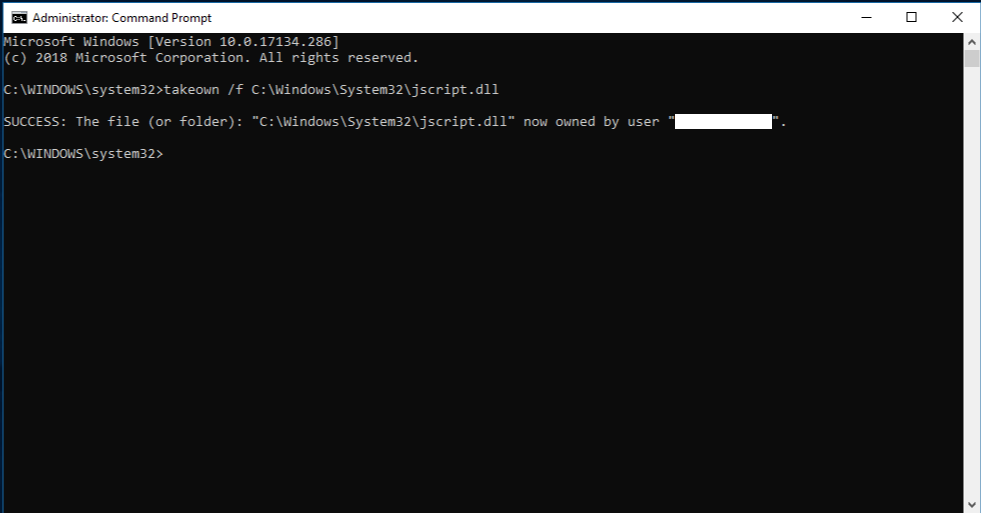
Grant administrators full access to the corrupted system file. To do this, copy and paste (or type) the following command, and then press ENTER:
icacls Path_And_File_Name /GRANT ADMINISTRATORS:F Note The Path_And_File_Name placeholder represents the path and the file name of the corrupted file. For example, type icacls C:\windows\system32\jscript.dll /grant administrators:F.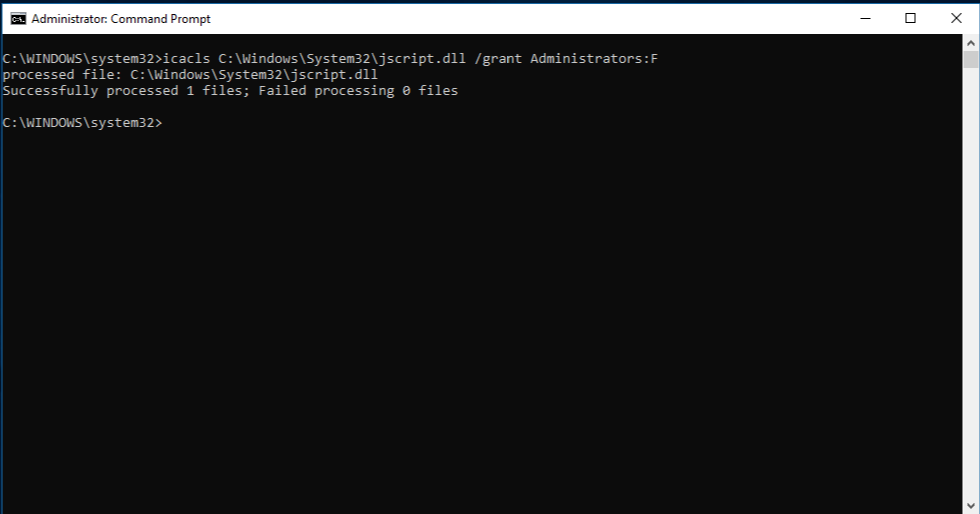
Replace the corrupted system file with a known good copy of the file. To do this, copy and paste (or type) the following command, and then press ENTER:
Copy Source_File Destination Note The Source_File placeholder represents the path and file name of the known good copy of the file on your computer, and the Destination placeholder represents the path and file name of the corrupted file. For example, type copy E:\temp\jscript.dll C:\windows\system32\jscript.dll.
If the steps above don’t work, you may need to reinstall Windows. For more info, see Windows 10 recovery options.
How to repair corrupted files in Windows 10

- Corrupted files in Windows 10 may bring the system to a halt so it’s imperative to repair Windows 10.
- An important method is to use some important tools for fixing corrupted files.
- It’s also a good idea to try and run the tools in Safe Mode and even before Windows starts.
- You can attempt a W indows 10 repair by replacing the files manually by following our steps below.

- Download Restoro PC Repair Tool that comes with Patented Technologies (patent available here).
- Click Start Scan to find Windows issues that could be causing PC problems.
- Click Repair All to fix issues affecting your computer’s security and performance
- Restoro has been downloaded by 0 readers this month.
Many computer problems are caused by corrupted system files. If your Windows 10 installation is corrupted, you’ll encounter instability issues and all sorts of other problems.
Fortunately, there are few ways to fix corrupted system files on your system, and today we’re going to show you how to repair Windows 10.
How do I fix corrupted files in Windows 10?
- Use the SFC tool
- Use DISM tool
- Run SFC scan from Safe Mode
- Perform SFC scan before Windows 10 starts
- Replace the files manually
- Use System Restore
- Reset your Windows 10
1. Use the SFC tool
1.1 Run System File Checker
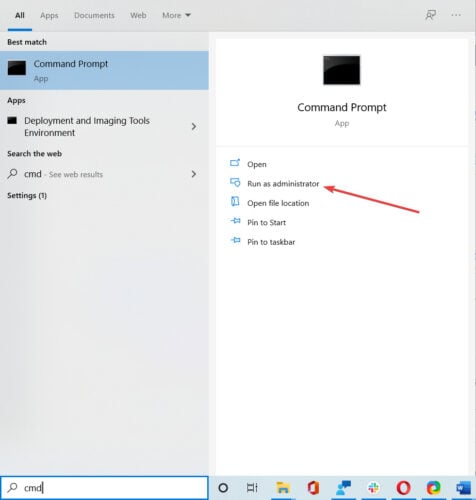
- Type cmd in the Search box and click on Run as Administrator to open an elevated Command Prompt window.

- When Command Prompt opens, enter sfc /scannow and press Enter.
- Don’t close Command Prompt or interrupt the repair process. It can take a while, so wait patiently while it completes.
After the repair process is finished, you’ll see Windows Resource Protection did not find any integrity violations message if your system files aren’t corrupted.
However, SFC tool can’t always fix corrupted files, so keep that in mind.
1.2 Check the SFC log
- Open Command Prompt as administrator as shown in the previous steps.
- Enter the following command and press Enter (By doing this, you’ll create a sfclogs.txt file on your Desktop): findstr /c:»[SR]» %windir%LogsCBSCBS.log >»%userprofile%Desktopsfclogs.txt»
- Open the sfclogs.txt and check the results of SFC scan.
Keep in mind that this log file contains only information related to SFC scan that is performed in Windows.
The SFC is a command line tool, and it will scan your PC and repair any corrupted system files. If you want to learn more about how to use it, read this comprehensive guide about the System File Checker.
2. Use the DISM tool
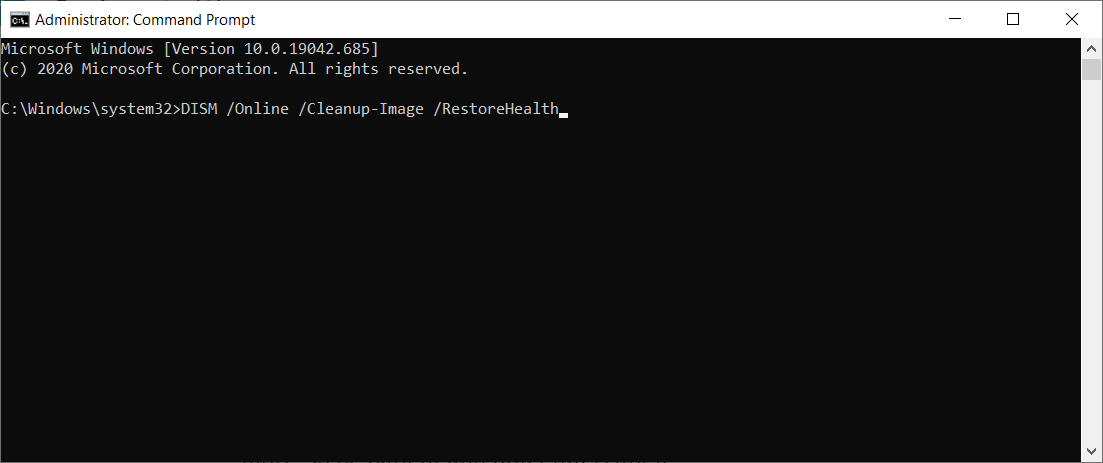
- Open Command Prompt as administrator as indicated at the first step.
- Enter the following command and press Enter: DISM /Online /Cleanup-Image /RestoreHealth
- The repair process can take 10 minutes or more, so be patient and don’t interrupt it.
- After DISM tool repairs your files, restart your PC.
When your PC restarts, you need to check if the problem is resolved. If the issue still persists, run SFC scan again.
If you can’t run SFC tool or if SFC can’t fix the problem, you can try using the DISM tool instead.
DISM stands for Deployment Image & Servicing Management tool, and it’s used to fix any corruption problems that can prevent SFC tool from running.
Just like SFC, DISM is a command-line tool that is used to repair system files.
3. Run SFC scan from Safe Mode
When Safe Mode starts, repeat the steps from Solution 1 to perform an SFC scan.
Sometimes SFC scan can’t repair your files from Windows, but if that happens, you can try running SFC tool from Safe Mode. Safe Mode is a special mode that uses only default drivers and applications.
By using the Safe Mode you’ll eliminate any possible interference from third-party apps.
4. Perform the SFC scan before Windows 10 starts

- Restart your PC by following the first three steps from the previous solution.
- When the list of options appears, select Troubleshoot.
- Choose Advanced options and select Command Prompt .
- When your PC restarts, you might be asked to enter your username and password, so be sure to do that.
- Find the letter of your Windows 10 drive. To do that, enter the following command and press Enter: wmic logicaldisk get deviceid, volumename, description
- Pay attention to Volume Name. In most cases Windows Volume Name will be assigned to the letter D. This is perfectly normal if you start Command Prompt before starting Windows, so no need to worry about it.
- Also check System Reserved drive. In most cases, it should be C.
- Enter the following command and press Enter (Be sure to use the letters that you got from the previous steps): sfc /scannow /offbootdir=C: /offwindir=D:Windows
- Wait while your system files are scanned.
- After the scan is completed, close Command Prompt and start Windows 10 normally.
Sometimes you need to scan and repair protected system files, but you can’t do that from Windows 10.
Fix corrupt archive files using these 6 tools

- Working with corrupted archived files is not only risky but also impossible sometimes.
- To this purpose, we’re listing a few tools to help you repair those files or the archive beforehand.
- WinZip is an excellent file compression and protection tool; to find our more, see our WinZip page for the whole collection of articles.
- Also, in our PC Software Hub you’ll find a lot of guides on apps and programs that you’re using on your device.

- Unzip all major file formats: ZIP, RAR, 7Z, TGZ, TAR, etc.
- Encrypts the files you zip for maximum protection
- Manage your files easily (PC, Cloud, network)
Open archived files
with ease on your PC
Are you looking for the best software to fix corrupt archive files? If the answer is yes, then continue reading this guide to learn what are the best tools to fix corrupt archive issues.
Data corruption happens a lot typically when dealing with a huge number of files at a time. Archive files sometimes may be incomplete or rendered corrupt due to a myriad of reasons which lead to loss of important information contained in the file.
Furthermore, some Windows users get the misconception that an archived file cannot get corrupted which is not necessarily true. It may be good to compress multiple files at once to save space, but it only takes one corrupt file to render the process incomplete.
This leads to the extraction process to halt when it gets to the corrupt file(s).
If you are experiencing issues with a corrupted archived file, the Windows Report team has curated some of the best methods to fix corrupt archive files.
How to fix corrupt archive files on Windows 10
WinZip (recommended)
WinZip is the most popular file compression tool, that also supports useful functions such as sharing, managing, protecting, and backing up your files.
The tool can be used to try fixing corrupt files included in a particular archive file, be it .zip or .zipx . The steps are as follows:
- Type Command Prompt in the search bar and open as admin.
- In the dialog box that opens, type the following command: C:Program FilesWinZipwzzip» -yf zipfile.zip
- Press Enter.
For a split or spanned Zip file, use the following command instead: C:Program FilesWinZipwzzip» -yfs zipfile.zip
Note: Change letter C with the corresponding drive on your device where the WinZip folder is located.
By using this command, WinZip will create a new Zip file with a FIXED suffix in the file name. The original Zip file will not be modified. Only the data in the original Zip file is used.
The FIXED Zip file is accessible, but the data may still be corrupt.
WinZip
WinRAR
 WinRAR is one of the most popular file extraction utility software used worldwide as it incorporates various advanced tools and features. This software can also be used to repair corrupt ZIP and RAR formats.
WinRAR incorporates a file repair tool in the software which helps to repair corrupted archive and it’s highly recommended by Windows Report. The steps to use this powerful utility application to repair the corrupt archive files are as follow:
- Launch WinRAR, click on the address bar, and then select the location where the corrupted file is saved.
- Click on the corrupted archive file (RAR or ZIP file)
- Click on the Repair button in the tool and choose the repair archiver from the drop-down list that appears.
- A new dialogue appears, choose the location that you want to save the new archive after repairing the file. Click on OK to save settings.
- After the repair process is completed, go to the folder chosen as the location for the new archive and access the repaired file.
Alternatively, you can fix corrupt archive files (most especially small-sized corrupt archive files) by using the shortcut menu. Here’s how to do this:
- Launch WinRAR
- Select the corrupt archive file and right-click on it
- Click on extract files in the shortcut menu that pops up
- Move to the Extraction path and options menu and choose a folder to save decompressed archives.
- Check the box indicating keep broken files in Miscellaneous
- Click OK to start the extraction process. Error messages might appear on the screen; ignore them and extract the archive.
- Check the saved folder to all the incorrupt files
Note: This method works well in some cases but it is recommended to try all the alternative methods listed above before resorting to this method to repair archived files.
PowerArchiver
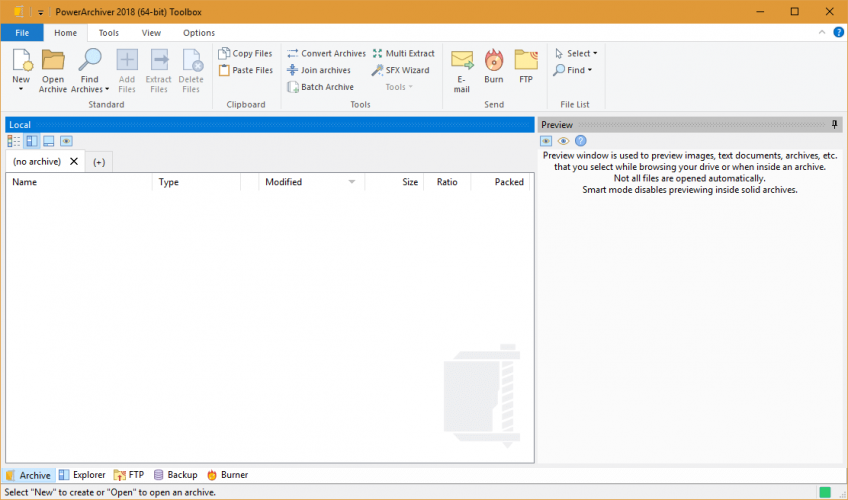 PowerArchiver Repair ZIP is one of the simple, fast and effective tool for fixing corrupt archive files. This utility software, despite its small size contains advanced features which makes it a useful option to consider.
The entire repair process is relatively simple as the tool comes with a simplified user interface which assists newbies in scaling easily through the application. The repair process itself is fast and most notably, it supports different formats of archived files.
After the repair process is completed, the new archive file is saved in the same folder as the corrupted file which can then be quickly accessed for further use.


