- Fixed: Copy/Cut/Paste Not Working in Windows 10/8/7
- Copy and Paste not working, help!
- Cannot backup files by copying and pasting in PC, fix it now!
- Quick Fix 1. Fix copy and paste not working error by uninstalling Adobe Reader
- Quick Fix 2. Run SFC and uninstall/reinstall keyboard drivers to fix Copy & Paste not working issue
- Method 1. Repair damaged Internet Explorer that cause Copy/Cut/Paste won’t work
- Method 2. Fix Copy/Cut/Paste not working error with Registry editor
- Copy cut paste windows
- Users who read this also read:
Fixed: Copy/Cut/Paste Not Working in Windows 10/8/7
Copy and Paste not working, help!
Case 1. Copy and Paste failed to work
«Hey there, do you know how to copy or move files to another drive or location as a backup when Copy & Paste fails to work? I tried to copy and paste wanted files to an external hard drive so to backup the file, but I cannot paste the files to the destination drive.
I tried Ctrl+C/Ctrl+V and right-click selected files with Copy and Paste, nothing worked.Still I got no copied files in the new drive. Do you know how to fix the problem?«
Case 2. Copy, Cut and Paste won’t respond
«I upgraded Windows 8 to Windows 10, and now here is the problem that I cannot copy, cut and paste any files or folders on my PC. Do you know how to repair and make copy, cut and paste work again? If you do know any methods or fixes, please let me know.«
If you are having the above mentioned error with Copy, Cut and Paste, in Windows 10, 8 or 7 PCs, don’t worry and continue reading to find solutions right here now.
Cannot backup files by copying and pasting in PC, fix it now!
Usually, copy and paste feature in Windows system is designed for helping users to create a copy file or backup for the original file into a new location or storage device. So what can you do to copy or create backup files when Copy & Paste not working in PC?В
EaseUS Todo Backup
If ‘Copy & Paste’ doesn’t work to backup files, EaseUS backup software can easily help you out.
Professional backup and recovery software from EaseUS can help you fix this issue. This software supports you to create backup images for important files and data in Windows PC with simple clicks. And the backup files will even take smaller space than the original file. You can simply free download and install it to create file backup or images for important data and files on Windows PCs now:
Support Windows 10/8.1/8/7/Vista/XP
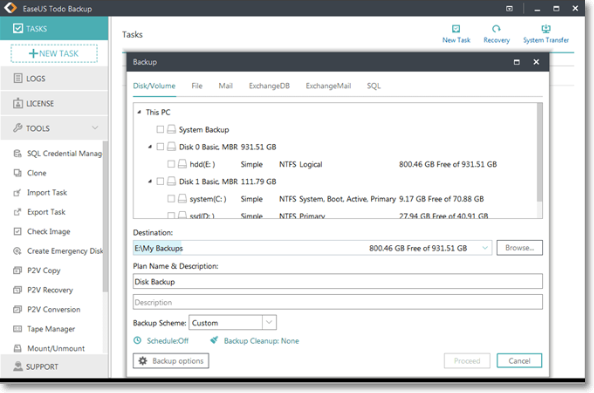
Step 1: Launch EaseUS Todo Backup software and then choose «File Backup», «Disk/partition Backup» or «System Backup» for different backup purpose.
Step 2: Choose the system, disk partition, files or apps that you want to back up. Then select a destination where you want to store the backup file.
Step 3: Click «Proceed» to start the data backup process.
3. Click Proceed to backup wanted files now.
Quick Fix 1. Fix copy and paste not working error by uninstalling Adobe Reader
Sometimes, newly installed Adobe Reader may affect other applications or programs, stopping them from working properly. So when you cannot use Copy and Paste feature to copy or move files in PC, you can try to uninstall Adobe Reader in Windows PC to see if this help or not:
- 1. Right-click onВ «Start» > Select «Programs and Features».
- 2. Find «Adobe Reader» and right-click it, select «Uninstall».
- 3. Uninstall Adobe Reader and restart PC.
After rebooting PC, you can then try to check out whether Copy & Paste feature work or not. If not, try Quick Fix 2 to get your problem solved now.
Quick Fix 2. Run SFC and uninstall/reinstall keyboard drivers to fix Copy & Paste not working issue
- 1. Press Win + R keys to open Run dialog and type: cmd to bring up Command Prompt by hitting Enter.
- 2. Type: sfc /scannow and hit Enter.
- Let the SFC command to check and repair corrupted files on your PC and then check out whether copy and paste feature work or not.
- 3. If SFC command doesn’t work, type: dism /online /cleanup-image /restorehealth and hit Enter.
- After this, you can reboot PC and then try to copy, cut and paste files or data into another location then.
If it still not works, try to enter Device Manager and uninstall and reinstall the keyboard driver to see whether copy and paste work or not:
- 1. Right-click on «This PC/My Computer» > Select «Manage».
- 2. Select Device Manager, expand «Keyboards» section > Right-click the keyboard that you want to repair and select «Uninstall».
- 3. Then click the Windows Start button and click «Restart».
- 4. Windows will reboot and automatically detect your keyboard and reinstall the keyboard drivers.
If these two quick fixes don’t solve your case, you can follow below 3 solutions to make copy, cut and paste feature work in Windows 10/8/7 again.
Method 1. Repair damaged Internet Explorer that cause Copy/Cut/Paste won’t work
- 1. Click «Start» > «Settings» > «Control Panel».
- 2. Double click «Add/Remove Programs» > «Microsoft Internet Explorer» > «Change/Remove».
- 3. Click «Repair Internet Explorer «in the Internet Explorer and Internet Tolls dialog > Click «OK».
If Copy and Paste feature still doesn’t work, try to restore the previous Windows configuration:
- 1. Click «Start» > «Settings» > «Control Panel».
- 2. Double click «Add/Remove Programs» > «Microsoft Internet Explorer».
- 3. Click «Restore the previous Windows configuration» and select «OK».
- 4. Follow the on-screen guidelines to complete the process.
Then you can check and try to coy, cut, and paste files to a new location.
Method 2. Fix Copy/Cut/Paste not working error with Registry editor
- 1. Follow the below path: C:\Windows\System\ and click IEMIGRAT.DLL > On the File menu, click «Rename».
- 2. Rename the file as lemigrat.dlx and close Windows Explorer.
- 3. Click Start > Run > type: regedit and click OK.
- 4. In Registry Editor, click «My Computer» > Click «Export Registry File» on the Registry menu.
- 5. Select a safe location to save the exported file;
- 6. In the File name box, type the name for new file and click «Save».
- 7. Click:В HKEY_LOCAL_MACHINE/Software/Microsoft/Windows/CurrentVersion/Setup/Migration in Registry Editor > find and click the 100 key in the right pane.
- 8. Click «Delete» on the Edit menu > Click «Close» on the File menu and then close all programs.
- 9. Restart PC and insert Windows Millennium Edition installation CD-ROM and follow the installation instructions to complete the process.
After this, Windows Explorer and Copy/Cut/Paste, etc., features and apps can all work properly then.
Copy cut paste windows
Table of Contents
Introduction
A basic, but important, concept to understand when using a computer is cut, copy and paste. These actions will allow you to easily copy or move data between one application and another or copy and move files and directories from one location to another. Though the procedures in this tutorial are considered to be basic concepts, you would be surprised as to how many people do not understand these essential features. Even more importantly, once you understand these fundamentals you will be able to use this knowledge on almost any computer operating system as long as you know the corresponding keys that are used for these features. For the purpose of this tutorial I will cover how to cut, copy and paste with the Windows operating system. Other operating systems, such as Linux, Unix, and Apple support these concepts as well but will not be discussed in this tutorial.
Introducing the Windows Clipboard
Windows has a feature called the Windows Clipboard. The clipboard gives Windows users the ability to store information in memory and than retrieve that information for later use. The cut, copy and paste functions rely on the clipboard in order to work. The process of placing data into the clipboard is know as copying or cutting. The process of retrieving the data from that clipboard and placing it into another location is called pasting. We will cover the specifics on these actions in more detail later in the tutorial. For now it is important to understand that the clipboard is used to contain the data that you want to paste into another location. If there is no information contained in the clipboard, then you will not be able to paste anything. Any data that is stored in the clipboard via a copy or cut command will stay there until it is overwritten by another copy or cut command. When you paste that data, the data is not removed from the clipboard, and can be pasted over and over as many times as wish. The data in the clipboard will be erased, though, when you shut down or restart your computer.
How to highlight text in a document
Before you can copy, cut, or paste text data you must be able to highlight, or select, the text that you want to perform the action on. This is called highlighting and allows you to select all the information in a document or certain portions of it. Once the text is highlighted you can then copy or cut that information depending on your needs. An example of what highlighted text looks like is below:

Figure 1: Example of highlighted text
There are four standard methods used to highlight text and they are as follows:
Use your mouse Using your mouse to select text could not be any easier. Simply find the location you would like to start selecting from and place your mouse cursor there. Then press and hold the left mouse button and drag the cursor to the last area you would like to highlight. You will find that as your are holding the left mouse button and dragging the mouse cursor, the text between where you first pressed the button and where you dragged the cursor to will now be highlighted.
Use the applications edit menu to select all Windows applications that support copy and paste will usually contain an edit menu. Under this edit menu you will see an option to Select All. When you click on that menu option the entire contents of the file you are working for will be highlighted.
Right click your document Many programs give you the ability to select all the data in your document, as described above, by right-clicking on the document and then clicking on Select All. the entire contents of the file will now be highlighted.
Use your keyboard You can use your keyboard to select text by using the arrow keys while holding down the shift key. Place your cursor at the location you would like to start highlighting and then press and hold the shift key while you move your cursor with the keyboards arrow keys. As long as you are holding down the shift key, as you move the cursor with the arrow keys the data that you are moving the cursor over will become highlighted. Pressing Control+A When you press Control and then the letter A on your keyboard at the same time the program will select all the data in the document similar to how Select All works in the previous methods.
Now that you know how to highlight text, you should practice the the art of highlighting text. You can do this by opening Notepad and typing in a few lines of text. Then practice the different methods of highlighting text. To open Notepad you can double-click its icon found in the Start Menu under the Accessories submenu.
How to select files and folders
Just as you can highlight, or select, text you can also highlight files and folders for use with the copy, cut, and paste commands. Selecting files and folders work a little differently then text though. When selecting text you must select the text so that the highlighted text is next to the other highlighted text. Files and folders, on the other hand, can be selected as seen fit and the files do not have to be next to each other. You can see an example of this in the figure below:
Figure 2. Select Files and Folders
As you can see from the image above, files and folder can be selected as needed and do not have to be right next to each other.
To select files or folder you can use the following methods:
Drag your mouse around the desired files or folders You can select multiple files and folders to work with by dragging the mouse cursor around these files. Simply left click in an empty space next to a folder, and while keeping your left mouse button pressed, drag your mouse to create a square or rectangle around those files or folder you want to select. As you drag the mouse, those items contained in the box will become selected. When you are done, release the left mouse button.
Use the applications edit menu to select all Windows applications that support copy and paste will usually contain an edit menu. Under this edit menu you will see an option to Select All. When you click on that menu option all the files in the folder you are looking at will become selected.
Use the Shift key The shift key is used to automatically select all the items between one selected item and another. Click once on a file or folder to select it. Then press and hold the shift key, and click again on another item. You will now see that all items between the first selected one and the next selected one will be highlighted. Use the Control The control key is used to choose individual items to be selected at the same time. Simply hold down the control key and, with that key held down, use your mouse to left click on other items to select . As long as the control is kept pressed down, you can choose as many individual items you would like to select at the same time.
To test this, open your My Documents folder and practicing selecting files and folders.
Copying text
What if you were working on a word processing document and you need to take text that is located in another document and add it to the current document. You could manually type the information found in the original document into the new document but that could take quite a long time. Luckily for us, operating systems give us the ability to copy text from one document to another document called Copy. When you copy highlighted data, this data is stored in the clipboard until you are ready to paste that data into another program
To copy something you must first highlight the text that you would like to copy using one of the methods described above. When when you have the text highlighted that you would like to copy, you can copy it to the clipboard in one of three ways:
- When the text is highlighted you can press the Control button and the C button at the same to copy the data.
- Right-clicking on the highlighted text or files and then clicking on Copy.
- If there is an Edit menu you can click on Edit and then click on Copy.
Once you use one of these methods a duplicate of the highlighted text will be placed in the clipboard allowing you to paste it in another document or application.
Cutting text
Cutting is very similar to copy in that they both place the highlighted item into the clipboard for future pasting. The difference is that you when you Cut the highlighted text, it will remove, or cut, the highlighted text from the original location and place it into clipboard. It is therefore important to be careful when using this command as it is possible to lose data if you mistakenly cut the data from the document and then save the file.
To cut text you must first highlight the text or data that you would like to cut using one of the methods described above. When when you have the text highlighted that you would like to cut, you can cut it to the clipboard in one of three ways:
- When the text is highlighted you can press the Control button and the X button at the same to cut the data.
- Right-clicking on the highlighted text and then clicking on Cut.
- If there is an Edit menu you can click on Edit and then click on Cut.
Once you use one of these methods a copy of the highlighted text will be placed in the clipboard and the highlighted data will be removed from the document. It is important to note that the text will only be removed from a document if that document is editable. For example, you can not cut text from a document set to read-only or a web page because it is not editable.
Pasting text
Now that you know how to Copy and Cut data from a document and have it placed in the clipboard, you need to learn how to retrieve that data and place it in your document. Once data has been copied or cut from a document, you can then paste it into another document, or the same document, by retrieving that information from the clipboard using the Paste command.
Simply move your cursor to the location where you would like the data to be pasted into your document and then choose one of the methods for pasting the data.
- When the cursor is at the location where you would like the data to be pasted press the Control button and the V button at the same to paste the data.
- Right-clicking on the document and clicking on Paste.
- If there is an Edit menu you can click on Edit and then click on Paste.
After you use one of the above commands the data contained in the clip board will now be pasted into the document.
Cut, Copy and Paste with Files and Folders
It is also possible to use the same key combinations and commands on files and folder. Simply select a file(s) or folder(s) and cut or copy it. Then you can select another location to paste it to. If you paste a copied file or folder in the same location that the original resides in, Windows will automatically append Copy of in front of the file name. For example if I copy and paste the file test.txt to the same directory the original is in, it will paste the file as a new file called Copy of test.txt.
When cutting files and folders, a duplicate of the file or folder will placed where you paste it to and the original will be deleted. Do not worry, though, as the original document you cut will not be deleted until a valid copy is pasted elsewhere.
Conclusion
Now that you know how to cut, copy and paste text and files from one location to another you have a powerful tool at your disposal. Now you can quickly take information from another document and paste it into a document of your choice. You also have the ability to cut or copy files from one location and place them into another location.
If you have any questions please feel free to post them in our computer help forums.
Users who read this also read:

How to use the Windows Snipping Tool
The Snipping Tool is a program that is part of Windows Vista, Windows 7, and Window 8. Snipping Tool allows you to take selections of your windows or desktop and save them as snips, or screen shots, on your computer. In the past if you wanted a full featured screen shot program you needed to spend some money to purchase a commercial one. If you needed basic screen shot capability, past versions of .

How to take and share a screen shot in Windows
Windows gives you the ability to take a snapshot of what is shown on your computer screen and save it as a file. You can then view this image at a later date to see what your screen looked like or share this image with other people to view. You may be asking why this is important and why you would want to share screen shots of your computer.

How to start Windows in Safe Mode
Windows Safe Mode is a way of booting up your Windows operating system in order to run administrative and diagnostic tasks on your installation. When you boot into Safe Mode the operating system only loads the bare minimum of software that is required for the operating system to work. This mode of operating is designed to let you troubleshoot and run diagnostics on your computer. Windows Safe Mode .
How to determine what services are running under a SVCHOST.EXE process
A very common question we see here at Bleeping Computer involves people concerned that there are too many SVCHOST.EXE processes running on their computer. The confusion typically stems from a lack of knowledge about SVCHOST.EXE, its purpose, and Windows services in general. This tutorial will clear up this confusion and provide information as to what these processes are and how to find out more .
Introduction to the Windows Command Prompt
Before Windows was created, the most common operating system that ran on IBM PC compatibles was DOS. DOS stands for Disk Operating System and was what you would use if you had started your computer much like you do today with Windows. The difference was that DOS was not a graphical operating system but rather purely textual. That meant in order to run programs or manipulate the operating system .


