- Seamlessly transfer content between your devices
- Cross-device copy and paste (for Surface Duo and select Samsung devices)
- Which devices support cross-device copy and paste?
- What can I copy and paste between my Android device and PC?
- Does what I copy on one device get added to the other device if I don’t paste it here?
- Why did my copied text lose its formatting?
- Does copying and pasting between my devices use data?
- File drag-and-drop (for select Samsung devices)
- What are the minimum requirements to use file drag-and-drop?
- What types of files can I drag and drop?
- Can I drag and drop content into or between apps?
- Four ways to transfer data from Windows phone to Android device for free
- Solution 1. How to transfer files from Winphone to Android with 1 Click
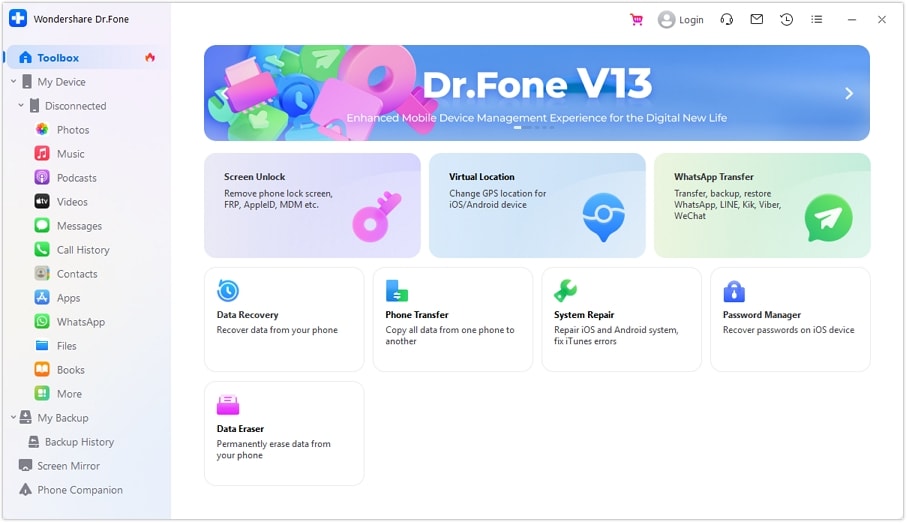
- Dr.Fone — Phone Transfer
- Steps about how to transfer data from Windows phone to Android device with Dr.Fone
- Step 1. Launch Winphone to Android Transfer
- Step 2. Connect Windows Phone and Android
- Step 3. Transfer from Windows Phone to Android
- Solution 2. Transfer data from Windows phone to Android device with computer
- Pros and cons of this way
- Solution 3. Transfer content from Windows Phone to Android with OneDrive
- Pros and cons of this way
- Solution 4. Transfer contacts with Outlook and Gmail
Seamlessly transfer content between your devices
Let emailing yourself photos and files be a thing of the past — now you can just copy and paste or drag and drop content between your Android device and your PC.
Cross-device copy and paste (for Surface Duo and select Samsung devices)
You can copy and paste content using the same shortcuts you normally use on your Android device and PC.
Before using cross-device copy and paste for the first time, you’ll need to make sure the feature is turned on. Open the Your Phone app on your PC, go to Settings > Features > Cross-device copy and paste, and make sure the toggle is On for Allow this app to access and transfer content I copy and paste between my phone and PC.
Which devices support cross-device copy and paste?
Cross-device copy and paste is supported on Surface Duo and Android devices that are running One UI version 2.1 or above. On your Android device, go to Settings > About > Software Information. A few examples of devices with this version are: Samsung Galaxy Note20 5G, Samsung Galaxy Note20 Ultra 5G, Samsung Galaxy S21 5G, Samsung Galaxy S21+ 5G, Samsung Galaxy S21 Ultra 5G, and Samsung Galaxy Z Flip devices.
What can I copy and paste between my Android device and PC?
It is only possible to copy text and images between your devices currently. Images above 1MB in size will be resized.
A note about Secure Folders
You can copy content and paste it into a Secure Folder, but you can’t copy and paste content from a Secure Folder onto your PC. Copying something from a Secure Folder will still replace any content you have on your PC clipboard.
Does what I copy on one device get added to the other device if I don’t paste it here?
Every time you copy something on either device, what you copy will replace the clipboard content on both of your devices.
Why did my copied text lose its formatting?
The apps you may be copying from and to may have different capabilities in how they read copied text, so you may occasionally lose your formatting.
Does copying and pasting between my devices use data?
Cross-device copy and paste requires the exchange of data between your PC and Android device. If you’ve allowed your devices to sync over mobile data, and you’re not connected to a Wi-Fi network, then copy and paste will use data. If this setting is turned off, you’ll only be able to copy and paste when both your Android device and PC are connected to a Wi-Fi network.
If you have the Link to Windows app on your Android device, you can check this by going to Settings > Advanced Features > Link to Windows and toggle Use mobile data.
If you have the Your Phone Companion app on your Android device, open the app, go to Settings > Sync over mobile data, and check to see if this is turned on.
First, make sure you have this feature turned on. On your PC:
Open the Your Phone app, go to Settings > Cross-device copy and paste, and make sure the toggle is On for “ Allow this app to access and transfer content I copy and paste between my phone and PC.”
If you tried to copy a large section of text and it didn’t paste on the other device, it’s likely to have exceeded the allowable amount. Try copying and pasting smaller sections between your devices.
If the feature is already turned on but you’re still unable to copy and paste content, there may be a connection issue between your Android device and PC. Try closing both the Your Phone app on your PC and Link to Windows on your Android device. Reopen both apps – your most recent messages, photos, and notifications should be visible in the Your Phone app on your PC if your connection is working normally. You should now be able to successfully copy and paste your content again. As a last resort, restart your PC and try again.
For Microsoft Edge users
If you’re using Edge, please make sure to update to the latest version of the Edge browser.
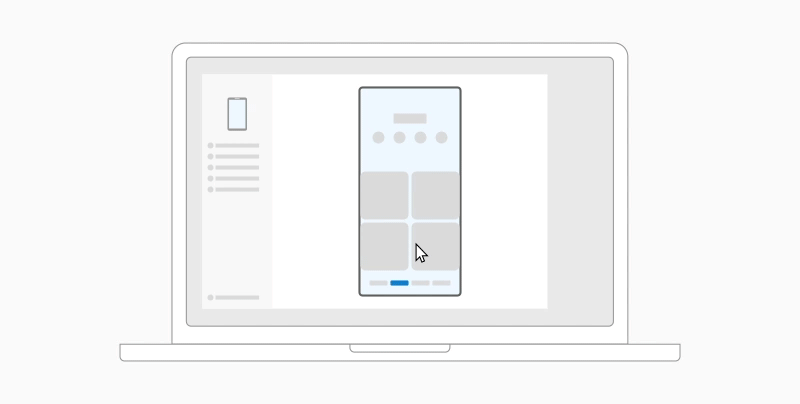
File drag-and-drop (for select Samsung devices)
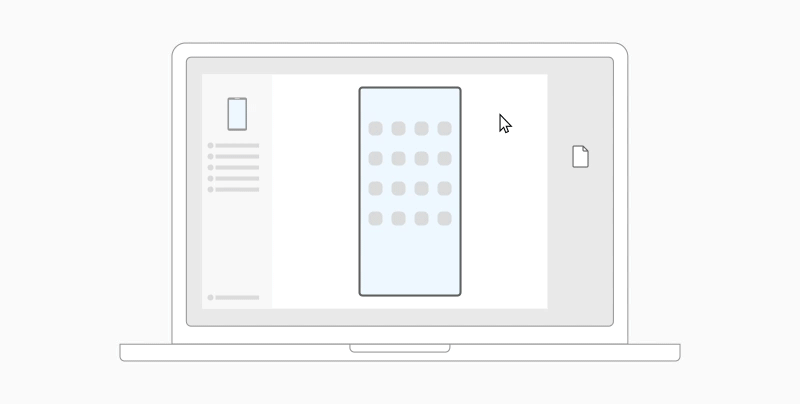
You can transfer content from your Android device to your PC and from your PC to your Android device. To get started, go to Apps and select Open phone screen or select the app you’d like to drag content from or into.
If you’re using the multiple apps experience (for select Samsung devices), you can drag and drop content from and into your mobile apps. Not all apps accept dragging and dropping content, or may not accept the file type you’re transferring. If your content can’t be transferred to the specific app you’ll get a banner notification indicating this. You can open Phone screen instead and drop the file there, it’ll be copied into the Downloads folder on your Android device and you can use it across your mobile apps from there.
Note: You can currently drag from your phone’s Gallery app or from the Samsung My Files app only.
To drag from My Files (min version 11.1.00.121):
Once you’ve opened Phone screen in the Your Phone app, use your mouse to navigate to a folder in My Files.
Long press on the file until a checkmark appears, then release. If you’d like to select additional files, you can do so by tapping on them.
Use your mouse to long press again on the file(s) you’ve selected, and a thumbnail will appear. Drag the files to your desired location on your PC. The cursor will change to indicate when you’re able to drop the file(s).
To drag from the Gallery app:
Once you’ve opened Phone screen in the Your Phone app, use your mouse to navigate to your Albums and select one.
Long press on a photo until a checkmark appears, then release. If you’d like to select additional photos, you can do so by tapping on them.
Use your mouse to long press on the photo(s) you’ve selected, and a thumbnail will appear. Drag the the photo(s) to your desired location on your PC. The cursor will change to say Copy when you are able to drop.
By default, content you drag from your PC to your Android device will be saved to your My Files app. Some apps, like OneDrive and Outlook, will allow you to directly drop content into them. If a file can’t be dropped into the app you intended, it will be transferred to your My Files app on your Android device instead.
Once you’ve opened Phone screen in the Your Phone app, use your mouse to select the file(s) you’d like to transfer and drag them to the phone screen window. The cursor will change to say Copy when you’re able to drop.
Release the mouse and your file(s) will start transferring. A progress indicator will show for a few seconds.
When a successful file transfer is made, you can either tap the notification that appears on your Android device, navigate to the app you dropped your content into, or go to your Internal Storage > Download folder to view your files.
If you drag and drop the same file again, a duplicate copy will be transferred to your device.
If you have an app open that supports receiving files, the app will prompt you where to drop the file(s), and where they will be stored.
What are the minimum requirements to use file drag-and-drop?
File drag and drop requires a Samsung device running Link To Windows version 1.0.52.30 or higher. Your Android device and PC must be connected to the same Wi-Fi network. A cable connection between devices is not required.
What types of files can I drag and drop?
File drag and drop supports the transfer of all file types except for folders and files backed up to the cloud. You can transfer up to 100 files at a time, of any type. No single file can be larger than 512MB in size.
Can I drag and drop content into or between apps?
While you can drag content between your phone and your PC, not all apps will accept content you want to transfer. If an app doesn’t accept your content, you can try using phone screen to transfer it instead. You can’t drag and drop files between your mobile apps from your PC.
You may see a red circle when attempting to drag files – this indicates that you can’t successfully drag files.
This could happen for several reasons, including:
There’s already a drag and drop file transfer happening. Right now, you can only complete one drag and drop operation at a time.
The item being transferred is not supported. For example, if even just one of the items you are dragging is a folder and not a file, or you try dragging 100 files, your Android device won’t allow you to start a transfer.
Keep the Your Phone app open
Minimizing the Your Phone app during drag and drop will cancel the transfer process, meaning you’ll have to start over. Keep the app window open while using file drag-and-drop.
Four ways to transfer data from Windows phone to Android device for free

Alice MJ
Dec 21, 2020 • Filed to: Data Transfer Solutions • Proven solutions
Solution 1. How to transfer files from Winphone to Android with 1 Click
Dr.Fone — Phone Transfer can transfer your photos, videos, music contacts, messages and other files directly from your Winphone to Android. It can also restore your contacts from Onedrive backup of Winphone to your Android device totally hassle-free. With Dr.Fone — Phone Transfer, you can transfer files from Windows phone to Android in batch.
![]()
Dr.Fone — Phone Transfer
Transfer Data from Windows Phone to Android in 1 Click!.
- Easily transfer all videos, music, contacts and photos from Windows phone to Android devices.
- Enable to transfer from HTC, Samsung, Nokia, Motorola and more to iPhone X/8/7S/7/6S/6 (Plus)/5s/5c/5/4S/4/3GS.
- Works perfectly with Apple, Samsung, HTC, LG, Sony, Google, HUAWEI, Motorola, ZTE, Nokia and more smartphones and tablets.
- Fully compatible with major providers like AT&T, Verizon, Sprint and T-Mobile.
- Fully compatible with iOS 11 and Android 8.0
- Fully compatible with Windows 10 and Mac 10.13.


Steps about how to transfer data from Windows phone to Android device with Dr.Fone
Step 1. Launch Winphone to Android Transfer
Open the Dr.Fone on your computer and click on the “Phone Transfer” option.
Step 2. Connect Windows Phone and Android
Use USB cables to connect both your Android device and windows device to your computer. On connecting both devices, click the “Flip” button on the program in order to switch the destination and source phones.
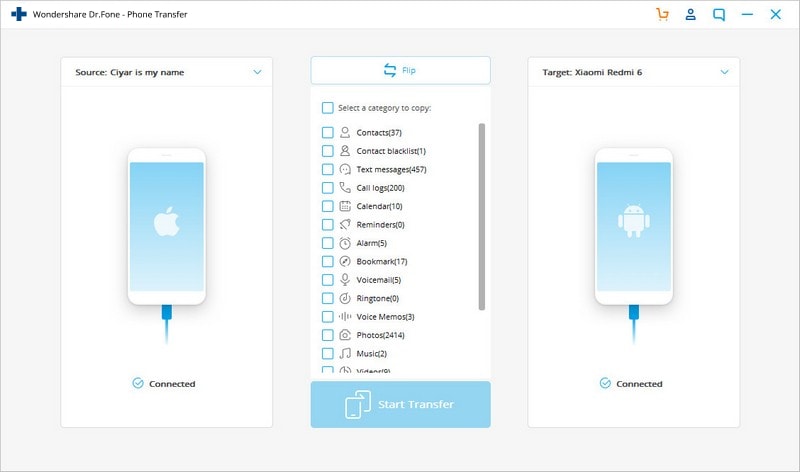
At this point, you will have to select the desired files to transfer by ensuring the box beside the file types is checked. You also have the choice of clearing the data in the destination phone if desired.
Note: Transferring contacts from windows phone to Android device will require you to backup contact to you Onedrive first while Dr.Fone — Phone Transfer helps you restore it to your Android device.
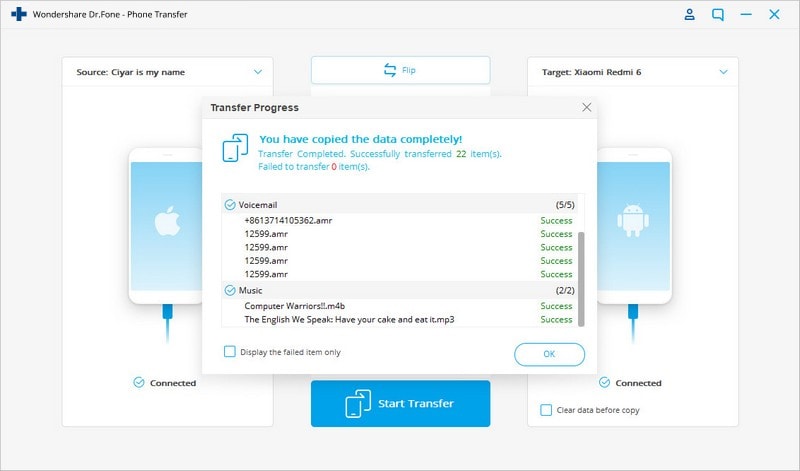
Step 3. Transfer from Windows Phone to Android
Click “Start Transfer” to start transferring. Ensure both phones stay connected during the transfer process.
Solution 2. Transfer data from Windows phone to Android device with computer
When it comes to transferring contacts, documents, audio video files and other data from Windows phone to Android devices, connecting both devices to your PC for data transferring is the most preferred Solution.
All that you need to do is to connect both devices to your computer or laptop with the help of data cables. Open each folder one by one, and simply copy-paste the content from windows phone folders to Android device folders.
Pros and cons of this way
This is the simplest method to transfer content from one device to the other. There is no need for an internet connection. Files are transferred within just few seconds.
The negative aspect is perhaps the fact that files and folders are transferred in their existing format. So, some videos, images, and files that you open in your Windows phone might not be compatible with Android device and may not even open after transferring. Same is the problem with transferring phone contacts, as every handset stores contacts in a different format. This method cannot be used to transfer text messages from one device to another.
Solution 3. Transfer content from Windows Phone to Android with OneDrive
Microsoft’s smart phone operating system may not be as popular as Android or iOS. But, some of Microsoft’s apps are impressive for sure! Microsoft’s OneDrive app is one of those apps that can really prove to be helpful for transferring data from one device to the other. The app supports Windows, iOS and Android devices. With OneDrive, you can transfer Windows Phone files to Android as well. Check the detailed steps below.
![]()
First step is to download OneDrive app in both devices. After downloading, the app will prompt you to sign in using your Microsoft account.
![]()
Once you sign-in using your outlook username and password, the app will open its home page and display your existing content that you have stored in OneDrive.
![]()
Now, open the same app in your windows phone and click on upload icon.
![]()
Click on «Upload files» Solution if you wish to upload documents, audio files, and other supported formats. If you wish to upload videos and photos from your device, just choose the dedicated Solution.
The app will display all the folders and sub-folders from your Windows phone. Open the folder one by one and choose the content that you wish to transfer in your new phone.
![]()
Once you select the concerned files, just click on «upload». The app will start uploading all the selected content on OneDrive server.
![]()
After uploading all the necessary content from Windows phone on OneDrive, open the OneDrive app on your Android device.
Select the content that you wish to sync with your Android phone and simply download the same.
![]()
This Solution is suitable for people who travel in various countries around the world and change their cell phone several times. As all the important content remains stored on OneDrive, users can retrieve it any time and from anywhere. All that they need is an Android, Windows, or iOS handset that supports the OneDrive app.
Pros and cons of this way
As mentioned earlier, this Solution is best suitable for people who wish to transfer contacts, documents, and files without using PC. Several people use this method to transfer their content from one phone to another while on the go. Images, documents and videos can be viewed with the help of OneDrive app, and can be downloaded in compatible format.
Now the drawback! You need an active internet connection in your Windows and Android device, most preferably, Wi-Fi. Transferring data may take considerable time, as files are first transferred to OneDrive, and then, from OneDrive to your Android device.
Unfortunately, this app cannot help in transferring contacts or text messages from one phone to another.
Solution 4. Transfer contacts with Outlook and Gmail
Follow the steps below to transfer contacts from Windows phone to Android phone:
In-order to transfer contacts from Windows phone to Android device, sync your contacts from Windows phone with Outlook. Then, sign-in to your Outlook account from desktop PC or tablet, and click on «People» Solution from the drop down menu.
![]()
In the next screen, click on «Manage» and select «Export for Outlook and other service» from drop down menu.
![]()
Once you click on that Solution, Outlook will automatically download contacts on your device in the form of .CSV file.
![]()
Now, open Gmail, and click on Gmail’s contact Solution.
![]()
The next screen will show you several Solutions, and you need to select «import.»
![]()
Once the pop-up window appears, click on choose file Solution, and select the Outlook contacts CSV file that you downloaded from Outlook. Then, simply click on import.
![]()
Within few seconds, Gmail will sync all the contacts from the Outlook’s file and merge them with your existing contacts on Google. Start your Android device, and simply sync Google’s contacts with your phone’s contacts. That’s it! This is perhaps the best way to transfer contacts from Windows phone to Android device, and that too, free of cost.


