- Move and copy files in Terminal on Mac
- Move a file or folder locally
- Copy a file or folder locally
- Copy a file or folder remotely
- Move and copy files in Terminal on Mac
- Move a file or folder locally
- Copy a file or folder locally
- Copy a file or folder remotely
- Question: Q: using Terminal to copy files from external usb drive to another external hdd
- Helpful answers
- How to Find the Path of a File on Mac OS X
- 1. Copy File Path from Mac Context Menu
- 2. Find File Paths via Get Info Option
- 3. Copy File Path via Go to Folder
- 4. Find the Path of a File in Mac Terminal
- 5. Create ‘Copy Path’ Service in Automator
Move and copy files in Terminal on Mac
In Terminal, you can move and copy files locally or remotely using the mv , cp and scp command-line tools.
Tip: It’s easier to move and copy files using the Finder. See Organise files in folders.
Move a file or folder locally
In the Terminal app  on your Mac, use the mv command to move files or folders from one location to another on the same computer. The mv command moves the file or folder from its old location and puts it in the new location.
For example, to move a file from your Downloads folder to a Work folder in your Documents folder:
You can also change the name of the file as it’s moved:
Copy a file or folder locally
In the Terminal app on your Mac, use the cp command to make a copy of a file.
For example, to copy a folder named Expenses in your Documents folder to another volume named Data:
The -R flag causes cp to copy the folder and its contents. Note that the folder name does not end with a slash, which would change how cp copies the folder.
Copy a file or folder remotely
In the Terminal app on your Mac, use the scp command to copy a file or folder to or from a remote computer.
scp uses the same underlying protocols as ssh .
For example, to copy a compressed file from your home folder to another user’s home folder on a remote server:
You’re prompted for the user’s password.
The -E flag preserves extended attributes, resource forks and ACL information.
The -r flag, which isn’t used in this example, causes scp to copy a folder and its contents.
Источник
Move and copy files in Terminal on Mac
In Terminal, you can move and copy files locally or remotely using the mv , cp , and scp command-line tools.
Tip: It’s easier to move and copy files using the Finder. See Organize files in folders.
Move a file or folder locally
In the Terminal app  on your Mac, use the mv command to move files or folders from one location to another on the same computer. The mv command moves the file or folder from its old location and puts it in the new location.
For example, to move a file from your Downloads folder to a Work folder in your Documents folder:
You can also change the name of the file as it’s moved:
Copy a file or folder locally
In the Terminal app on your Mac, use the cp command to make a copy of a file.
For example, to copy a folder named Expenses in your Documents folder to another volume named Data:
The -R flag causes cp to copy the folder and its contents. Note that the folder name does not end with a slash, which would change how cp copies the folder.
Copy a file or folder remotely
In the Terminal app on your Mac, use the scp command to copy a file or folder to or from a remote computer.
scp uses the same underlying protocols as ssh .
For example, to copy a compressed file from your home folder to another user’s home folder on a remote server:
You’re prompted for the user’s password.
The -E flag preserves extended attributes, resource forks, and ACL information.
The -r flag, which isn’t used in this example, causes scp to copy a folder and its contents.
Источник
Question: Q: using Terminal to copy files from external usb drive to another external hdd
New to using Terminal so be gentle. I keep my lightroom catalog on a little external thumbdrive on my macair. Now the thumbdrive does not appear in the Finder but it is present in Disk Utility and in Terminal. So I want to copy my lightroom catalog as well as the few photos saved to this thumbdrive to another external hd so I can attempt to reformat this drive, which may solve the Finder issue.
My question is, I am very new to Terminal and all I know is that I want to COPY the files not MOVE the files. I don’t know how to properly write the command lines to tell Terminal where my Directories are and where I want to send them (so i don’t know how to indicate paths) and i don’t know the proper Terminal to execute a Copy Directory.
MacBook Air, iOS 10.1.1
Posted on Jan 5, 2017 4:10 AM
Helpful answers
Restore will not erase the Source. It will erase the destination. I’m not sure where you got that idea from.
I gave you one Finder option which will work if the drive is visible in Terminal. The rest are just other GUI options
cp -R source_dir target_directory
Don’t put a trailing / on source_dir so it will copy that folder also.
That’s the best I can offer since you didn’t give the rest of the information.
Now, not knowing anything about a Lightroom catalog structure, there may be other options required in the copy command to pull it over correctly. If the catalog contains hard links, then you can’t use copy.
Jan 5, 2017 5:40 AM
The paths in Terminal should be
in each case. If there is a space in a name it should be preceded by a backslash — \
If you have more than directory at root level you could presumably just leave that bit off. You mentioned in your first post that you wanted to format the thumb drive — you are aware that this will erase its contents?
Jan 5, 2017 6:36 AM
There’s more to the conversation
Loading page content
Page content loaded
Before going into Terminal, in the Finder look at menu Finder>Preferences; select ‘Sidebar’ and under ‘Devices’ make sure ‘External Disks’ are checked. Then open a Finder window and see if your thumb drive appears in the sidebar.
Jan 5, 2017 4:13 AM
everything is checked, the other external drive i’m trying to transfer to appears in Finder.
Jan 5, 2017 4:18 AM
Open Terminal and type man cp . You will need to keep hitting the return key to see more of the article. It looks as if cp -R may be the instruction you need but read the manual to check.
Jan 5, 2017 4:27 AM
man cp is tmi for someone who only ever used Terminal to disable Apple Photos from launching and I only did that by literally copying and pasting code. Which is what I’m looking for here.
Jan 5, 2017 4:41 AM
In Disk Utility make sure the drive is mounted. You may also want to verify the drive. If you can get it mounted and displayed I would just use Finder to copy the files. Dragging from one drive to another copies files, not move.
Jan 5, 2017 4:47 AM
He says that the drive doesn’t appear in the Finder, though it does in Disk Utility and Terminal, thus making simple drag and drop impossible.
loosecaboose — have you tried ‘Repair disk’ in Disk Utility?
Jan 5, 2017 4:50 AM
i’m looking for a solution using Terminal. OS X ie Finder is not an option and Disk Utility repair says there is nothing wrong with the drive and I see the data is on the drive. I need lines of code in Terminal to pull the data off the drive and transfer it to another drive so I can reformat my drive.
Jan 5, 2017 4:57 AM
man cp is tmi for someone who only ever used Terminal to disable Apple Photos from launching and I only did that by literally copying and pasting code. Which is what I’m looking for here.
Use another GUI tool to copy the disk, then. If it shows in Disk Utility and is accessible in Terminal, there is no reason short of some setting that is preventing it from showing in the Finder (Go Computer, perhaps).
Carbon Copy Cloner or SuperDuper would likely be able to see it if it is mounted.
Or, use the Restore function in Disk Utility to copy one to the other. Select the empty drive in Disk Utility and click the Restore button. Set the source disk in the popup menu. That will completely replace the contents of the destination drive with the contents of the source drive. The destination would have to be at least as big as the source.
If you only know how to copy and paste «some code,» then you will likely end up wiping out your drive instead of copying it. Then, you’d just blame us.
We’d have to know the name of each of the volumes as shown in /Volumes to provide the necessary code for you to copy and paste.
Источник
How to Find the Path of a File on Mac OS X
File path is the address or location of a file or folder in a computer’s file system. If you are a Mac user, you may need the full path of a file or folder at times. While it’s easy to find the path of a file in the Mac terminal using drag and drop, there are some more ways to copy the path of a file or folder on Mac OS X Mountain Lion and macOS Catalina and Mojave. You can paste the file path on Mac using Command +V.
I already wrote a detailed tutorial describing 7 ways to find the path of a file and folder on Windows 10. Below, I’ll be describing 5 ways to find a file path on Mac. The copied full path of a file will look as shown below:
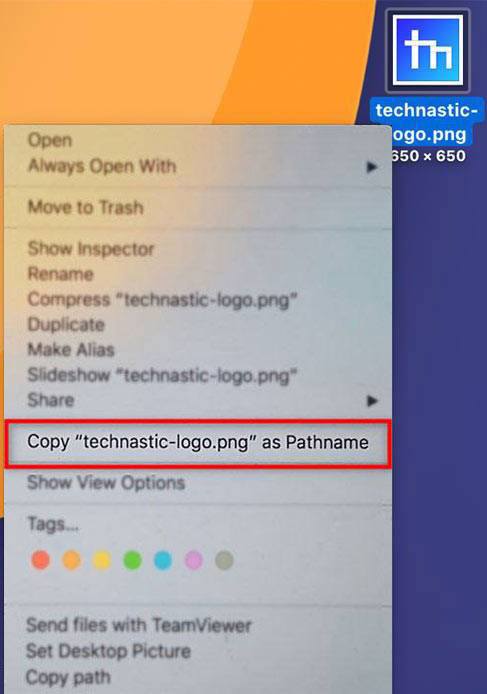
1. Copy File Path from Mac Context Menu
This is probably the easiest way to copy the path of a file or folder on macOS and is very similar to Shift + Right-click keyboard shortcut on Windows. The Copy path option is hidden by default
- Select a file or folder and perform a right-click.
- When the context menu pops up, press and hold the Option key on the keyboard.
- Copy “file-name” as Pathname option will appear in the context menu. Just click it to copy the full file path to the clipboard.

2. Find File Paths via Get Info Option
Just like the Properties option on Windows, macOS has an option called Get info in the context menu. Using this option, you can see all information related to any file on your Macintosh computer such as file name, file type, file size, location, and so on.
- Right-click on a file or folder and click the Get info option in the context menu.
- The infobox will pop-up.
- Check the Where label and you will find the path of the file as shown below. You can highlight the path of the file and copy it.
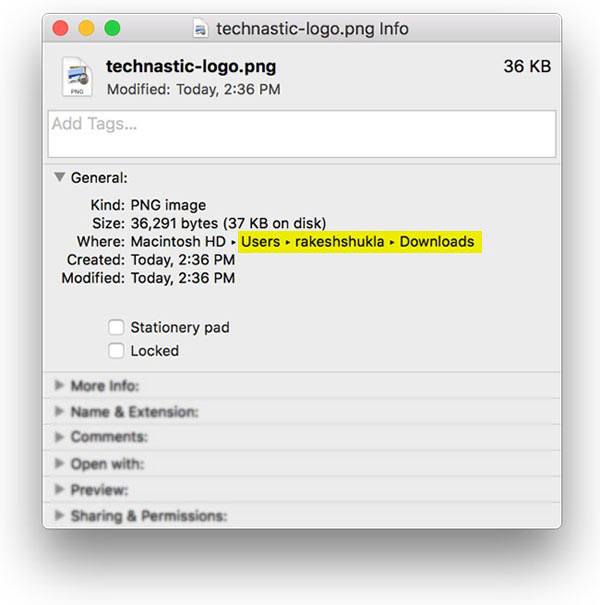
Use this method only if you just want to know the location of a file or folder. You can copy the path of the file but can’t use it in the Terminal or a file upload dialog box.
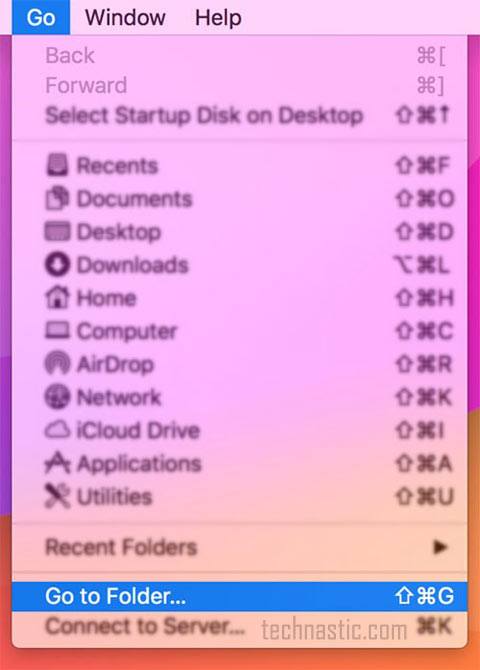
3. Copy File Path via Go to Folder
There is yet another easy way using which you can find and copy the file path on your Mac.
- While in Finder, click on the Go option on the taskbar of your Mac.
- Select Go to Folder option.
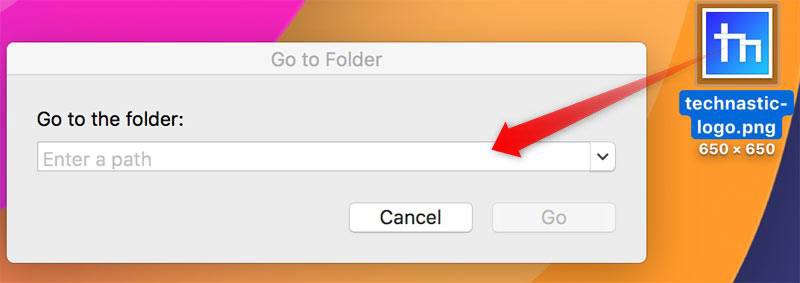
- You’ll see a new pop-up window named Go to Folder.
- Now, you need to drag the file or folder you want to copy the full path of and drag it into the input field that says Enter a path.
- You should now see the full file path in the Go to Folder dialog box.
- Just press Command + C to copy the path of the file to the clipboard. You can now paste the full path of the file anywhere you want.


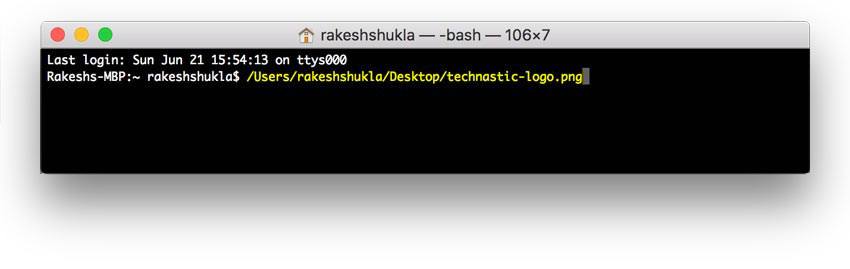
4. Find the Path of a File in Mac Terminal
Mac Terminal is generally used to execute commands but you can also use to find the path of a file on macOS. Follow these steps to find a file path using the Terminal app on Mac. This method is useful especially if you need to type the full path of a file in a command line.
- Navigate to Finder > Go > Utilities. Utilities» width=»800″ height=»586″ data-lazy-srcset=»https://technastic.com/wp-content/uploads/2020/02/go-utilities-macos.jpg 800w, https://technastic.com/wp-content/uploads/2020/02/go-utilities-macos-300×220.jpg 300w, https://technastic.com/wp-content/uploads/2020/02/go-utilities-macos-768×563.jpg 768w» data-lazy-sizes=»(max-width: 800px) 100vw, 800px» data-lazy-src=»https://technastic.com/wp-content/uploads/2020/02/go-utilities-macos.jpg»>
- Launch the Terminal app.
- Now, drag the file or folder you want the find the path of and drop it in the Terminal window.
- It’ll instantly show you the full path of the file. If the file is located on the desktop, it will show the desktop path. Similarly, if the file is in the Downloads folder, it will show the download folder path in the Terminal.
- Just highlight the file path and copy it to the clipboard. The path of the file is ready to be pasted wherever you want.
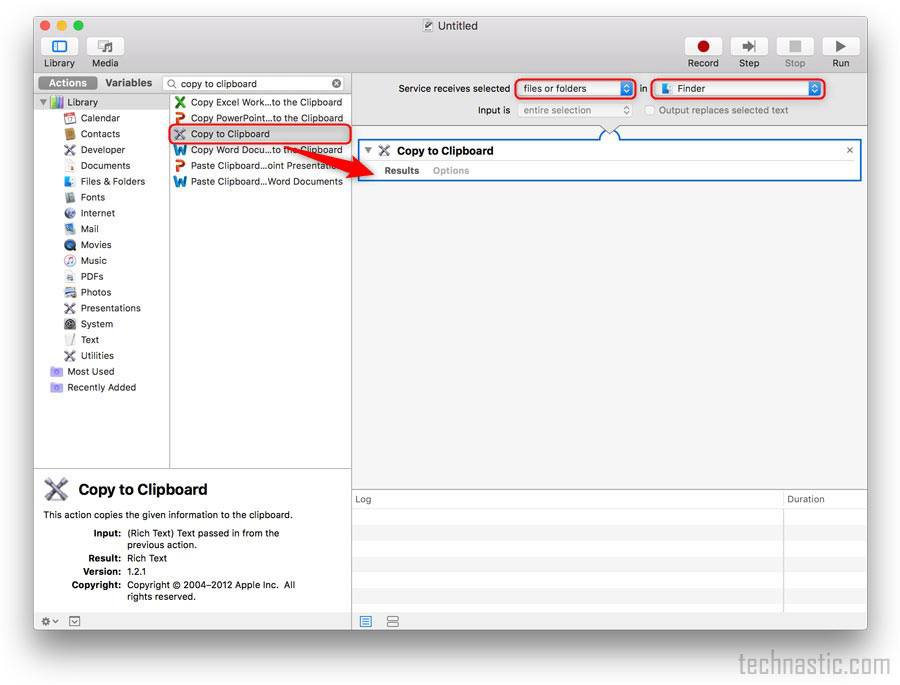
5. Create ‘Copy Path’ Service in Automator
This method requires a little effort on your part because you need to create an Automator service using Copy to clipboard feature on macOS. Once you have created the service, you’ll have a Copy path option in the context menu for all files and folders. As this option will be permanently available in Mac’s context menu, it’ll really prove very handy if you need to copy the file path on your Mac frequently.
The trick described below might sound a bit geeky to you but believe me you can create the Copy path service easily using my detailed steps.
- Launch the Automator app on your Mac. If you don’t know where to find it, try one of the methods described below and double-click the app icon to launch it.
- Click on the File tab in the Finder screen and type “Automator” in the search bar.
- Click on Go > Utilities and search for Automator.
- Launch Finder and look for Automator under Applications.
- On the next screen, select Service and click on Choose to create a new service.
- In the search input box, type “Copy to Clipboard”.
- Drag Copy to Clipboard into that into the right pane of the window.
- Now, configure the 2 options under Service receives selected as files or folders and Finder as shown below.
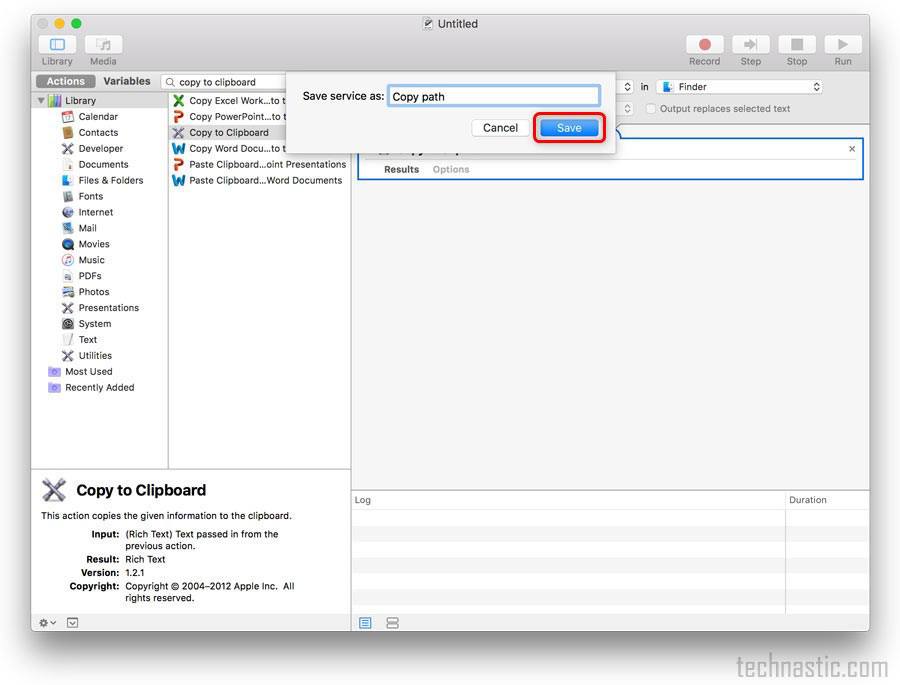
- Finally, click on File > Save and save your newly created service as “Copy path” or “Copy path to clipboard“.


Now select any file or folder in Finder and perform a right-click. You’ll see a new item called Copy path in the context menu. Clicking this option will copy the full path of a file to the clipboard.

If you use any of the methods listed above, you won’t need to type the desktop path or the download folder path of a file manually. In place using the Terminal app to find the path of a file, it’s better to create the Copy path service so that the option is always available in the context menu itself.
Источник


