- Powershell SCP to Transfer files between Windows and Linux
- Download files from remote server Using Get-SCPFile :
- Download Folder from remote server Using Get-SCPFolder :
- Upload File to the remote server:
- Upload file by Set-SCPFile :
- Upload file by Set-SCPItem :
- Upload Folder to remote server Using Set-SCPItem :
- Copy files between Linux and Windows
- Contents
- You are on a Linux host
- You want to access a Windows drive
- troubleshooting
- You want to share a folder
- You are on a Windows host
- You want to access a Linux drive
- You want to share a folder
- Копирование файлов scp
- Что такое SCP?
- Копирование файлов scp
- Выводы
Powershell SCP to Transfer files between Windows and Linux
This Blog will show detailed information about SCP, Installation of SCP on Powershell (Windows host), practical demos to use SCP by transferring data between windows Powershell and a Linux host, etc.
What is SCP?
SCP for Secure Copy Protocol. SCP can be used to securely transfer files between local and remote hosts. We can consider it similar to a secured FTP. By default, SCP runs on Port 22. The SCP client can upload files to the SSH server or request files and folders for downloading.
About the module: Posh-SSH
It is a windows Powershell module that uses a custom version of the SSH.NET Library to provide SSH functionality in windows Powershell. It provides functionality for automating SSH, SFTP and SCP actions. It supports public key, password and keyboard-interactive methods for authentication. It supports RSA and DSA private key mechanism. We can also use SOCKS4, SOCKS5 and HTTP Proxy methods. Remote, dynamic and local port forwarding can be done by SCP.
The main purpose of the module is to facilitate automating actions against one or multiple SSH enabled servers. This module is more useful to red teamers to transfer the data between hosts using Powershell.
Note: This module is for Windows PowerShell 3.0 or above. It is compiled for .NET Framework 4.5.
By default, SCP Functionality is not installed as Powershell cmdlets.
Now to use it, we have two options:
1. Install the SCP module by the following command :
2. Download the module from Github repository and include it at runtime directly in Powershell, Then use it directly.
Here we gonna use this method. So let’s start.
Download Posh-SSH form Github Repository: https://github.com/darkoperator/Posh-SSH
Navigate Powershell to the directory : \Posh-SSH-master\Release\
Import Posh-SSH module by using the following command:

After including the module, we can use all the functionality provided by Posh-SSH :
- Get-SCPFile – Download files from remote servers.
- Get-SCPFolder – Download the Entire folder from remote server.
- Get-SCPItem – Download both files or folders from the remote servers.
- Set-SCPFile – Upload files into remote servers.
- Set-SCPFolder – Upload the Entire folder into the remote server.
- Set-SCPItem – Can upload both files or folders to the remote servers.
And many more included Documentation of the repository.
Before using this module on Powershell, let’s confirm that SSH service is running on remote host. Use command service ssh status to confirm.

If SSH is not running then start the SSH service on the remote host using the command :
Now to use the SCP Functionality with the Posh-SSH module, we need to supply username and password as PSCredential to Powershell for authentication of the remote host. Run the following command :

Supply the credentials of the remote host and click OK. It will store credentials in a Powershell variable that we can use further directly.
Download files from remote server Using Get-SCPFile :
Use the following command:

- ComputerName – Remote Host IP address
- Credential – Credentials variable
- RemoteFile – Remote file path which we want to download
- LocalFile – Local file path and name to store the downloaded file on the local machine.
Download Folder from remote server Using Get-SCPFolder :
Use the following command:

- ComputerName – Remote Host IP address
- Credential – Credentials variable
- RemoteFile – Remote directory path which we want to download
- LocalFile – Local directory path and name to store downloaded content of a directory on the local machine.
Here we can also use Get-SCPItem module. Get-SCPItem module can be used to download anything from the remote server, it can be files or directory. It is a general-purpose module to download the data from the server.
Upload File to the remote server:
The file can be uploaded on the remote host using two SCP methods
Upload file by Set-SCPFile :
Use the following command:

- ComputerName – Remote Host IP address
- Credential – Credentials variable
- RemotePath – Remote directory path where we want to upload the file.
- LocalFile – Local file path and name which is to be uploaded on the server.
Now, We can confirm on Linux host that the file is uploaded successfully,

Upload file by Set-SCPItem :
Use the following command:

- ComputerName – Remote Host IP address
- Credential – Credentials variable
- Destination – Remote directory path where we want to upload the file.
- Path – Local file path and name which is to be uploaded on the server.
Confirm on Linux host that the file is uploaded successfully,

Upload Folder to remote server Using Set-SCPItem :
Set-SCPItem module can be used to upload both files and folders on remote server. It is very useful to transfer content because it is a general-purpose module.
Use the following command:

- ComputerName – Remote Host IP address
- Credential – Credentials variable
- Destination – Remote directory path where we want to upload the folder.
- Path – Local directory path and name which is to be uploaded on the server. Here, don’t forget to use “\*” at the end otherwise, it will generate an error.
Confirm on Linux host that the directory content is uploaded successfully,

So, here the content of local folder “evil” is copied to the remote folder “ /home/jj/test/ “.
Note: To upload folders on remote host another command “Set-SCPFolder” can be used, but it will generate the following error when I am trying to use it.
Error: Set-SCPFolder : scp: error: unexpected filename: .
So, Set-SCPItem is the best module to copy contents to remote hosts because It can upload both files and folders.
There are many more modules of SCP available in Posh-SSH library. We can do many things using this. So go through all the modules included once, to make wider your knowledge.
Источник
Copy files between Linux and Windows
This describes how to copy files over the network between a computer (or virtual machine) running Windows and another computer (or virtual machine) running Linux.
There is also an article how to access a Linux partition when running Windows and how to access a Windows partition when running Linux. You may need this if your computer is running only one operating system and having two hard disk partitions.
Contents
You are on a Linux host
You want to access a Windows drive
So you are on a Linux computer and want to access a Windows drive over the network. This explains how. In this example we assume winhost is your Windows computer’s hostname (you can check the hostname by right clicking on My Computer and selecting Properties). Go to the Windows computer and open the Explorer. Share a folder by right-clicking onto it and selecting «Sharing and security». Call it «share1». Then, on your Linux computer,
- Open up your favorite file explorer, perhaps Konqueror or Nautilus
- In the address bar, type smb://winhost/share1
- You should now see the files and folders in that share. Double-click on them to open them up and view them.
troubleshooting
If that doesn’t work, then you may need to do something more complicated.
- install the samba client software
- try to find the share:
- If you see the share, mount it like this:
- after the next reboot, your mount will be lost. To make it persistant, add the following line to your /etc/fstab:
You want to share a folder
So you are on a Linux computer and want to share a folder so that also Windows machines can access it over the network. To do this, you run the SAMBA service on your computer. To enable sharing to Windows machines, right click on a folder in Nautilus; the menu should have an item called «Sharing Options». Click it and pick the name for your share. If you don’t have Windows folder sharing enabled yet, Nautilus will ask you for a password and install the service, after which you will need to log out and back in. The share should now be available on the Windows computer.
You are on a Windows host
You want to access a Linux drive
Use WinSCP. Choose the SFTP protocol; the login and password are the same as those you use when logging in locally. If it does not work, look at your Linux computer: Try to shut down your firewall and install the openssh service.
You want to share a folder
You can share files with Linux using normal Windows sharing mechanisms. The Linux host will be able to access these files using samba.
Источник
Копирование файлов scp
Если у вас есть домашний сервер или сервер в интернете, то вам понадобится способ для безопасного перемещения файлов между машинами. Между локальными машинами мы могли бы просто переносить данные с помощью флешки, но на удаленный сервер нужно передавать данные только через сеть. Есть много способов реализации этой задачи.
В этой статье мы рассмотрим как выполняется копирование файлов с помощью утилиты scp (Secure Copy Command), а также что из себя представляет команда Linux scp. При передаче файлы шифруются, так что больше никто не сможет получить к ним доступ и самое интересное, что вам не нужно настраивать FTP или другое дополнительное программное обеспечение. Будет достаточно сервера SSH.
Что такое SCP?
Команда scp — это утилита, которая работает по протоколу SSH, а значит, все что вам нужно для передачи файла на компьютер, это чтобы на нем был запущен SSH сервер, а также вы должны знать логин и пароль для подключения к нему. С помощью команды scp вы можете не только перемещать файлы между локальной и удаленной системой, но и между двумя удаленными системами. Для этого тоже будет достаточно знать пароли от них. И в отличие от Rsync вам не нужно авторизоваться на одном из серверов.
Копирование файлов scp
Эта статья рассчитана в первую очередь на начинающих, поэтому я попытаюсь объяснять все как можно подробнее. Перед тем, как мы перейдем к практике, нужно рассмотреть общий синтаксис команды:
$ scp опции пользователь1@хост1 : файл пользователь2@хост2: файл
Опции утилиты больше касаются протокола SSH и настраивают общее ее поведение. Дальше следует адрес первого и второго файла. Каждый из них может быть расположен как на локальной, так и на удаленной машине. А теперь рассмотрим основные опции, которые могут нам понадобиться:
- -1 — использовать протокол SSH1;
- -2 — использовать протокол SSH2;
- -B — пакетный режим для передачи нескольких файлов;
- -C — включить сжатие;
- — l — установить ограничение скорости в кбит/сек;
- -o — задать нужную опцию SSH;
- -p — сохранять время модификации;
- -r — рекурсивное копирование директорий;
- -v — более подробный режим.
scp /home/sergiy/file root@losst.ru:/root/
В качестве пользователя нужно использовать любого пользователя, который есть на сервере. Вместо IP вы можете также домен сервера. Только необходимо, чтобы у выбранного пользователя были права записи в указанную папку.
С помощью опции -r вы можете скопировать на удаленную машину целый каталог. Команда будет выглядеть вот так:
scp -r /home/sergiy/photos root@losst.ru:/root/
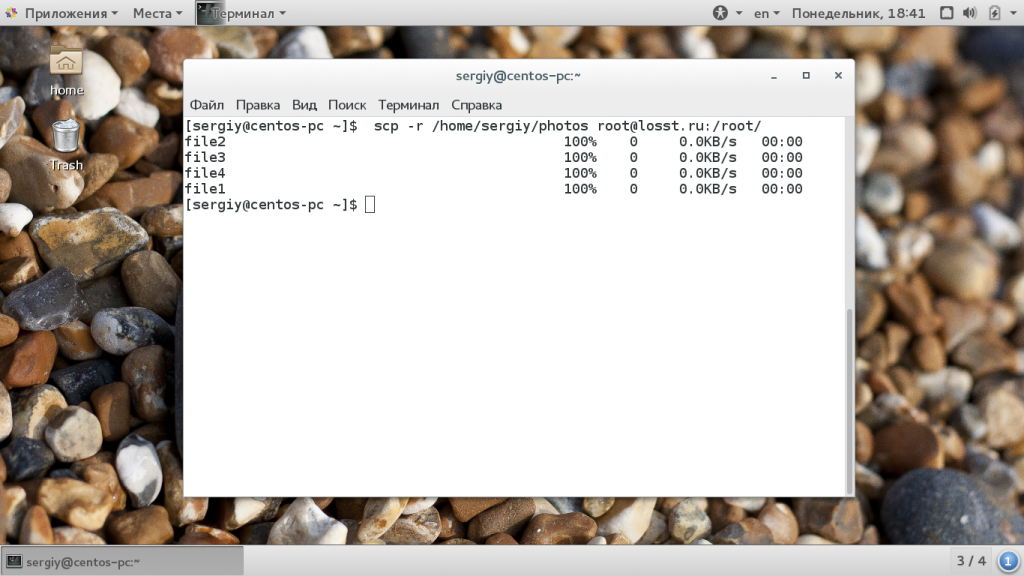
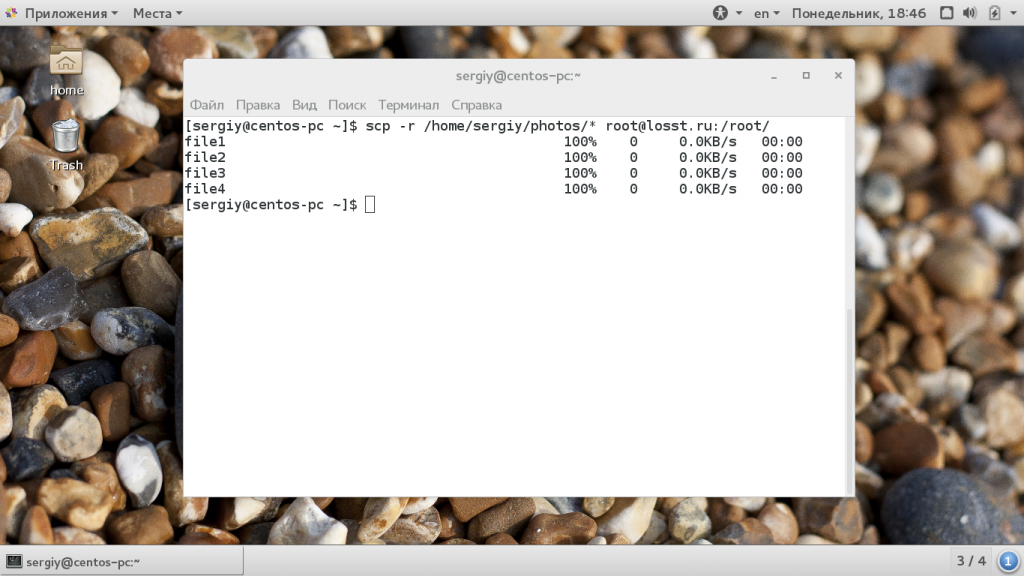
Убедитесь, что у исходного каталога нет косой черты, а у каталога назначения она должна обязательно быть. Немного изменив синтаксис с косой чертой можно передать все файлы из каталога на удаленный сервер:
scp -r /home/sergiy/photos/* root@losst.ru:/root/
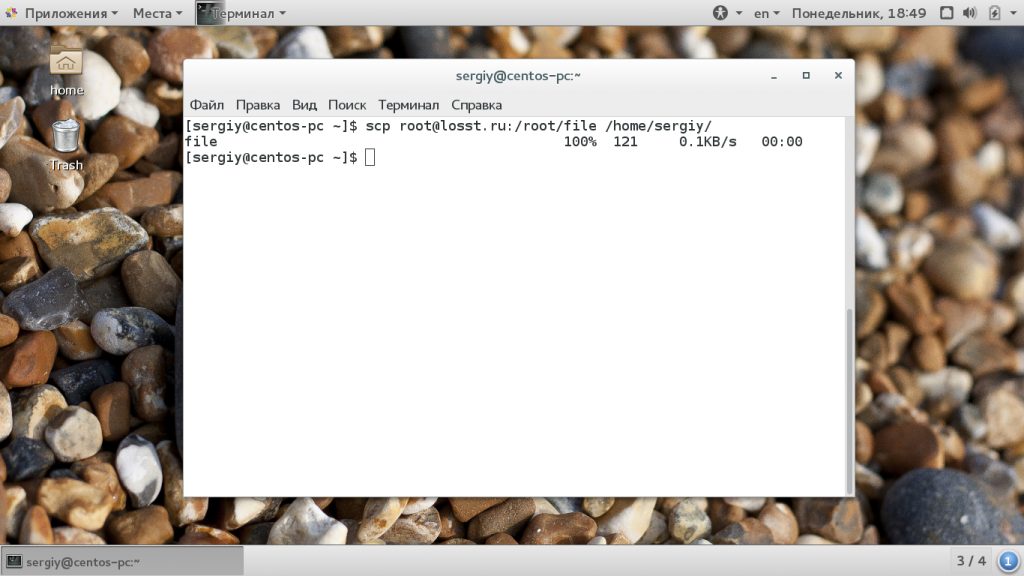
Если поменять местами локальный путь и сервер, то вы сможете копировать файлы scp c удаленного сервера на локальный компьютер:
scp root@losst.ru:/root/file /home/sergiy/
Таким же самым образом вы можете копирование файлов scp или папок с сервера:
scp -r root@losst.ru:/root/photos /home/sergiy/

Обратите внимание, что папка, в которую вы собираетесь копировать должна завершаться косой чертой, иначе папка, которую вы копируете запишется вместо той, в которую нужно скопировать.
Чтобы скачать файл scp из одного сервера на другой, просто необходимо указать данные аутентификации на каждом из них. Например, скопируем один файл:
scp root@losst.ru:/home/root/index.html root@losst.ru:/home/root/www/
Скопируем папку с того же удаленного сервера:
scp root@losst.ru:/root/photos root@losst.ru:/home/root/www/
Выводы
В этой статье мы рассмотрели как выполняется передача файлов scp, как это работает и что вы можете сделать с помощью этой утилиты. Как вы видите, перемещать файлы с одного сервера на другой очень просто. В Linux достаточно понять основы чтобы начать работать эффективнее! А команда scp один из таких инструментов.
Источник


