- CopyFileW function (winbase.h)
- Syntax
- Parameters
- Return value
- Remarks
- Examples
- Windows copy command syntax and examples
- Copy the contents of a file to another file
- Copy file to another directory
- Copy files with white space in name
- Copy multiple files
- Use of environment variables
- OpenedFilesView
- О программе
- Что нового
- Системные требования
- Полезные ссылки
- Подробное описание
- Copy-Item копирование файлов и папок из PowerShell
- Копирование файлов и каталогов
- Копирование с заменой и копирование с заменой read-only файлов
- Копирование с фильтрацией по шаблону
- Исключение файлов при копировании
- Копирование файлов на удаленный компьютер по сети
- Ключ PassThru
- Ключ Verbose
- Несколько полезных скриптов с Copy-Item
CopyFileW function (winbase.h)
Copies an existing file to a new file.
The CopyFileEx function provides two additional capabilities. CopyFileEx can call a specified callback function each time a portion of the copy operation is completed, and CopyFileEx can be canceled during the copy operation.
To perform this operation as a transacted operation, use the CopyFileTransacted function.
Syntax
Parameters
The name of an existing file.
In the ANSI version of this function, the name is limited to MAX_PATH characters. To extend this limit to 32,767 wide characters, call the Unicode version of the function and prepend «\?» to the path. For more information, see Naming a File.
The name of the new file.
In the ANSI version of this function, the name is limited to MAX_PATH characters. To extend this limit to 32,767 wide characters, call the Unicode version of the function and prepend «\?» to the path. For more information, see Naming a File.
If this parameter is TRUE and the new file specified by lpNewFileName already exists, the function fails. If this parameter is FALSE and the new file already exists, the function overwrites the existing file and succeeds.
Return value
If the function succeeds, the return value is nonzero.
If the function fails, the return value is zero. To get extended error information, call GetLastError.
Remarks
The security resource properties (ATTRIBUTE_SECURITY_INFORMATION) for the existing file are copied to the new file.
WindowsВ 7, Windows ServerВ 2008В R2, Windows ServerВ 2008, WindowsВ Vista, Windows ServerВ 2003 and WindowsВ XP:В В Security resource properties for the existing file are not copied to the new file until WindowsВ 8 and Windows ServerВ 2012.
File attributes for the existing file are copied to the new file. For example, if an existing file has the FILE_ATTRIBUTE_READONLY file attribute, a copy created through a call to CopyFile will also have the FILE_ATTRIBUTE_READONLY file attribute. For more information, see Retrieving and Changing File Attributes.
This function fails with ERROR_ACCESS_DENIED if the destination file already exists and has the FILE_ATTRIBUTE_HIDDEN or FILE_ATTRIBUTE_READONLY attribute set.
When CopyFile is used to copy an encrypted file, it attempts to encrypt the destination file with the keys used in the encryption of the source file. If this cannot be done, this function attempts to encrypt the destination file with default keys. If neither of these methods can be done, CopyFile fails with an ERROR_ENCRYPTION_FAILED error code.
Symbolic link behavior—If the source file is a symbolic link, the actual file copied is the target of the symbolic link.
If the destination file already exists and is a symbolic link, the target of the symbolic link is overwritten by the source file.
In WindowsВ 8 and Windows ServerВ 2012, this function is supported by the following technologies.
| Technology | Supported |
|---|---|
| Server Message Block (SMB) 3.0 protocol | Yes |
| SMB 3.0 Transparent Failover (TFO) | Yes |
| SMB 3.0 with Scale-out File Shares (SO) | Yes |
| Cluster Shared Volume File System (CsvFS) | Yes |
| Resilient File System (ReFS) | Yes |
В
Examples
The winbase.h header defines CopyFile as an alias which automatically selects the ANSI or Unicode version of this function based on the definition of the UNICODE preprocessor constant. Mixing usage of the encoding-neutral alias with code that not encoding-neutral can lead to mismatches that result in compilation or runtime errors. For more information, see Conventions for Function Prototypes.
Windows copy command syntax and examples
Using copy command, we can copy files from one directory to another directory. This command is similar to the Linux cp command, but it does not match with the full functionality of cp. Windows copy command can be used to copy files only, we can’t copy directories.
The syntax and usecases of copy command are explained below with examples.
Copy the contents of a file to another file
Example: To copy a file from c:\data\file1.doc to D:\backup\file2.doc
If the destination file already exists you will be prompted for confirmation. To suppress this confirmation you can use /Y switch with copy command. This would be useful if you are executing copy command from a batch file.
If the destination file exists, the above command will overwrite the same without asking the user for confirmation.
Copy file to another directory
When we specify a directory path as the destination, the files will be copied with the same name. We can assign a different name by specifying the new name in the destination path. Example is shown below.
To copy the file 1.doc loated at c:\data\documents to the directory c:\data\newdocs
Copy files with white space in name
If the file name has white space within it, we can wrap up the name in double quotes.
Example: To copy file, my resume.doc to another folder
Copy multiple files
We can’t specify multiple file names in copy command. However, we can use wildcards to identify a group of files and then copy all of them in a single command.
For example, to copy all excel files from current folder to another folder F:\backup
To copy all files in current folder to another folder
Use of environment variables
We can use environment variables in the copy command to specify the path of the folders. Like USERPROFILE, SystemRoot, ProgramFiles, TEMP, WINDIR, APPDATA, HOMEPATH.
For example, to copy a file to a user’s documents folder
The above command copies the file to the My Documents folder of the current logged in user.
You may also want to read
Windows «copy» is funny. Type «copy 1 2» and the file «1» will be copied into a new file «2». Now separate them by a plus sign instead of a space (copy 1+2) and you’ll concatenate 1 and 2 and replace the old file «1» with the result of the concatenation!
Yes, we can concatenate two or more files using copy command. You need to separate the list of files using +. You can redirect the resultant data to a new file also.
The above command will not alter the file 1. It creates a new file 3 with the concatenated data of 1 & 2. If no file name is provided it stores the result in the first file.
My Win7 cannot find a copy command, and when i run xcopy, a window flashes and exits.
I have the same problem. If you solved it, could you please explain how?
If you can not find your copy.exe file, you can download it to your windows directory or C:\ Directory depending the setting on your OS you should also be able to copy and run it from system32 or system folder.
how can i combine 2 .exe files and be able to use both after concatenation
I want to copy 2 different files(.exe,.config) from source to destination server of windows.
can you please help me on this command.
Hello i have a problem with my cmd windows 7.when i try to copy a command. Like help > file.pdf. i mean in extension pdf because i have this problem only with .pdf extension but not with .txt.So whe i execute the command. No problem. Then when i go to open the file.pdf ftom user destination the file.pdf doesn’t open say that is corrupted.please do help me .thanks
i have a file contain many lines as sources and another file has the same numbre of lines as destinations. i want to copy first line as source( c:/test/*.txt) to first line in destination ( d:/test2/), secend line ( c:/test/*.pdf) to second line in destination ( E:/test3/)……
Can I use the DOS/Windows “COPY” command in a BAT file to copy a file or a short string of text to computer memory and then paste (Ctrl +V) that string or file into a document?
OpenedFilesView
| Разработчик: | Nir Sofer |
| Лицензия: | Freeware (бесплатно) |
| Версия: | 1.86 |
| Обновлено: | 2018-09-11 |
| Системы: | 10 / 8 / 7 / 2008 / Vista / 2003 / XP x32|x64 |
| Интерфейс: | английский / русский * |
| Рейтинг: |  |
| Ваша оценка: | |
| Категория: | Разблокировка папок и файлов |
| Размер: | 75 KB / 96 KB (x64) |
О программе
Что нового
Новое в версии 1.86
- Исправлена отправка данных в stdout при обнаружении пустой строки (например: OpenedFilesView.exe /scomma «» ).
Системные требования
Полезные ссылки
Подробное описание
OpenedFilesView — утилита, которая особенно полезна для удаления, перемещения и открытия файлов при получении следующих системных уведомлений:
- Невозможно удалить [имя файла]. Источник или файл может использоваться.
- Невозможно удалить [имя файла]. Файл используется другой программой или пользователем. Закройте программы, которые могут использовать файл и попробуйте снова.
Когда Вы получаете подобное сообщение, OpenedFilesView покажет, какой именно процесс заблокировал ваш файл. Завершение связанного процесса приведет к разблокировке файла и решению данной проблемы. Опционально пользователь может освободить файл за счет завершения его дескрипторов. Имейте в виду, что использование данного метода может привести к нестабильной работе программ, используемых файл и системным сбоям.
Copy-Item копирование файлов и папок из PowerShell
PowerShell командлет Copy-Item используется для копирования файлов между локальными, сетевыми каталогами или между компьютерами по сети через WinRM. Командлет Copy-Item предоставляет большое количество опций, которые можно использовать в разных сценариях копирования файлов и каталогов (по своим возможностям этот командлет почти не уступает утилите robocopy). Например:
- перезапись файлов (override)
- фильтрация по имени/шаблону
- исключение по имени/шаблону
- Verbose режим
- Копирование файлов с/на удаленные компьютеры
Начнем с простых примеров использования Copy-Item и будем переходить к более сложным.
Копирование файлов и каталогов
Чтобы скопировать один файл 1.txt из каталога C:\SourceFolder\ в F:\DestFolder\, выполните:
Copy-Item -Path «C:\SourceFolder\1.txt» -Destination «F:\DestFolder\1.txt»
Можно использовать сокращенный синтаксис командлета, пропустив указание параметров Path и Destination:
cpi «C:\SourceFolder\1.txt» «F:\DestFolder\1.txt»
Теперь скопируем каталог C:\SourceFolder\folder в F:\DestFolder\folder. В папке folder находится файл 1.txt. Обратите внимание что без ключа –Recurse, папка folder копируется без содержимого:
Copy-Item -Path «C:\SourceFolder\folder» -Destination «F:\DestFolder\folder» -Recurse
С помощью Copy-Item также можно просто объединить файлы из несколько директорий в одну (слияние директории), для этого нужно перечислить директории в ключе –Path:
Copy-Item -Path «C:\SourceFolder\*», «C:\SourceFolder2\*», «C:\SourceFolder3\*» -Destination «F:\DestFolder\»
Копирование с заменой и копирование с заменой read-only файлов
Copy-Item по умолчанию при копировании заменяет файлы в целевом каталоге. Никаких дополнительных параметров указывать не нужно. При копировании каталога, если нужно заменить каталог в целевой папке, нужно использовать ключ –Force, иначе будет ошибка “Элемент folder с указанным именем уже существует — DirectoryExists”.

Для перезаписи файла с атрибутом read-only, нужно использовать ключ -Force. Если его не использовать, вы получите ошибку “отказано в доступе по пути… CopyFileInfoItemUnauthorizedAccessError”.

Чтобы скопировать файл с перезаписью файла с read-only атрибутом используйте параметр Force.
Copy-Item -Path «C:\SourceFolder\1.txt» -Destination «F:\DestFolder\1.txt» -Force
Чтобы Copy-Item скопировал файлы из одной папки в другую без замены существующих файлов, можно использовать этот простой скрипт
Copy-Item (Join-Path «C:\SourceFolder\» «*») «F:\DestFolder\» -Exclude (Get-ChildItem «F:\DestFolder\») -Recurse
Этот скрипт скопирует все файлы и папки из C:\SourceFolder в F:\DestFolder без замены файлов уже существующих в F:\DestFolder
Копирование с фильтрацией по шаблону
С помощью Copy-Item можно скопировать файлы/директории выбранные с помощью wildcard символа * или с помощью символа ?. Также поддерживаются некоторые регулярные выражения
- * — обозначает любое количество любых символов
- ? – обозначает 1 любой символ
- [a-z], [0-9] – символы между a-z и цифры между 0 и 9
Для примера возьмём такую структуру файлов:
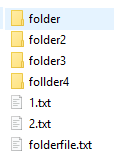
Выполним копирование командой:
Copy-Item -Path «C:\SourceFolder\fol*» -Destination «F:\DestFolder\»
Результат в F:\DestFolder\
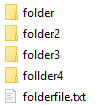
Теперь чистим папку назначения и выполняем:
Copy-Item -Path «C:\SourceFolder\folder2» -Destination «F:\DestFolder\»

Папка без цифры в окончании не скопировалась, потому что folder3 подразумевает что после folder будет как минимум еще 1 символ между 0 и 3
Исключение файлов при копировании
С помощью ключа –Exclude можно исключить файлы при копировании. Например, следующай команда скопирует все файлы кроме файлов с расширением txt.
Copy-Item -Path «C:\SourceFolder\*» -Destination «F:\DestFolder\» -Recurse -Force -Exclude «*.txt»
Аналогичным же образом можно применить ключ –Include, например
Copy-Item -Path «C:\SourceFolder\*» -Destination «F:\DestFolder\» -Recurse -Force -Include «*.txt»
Скопирует только txt файлы. Хотя для простоты гораздо удобнее использовать при копировании вид -Path «C:\SourceFolder\*.txt» .
Копирование файлов на удаленный компьютер по сети
Copy-File может копировать не только по SMB протоколу, но и через WinRM (WSMan).
Создайте новую сессию с компьютером testnode1 и выполните копирование в её контексте:
$session = New-PSSession -ComputerName testnode1
Copy-Item -Path «C:\SourceFolder\*» -ToSession $session -Destination «C:\SourceFolder\» -Recurse -Force
Эта команда скопирует файлы с локального компьютера из директории C:\SourceFolder на компьютер testnode1 в C:\SourceFolder\.
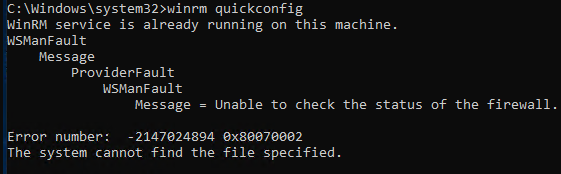
Test-WSMan -ComputerName testnode1

Если WSMan не настроен, вы можете выполнить его быструю конфигурацию. Для этого откройте командную строку с правами администратора и выполните winrm quickconfig
Также можно копировать и через обычные сетевые SMB шары, для этого просто используйте UNC формат сетевого пути.
Copy-Item -Path «C:\SourceFolder\*» -Destination «\\testnode1\C$\copy_tutorial\»
Можно скопировать файл с удаленного компьютера. Принцип такой же, как и при копировании файлов на удаленный компьютер, за исключением параметра –ToSession, вместо него нужно использовать –FromSession:
$session = New-PSSession -ComputerName testnode1
Copy-Item -FromSession $session -Path «C:\SourceFolder\*» -Destination «F:\DestFolder\» -Recurse -Force
Эта команда скопирует содержимое папки C:\SourceFolder\ с компьютера testnode1 на локальный компьютер в директорию F:\DestFolder
Ключ PassThru
Командлет Copy-Item (как и многие другие командлеты PowerShell) не возвращает результатов в консоль. Параметр PassThru применяется скриптах, или для лог-файлов, когда нужно получить список скопированных файлов и работать с ним дальше. Рассмотрим пример
$items = Copy-Item -Path «C:\SourceFolder\*» –Destination «\\testnode1\C$\copy_tutorial\» -PassThru
Переменная $items будет содержать список скопированных файлов, с которым вы можете работать дальше.Это значит что вы можете напрямую работать с этими файлами. Например выполнив команду Remove-Item $items[0] , вы удалите директорию folder.
Ключ Verbose
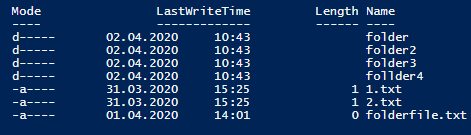
При использовании ключа -Verbose вы получите подробный лог операций копирования. Например, вывод команды
Copy-Item -Path «C:\SourceFolder\*.txt» -Destination «F:\DestFolder\» -Recurse -Force -Verbose

Несколько полезных скриптов с Copy-Item
Скопировать только файлы:
Get-ChildItem «C:\SourceFolder» -File -Recurse | Copy-Item -Destination «F:\DestFolder»
Скопировать структуру папок, без файлов:
$path = Get-ChildItem «C:\SourceFolder» -Recurse | ?<$_.PsIsContainer -eq $true>
$dest = «F:\DestFolder\»
$parent = $path[0].Parent.Name
$path | foreach <
$_.FullName -match «$parent.+»
New-Item -ItemType directory ($dest + $Matches[0])
>
Copy-Item очень простой и удобный в использовании командлет PowerShell для выполнения операций копирования и перемещения файлов. В сочетании с другими инструментами PowerShell, Copy-Item также является мощным инструментом для написания скриптов.


