- Manually generating your SSH key in macOS
- About Terminal
- Generating an SSH key
- Importing your SSH key
- Troubleshooting
- What are my next steps?
- How do I get an SSH Public Key on Mac?
- Step 1 – Open Terminal
- Step 2 – Generate Your SSH Keys
- Step 3 – Save your Private Key, send your Public Key
- 🗝 Как сгенерировать ключи SSH в macOS Mojave
- Откройте приложение терминал
- Генерация ключей SSH
- Скопируйте свой ключ на сервер
- RTFM.WIKI
- Инструменты пользователя
- Инструменты сайта
- Боковая панель
- Навигация
- Линкшэринг
- ALARM!
- Добавить новую страницу
- Реклама
- Содержание
- SSH: подключение по ключу без пароля на примере macOS
- Шаг 1. Создать пару ключей
- Шаг 2. Скопировать открытый ключ на удаленный хост
- Долгий путь
- ssh-copy-id
- cat + ssh
- Шаг 3. Локальный конфиг SSH и тест подключение
- Copy SSH key to clipboard
- Looking for something else?
- Welcome to the developer cloud
Manually generating your SSH key in macOS
You generate an SSH key through macOS by using the Terminal application. Once you upload a valid public SSH key, the Triton Compute Service uses SmartLogin to copy the public key to any new SmartMachine you provision.
Joyent recommends RSA keys because the node-manta CLI programs work with RSA keys both locally and with the ssh agent. DSA keys will work only if the private key is on the same system as the CLI, and not password-protected.
About Terminal
Terminal is the terminal emulator which provides a text-based command line interface to the Unix shell of macOS.
To open the macOS Terminal, follow these steps:
- In Finder, choose Utilities from the Applications folder.
- Find Terminal in the Utilities listw.
- Open Terminal.
The Terminal window opens with the commandline prompt displaying the name of your machine and your username.
Generating an SSH key
An SSH key consists of a pair of files. One is the private key, which should never be shared with anyone. The other is the public key. The other file is a public key which allows you to log into the containers and VMs you provision. When you generate the keys, you will use ssh-keygen to store the keys in a safe location so you can bypass the login prompt when connecting to your instances.
To generate SSH keys in macOS, follow these steps:
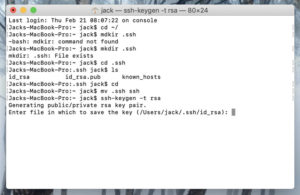
Enter the following command in the Terminal window.
This starts the key generation process. When you execute this command, the ssh-keygen utility prompts you to indicate where to store the key.
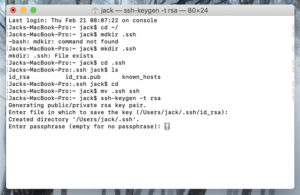
Press the ENTER key to accept the default location. The ssh-keygen utility prompts you for a passphrase.
You will need to enter the passphrase a second time to continue.
After you confirm the passphrase, the system generates the key pair.
Your private key is saved to the id_rsa file in the .ssh directory and is used to verify the public key you use belongs to the same Triton Compute Service account.
| Never share your private key with anyone! |
|---|
Your public key is saved to the id_rsa.pub ;file and is the key you upload to your Triton Compute Service account. You can save this key to the clipboard by running this:
Importing your SSH key
Now you must import the copied SSH key to the portal.
- After you copy the SSH key to the clipboard, return to your account page.
- Choose to Import Public Key and paste your SSH key into the Public Key field.
- In the Key Name field, provide a name for the key. Note: although providing a key name is optional, it is a best practice for ease of managing multiple SSH keys.
- Add the key. It will now appear in your table of keys under SSH.

Troubleshooting
You may see a password prompt like this:
This is because:
- You did not enter the correct passphrase.
- The private key on your Macintosh ( id_rsa ) does not match the public key stored with your Triton Compute Service account.
- The public key was not entered correctly in your Triton account.
What are my next steps?
In order to use the Terminal to create instances, set up triton and CloudAPI as well as the triton-docker commandline tool.
Источник
How do I get an SSH Public Key on Mac?
11th April 2019 by Ricki Larkin
.So you have been to asked for your Public SSH Key? We are here with a quick guide into getting hold of one on your Mac!

Step 1 – Open Terminal

There are many options of running the SSH public key on Macs. However we recommend running this from the terminal command line as this is the easiest.
To get started, you need to open the Terminal application which is found in Applications > Utilities > Directory, but you can also launch this by hitting cmd+spacebar and typing “Terminal” into the search box and then return.
Once open you will be greeted with a window where your cursor is just after a $ symbol. This means you are ready to go!
Step 2 – Generate Your SSH Keys
Now you are ready to type, enter the following command and hit enter:
ssh-keygen -t rsa -b 4096
If this works, you will be asked where to save your keys, the default location is fine so you can just hit enter again. Please be aware that if you enter a location other than default then the code in Step 3 will change to the location you specified.
Next you will be prompted to enter a passphrase. This can be anything you wish but please remember it as you will need to confirm it immediately after.
That’s it! Your keys have been generated, now how to you get hold of them? You’ll still need this Terminal window, so keep it open for now.
Step 3 – Save your Private Key, send your Public Key
Your Private Key will live forever at location you specified in Step 2. You should NEVER share your Private Key, so keep it a secret!
Your Public Key needs to be sent over to us so we can set you up with access. In order to copy your Public Key so you can paste it into an email, simply enter the following command in your Terminal window and hit enter:
You should now have your Public Key on your clipboard. Now head over to your email client, paste into the email content and send it over.
Once we’ve received your Public Key, our server technicians can set you up with access to the server and talk you through how to connect.
If you need any further assistance, please contact your account manager by raising a support ticket or calling the office on 01785 279920.
Источник
🗝 Как сгенерировать ключи SSH в macOS Mojave
macOS может работать с ключами SSH.
Мы покажет вам, как сгенерировать необходимые ключи и скопировать их на сервер.
Аутентификация по ключу SSH – это один из способов повысить безопасность удаленных сеансов между двумя компьютерами.
Этот тип аутентификации зависит от пары ключей, которые генерируются пользователем на клиентском компьютере.
В Linux эта задача невероятно проста.
С macOS процесс такой же простой.
Настолько легко, что с этим может справиться любой человек.
Я хочу провести вас через процесс генерации ключей SSH в macOS Mojave, а затем покажу вам, как скопировать ключ на удаленный сервер для более надежных соединений между двумя компьютерами.
Процесс должен занять у вас всего пару минут.
Откройте приложение терминал
Эта задача будет выполнена через терминальное приложение macOS.
Чтобы открыть это приложение, нажмите значок Launchpad на панели Dock и найдите терминал.
Когда появится это приложение, откройте его одним щелчком мыши.
Генерация ключей SSH
Из окна терминала введите следующую команду:
Примите каталог по умолчанию (рисунок A), используя клавишу Enter на клавиатуре.
Вам будет предложено ввести новую ключевую фразу для ключа (рисунок B).
Обязательно введите надежный и уникальный пароль для ключей.
После того как вы введете и подтвердите свой пароль, SSH сгенерирует случайное ображание для вашего ключа (рисунок C) и вернет вам приглашение.
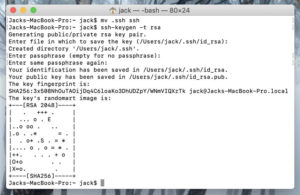
Этот процесс создаст два ключа в каталоге /Users/USERNAME/.ssh (где USERNAME – ваше имя пользователя macOS).
Файл, заканчивающийся на .pub, является открытым ключом.
Это ключ, которым вы можете поделиться с другими пользователями.
Другой ключ, id_rsa, это ваш личный ключ. Никогда не делитесь этим ключом.
Скопируйте свой ключ на сервер
Теперь, когда у вас есть пара ключей, как вы их должны использовать?
Вот самый простой и часто используемый метод использования ключей SSH.
Вы должны скопировать ключ на удаленный сервер, чтобы использовать аутентификацию по ключу SSH (вместо более слабой аутентификации по паролю).
К счастью, в SSH есть встроенный механизм для копирования этого ключа.
Предположим, что рассматриваемый удаленный сервер имеет IP-адрес 192.168.1.12, а имя пользователя – jack.
Чтобы скопировать ключ на этот сервер, введите команду (из macOS):
Сначала вам будет предложено ответить, хотите ли вы продолжить соединение.
Введите y и нажмите Enter.
Далее вам будет предложено ввести пароль удаленного пользователя.
После успешной аутентификации ключи будут скопированы, и вы будете готовы войти на удаленный сервер, используя аутентификацию по ключу SSH.
Чтобы войти на удаленный сервер, введите команду (при необходимости подставив имя пользователя и IP-адрес):
Вместо того, чтобы запрашивать пароль пользователя, вам будет предложено ввести пароль для ключа SSH (рисунок D).

Поздравляем, вы не только сгенерировали ключи SSH в macOS, но и скопировали эти ключи на удаленный сервер для более безопасного соединения.
Источник
RTFM.WIKI
Ordnung muß sein. Ordnung über alles (18+)
Инструменты пользователя
Инструменты сайта
Боковая панель
Навигация
Линкшэринг
socialite Display:icon facebook twitter
ALARM!
Добавить новую страницу
Реклама
Содержание
SSH: подключение по ключу без пароля на примере macOS
Минимум теории и максимум хауту. За теорией лучше обратиться на сайт wikipedia или на ssh.com

Шаг 1. Создать пару ключей
Нужно создать пару ключей: приватный (закрытый) ключ и публичный (открытый) ключ. Приватный ключ никогда никуда никому не передавать. Публичный ключ можно показывать всем.
Пр желании можно дать ключу другое имя (ключ -f ), например id_rsa_server_vps13.
Следующий пункт passphrase. Это парольная фраза или проще говоря пароль для ключа.
Минусы. Его нужно будет вводить каждый раз, когда используется ключ.
Очевидный плюс. Если файл окажется в чужих руках без парольной фразы использовать его не получится. Ну и не стоит использовать пароли admin111 или qwerty123.
Шаг 2. Скопировать открытый ключ на удаленный хост
Как всегда в unix есть множество вариантов для этого.
Долгий путь
В macOS можно скопировать содержимое файла в буфер обмена с помощью pbcopy
Подключаемся к удаленному серверу, переходим в директорию .ssh и открываем (или создаем) файл authorized_keys.
Добавляем ключ из буфера обмена.
Кстати каждый ключ должен быть на отдельной строке. И никаких пустых строк между ключами.
ssh-copy-id
Начиная с Sierra утилита уже есть в составе системы и не нужно ставить с github или через homebrew.
или с указанием имени ключа
cat + ssh
Шаг 3. Локальный конфиг SSH и тест подключение
Добавим локальный файл конфигурации для SSH клиента в файл
Особый интерес представляют опции UseKeychain и AddKeysToAgent.
Пароль приватного ключа можно хранить в «Связке ключей» (Apple KeyChain). Один раз добавили и всё — больше никогда не надо вводить никаких паролей для подключения по ssh.
В каком-то релизе (Sierra? у меня не Linux, чтобы отслеживать это) всё сломали и Terminal теперь по-умолчанию не использует keychain.
Опция AddKeysToAgent вышла в OpenSSH 7.2 еще в 2016 году, но я узнал про нее только сейчас.
В клиент ssh добавлена опция AddKeysToAgent, управляющая передачей в ssh-agent закрытого ключа, используемого в процессе аутентификации. Опция может принимать значения ‘yes’, ‘no’, ‘ask’, и ‘confirm’ (по умолчанию ‘no’)
Что еще важного в ссылках выше?
Буду рад если кто-то более подробно разобрался в данном вопросе и дополнит заметку.
Источник
Copy SSH key to clipboard
By this command, in your terminal, you can copy your ssh key to your clipboard:
pbcopy
These answers are provided by our Community. If you find them useful, show some love by clicking the heart. If you run into issues leave a comment, or add your own answer to help others.
and copy terminal output
If you’re running Windows, using Git Bash you can do this:
thanks that worked
I figured it out. Instead of nano, I should have used the vi text editor. Doh! Such a simple solution. Thanks again for all of your help!
For anyone else that ran into this issue, follow these instructions:
/.ssh
2. sudo vi id_rsa.pub
3. Click and hold down the left mouse button to highlight the entire SSH key but do not highlight any spaces after your email address at the end of the SSH key.
4. Paste into Github 🙂
Really helpful. Many thanks. 🙂
Thanks, I am finally on github after 3 days of trying!
Easiest way I’m aware of is:
This is by far and away the easiest way to do this
You can also use xclip (assumes you’re running a Debian based distro):
install GIT GUI using : sudo apt-get install git-gui
open it using git citool to open git gui
click help > show ssh key > copy to clipboard
it worked for me after I tried all other options, credits to Bitbucket Support
I think the easiest way to copy the SSH keys is to open the public SSH key file (as you did) and manually copy and paste the key. This can be done in PuTTy by selecting your text with the left mouse button. Once it is selected, it should already be copied to your clipboard.
You cannot copy the text from the console viewer.
Please let me know if you continue having issues.
I really appreciate the assistance! Thanks for the reply. I am able to copy the SSH key to clipboard using PuTTY but GitHub doesn’t like the key. I have a feeling that I’m not copying the entire SSH key. Double clicking the left mouse button will highlight/copy the line but only what you see on your line, not the entire line. This is the problem because even if I stretch my Putty window as wide as it allows, it seems that I’m still not copying the entire SSH key.
Is there a way to copy the entire line in the file, even if my console doesn’t display it all?
Looking for something else?
Sign up for Infrastructure as a Newsletter.

Working on improving health and education, reducing inequality, and spurring economic growth? We’d like to help.

You get paid; we donate to tech nonprofits.
Welcome to the developer cloud
DigitalOcean makes it simple to launch in the cloud and scale up as you grow – whether you’re running one virtual machine or ten thousand.
© 2021 DigitalOcean, LLC. All rights reserved.
Источник


