Windows USB/DVD Download Tool
Overview
When you download Windows from Microsoft Store, you have two options: You can download a collection of compressed files, or you can download an ISO file. An ISO file combines all the Windows installation files into a single uncompressed file.
If you choose to download an ISO file so you can create a bootable file from a DVD or USB drive, copy the Windows ISO file onto your drive and then run the Windows USB/DVD Download Tool. Then simply install Windows onto your computer directly from your USB or DVD drive.
When you download the ISO file, you must copy it onto a USB or DVD. When you’re ready to install Windows, insert the USB drive or DVD with the ISO file on it and then run Setup.exe from the root folder on the drive.
This allows you to install Windows onto your machine without having to first run an existing operating system. If you change the boot order of drives in your computer’s BIOS, you can run the Windows installation directly from your USB drive or DVD when you first turn on your computer. Please see the documentation for your computer for information about how to change the BIOS boot order of drives.
Making copies
To install the software, you can make one copy of the ISO file on a disc, USB flash drive, or other media.
After you’ve installed the software and accepted the license terms that accompany the software, those license terms apply to your use of the software. The license terms for Windows permit you to make one copy of the software as a back-up copy for re-installation on the licensed computer. If you do not delete your copy of the ISO file after installing the Windows software, the copy of the ISO file counts as your one back-up copy.
If you need to download the software again, you can go to your Download Purchase History in your Microsoft Store account and access the download there.
Installation
To install the Windows USB/DVD Download Tool:
2. Click Download then Run.
3. Follow the steps in the setup dialogs. You’ll have the option to specify where to install the Windows USB/DVD Download Tool.
You must be an administrator on the computer on which you are installing the Windows USB/DVD Download tool. It requires the Microsoft .NET Framework version 2.0 or higher.
System requirements
Windows XP SP2, Windows Vista, or Windows 7 (32-bit or 64-bit)
Pentium 233-megahertz (MHz) processor or faster (300MHz is recommended)
50MB of free space on your hard drive
DVD-R drive or 4GB removable USB drive
For Windows XP users
The following applications must be installed prior to installing the tool:
Microsoft .NET Framework 2.0 must be installed. It can be downloaded here.
Microsoft Image Mastering API v2 must be installed. It can be downloaded here.
Using the Windows USB/DVD Download Tool
Before you run the Download Tool, make sure you have purchased the Windows ISO download from Microsoft Store and downloaded the Windows ISO file to your drive. If you have purchased Windows but have not yet downloaded the ISO file, you can download the ISO file from your Microsoft Store Account.
To make a copy of your Windows ISO file:
1. Click the Windows START button, and click WINDOWS USB/DVD DOWNLOAD TOOL in the ALL PROGRAMS list to open the Windows USB/DVD Download Tool.
2. In the SOURCE FILE box, type the name and path of your Windows ISO file, or click BROWSE and select the file from the OPEN dialog box. Click NEXT.
3. Select USB DEVICE to create a copy on a USB flash drive or select DVD disk to create a copy on a DVD disk.
4. If you are copying the file to a USB flash drive, select your USB device in the drop-down list and click BEGIN COPYING. If you are copying the file up to a DVD, click BEGIN BURNING.
When your Windows ISO file is copied to your drive, install Windows by moving to the root folder of your DVD or USB drive, and then double-click Setup.exe.
Frequently Asked Questions
Where can I download .NET framework 2.0?
The .NET framework can be downloaded here.
Where can I download Image Mastering API 2.0?
The Image Mastering API can be downloaded here.
What size USB drive is required?
You need a USB drive with a minimum of 4GB of free space.
Can I use my newly created USB drive to install Windows on someone else’s computer?
No. The Windows ISO file on the USB drive is only intended to be used to install Windows on the licensed user’s own computer.
Can I back up to a CD-ROM?
No. The Windows ISO file is too large to fit on a CD.
Can I back up to a Blu-ray Disc?
Yes, as long as your DVD drive can write to a Blu-ray Disc.
IfI have other files on the USB drive will the Windows USB/DVD download tool delete them?
This tool requires the USB drive to be completely blank before the Windows files are copied. This helps ensure that the device is bootable after the copying has completed.
Can I backup to an external hard drive or other device with enough free disk space?
Yes, but this is not recommended. The device must be formatted in order for the device to be bootable. A dedicated USB flash drive would be a better option.
Can I use the Windows USB/DVD Download Tool to back up other files?
No. This tool is only for use with the Windows ISO file purchased from Microsoft Store.
Does the tool support dual-layer DVD discs for burning?
No. Currently, the tool does not support dual-layer DVD discs.
Troubleshooting
The tool is asking me to install the .NET framework and Image Mastering API before I install the tool
If you’re running Windows XP, you must install the .NET Framework 2.0 and the Image Mastering API 2.0 before installing the tool. You can download .NET framework here and you can download the Image Mastering API here.
A restart may be required after installing the .NET framework and the Image Mastering API.
When creating a bootable USB device, I am getting an error about bootsect
To make the USB drive bootable, you need to run a tool named bootsect.exe. In some cases, this tool needs to be downloaded from your Microsoft Store account. This may happen if you’re trying to create a 64-bit bootable USB device from a 32-bit version of Windows. To download bootsect:
1. Login to your Microsoft Store account to view your purchase history.
2. Look for your Windows purchase.
3. Next to Windows, there is an Additional download options drop-down menu.
4. In the drop-down menu, select 32-bit ISO.
5. Right-click the link, and then save the bootsect.exe file to the location where you installed the Windows USB/DVD Download Tool (e.g. C:\Users\username\AppData\Local\Apps\Windows USB DVD Download Tool).
6. Once the file has been saved, go back to the Windows USB/DVD Download Tool to create your bootable USB device.
My USB drive is not in the list of available devices
If you don’t see your USB drive in the list of available devices, please make sure the drive is inserted in the USB port, and then click the Refresh button beside the list of available drives.
I inserted a blank DVD in my DVD-ROM drive, but the Windows USB/DVD Download Tool doesn’t recognize it
If there are multiple drives on the system, the tool will select the first one that is capable of burning DVDs. If you have multiple DVD-R drives, try inserting the blank DVD into another DVD-R drive. If that doesn’t help, please make sure that your disc isn’t damaged and that your DVD-R drive is operational. Contact Product Support if issues continue to arise.
I inserted a blank DVD in my DVD-ROM drive, but the tool won’t let me burn it
Make sure the disc isn’t a dual-layer DVD disc. Currently, dual-layer discs are not supported within the tool.
Как записать образ ISO на флешку // 2 способа
 Всем добра!
Довольно часто требуется записать какой-нибудь образ диска ISO на флешку, например, при установке Windows, при создании аварийной флешки, для тестирования оперативной памяти, жесткого диска и т.д.
Тем более, что та же установка Windows с CD/DVD диска идет дольше (да и выходят из строя они чаще, чем флешки). Я уже не говорю о том, что далеко не на каждом новом ПК/ноутбуке установлен привод для дисков. Именно поэтому, использование флешки — предпочтительнее (да и универсальнее — к любому ПК с USB-портом можно подключить).
В этой статье я рассмотрю пару программ, которые могут легко и быстро записать любой образ диска в формате ISO на флешку.
Примечание : ISO — самый популярный формат образов дисков. В нем распространяются больше половины всевозможных образов, которые можно встретить в сети.
Запись ISO-образа на USB-флешку
Способ №1 — PowerISO
PowerISO — очень мощная программа для работы с ISO-образами. Позволяет их открывать, редактировать, извлекать из них файлы, добавлять в ISO-образы файлы, сжимать их, записывать на CD/DVD диски и флешки, и пр. Так же в PowerISO можно сделать образ любого своего диска, протестировать его, получить контрольную сумму (для оценки — битый ли файл. ).
В общем, как в PowerISO записать образ на флешку.
1) Первое, что делаете — открываете образ. Для этого нажмите кнопку «Открыть» , либо откройте меню файл, а затем укажите файл-образ. Так же можно воспользоваться нажатием клавиш Ctrl+O .
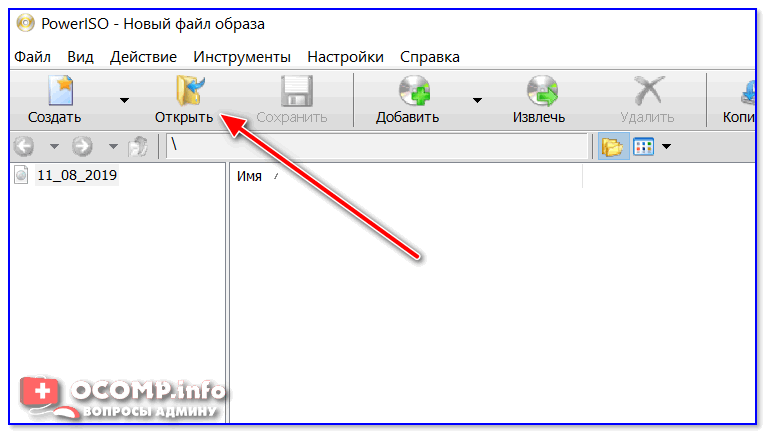
PowerISO — открытие ISO образа диска
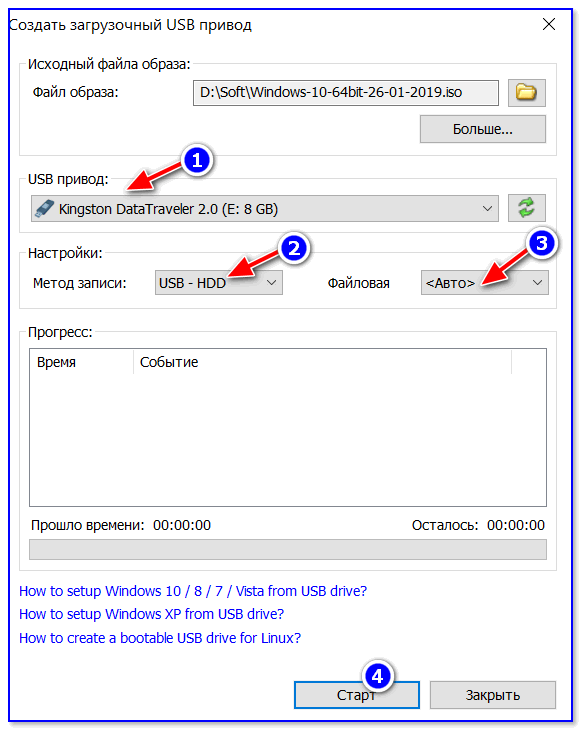
2) Если образ был открыть и никаких предупреждений программа не выдавала, переходим к меню «Инструменты» . Выберите такую функцию, как «Создать загрузочный USB привод» (см. на стрелки на скриншоте ниже).
Создать загрузочный USB-привод
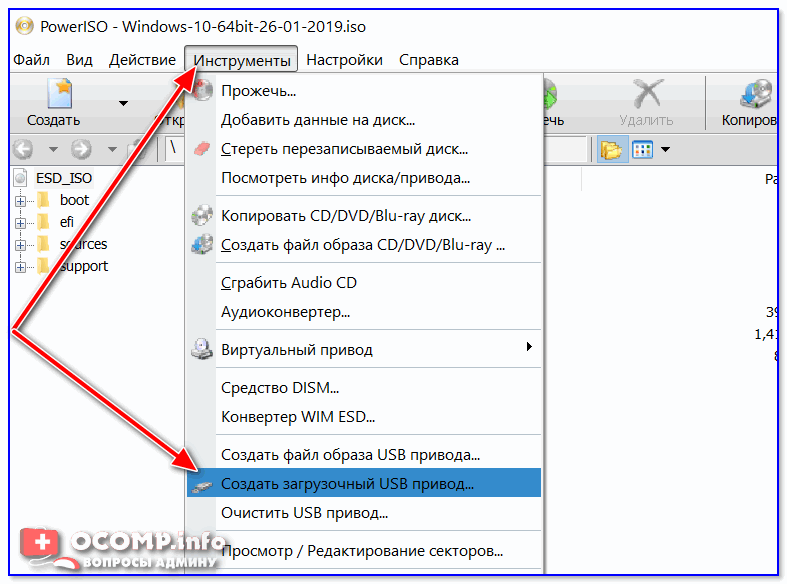
3) В некоторых случаях программа попросит дать ей права администратора. Просто соглашаемся: программа будет перезапущена, и вы продолжите процесс записи.
С правами администратора
4) В окне настроек записи, нужно:
- в графе «USB привод» указать вашу флешку ( Осторожно! Не перепутайте буквы, т.к. в процессе записи все данные на флешке будут удалены;
- метод записи: если вы записываете загрузочный образ ISO — выбирайте метод записи «USB — HDD» (например, для записи образов с Windows);
- графу с файловой системой можно оставить по умолчанию;
- далее нажмите «Старт» ;
- кстати, обратите внимание, внизу окна даны ссылки на инструкции (несколько ссылок, в зависимости от записываемого образа).
Настройки записи в PowerISO
5) Программа вас еще раз предупредит, что все данные на выбранной флешке будут удалены!
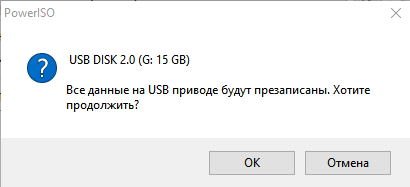
Предупреждение: флешка будет очищена
6) Далее начнется процесс записи. Время записи сильно зависит от:
- загрузки вашего компьютера посторонними задачами (рекомендую все лишнее выключить: по крайней мере, торренты, игры, видео-редакторы и пр. программы, сильно нагружающие ПК);
- размера записываемого образа;
- скорости работы USB-привода и самой флешки.
7) Если запись прошла хорошо и без ошибок: вы увидите сообщение «Запись USB привода успешно завершена» , как на скрине ниже.
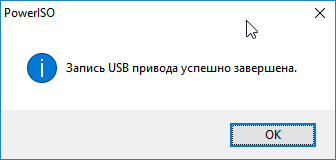
Успешная запись флешки
Способ №2 — UltraISO
UltraISO — самая знаменитая программа для работы с ISO образами. Умеет делать с ними практически все то же самое, что и первая: открывать, монтировать, редактировать и изменять, записывать загрузочные флешки, внешние жесткий диски, CD/DVD-диски пр.
Пользоваться ей столь же просто, как и первой. Обе, кстати говоря, поддерживают русский язык в полном объеме.
И так, начинаем работать в UltraISO
1) Для начала скачиваем (ссылка выше), устанавливаем и запускаем программу. Здесь особо комментировать нечего, разве только кроме одного — запустите программу от имени администратора (иначе может быть недоступна опция записи USB-флешки!).
Примечание ! Для запуска от администратора: просто щелкните по значку с программой UltraISO — и в контекстном меню выберите «Запуск от имени администратора», как показано на скрине ниже.
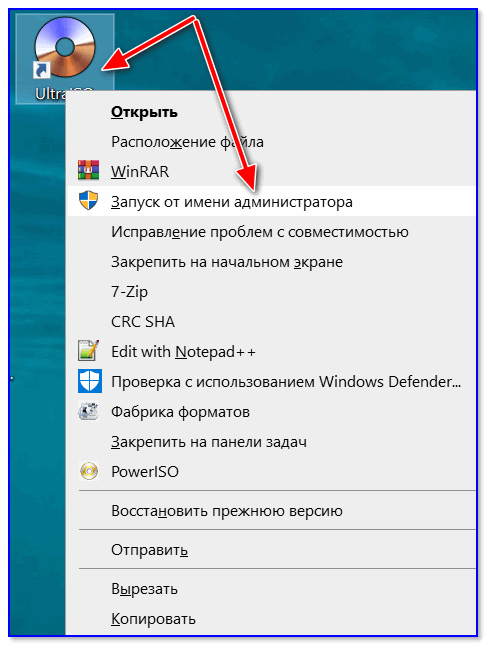
Запуск с правами администратора
2) Далее откройте файл-образ ISO (для этого нажмите меню » Файл/открыть «).
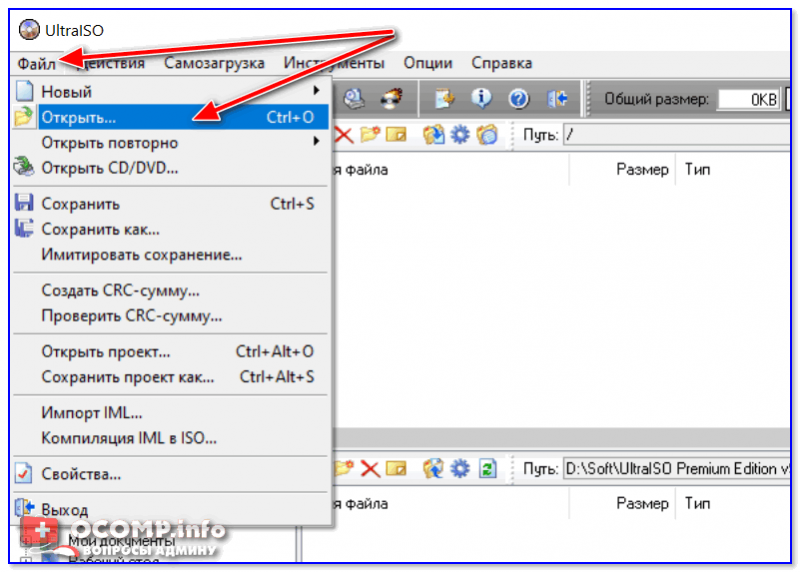
UltraISO — открытие образа
3) Если образ открылся, откройте меню » Самозагрузка/Записать образ диска » (см. скриншот ниже).
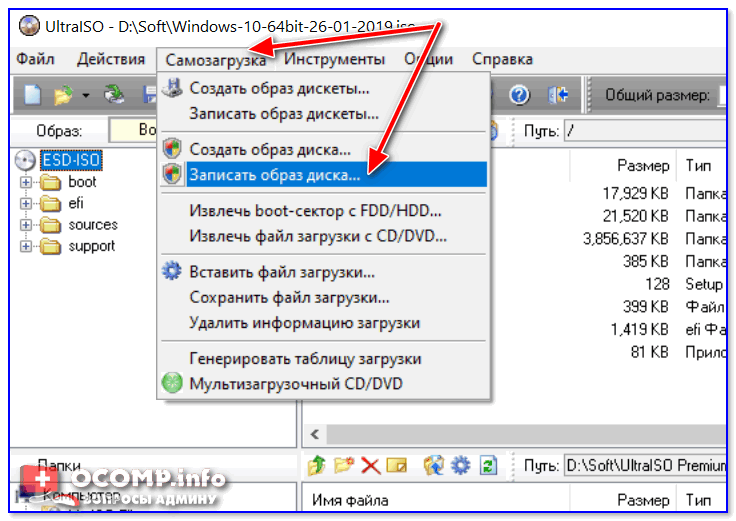
Запись образа диска
4) После чего необходимо задать настройки записи:
- disk drive : выберите букву своей флешки (данные на ней будут удалены, поэтому — осторожно и внимательно!)
- метод записи : либо USB-HDD+ , либо USB-HDD (это для записи загрузочных носителей, что в большинстве случаев и требуется) . Сказать конкретно, что выбирать — довольно трудно, в большинстве случаев работает USB-HDD+ — но если вдруг ваша версия BIOS его не увидит, перезапишите флешку в режиме USB-HDD ;
- далее нажмите кнопку «Записать» .

Настройки записи в UltraISO
Примечание! В обычном режиме UltraISO автоматически форматирует носитель в файловую систему FAT32 (даже если до этого на флешке была NTFS). Для того чтобы осталась NTFS — требуется выбрать ExpressBoot, затем нажать на ExpressWrite. Итог: при распаковке образа на флешку, файловая система останется неизменной.
5) Дальше появиться стандартное предупреждение об удаление всей информации с вашей флешки. Еще раз проверяем букву флешки и соглашаемся.
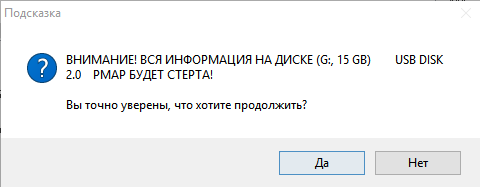
Предупреждение об удалении
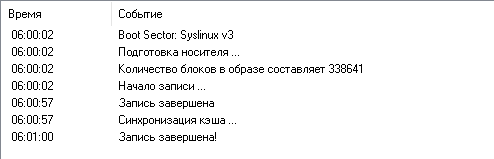
6) Если все прошло успешно в сообщения программы вы увидите надпись: «Синхронизация кэша. Запись завершена!» . Обратите внимание, чтобы в списке сообщений программы не было ошибок, иначе ваш загрузочный образ просто выдаст ошибку при инсталляции Windows 👌.
Пример успешной записи показан на скрине ниже.
После записи флешки, обычно приступают к настройке BIOS и установке Windows.


