- Windows Robocopy Command Tutorial with Examples To Copy Files In Safe Way
- robocopy Features
- robocopy Command Syntax
- Copy Specified Folder
- Copy From Local System To Remote System
- Copy Only Given File Types or Extensions
- Copy SubFolders
- List Files
- List Files Recursively
- Copy Files Lower Than Given Size
- Copy Files Higher Than Given Size
- Move Files
- Logging Operations
- Copy Given File Properties
- Copy All Attributes with /copyall
- Delete or Remove Destination Files and Directories That No Longer Exist In The Source
- 3 thoughts on “Windows Robocopy Command Tutorial with Examples To Copy Files In Safe Way”
- Windows copy command syntax and examples
- Copy the contents of a file to another file
- Copy file to another directory
- Copy files with white space in name
- Copy multiple files
- Use of environment variables
- Copy-Item копирование файлов и папок из PowerShell
- Копирование файлов и каталогов
- Копирование с заменой и копирование с заменой read-only файлов
- Копирование с фильтрацией по шаблону
- Исключение файлов при копировании
- Копирование файлов на удаленный компьютер по сети
- Ключ PassThru
- Ключ Verbose
- Несколько полезных скриптов с Copy-Item
Windows Robocopy Command Tutorial with Examples To Copy Files In Safe Way
Robocopy or Robust File and Folder Copy application is very popular amongst Windows system administrators. Robocopy will copy the local or given file to the remote or destination location.
robocopy Features
The command robocopy provides very useful features for files copying over network. Below we will list some of them.
Resume Interrupted Copy when the network or remote host is down during a copy the copy operation can resume where it left.
Preserve File Attributes and timestamp of the copied file where owner and audit information is also preserved.
Ability To Update Copied File Attributes and Timestamps of the copied files and folders which will set to the latest date and time.
Administrator Owned File Copy is supported with the option /B .
Mirror Mode is provided to sync or mirror given files and folder or directory updated files will be updated and deleted files will be deleted on the target.
Skip Allready Existing Files by checking size and timestamp information and comparing it to the source and target.
Progress Bar will shown current copy operation graphically.
Multi-threaded copying which will allow copy, mirror multiple files and directories at the same time which will decrease the complete copy operation time.
robocopy Command Syntax
The general syntax of robocopy command is like below.
- SOURCE is the source file or directory we want to copy
- DESTINATION is the destination file or directory we want to copy
- OPTIONS are different features or behaviors we want to use like recursive, verbose, extension filter, etc.
Copy Specified Folder
The most basic operation with robocopy is copying sources folders to the destination. In this example, we will copy the directory named mytest to the destination folder yourtest
After copy operation, some statistics are provided by robocopy
- Start shows start time of copy operation
- Source shows source directory
- Dest shows destination directory
- Files shows file filter
- Options shows given options
- Total shows total files and folders count
- Copied shows copied files and folders count
- Skipped shows not copied files and folders
Copy From Local System To Remote System
We can also copy a file and folders to the remote system. We will provide a remote system hostname or IP address before the destination path. We can use \\BACKUPSERVER or \\10.5.2.30 to specify the remote system.
In this example, we will copy the source directory named mytest to the remote system with IP address 192.168.122.46 under the path Users\ismail with the named yourtest .
Copy Only Given File Types or Extensions
robocopy provides some filtering features while copying files. We can specify the filenames and extensions we want to copy. This will skip other file names and extensions. We will provide the file name or extension after the destination folder.
In this example, we only want to copy *.txt extension files.
We can see from the output that only one file is copied but there was more than one file. Copied file name and byte count is also printed.
Copy SubFolders
By default, only first level directories are copied to the destination. If we need to copy all level and subdirectories folders we should enable /S .
List Files
There is a very useful feature for robocopy where source files are not copied and just listed. This feature can be useful if we want to check existing files and folders. We can use /L option to print the list of files and directories.
As we can see from the output that all files and folders are skipped and not copied.
List Files Recursively
While robocopy is mainly used to copy files from remote to local or local to remove we can use /L and /S options in order to list remote files. We can merge two options list and recursive to list all level files and folders.
Copy Files Lower Than Given Size
While copying files we can specify the size of files we want to copy. In this example we will copy files those sizes are lower than 1K . We will use the /MAX option for this.
As we can see from the results some of the files are copied but some of them are not copied because of the size restriction.
Copy Files Higher Than Given Size
The reverse of the previous option is /MIN option . This will only copy files higher than the given size. In this example, we will copy files higher than 1K which is 1000 kilobytes.
Move Files
The default behavior of robocopy is copying files. Sometimes we may need to move files. This can be done with robocopy too. We will provide /MOV option in order to move files and folders.
Logging Operations
While doing copy and move operations we can also need some logs, especially in bulk data operations. We can write a log about specified operations with /LOG option. We can also specify the log file name y adding at the end of /LOG option. In this example, we will write robocopy operation log to log file named backup.log . This will prevent regular output
The log file can be listed with type command in MS-DOS command line like below.
Copy Given File Properties
Files and folders may have different properties. These properties can be used for different purposes like the listing owner, audit information, timestamps, etc. We can copy these attributes too with the robocopy command. Here are the attributes we can specify for the copy. We will also use /copy: option by adding the property we want to copy.
- D is used to copy data properties
- A used for attributes
- T for time stamps
- S is used for NTFS access control list simply ACL
- O is used for the owner information
- U is used for Auditing information
In this example, we will copy time stamp attributes or properties with the following command.
Copy All Attributes with /copyall
We can also copy files with all properties of attributes with the /copyall parameter like below. This is equal to the /copy:DATSOU .
Delete or Remove Destination Files and Directories That No Longer Exist In The Source
If we are trying to make an identical copy of the local files and directories to the remote we need to purge or remove remote files and directories that no longer exist in the source. We can use /purge option for this.
3 thoughts on “Windows Robocopy Command Tutorial with Examples To Copy Files In Safe Way”
Thanks for this article it was great but I already shifted to GS Richcopy 360. Using Robocopy was a mess, it gave errors one day or another. Now I am satisfied with GS Richcopy 360’s performance. I don’t think I am going back and use Robo. Thanks!
I’m doing fine with Robocopy, I won’t pay for any software to do something I can already do on my own. Thank you for your tutorial!
Thanks. Not a bad summary. I recommend two additions:
1) some examples for spotting new/changed files based on dates, along the /XC /XN /XO settings, especially in combos.
2) a note about how DANGEROUS the /MIR and /PURGE options can be, accidentally deleting files.
Windows copy command syntax and examples
Using copy command, we can copy files from one directory to another directory. This command is similar to the Linux cp command, but it does not match with the full functionality of cp. Windows copy command can be used to copy files only, we can’t copy directories.
The syntax and usecases of copy command are explained below with examples.
Copy the contents of a file to another file
Example: To copy a file from c:\data\file1.doc to D:\backup\file2.doc
If the destination file already exists you will be prompted for confirmation. To suppress this confirmation you can use /Y switch with copy command. This would be useful if you are executing copy command from a batch file.
If the destination file exists, the above command will overwrite the same without asking the user for confirmation.
Copy file to another directory
When we specify a directory path as the destination, the files will be copied with the same name. We can assign a different name by specifying the new name in the destination path. Example is shown below.
To copy the file 1.doc loated at c:\data\documents to the directory c:\data\newdocs
Copy files with white space in name
If the file name has white space within it, we can wrap up the name in double quotes.
Example: To copy file, my resume.doc to another folder
Copy multiple files
We can’t specify multiple file names in copy command. However, we can use wildcards to identify a group of files and then copy all of them in a single command.
For example, to copy all excel files from current folder to another folder F:\backup
To copy all files in current folder to another folder
Use of environment variables
We can use environment variables in the copy command to specify the path of the folders. Like USERPROFILE, SystemRoot, ProgramFiles, TEMP, WINDIR, APPDATA, HOMEPATH.
For example, to copy a file to a user’s documents folder
The above command copies the file to the My Documents folder of the current logged in user.
You may also want to read
Windows «copy» is funny. Type «copy 1 2» and the file «1» will be copied into a new file «2». Now separate them by a plus sign instead of a space (copy 1+2) and you’ll concatenate 1 and 2 and replace the old file «1» with the result of the concatenation!
Yes, we can concatenate two or more files using copy command. You need to separate the list of files using +. You can redirect the resultant data to a new file also.
The above command will not alter the file 1. It creates a new file 3 with the concatenated data of 1 & 2. If no file name is provided it stores the result in the first file.
My Win7 cannot find a copy command, and when i run xcopy, a window flashes and exits.
I have the same problem. If you solved it, could you please explain how?
If you can not find your copy.exe file, you can download it to your windows directory or C:\ Directory depending the setting on your OS you should also be able to copy and run it from system32 or system folder.
how can i combine 2 .exe files and be able to use both after concatenation
I want to copy 2 different files(.exe,.config) from source to destination server of windows.
can you please help me on this command.
Hello i have a problem with my cmd windows 7.when i try to copy a command. Like help > file.pdf. i mean in extension pdf because i have this problem only with .pdf extension but not with .txt.So whe i execute the command. No problem. Then when i go to open the file.pdf ftom user destination the file.pdf doesn’t open say that is corrupted.please do help me .thanks
i have a file contain many lines as sources and another file has the same numbre of lines as destinations. i want to copy first line as source( c:/test/*.txt) to first line in destination ( d:/test2/), secend line ( c:/test/*.pdf) to second line in destination ( E:/test3/)……
Can I use the DOS/Windows “COPY” command in a BAT file to copy a file or a short string of text to computer memory and then paste (Ctrl +V) that string or file into a document?
Copy-Item копирование файлов и папок из PowerShell
PowerShell командлет Copy-Item используется для копирования файлов между локальными, сетевыми каталогами или между компьютерами по сети через WinRM. Командлет Copy-Item предоставляет большое количество опций, которые можно использовать в разных сценариях копирования файлов и каталогов (по своим возможностям этот командлет почти не уступает утилите robocopy). Например:
- перезапись файлов (override)
- фильтрация по имени/шаблону
- исключение по имени/шаблону
- Verbose режим
- Копирование файлов с/на удаленные компьютеры
Начнем с простых примеров использования Copy-Item и будем переходить к более сложным.
Копирование файлов и каталогов
Чтобы скопировать один файл 1.txt из каталога C:\SourceFolder\ в F:\DestFolder\, выполните:
Copy-Item -Path «C:\SourceFolder\1.txt» -Destination «F:\DestFolder\1.txt»
Можно использовать сокращенный синтаксис командлета, пропустив указание параметров Path и Destination:
cpi «C:\SourceFolder\1.txt» «F:\DestFolder\1.txt»
Теперь скопируем каталог C:\SourceFolder\folder в F:\DestFolder\folder. В папке folder находится файл 1.txt. Обратите внимание что без ключа –Recurse, папка folder копируется без содержимого:
Copy-Item -Path «C:\SourceFolder\folder» -Destination «F:\DestFolder\folder» -Recurse
С помощью Copy-Item также можно просто объединить файлы из несколько директорий в одну (слияние директории), для этого нужно перечислить директории в ключе –Path:
Copy-Item -Path «C:\SourceFolder\*», «C:\SourceFolder2\*», «C:\SourceFolder3\*» -Destination «F:\DestFolder\»
Копирование с заменой и копирование с заменой read-only файлов
Copy-Item по умолчанию при копировании заменяет файлы в целевом каталоге. Никаких дополнительных параметров указывать не нужно. При копировании каталога, если нужно заменить каталог в целевой папке, нужно использовать ключ –Force, иначе будет ошибка “Элемент folder с указанным именем уже существует — DirectoryExists”.

Для перезаписи файла с атрибутом read-only, нужно использовать ключ -Force. Если его не использовать, вы получите ошибку “отказано в доступе по пути… CopyFileInfoItemUnauthorizedAccessError”.

Чтобы скопировать файл с перезаписью файла с read-only атрибутом используйте параметр Force.
Copy-Item -Path «C:\SourceFolder\1.txt» -Destination «F:\DestFolder\1.txt» -Force
Чтобы Copy-Item скопировал файлы из одной папки в другую без замены существующих файлов, можно использовать этот простой скрипт
Copy-Item (Join-Path «C:\SourceFolder\» «*») «F:\DestFolder\» -Exclude (Get-ChildItem «F:\DestFolder\») -Recurse
Этот скрипт скопирует все файлы и папки из C:\SourceFolder в F:\DestFolder без замены файлов уже существующих в F:\DestFolder
Копирование с фильтрацией по шаблону
С помощью Copy-Item можно скопировать файлы/директории выбранные с помощью wildcard символа * или с помощью символа ?. Также поддерживаются некоторые регулярные выражения
- * — обозначает любое количество любых символов
- ? – обозначает 1 любой символ
- [a-z], [0-9] – символы между a-z и цифры между 0 и 9
Для примера возьмём такую структуру файлов:
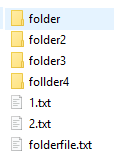
Выполним копирование командой:
Copy-Item -Path «C:\SourceFolder\fol*» -Destination «F:\DestFolder\»
Результат в F:\DestFolder\
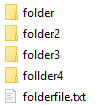
Теперь чистим папку назначения и выполняем:
Copy-Item -Path «C:\SourceFolder\folder2» -Destination «F:\DestFolder\»

Папка без цифры в окончании не скопировалась, потому что folder1 подразумевает что после folder будет как минимум еще 1 символ между 0 и 3
Исключение файлов при копировании
С помощью ключа –Exclude можно исключить файлы при копировании. Например, следующай команда скопирует все файлы кроме файлов с расширением txt.
Copy-Item -Path «C:\SourceFolder\*» -Destination «F:\DestFolder\» -Recurse -Force -Exclude «*.txt»
Аналогичным же образом можно применить ключ –Include, например
Copy-Item -Path «C:\SourceFolder\*» -Destination «F:\DestFolder\» -Recurse -Force -Include «*.txt»
Скопирует только txt файлы. Хотя для простоты гораздо удобнее использовать при копировании вид -Path «C:\SourceFolder\*.txt» .
Копирование файлов на удаленный компьютер по сети
Copy-File может копировать не только по SMB протоколу, но и через WinRM (WSMan).
Создайте новую сессию с компьютером testnode1 и выполните копирование в её контексте:
$session = New-PSSession -ComputerName testnode1
Copy-Item -Path «C:\SourceFolder\*» -ToSession $session -Destination «C:\SourceFolder\» -Recurse -Force
Эта команда скопирует файлы с локального компьютера из директории C:\SourceFolder на компьютер testnode1 в C:\SourceFolder\.
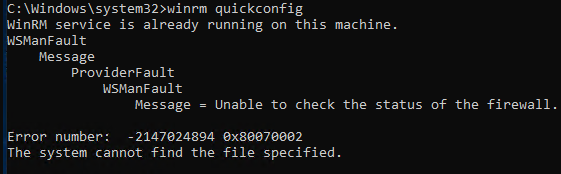
Test-WSMan -ComputerName testnode1

Если WSMan не настроен, вы можете выполнить его быструю конфигурацию. Для этого откройте командную строку с правами администратора и выполните winrm quickconfig
Также можно копировать и через обычные сетевые SMB шары, для этого просто используйте UNC формат сетевого пути.
Copy-Item -Path «C:\SourceFolder\*» -Destination «\\testnode1\C$\copy_tutorial\»
Можно скопировать файл с удаленного компьютера. Принцип такой же, как и при копировании файлов на удаленный компьютер, за исключением параметра –ToSession, вместо него нужно использовать –FromSession:
$session = New-PSSession -ComputerName testnode1
Copy-Item -FromSession $session -Path «C:\SourceFolder\*» -Destination «F:\DestFolder\» -Recurse -Force
Эта команда скопирует содержимое папки C:\SourceFolder\ с компьютера testnode1 на локальный компьютер в директорию F:\DestFolder
Ключ PassThru
Командлет Copy-Item (как и многие другие командлеты PowerShell) не возвращает результатов в консоль. Параметр PassThru применяется скриптах, или для лог-файлов, когда нужно получить список скопированных файлов и работать с ним дальше. Рассмотрим пример
$items = Copy-Item -Path «C:\SourceFolder\*» –Destination «\\testnode1\C$\copy_tutorial\» -PassThru
Переменная $items будет содержать список скопированных файлов, с которым вы можете работать дальше.Это значит что вы можете напрямую работать с этими файлами. Например выполнив команду Remove-Item $items[0] , вы удалите директорию folder.
Ключ Verbose
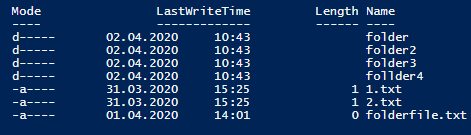
При использовании ключа -Verbose вы получите подробный лог операций копирования. Например, вывод команды
Copy-Item -Path «C:\SourceFolder\*.txt» -Destination «F:\DestFolder\» -Recurse -Force -Verbose

Несколько полезных скриптов с Copy-Item
Скопировать только файлы:
Get-ChildItem «C:\SourceFolder» -File -Recurse | Copy-Item -Destination «F:\DestFolder»
Скопировать структуру папок, без файлов:
$path = Get-ChildItem «C:\SourceFolder» -Recurse | ?<$_.PsIsContainer -eq $true>
$dest = «F:\DestFolder\»
$parent = $path[0].Parent.Name
$path | foreach <
$_.FullName -match «$parent.+»
New-Item -ItemType directory ($dest + $Matches[0])
>
Copy-Item очень простой и удобный в использовании командлет PowerShell для выполнения операций копирования и перемещения файлов. В сочетании с другими инструментами PowerShell, Copy-Item также является мощным инструментом для написания скриптов.


