- How to Transfer Data from Old SSD to New SSD in Windows 10/8/7?
- “How do I transfer all data from old SSD to new SSD?”
- You can transfer SSD to new SSD by cloning solid-state drive
- Best tool to clone SSD for transferring SSD to another SSD
- Steps to transfer all data from SSD to new SSD
- Conclusion
- Перенос (клонирование) Windows на другой SSD/HDD диск
How to Transfer Data from Old SSD to New SSD in Windows 10/8/7?
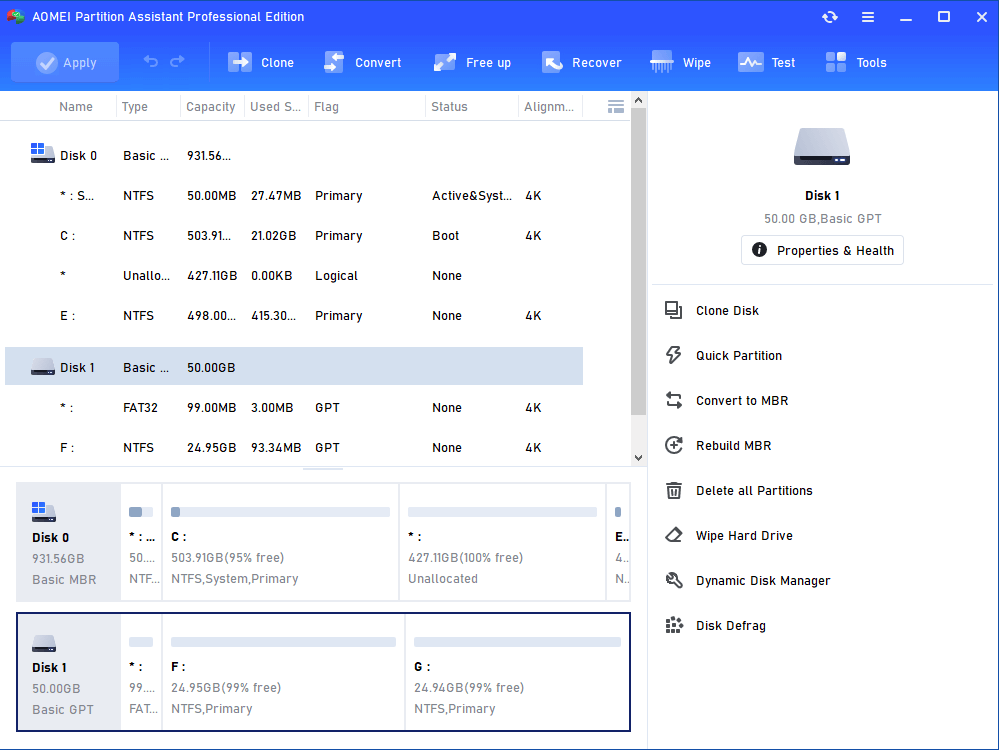
If you want to transfer data or files from SSD to new SSD, you can transfer the SSD to new SSD by cloning it. Then AOMEI Partition Assistant is a great choice for cloning SSD to transfer data to another SSD.

By Emily  / Last Updated February 21, 2021
“How do I transfer all data from old SSD to new SSD?”
“I currently have a Western Digital SSD drive where the Windows 10 is installed on. And I was planning to get a new SSD and wanted to migrate all data including the OS and installed games from the old SSD to the new one. So how do I transfer OS and other data from SSD to new SSD? Thanks for any help!”
You can transfer SSD to new SSD by cloning solid-state drive
The solid-state drive has become quite popular among computer users due to its better performance, faster reading/writing speed, and excellent durability, etc. Many users even install or migrate OS onto SSD drive from HDD to speed up the computer. However, when the old SSD is small, or about to fail, you might want to transfer everything from old SSD to new SSD for an upgrade or replacement.
To migrate a small number of personal files like photos, music, documents from one SSD to another SSD, you can copy or cut them in the old SSD and paste them into the new SSD drive. But to move a large amount of data, it will cost much time. Also, if you transfer applications through “copy and paste” to another SSD, some can be unusable and unbootable. Furthermore, if the SSD is a bootable drive and holds the boot files, that method will make the boot files invalid. Then you cannot boot OS from the new SSD drive afterward.
Luckily, there is another option: clone your SSD drive. This can transfer all data from old SSD to new SSD and then transferred OS/programs can load up as they were in the old solid-state drive.
Best tool to clone SSD for transferring SSD to another SSD
Now that we have known the best method of transferring data from SSD to SSD is to clone the whole old SSD drive, next we need to find out which tool can effectively clone SSD to SSD without boot issues. After fair comparison and user reviews, AOMEI Partition Assistant Professional is worth trying.
This software provides the «Disk Clone» function to help transfer everything to new SSD via cloning the entire disk. Besides, there are two different disk clone methods for you to choose based on your actual requirements and SSD size.
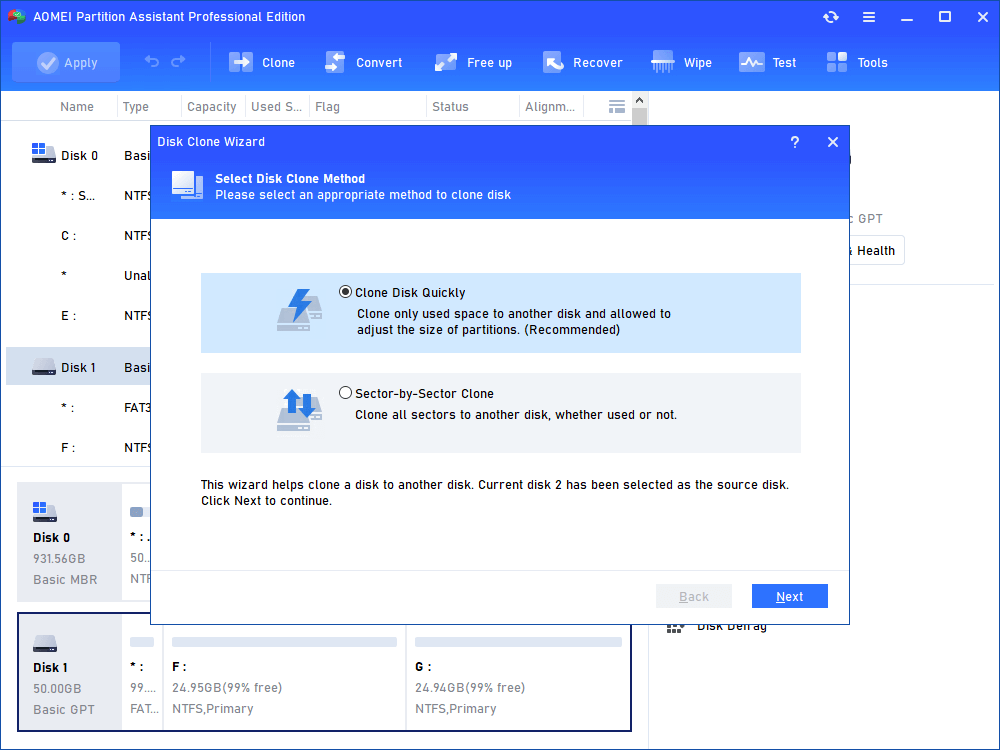
▸ “Clone Disk Quickly” will only copy the used space of the disk to another disk. So the destination disk must have to be larger than the used space of the source disk. This method can clone larger SSD to smaller SSD.
▸ “Sector-by-Sector Clone” will copy every sector of the disk to another one no matter it is used or not. So the target disk must be larger than the source disk. This method can help you clone BitLocker disk.
This method also works for cloning USB flash drive, SD card and other hard drives in Windows 10/8/7/XP/Vista. Moreover, its “Partition Clone” feature allows you to clone a specific partition to another drive.
Steps to transfer all data from SSD to new SSD
After getting a basic understanding of this SSD cloning software, you might want to know how to transfer data from old SSD to new SSD via its «Disk Clone» function. So, next we will show you how to perform it step by step.
PS.. the AOMEI Partition Assistant Professional Demo Version is available for free download and trial.
Step 1. Connect the destination SSD to your computer (you might need a SATA-to-USB adapter) and make sure it is detected. Install and run AOMEI software. Right-click the target SSD and select «Clone Disk».
Step 2. Choose a disk copying method based on your situation and click «Next».
Step 3. Now select the target SSD to hold all content on the old SSD and tick «Optimize the performance of SSD». Then click «Next».
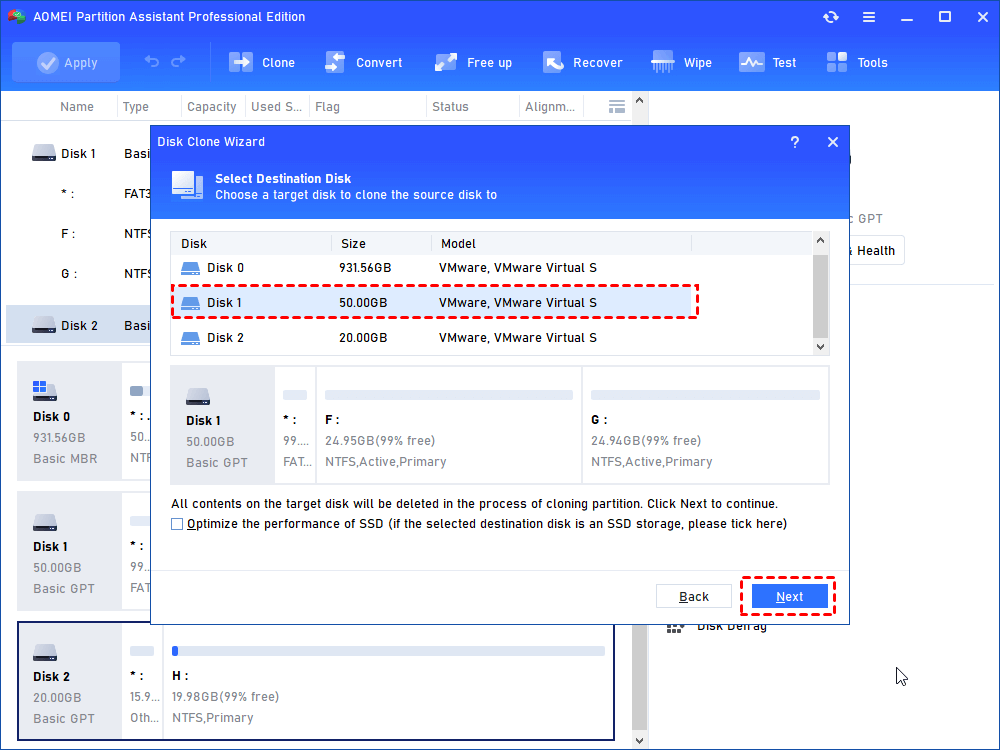
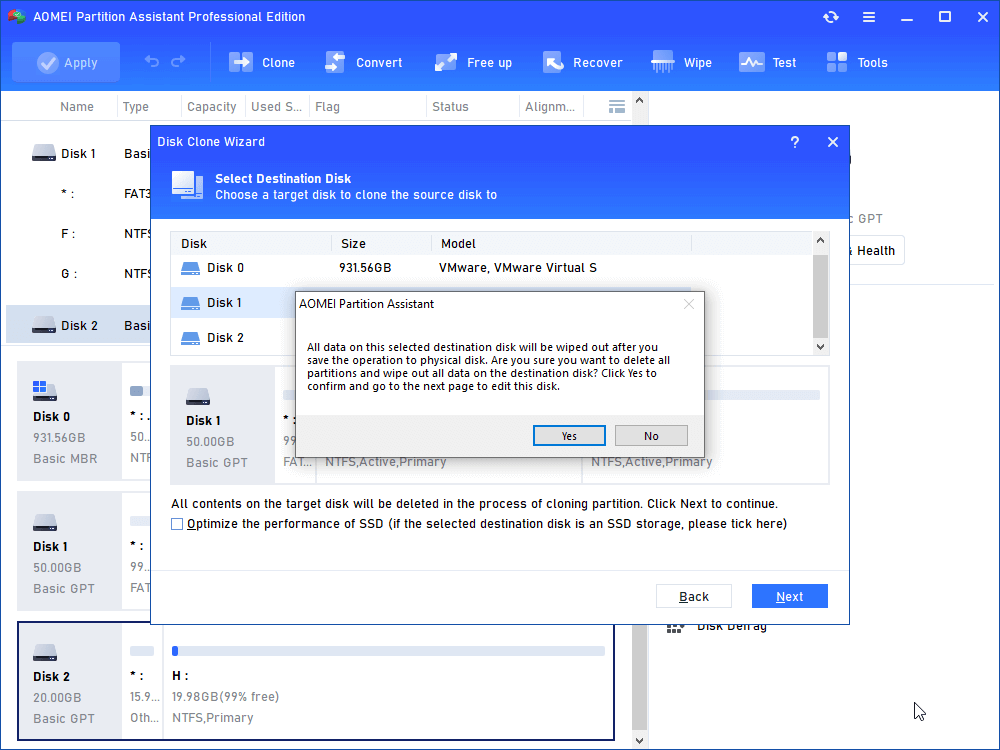
Step 4. A warning about the data loss on the target disk will appear. If you have backed up vital files, click “Yes” to continue.
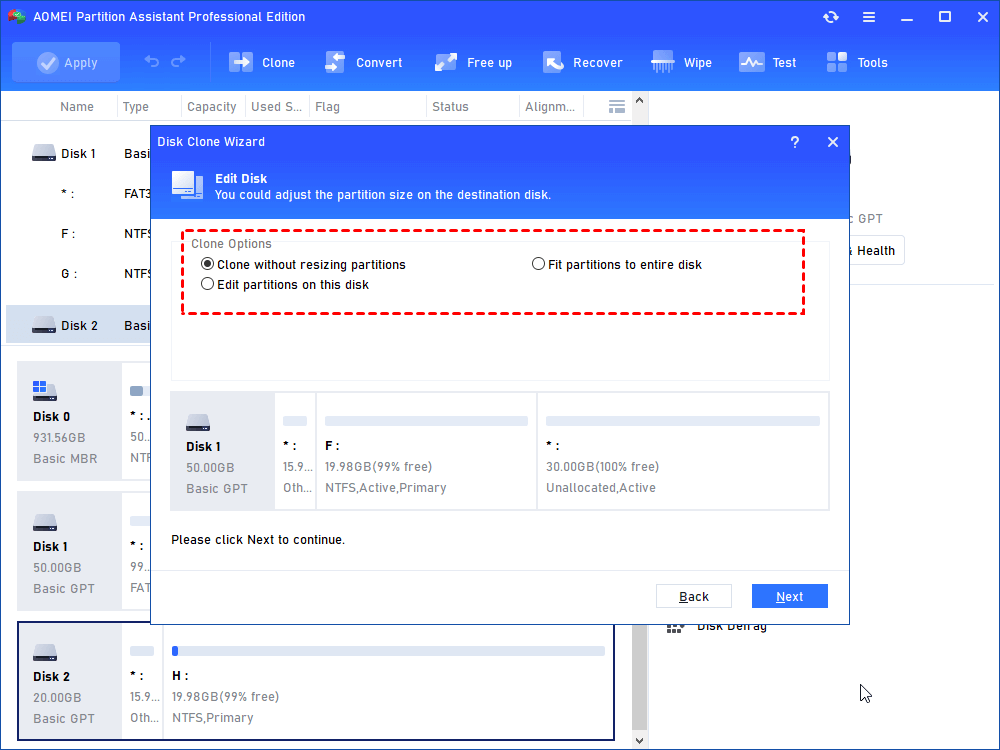
Step 5. Here, you can change the partition size on the new SSD drive. Click «Next» to proceed.
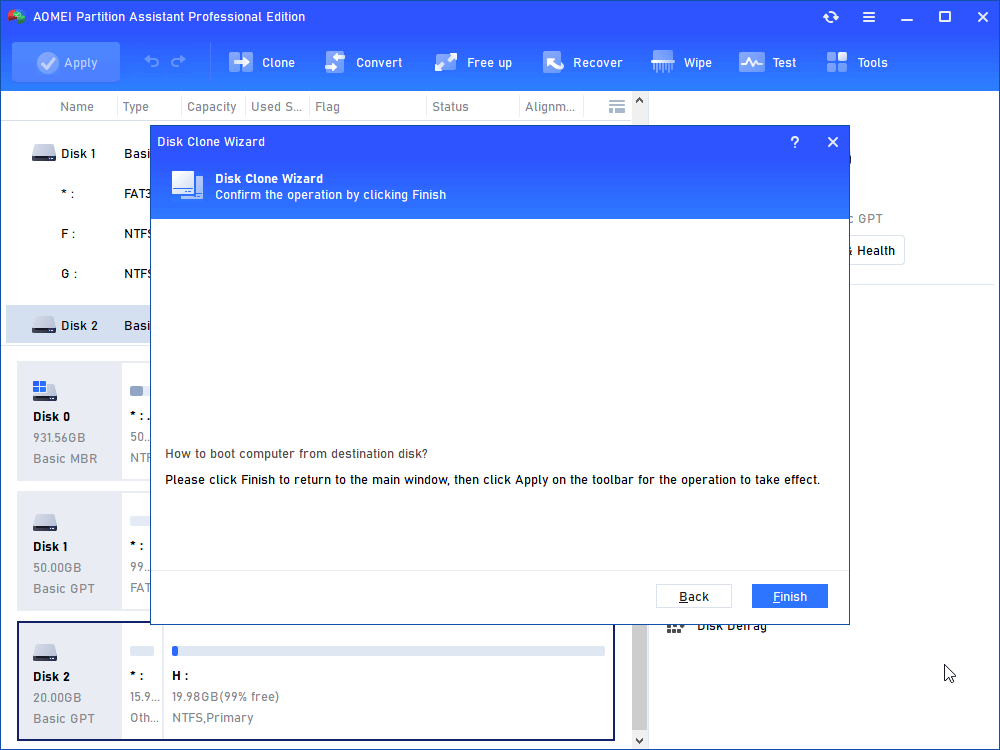
Step 6. Then, you will receive a note on how to boot OS successfully from the destination disk afterward. Read it carefully and click «Finish».
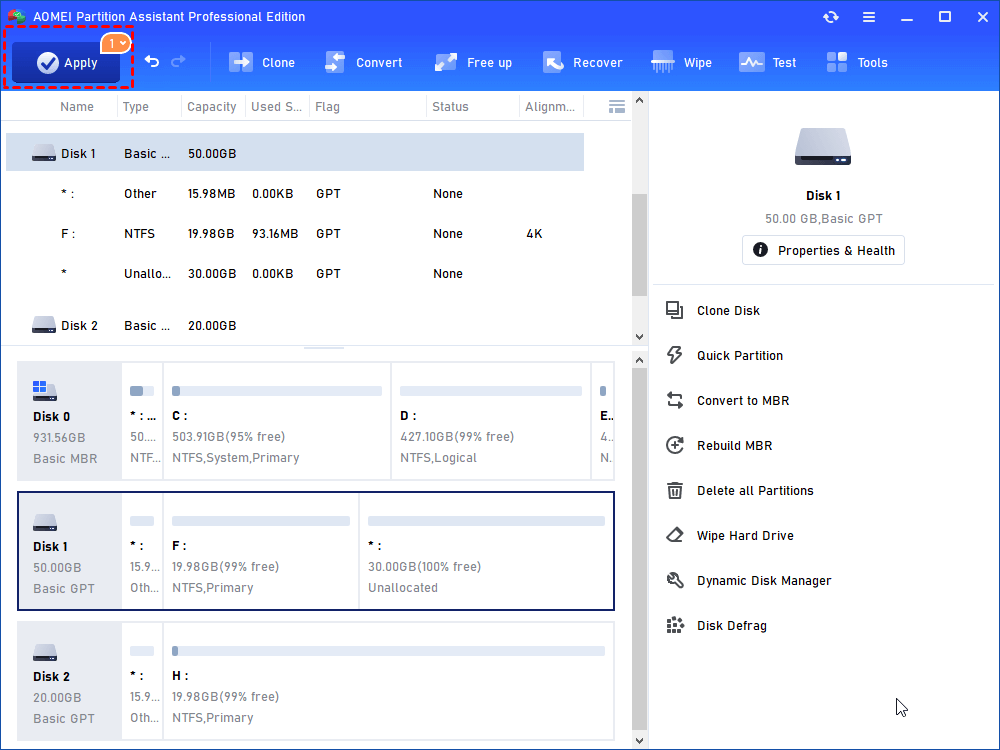
Step 7. Click «Apply» to start the SSD cloning process.
This guide is based on transferring/cloning the MBR SSD with OS installation to another GPT SSD drive. If you are doing that as well, please ensure your motherboard supports the UEFI boot mode because you need to change into UEFI from BIOS so as to boot OS from cloned SSD successfully. The vice versa is also true. If you don’t want to change the boot mode or the motherboard does not support UEFI, you can convert SSD to MBR before cloning.
Conclusion
So, with AOMEI Partition Assistant Professional, you can effectively transfer SSD to new SSD by cloning hard disk. Furthermore, it is not only an SSD cloning utility to transfer data between two SSD drives, but also an SSD repair tool to help fix damaged or corrupted SSD. If you want to clone SSD to SSD in Windows Server, you can try AOMEI Partition Assistant Server.
Перенос (клонирование) Windows на другой SSD/HDD диск
В этой статье мы рассмотрим, как перенести установленную Windows с одного жесткого диска на другой только с помощью встроенных средств без использования сторонних программ (таких, как Paragon, AOMEI или Acronis). Эта инструкция поможет вам, например, перенести Windows с HDD на новый SSD диск, или склонировать установленную и настроенную Windows на другой компьютер (есть нюансы) или новый жесткий диск большего размера.
В качестве примера мы склонируем установленную Windows 10 на новый диск с помощью загрузочной USB флешки, командной строки и встроенной утилиты robocopy.
Вы сможете склонировать жесткий диск на новый диск меньшего размера, если место, занятое на системном диске текущей Windows меньше, чем емкость нового диска. Если это не так, придется удалить/переместить часть файлов с диска. Чаще всего такой вопрос возникает при переносе на SSD диск меньшей емкости, чем обычный HDD.
Процедура переноса Windows на другой диск зависит от, того, в каком режиме работает ваш компьютер: BIOS или UEFI. Выполните команду:
Если в строке BIOS mode (режим BIOS) указано Legacy (Устаревший), у вас компьютер с BIOS (или UEFI работает в режиме Legacy/CSM). Если указано UEFI – у вас современных компьютер и Windows установлена в UEFI режиме.
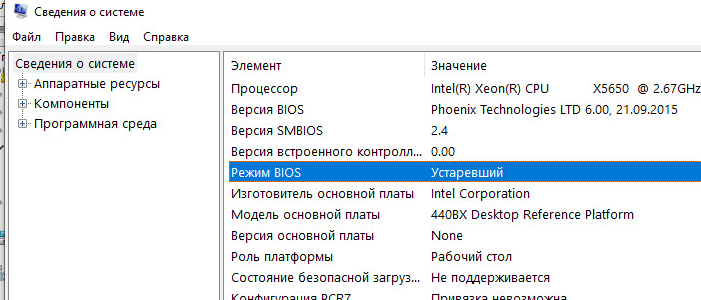
- Если компьютер работает в нативном UEFI режиме и имеет таблицу разделов GPT, я буду помечать команды для таких компьютеров UEFI GPT ;
- Если у вас старый компьютер с BIOS или с UEFI но в Legacy режиме, а таблица разделом MBR – команды будут помечены меткой BIOS MBR .
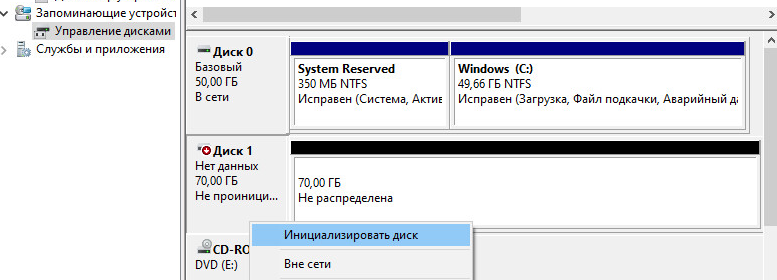
В первую очередь нужно создать таблицы разделов на новом диске. Это можно сделать непосредственно из запущенной Windows 10 с помощью diskpart. Если диск новый, инициализируйте его с помощью консоли diskmgmt.msc или PoweShell команды Initialize-Disk:
Get-Disk | Where-Object PartitionStyle –Eq ‘RAW’ | Initialize-Disk
Теперь создадим таблицу разделов на диске. Откройте командную строку с правами администратора и выполните команду:
В контексте diskpart выполните следующие команды.
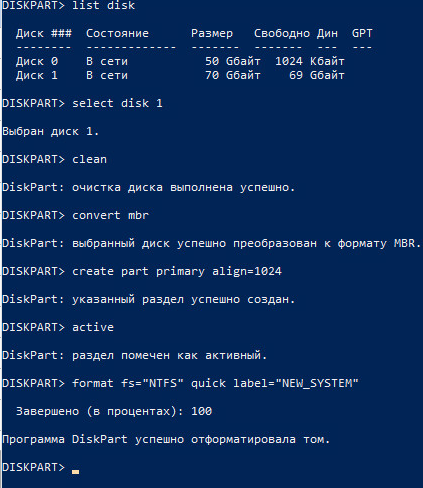
list disk
select disk 1 (в зависимости от номера вашего нового диска, который выдала предудущая команда)
clean
Далее команды отличаются в зависимости от типа вашей платформы.
Для UEFI GPT :
convert gpt
create partition efi size=100
format fs=»FAT32″ quick label=»EFI»
create partition msr size=16
create partition primary
format fs=»NTFS» quick label=»NEW_SYSTEM»
exit
Мы создали на новом диске таблицу разделов GPT, два небольших служебных раздела (EFI и MSR), на оставшемся месте создан один большой раздел (см. подробнее о структуре GPT разделов для EFI).
Для BIOS MBR следующие команды:
convert mbr
create partition primary align=1024
active
format fs=»NTFS» quick label=»NEW_SYSTEM»
exit
Для клонирования Windows на новый диск вам понадобится загрузочная USB флешка с установочным образом Windows 10 (проще всего создать такую флешку с помощью MediaCreationTool).
Перезагрузите ваш компьютер и загрузитесь с установочного диска. При появлении окна установки Windows нажмите Shift+F10 чтобы открыть командую строку. В открывшемся окне выполните команды
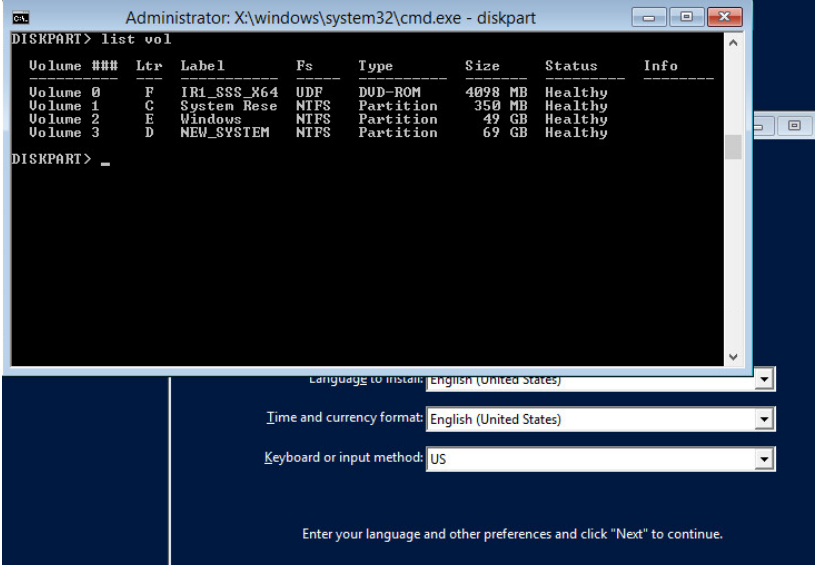
На скриншоте ниже видно, что оригинальному разделу Windows на старом диске присвоена буква диска E:, а большому разделу на новом диске (с меткой NEW_SYSTEM) назначена буква D:.
Теперь нужно скопировать файлы со старого диска с установленной Windows на новый. Проще всего это сделать с помощью robocopy. Следующая команда robocopy скопирует все символические ссылки, файлы и папки с атрибутами, NTFS правами и timestamp. При этом лог копирования будет сохранен в корень целевого диска:
robocopy E:\ D:\ /E /COPYALL /SL /XJ /R:3 /W:3 /UNILOG:»D:\rcopy.log» /TEE
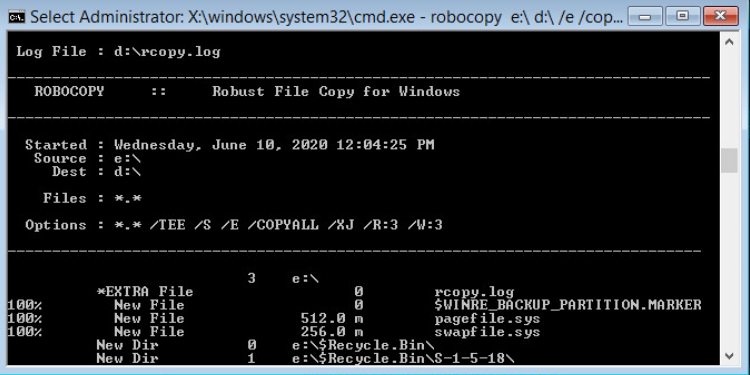
Копирование может занять продолжительно время в зависимости от размер старого диска (в моем случае копирование 60 Гб диска заняло около часа).
Теперь можно выключить компьютер и отключить старый жесткий диск.
Следующий шаг, настройка загрузчика Windows на новом диске.
Опять загрузите компьютер в среде установки Windows и запустите командную строку ( Shift+F10 ).
Восстановление BIOS MBR загрузчика.
Проверьте букву диска, назначенную новому большому разделу на диске:
Диску назначена буква C:
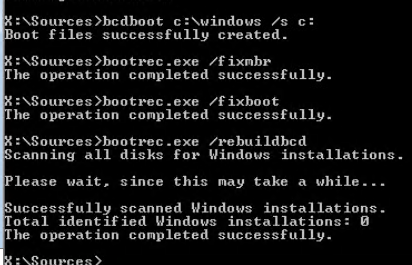
Восстановите BCD загрузчик на диске C:
bcdboot C:\Windows /S C:
Исправьте MBR запись и записи в BCD загрузчике:
bootrec.exe /FixMbr
bootrec.exe /FixBoot
bootrec.exe /RebuildBcd
Восстановление загрузчика на UEFI GPT компьютере (подробно эта процедура описана в статье восстановление загрузчика Windows 10 на UEFI компьютере).
Нужно определить букву системного диска и назначить букву диска разделу с EFI.
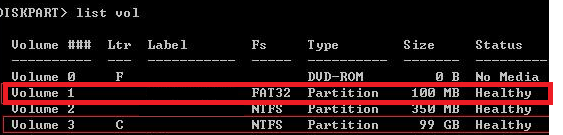
В данном примере системному разделу назначена буква диска C. Вам нужно назначить букву разделу EFI (размер 100 мб и файловая система FAT32) следующими командами (в командах измените номера разделов в соответствии с вашей конфигурацией):
select volume 1
assign letter M:
exit
Теперь нужно пересоздать конфигурацию BCD загрузчика:
cd /d m:\efi\microsoft\boot\
ren BCD BCD.bak
bcdboot С:\Windows /l en-us /s M: /f ALL
Перезагрузите компьютер и отключите загрузочную флешку. Убедитесь, что Windows корректно загрузилась с нового диска.
Все установленные приложения, документы и настройки остались на месте. Вы успешно скопировали установленную Windows 10 на новый диск.
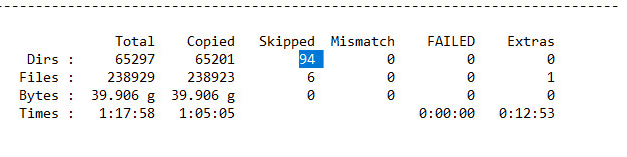
При копировании файлов на новый диск с помощью robocopy могут встречаться ошибки. Откройте на новом диске файл rcopy.log и посмотрите какие файлы не были скопированы. В моем случае не было скопировано 94 файла (в моем случае не скопировать только мусорные файлы).


Не очень понятно здесь:
«Вам нужно назначить букву разделу EFI (размер 100 мб и файловая система FAT32) следующими командами (в командах измените номера разделов в соответствии с вашей конфигурацией):
select volume 2»
на скриншоте 100 MB — это volume 1.
Нет?

Да, здесь ошибка. Поправил текст.
Прикольно. Сохраню. Обычно это делаю через Acronis 🙂
переход на другой диск или с mbr на uefi
1. Гружусь через любой WinPE .
2. Снимаю образ
Dism /Capture-Image /ImageFile:d:\windows.wim /CaptureDir:c:\ /Name:»Windows»
3. Подготавливаю новый диск в UEFI
rem == CreatePartitions-UEFI.txt ==
rem == These commands are used with DiskPart to
rem create four partitions
rem for a UEFI/GPT-based PC.
rem Adjust the partition sizes to fill the drive
rem as necessary. ==
select disk 0
clean
convert gpt
rem == 1. System partition =========================
create partition efi size=260
rem ** NOTE: For Advanced Format 4Kn drives,
rem change this value to size = 260 **
format quick fs=fat32 label=»System»
assign letter=»S»
rem == 2. Microsoft Reserved (MSR) partition =======
create partition msr size=16
rem == 3. Windows partition ========================
rem == a. Create the Windows partition ==========
create partition primary
rem == b. Create space for the recovery tools ===
shrink minimum=500
rem ** NOTE: Update this size to match the
rem size of the recovery tools
rem (winre.wim) **
rem == c. Prepare the Windows partition =========
format quick fs=ntfs label=»Windows»
assign letter=»W»
rem === 4. Recovery tools partition ================
create partition primary
format quick fs=ntfs label=»Recovery tools»
assign letter=»R»
set
gpt attributes=0x8000000000000001
list volume
list disk
exit
4. Заливаю образ.
rem == ApplyImage.bat ==
rem == These commands deploy a specified Windows
rem image file to the Windows partition, and configure
rem the system partition.
rem Usage: ApplyImage WimFileName
rem Example: ApplyImage E:\Images\ThinImage.wim ==
rem == Set high-performance power scheme to speed deployment ==
call powercfg /s 8c5e7fda-e8bf-4a96-9a85-a6e23a8c635c
rem == Apply the image to the Windows partition ==
dism /Apply-Image /ImageFile:%1 /Index:1 /ApplyDir:W:\
rem == Copy boot files to the System partition ==
W:\Windows\System32\bcdboot W:\Windows /s S:
:rem == Copy the Windows RE image to the
:rem Windows RE Tools partition ==
md R:\Recovery\WindowsRE
xcopy /h W:\Windows\System32\Recovery\Winre.wim R:\Recovery\WindowsRE\
:rem == Register the location of the recovery tools ==
W:\Windows\System32\Reagentc /Setreimage /Path R:\Recovery\WindowsRE /Target W:\Windows
:rem == Verify the configuration status of the images. ==
W:\Windows\System32\Reagentc /Info /Target W:\Windows
:rem == Delete OneDrive
del w:\Windows\SysWOW64\OneDriveSetup.exe
:rem == Reboot
rem Wpeutil reboot
Благодарю за идею. через wim образ наверно даже надежнее будет.


