- INF CopyFiles Directive
- Entries
- Remarks
- Examples
- Использование Robocopy для синхронизации и резервного копирования файлов, примеры
- Основные возможности Robocopy
- Синтаксис и параметры robocopy
- Использование robocopy для зеркалирования каталогов
- Инкрементальное копирование с помощью robocopy
- Robocopy: перемещение файлов
- Пример использование robocopy в планировщике задач
- Отслеживание изменений в каталогах с помощью robocopy
- Коды возврата (ошибки) robocopy
INF CopyFiles Directive
A CopyFiles directive can do either of the following:
- Cause a single file to be copied from the source media to the default destination directory.
- Reference one or more INF-writer-defined sections in the INF that each specifies a list of files to be copied from the source media to the destination.
A CopyFiles directive can be specified within any of the sections shown in the formal syntax statement. This directive can also be specified within any of the following INF sections:
Each named section referenced by a CopyFiles directive has one or more entries of the following form:
An INF-writer-defined file-list-section can have any number of entries, each on a separate line.
Each file-list-section can have an optional, associated file-list-section.security section of the following form:
Entries
destination-file-name
Specifies the name of the destination file. If no source-file-name is given, this specification is also the name of the source file.
source-file-name
Specifies the name of the source file. If the source and destination file names for the file copy operation are the same, source-file-name can be omitted.
unused
This entry is no longer supported in Windows 2000 and later versions of Windows.
flag
These optional flags, expressed in hexadecimal notation or as a decimal value in a section entry, can be used to control how (or whether) a particular source file is copied to the destination. One or more (ORed) values for the following system-defined flags can be specified. However, some of these flags are mutually exclusive:
0x00000001 (COPYFLG_WARN_IF_SKIP)
Send a warning if the user chooses not to copy a file. This flag and the next are mutually exclusive, and both are irrelevant to INF files that are digitally signed.
0x00000002 (COPYFLG_NOSKIP)
Do not allow the user to skip copying a file. This flag is implied if the driver package is signed.
0x00000004 (COPYFLG_NOVERSIONCHECK)
Ignore file versions and write over existing files in the destination directory. This flag and the next two are mutually exclusive. This flag is irrelevant to digitally signed INF files.
0x00000008 (COPYFLG_FORCE_FILE_IN_USE)
Force file-in-use behavior: do not copy over an existing file of the same name if it is currently open. Instead, copy the given source file with a temporary name so that it can be renamed and used when the next restart occurs.
0x00000010 (COPYFLG_NO_OVERWRITE)
Do not replace an existing file in the destination directory with a source file of the same name. This flag cannot be combined with any other flags.
0x00000020 (COPYFLG_NO_VERSION_DIALOG)
Do not write over a file in the destination directory with the source file if the existing file is newer than the source file.
The newer check is done using the file version, as extracted from the VS_VERSIONINFO file version resource. For more info, see Version Information. If the target file is not an executable or resource image, or the file does not contain file version information, then device install assumes that the target file is older.
0x00000040 (COPYFLG_OVERWRITE_OLDER_ONLY)
Copy the source file to the destination directory only if the file on the destination is superseded by a newer version. This flag is irrelevant to digitally signed INF files. The version check uses the same procedure as that described above in COPYFLG_NO_VERSION_DIALOG.
0x00000400 (COPYFLG_REPLACEONLY)
Copy the source file to the destination directory only if the file is already present in the destination directory.
0x00000800 (COPYFLG_NODECOMP)
(Windows 7 and later) Copy the source file to the destination directory without decompressing the source file if it is compressed.
0x00001000 (COPYFLG_REPLACE_BOOT_FILE)
This file is required by the system loader. The system will prompt the user to restart the system.
0x00002000 (COPYFLG_NOPRUNE)
Do not delete this operation as a result of optimization.
For example, Windows might determine that the file copy operation is not necessary because the file already exists. However, the writer of the INF knows that the operation is required and directs Windows to override its optimization and perform the file operation.
This flag can be used to ensure that files are copied if they are also specified in an INF DelFiles directive or an INF RenFiles directive.
0x00004000 (COPYFLG_IN_USE_RENAME)
If the source file cannot be copied because the destination file is being used, rename the destination file, then copy the source file to the destination file, and delete the renamed destination file. If the destination file cannot be renamed, complete the copy operation during the next system restart. If the renamed destination file cannot be deleted, delete the renamed destination file during the next system restart.
security-descriptor-string
Specifies a security descriptor, to be applied to all files copied by the named file-list-section. The security-descriptor-string is a string with tokens to indicate the DACL (D:) security component.
For information about security descriptor strings, see Security Descriptor Definition Language (Windows). For information about the format of security descriptor strings, see Security Descriptor Definition Language (Windows).
If an file-list-section.security section is not specified, files inherit the security characteristics of the directory into which the files are copied.
If an file-list-section.security section is specified, the following ACE’s must be included so that installations and upgrades of devices and system service packs can occur:
- (A;;GA;;;SY) в€’ Grants all access to the local system.
- (A;;GA;;;BA) в€’ Grants all access to built-in administrators.
Do not specify ACE strings that grant write access to nonprivileged users.
For more information about how to specify security descriptors, see Creating Secure Device Installations.
Remarks
Windows only copies a driver package to its destination location as part of a driver installation if the file has an INF CopyFiles directive. When it copies files, the operating system automatically generates temporary file names, when necessary, and renames the copied source files the next time that the operating system is started.
The INF file writer must also supply path specifications for files that are copied from source media by using the INF SourceDisksNames section and the INF SourceDisksFiles section to explicitly specify the path of each source file relative to the INF file in the source media.
The destination of copy operations is controlled by the INF DestinationDirs section. This section controls the destination for all file-copy operations, as follows:
- If a named section referenced by a CopyFiles directive has a corresponding entry in the DestinationDirs section of the same INF, that entry explicitly specifies the target destination directory into which all files that are listed in the named section are copied. If the named section is not listed in the DestinationDirs section, Windows uses the DefaultDestDir entry in the DestinationDirs section of the INF file.
- If a CopyFiles directive uses the @filename syntax, Windows uses the DefaultDestDir entry in the DestinationDirs section of the INF file.
The following points apply to the INF CopyFiles directive:
- Every file-list-section name must be unique to the INF file, but it can be referenced by CopyFiles, DelFiles, or RenFiles directives elsewhere in the same INF file. The section name must follow the general rules that are described in General Syntax Rules for INF Files.
- File names that are specified in either the @filename or file-list-section entries must be the exact name of a file on the source media. You cannot use a %strkey% token to specify the file name. For more information about %strkey% tokens, see INF Strings Section.
- The CopyFiles directive does not support decorating a file-list-section name with a system-defined platform extension (.nt, .ntx86, .ntia64, or .ntamd64).
- Do not use CopyFiles directives to copy INF files. For more information, see Copying INF Files.
Starting with Windows Vista, the following points also apply to the INF CopyFiles directive:
- When the DIFx tools preinstall a driver package in the driver store, they only copy a file from the driver package source to the driver store if the file has a corresponding INF CopyFiles directive.
- As part of a Windows upgrade, Windows only copies a driver package file to the driver store as part of a driver migration if the file has an INF CopyFiles directive.
Examples
This example shows how the SourceDisksNames, SourceDisksFiles, and DestinationDirs sections specify the paths for copy-file (and delete-file) operations that occur in processing a simple device-driver INF. (The same INF was also used previously as examples of Version, SourceDisksNames, and SourceDisksFiles sections.)
This example shows how a CopyFiles directive can be used in a DDInstall.CoInstallers section of an INF for a device driver that provides two device-specific co-installers to supplement the INF processing of the system device-type-specific class installer.
As the preceding example suggests, the names of new device-specific co-installers can be constructed from the name of the provider (shown here as Xx) and the intended use for each such co-installer DLL (shown here as PreInst and PostInst).
For additional examples of how to use the INF CopyFiles directive, see the INF files for the device driver samples that are included in the src directory of the Windows Driver Kit (WDK).
Использование Robocopy для синхронизации и резервного копирования файлов, примеры
Robocopy – это консольная утилита Windows для копирования файлов, которую можно использовать для синхронизации/репликации файлов и каталогов, и в сценариях резервного копирования. Robocopy (Robust File Copy) доступна начиная с Windows NT 4.0 Resource Kit, но по умолчанию эта функция появилась только в Windows Vista и Windows Server 2008. Robocopy заменяет Xcopy и copy, как более функциональная.
Основные возможности Robocopy
Кроме обычного копирования файлов и папок из папки источника в каталог назначения, в Robocopy есть множество очень полезных функций:
- Устойчивость к обрывам сети (robocopy может продолжить копирования после восстановления сетевого доступа);
- Корректное копирование файлов с их атрибутами и NTFS правами доступа;
- Копирование с сохранением исходной временной метки;
- Возможность копирования файлов и директорий, запрещенных для доступа даже администратору, с помощью ключа /B (ключ позволяет игнорировать проверку прав доступа, ключ доступен только для участников группы Администраторы или Операторы архива);
- Возможность задать количество попыток копирования файла, если файл недоступен;
- Режим полного зеркалирования директорий;
- Пропуск уже существующих файлов (с одинаковым размером или временной меткой timestamp);
- Индикатор прогресса копирования;
- Корректная работа с длинными путями (более 260 символов);
- Эффективные алгоритмы и многопоточность позволяют выполнять копирование файлов намного быстрее, чем обычное копирование средствами Windows;
- Поддержка коды возврата (что позволяет использовать robocopy в различных внешних скриптах и утилитах).
Официальной графической версии robocopy (c GUI) от Microsoft нет. Существуют пользовательские версии, но их поддержка прекращена. Список неофициальных GUI для robocopy (это сторонние программы):
Синтаксис и параметры robocopy
Robocopy имеет много параметров, которые на первый взгляд могут показаться сложными, но имея под рукой документацию, вы с легкостью разберетесь и сможете править скрипты под себя.
Синтаксис robocopy состоит из двух обязательных параметров (исходный и целевой каталог) и двух необязательных (фильтр файлов и параметры):
robocopy [фильтр файлов] [параметры]
Поддерживаются как локальные пути, так и UNC, например, \\server\directory
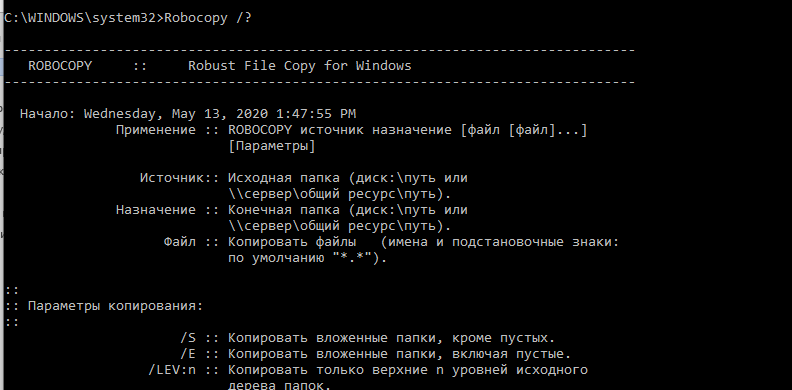
Полный синтаксис утилиты robocopy (все параметры и их описания) доступны по команде:
Поскольку ключей в robocopy много, мы будем рассматривать их на практике, в готовых командах. Мы не будем рассматривать самые простые примеры использования robocopy, т.к. обычно они не вызывают вопросов. Ниже представлены готовые к применению более сложные команды robocopy, которые можно использовать в реальных сценариях.
Использование robocopy для зеркалирования каталогов
Вы можете зеркалировать (синхронизировать) содержимое двух каталог с помощью следующей команды robocopy (под зеркалированием понимается копирование файлов из целевой папки с удалением файлов в целевом каталоге, если они удалены в источнике).
robocopy \\testnode1\C$\source\ \\testnode2\c$\dest\ *.txt /MIR /COPYALL /Z /B /J /R:3 /W:1 /REG /TEE /LOG+:%appdata%\robocopy.log
- \\testnode1\C$\source\ — исходный каталог, откуда копируются файлы
- \\testnode2\C$\dest\ — каталог назначения, куда скопируются файлы
- *.txt – фильтр файлов. Синхронизируются только .txt файл и директории.
- /MIR – полное зеркалирование данных в source и dest директориях. Файлы, удаленные из source директории или не присутствующие в ней, также будут удалены из dest. Если вы хотите, чтобы удаленные из source файлы оставались в dest, то поменяйте параметр /MIR на /E
- /COPYALL – копирует всю информацию о файле (Атрибуты, параметры безопасности и т.д.). Как альтернатива, можно применять флаг /COPY:DT для копирования timestamp, а не всей информации. /COPALL требует прав администратора
- /Z – robocopy продолжит копирование файла при обрыве. Полезно при копировании больших файлов (неплохая альтернатива копированию файлов по BITS)
- /B – позволяет robocopy избегать ошибки access denied error. В этом режиме robocopy игнорирует все права на файлы, которые могли бы помешать прочитать/записать файл. Этот режим требует прав администратора либо участие в группе Операторы архива
- /J – Копирование без буфера (файлового кэша, оперативной памяти). Эффективно для больших файлов.
- /R:3 – количество попыток скопировать недоступный файл. Значение по умолчанию – миллион, поэтому необходимо его сменить.
- /W:1 – секунды между попытками скопировать недоступный файл. Значение по умолчанию – 30 секунд.
- /REG – сохранить текущие значения ключей /R и /W в реестр как стандартные, для будущих вызовов robocopy.
- /TEE – разделение вывода работы команды и в лог файл, и в консоль. При фоновом вызове robocopy (например, из планировщика задача) этот параметр можно убрать, оставив только /LOG
- /LOG – путь к файлу лога
Обратите внимание на ключ /Z даже если вы копируете небольшие файлы по устойчивому каналу. Он не несёт дополнительных расходов при использовании, но в случае обрыва, вы сможете продолжить копирование просто повторно запустив скрипт.
Инкрементальное копирование с помощью robocopy
Сам по себе robocopy не может полностью обеспечить инкрементальное резервное копирование каталога (копирование новых и измененных файлов), для этого мы будем использовать небольшой bat скрипт:
- set date_=%date:/=-% — эта строчка присваивает значение переменной date_ в формате DD.MM.YYYY
- /maxage:1 — Максимальный возраст файла. Исключает файлы старше N дней или даты. Дата указывается в формате YYMMDD, например, /maxage:20200421
- /E – копирует подпапки, без ограничения уровня вложенности. Для контроля уровня вложенности директорий можно использовать параметр /lev, например, /lev:3
Инкрементальность осуществляется за счёт параметра /maxage:1 — файлы старше суток копироваться не будут. Для первого, “базового” копирования, можно выполнить этот скрипт без параметра /maxage.
Robocopy: перемещение файлов
С помощью ключа /mov или /move вы можете переместить файлы (а точнее удалить успешно скопированные файлы из исходной директории):
robocopy C:\source\ F:\dest\ /MOVE /E /COPYALL /Z /B /J /R:3 /W:1 /REG /TEE /LOG+:%appdata%\robocopy.log
- /MOVE – удалить файлы и директории из исходной папки, после того как они были скопированы. Имейте в виду, что этот ключ нужно использовать вместе с /E или /S, в противном случае вы перенесете только файлы, но не директории. Если вы хотите перенести только файлы, используйте ключ /MOV
- Если вы используете ключ /MOVE с ключом /E, то вы перенесете все файлы, директории (включая файлы внутри них) и пустые директории. Файлы и директории удалятся из исходной папки. /MOVE с /S даст такой же результат, но пустые директории не перенесутся и будут удалены.
- Если вы используете ключ /MOV с ключом /E, то вы перенесете все файлы, включая те, которые находятся в директориях и поддиректориях, также скопируются все директории (включая пустые), но они не будут удалены из исходного каталога, в отличие от файлов. Используя /MOV с /S, вы получите такой же результат, но пустые директории не будут скопированы.
Пример использование robocopy в планировщике задач
Для примера возьмём задачу: нам необходимо с помощью robocopy регулярно синхронизировать содержимое сетевой папки между двумя серверами с ведением логов.
- Исходный путь — \\testnode1\C$\source
- Целевая директория- \\testnode2\C$\source
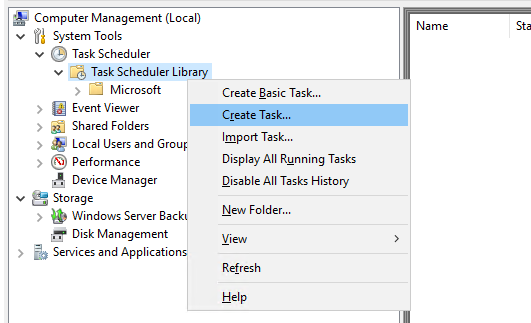
Запустите командную строку с правами администратора и введите: compmgmt.msc
Перейдите в System Tools -> Task Scheduler Library. Создайте новое задание планировщика (Create task).
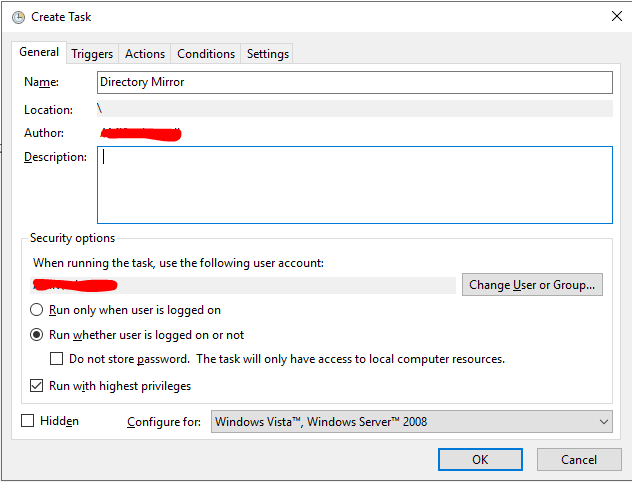
Укажите имя задания, и выберите пользователя из-под которого будет выполняться задание. Пользователь должен иметь доступ на чтению и запись в обоих каталогах (при копировании по сети между серверами домена можно использовать аккаунт System, в этом случае нужно предоставить на целевой каталог права RW для объекта computer сервера-источника) .
Выберите опцию Run whether user is logged on or not, для того чтобы задание выполнялось в фоновом режиме. Также отметьте Run with highest privileges. Эта опция сработает если аккаунт из-под которого выполняется задание, будет иметь права администратора.
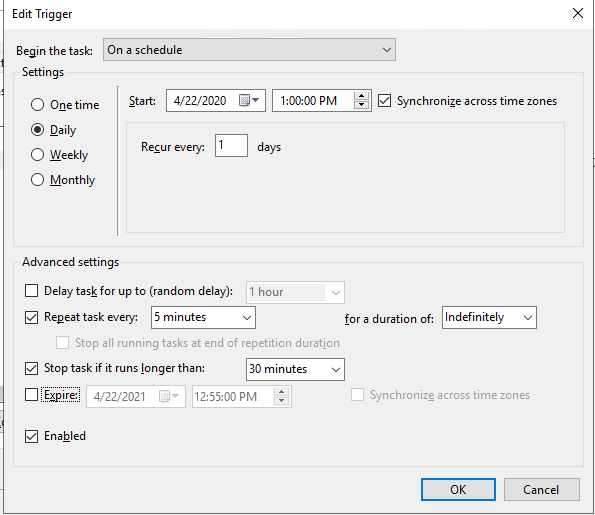
Перейдите на вкладку Triggers и создайте новый триггер.
Выберите параметр On a schedule (по расписанию), выберите время начала и отметьте Repeat task every, указав интервал выполнения. В моём случае это 5 минут – каждые 5 минут, начиная с часа дня 22 апреля (обязательно измените эту дату на ту, которая нужна вам), директории будут синхронизированы. В for a duration of поставьте Indefinitely (бесконечно)
Перейдите во вкладку Actions и нажмите New…
Выберите Start a program, и укажите путь к .bat скрипту.
Содержание robocopy-mirror.bat:
Помимо журнала выполнения задания планировщика, robocopy будет писать собственный лог файл копирования в C:\robocopy.log. Если аккаунт из-под которого будет выполняться скрипт не имеет прав администратора, смените C:\robocopy.log на нужный вам путь.

Остальные настройки заполнять не надо. После нажатия на кнопку ОК, вас попросит ввести пароль от учетной записи, которую вы выбрали для запуска задания.
Если вы всё настроили правильно, директории должны начать синхронизироваться. 
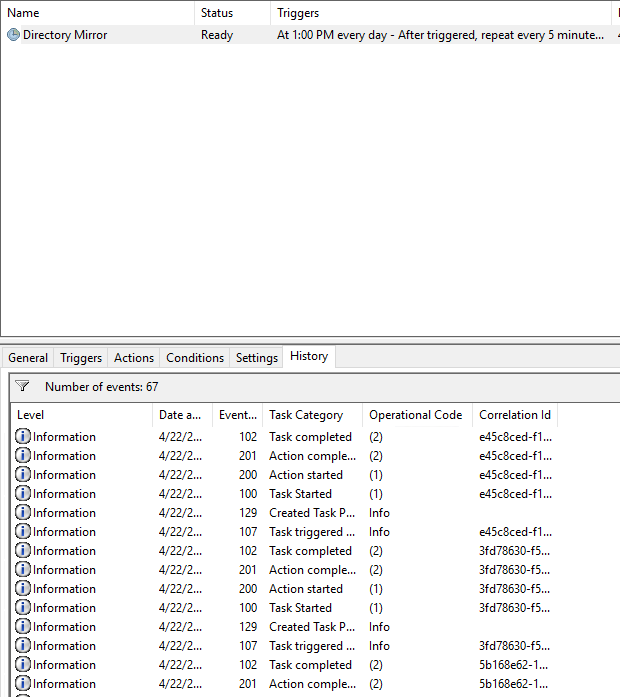
Если у вас возникли проблемы с выполнением скрипта, то обязательно проверьте вкладку History вашей задачи
Отслеживание изменений в каталогах с помощью robocopy
В robocopy есть встроенный механизм отслеживания изменений в исходном каталоге (и их последующего копирования) и встроенный планировщик – параметры /mon и /mot .
- /mon:N – проверяет исходную директорию на предмет изменений каждую 1 минуту, и если изменений в директории больше чем N, то будет произведено копирование в целевую директорию. Если задан параметр /mot:Y, то изменения будут проверяться каждые Y минут.
- /mot:N – проверяет исходную директорию на предмет изменений каждые N минут. Минимальное значение N = 1, в минутах. Если параметр /mon не задан, то будет считаться что /mon:1
.bat скрипт для зеркалирования с отслеживанием изменений с интервалом в 1 минуту. Этот скрипт нужно запускать из-под аккаунта с правами администратора.
Плюсы:
- Не нужно создавать задание в планировщике задач
- Подходит для непостоянного выполнения. Например, в течение нескольких часов, в таком случае запустить скрипт руками через CMD проще, чем создавать задание в планировщике
Минусы:
- Чтобы запустить .bat скрипт в фоновом режиме, нужно либо использовать VBS скрипт, либо стороннее ПО, например, NirCmd.
- Минимальный интервал поиска изменений и копирования – 1 минута. Для меньшего интервала нужно использовать PowerShell или bat скрипт.
Коды возврата (ошибки) robocopy
Ниже приведены стандартные коды возврата robocopy, которые можно использовать для обработки различных ошибок, которые возвращает утилита после выполнения действия копирования (кот возврата эта битовая маска).
| Hex | Decimal | Meaning if set |
| 0x00 | 0 | No errors occurred, and no copying was done. The source and destination directory trees are completely synchronized. |
| 0x01 | 1 | One or more files were copied successfully (that is, new files have arrived). |
| 0x02 | 2 | Some Extra files or directories were detected. No files were copied Examine the output log for details. |
| 0x04 | 4 | Some Mismatched files or directories were detected. Examine the output log. Housekeeping might be required. |
| 0x08 | 8 | Some files or directories could not be copied (copy errors occurred and the retry limit was exceeded). Check these errors further. |
| 0x10 | 16 | Serious error. Robocopy did not copy any files. Either a usage error or an error due to insufficient access privileges on the source or destination directories. |
| Коды возврата могут комбинироваться: | ||
| 0x03 | 3 | (2+1) Some files were copied. Additional files were present. No failure was encountered. |
| 0x05 | 5 | (4+1) Some files were copied. Some files were mismatched. No failure was encountered. |
| 0x06 | 6 | (4+2) Additional files and mismatched files exist. No files were copied and no failures were encountered. This means that the files already exist in the destination directory |
| 0x07 | 7 | (4+1+2) Files were copied, a file mismatch was present, and additional files were present. |
Любое значение больше 7 говорит о том, что при копировании через robocopy возникла ошибка. Вы можете обрабатывать эти ошибки в bat файле:
if %ERRORLEVEL% EQU 16 echo ***FATAL ERROR*** & goto end
if %ERRORLEVEL% EQU 15 echo OKCOPY + FAIL + MISMATCHES + XTRA & goto end
if %ERRORLEVEL% EQU 14 echo FAIL + MISMATCHES + XTRA & goto end
if %ERRORLEVEL% EQU 13 echo OKCOPY + FAIL + MISMATCHES & goto end
if %ERRORLEVEL% EQU 12 echo FAIL + MISMATCHES& goto end
if %ERRORLEVEL% EQU 11 echo OKCOPY + FAIL + XTRA & goto end
if %ERRORLEVEL% EQU 10 echo FAIL + XTRA & goto end
if %ERRORLEVEL% EQU 9 echo OKCOPY + FAIL & goto end
if %ERRORLEVEL% EQU 8 echo FAIL & goto end
if %ERRORLEVEL% EQU 7 echo OKCOPY + MISMATCHES + XTRA & goto end
if %ERRORLEVEL% EQU 6 echo MISMATCHES + XTRA & goto end
if %ERRORLEVEL% EQU 5 echo OKCOPY + MISMATCHES & goto end
if %ERRORLEVEL% EQU 4 echo MISMATCHES & goto end
if %ERRORLEVEL% EQU 3 echo OKCOPY + XTRA & goto end
if %ERRORLEVEL% EQU 2 echo XTRA & goto end
if %ERRORLEVEL% EQU 1 echo OKCOPY & goto end
if %ERRORLEVEL% EQU 0 echo No Change & goto end
:end
Утилита robocopy имеет огромный функционал и позволяет гибко настроить операции копирования. Как альтернативу robocopy в PowerShell можно использовать командлет Copy-Item, который хоть и менее функционален, но работает с объектной моделью PowerShell, что может быть важно, если вы часто используете PowerShell или используете цепочки автоматизации с другими языками программирования.


