- iOS Platform Guide
- Requirements and Support
- Installing the Requirements
- Xcode
- Deployment Tools
- CocoaPods
- Project Configuration
- Deploying to Simulator
- Deploying to Device
- Signing an App
- Using Flags
- Using build.json
- Xcode Build Flags
- Debugging
- Open a Project within Xcode
- Platform Centered Workflow
- Upgrading
- Create your first Cordova app
- Installing the Cordova CLI
- Create the App
- Add Platforms
- See Also
- Build the App
- Add Plugins
- Using merges to Customize Each Platform
- Updating Cordova and Your Project
iOS Platform Guide
This guide shows how to set up your SDK development environment to deploy Cordova apps for iOS devices such as iPhone and iPad, and how to optionally use iOS-centered command-line tools in your development workflow. You need to install the SDK tools regardless of whether you want to use these platform-centered shell tools or cross-platform Cordova CLI for development. For a comparison of the two development paths, see the Overview. For details on the CLI, see Cordova CLI Reference.
Requirements and Support
AppleВ® tools required to build iOS applications only run on the OS X operating system on Intel-based Macs. XcodeВ® 11.0 (the minimum required version) runs only on OS X version 10.14.4 (Mojave) or greater, and includes the iOS 13 SDK (Software Development Kit). To submit apps to the Apple App Storeв„ requires the latest versions of the Apple tools.
You can test many of the Cordova features using the iOS simulator installed with the iOS SDK and Xcode, but you need an actual device to fully test all of the app’s device features before submitting to the App Store. The device must have at least iOS 11 installed, the minimum iOS version supported since the release of cordova-ios v6.0.0.
Installing the Requirements
Xcode
There are two ways to download Xcode:
from the App Store, available by searching for «Xcode» in the App Store application.
from Apple Developer Downloads, which requires registration as an Apple Developer.
Once Xcode is installed, several command-line tools need to be enabled for Cordova to run. From the command line, run:
Deployment Tools
The ios-deploy tools allow you to launch iOS apps on an iOS Device from the command-line.
Install ios-deploy via Homebrew by running:
CocoaPods
The CocoaPods tools is needed to build iOS apps. A minimum version of 1.8.0 is required but the latest release is always recommended.
To install CocoaPods, run the following from command-line terminal:
Project Configuration
Installing Xcode will mostly set everything needed to get started with the native side of things. You should now be able to create and build a cordova project. For more details on installing and using the CLI, refer to Create your first app guide.
Deploying to Simulator
To preview the app in the iOS simulator:
Open the workspace file ( platforms/ios/HelloWorld.xcworkspace ) from Xcode, or from the command line:
Make sure the HelloWorld project is selected in the left panel (1).
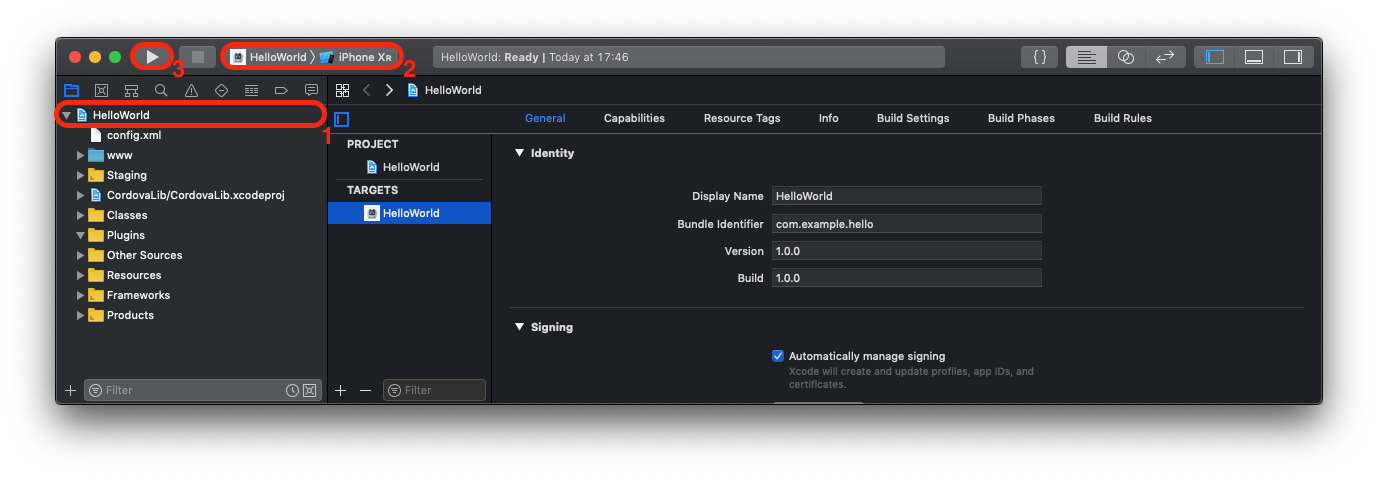
Select the intended device from the toolbar’s Scheme menu, such as the iPhone XR Simulator as highlighted in (2)
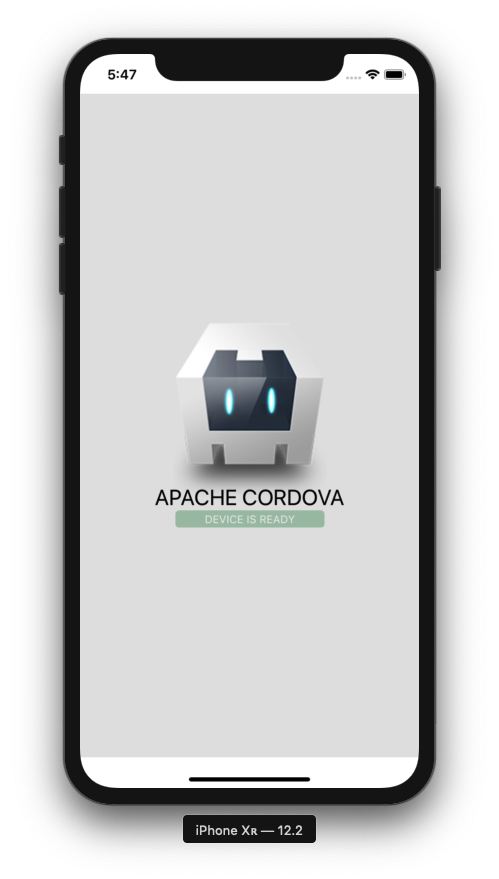
Press the Run button (3) in the same toolbar to the left of the Scheme. That builds, deploys, and runs the application in the simulator. A separate simulator application opens to display the app:
Only one simulator may run at a time, so if you want to test the app in a different simulator, you need to quit the simulator application and run a different target within Xcode.
Xcode comes bundled with simulators for the latest versions of iPhone and iPad. Older versions may be available from the Xcode → Preferences… → Components panel.
Deploying to Device
For details about various requirements to deploy to a device, refer to the Launch Your App On Devices section of Apple’s About App Distribution Workflows. Briefly, you need to do the following before deploying:
Create a Provisioning Profile within the iOS Provisioning Portal. You can use its Development Provisioning Assistant to create and install the profile and certificate Xcode requires.
Verify that the Code Signing Identity setting within the Code Signing section within the build settings is set to your provisioning profile name.
To deploy to the device:
Use the USB cable to plug the device into your Mac.
Select the name of the project in the Xcode window’s Scheme drop-down list.
Select your device from the Device drop-down list. If it is plugged in via USB but still does not appear, press the Organizer button to resolve any errors.
Press the Run button to build, deploy and run the application on your device.
Signing an App
Using Flags
To sign an app, you need the following parameters:
| Parameter | Flag | Description |
|---|---|---|
| Code Sign Identity | —codeSignIdentity | Code signing identity to use for signing. It can be created with Xcode and added to your keychain. Starting with Xcode 8 you should use —codeSignIdentity=»iPhone Developer» both for debug and release . |
| Development Team | —developmentTeam | The development team (Team ID) to use for code signing. You would use this setting and a simplified Code Sign Identity (i.e. just ‘iPhone Developer’) to sign your apps, you do not need to provide a Provisioning Profile. |
| Packaging Type | —packageType | This will determine what type of build is generated by Xcode. Valid options are development (the default), enterprise , ad-hoc , and app-store . |
| Provisioning Profile | —provisioningProfile | (Optional) GUID of the provisioning profile to be used for manual signing. It is copied here on your Mac: /Library/MobileDevice/Provisioning\ Profiles/ . Opening it in a text editor, you can find the GUID which needs to be specified here if using manual signing. |
| Code Sign Resource Rules | —codesignResourceRules | (Optional) Used to control which files in a bundle should be sealed by a code signature. For more details, read The OS X Code Signing In Depth article |
| Automatic Provisioning | —automaticProvisioning | (Optional) Enable to allow Xcode to automatically manage provisioning profiles. Valid options are false (the default) and true . |
Using build.json
Alternatively, you could specify them in a build configuration file ( build.json ) using the —buildConfig argument to the same commands. Here’s a sample of a build configuration file:
For automatic signing, where provisioning profiles are managed automatically by Xcode (recommended):
For manual signing, specifying the provisioning profiles by UUID:
Xcode Build Flags
If you have a custom situation where you need to pass additional build flags to Xcode you would use one or more —buildFlag options to pass these flags to xcodebuild . If you use an xcodebuild built-in flag, it will show a warning.
You can also specify a buildFlag option in build.json above (the value for the buildFlag key is a string or an array of strings).
Debugging
For details on the debugging tools that come with Xcode, see this article and this video.
Open a Project within Xcode
Cordova for iOS projects can be opened in Xcode. This can be useful if you wish to use Xcode built in debugging/profiling tools or if you are developing iOS plugins. Please note that when opening your project in Xcode, it is recommended that you do NOT edit your code in the IDE. This will edit the code in the platforms folder of your project (not www ), and changes are liable to be overwritten. Instead, edit the www folder and copy over your changes by running cordova build .
Plugin developers wishing to edit their native code in the IDE should use the —link flag when adding their plugin to the project via cordova plugin add. This will link the files so that changes to the plugin files in the platforms folder are reflected in your plugin’s source folder (and vice versa).
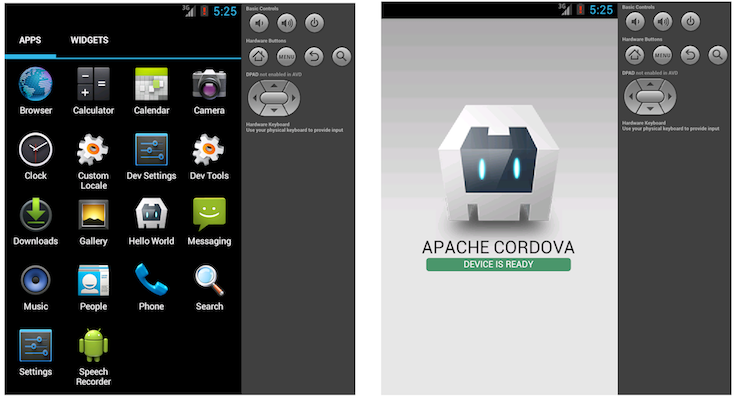
Once the ios platform is added to your project and built using cordova build , you can open it from within Xcode. Double-click to open the $
The screen should look like this:
Platform Centered Workflow
cordova-ios includes a number of scripts that allow the platform to be used without the full Cordova CLI. This development path may offer you a greater range of development options in certain situations than the cross-platform cordova CLI. For example, you need to use shell tools when deploying a custom Cordova WebView alongside native components. Before using this development path, you must still configure the SDK environment as described in Requirements and Support above.
For each of the scripts discussed below, refer to Cordova CLI Reference for more information on their arguments and usage. Each script has a name that matches the corresponding CLI command. For example, cordova-ios/bin/create is equivalent to cordova create .
To get started, either download the cordova-ios package from npm or Github.
To create a project using this package, run the create script in the bin folder:
To run the app, use the run script in the bin folder:
The created project will have a folder named cordova inside that contains scripts for the project-specific Cordova commands (e.g. run , build , etc.).
To install plugins in this project, use the Cordova Plugman Utility.
Upgrading
Refer to this article for instructions to upgrade your cordova-ios version.
(MacВ®, OS XВ®, AppleВ®, XcodeВ®, App Storeв„ , iPadВ®, iPhoneВ®, iPodВ® and FinderВ® are Trademarks of Apple Inc.)
Источник
Create your first Cordova app
This guide shows you how to create a JS/HTML Cordova application and deploy them to various native mobile platforms using the cordova command-line interface (CLI). For detailed reference on Cordova command-line, review the CLI reference
Installing the Cordova CLI
The Cordova command-line tool is distributed as an npm package.
To install the cordova command-line tool, follow these steps:
Download and install Node.js. On installation you should be able to invoke node and npm on your command line.
(Optional) Download and install a git client, if you don’t already have one. Following installation, you should be able to invoke git on your command line. The CLI uses it to download assets when they are referenced using a url to a git repo.
Install the cordova module using npm utility of Node.js. The cordova module will automatically be downloaded by the npm utility.
- on OS X and Linux:
On OS X and Linux, prefixing the npm command with sudo may be necessary to install this development utility in otherwise restricted directories such as /usr/local/share . If you are using the optional nvm/nave tool or have write access to the install directory, you may be able to omit the sudo prefix.
The -g flag above tells npm to install cordova globally. Otherwise it will be installed in the node_modules subdirectory of the current working directory.
Following installation, you should be able to run cordova on the command line with no arguments and it should print help text.
Create the App
Go to the directory where you maintain your source code, and create a cordova project:
This creates the required directory structure for your cordova app. By default, the cordova create script generates a skeletal web-based application whose home page is the project’s www/index.html file.
Add Platforms
All subsequent commands need to be run within the project’s directory, or any subdirectories:
Add the platforms that you want to target your app. We will add the ‘ios’ and ‘android’ platform and ensure they get saved to config.xml and package.json :
To check your current set of platforms:
Running commands to add or remove platforms affects the contents of the project’s platforms directory, where each specified platform appears as a subdirectory.
Note: When using the CLI to build your application, you should not edit any files in the /platforms/ directory. The files in this directory are routinely overwritten when preparing applications for building, or when plugins are re-installed.
##Install pre-requisites for building To build and run apps, you need to install SDKs for each platform you wish to target. Alternatively, if you are using browser for development you can use browser platform which does not require any platform SDKs.
To check if you satisfy requirements for building the platform:
See Also
Build the App
By default, cordova create script generates a skeletal web-based application whose start page is the project’s www/index.html file. Any initialization should be specified as part of the deviceready event handler defined in www/js/index.js .
Run the following command to build the project for all platforms:
You can optionally limit the scope of each build to specific platforms — ‘ios’ in this case:
SDKs for mobile platforms often come bundled with emulators that execute a device image, so that you can launch the app from the home screen and see how it interacts with many platform features. Run a command such as the following to rebuild the app and view it within a specific platform’s emulator:
Following up with the cordova emulate command refreshes the emulator image to display the latest application, which is now available for launch from the home screen:
Alternately, you can plug the handset into your computer and test the app directly:
Before running this command, you need to set up the device for testing, following procedures that vary for each platform.
Add Plugins
You can modify the default generated app to take advantage of standard web technologies, but for the app to access device-level features, you need to add plugins.
A plugin exposes a Javascript API for native SDK functionality. Plugins are typically hosted on npm and you can search for them on the plugin search page. Some key APIs are provided by the Apache Cordova open source project and these are referred to as Core Plugin APIs. You can also use the CLI to launch the search page:
To add and save the camera plugin to package.json , we will specify the npm package name for the camera plugin:
Plugins can also be added using a directory or a git repo.
NOTE: The CLI adds plugin code as appropriate for each platform. If you want to develop with lower-level shell tools or platform SDKs as discussed in the Overview, you need to run the Plugman utility to add plugins separately for each platform. (For more information, see Using Plugman to Manage Plugins.)
Use plugin ls (or plugin list , or plugin by itself) to view currently installed plugins. Each displays by its identifier:
Using merges to Customize Each Platform
While Cordova allows you to easily deploy an app for many different platforms, sometimes you need to add customizations. In that case, you don’t want to modify the source files in various www directories within the top-level platforms directory, because they’re regularly replaced with the top-level www directory’s cross-platform source.
Instead, the top-level merges directory offers a place to specify assets to deploy on specific platforms. Each platform-specific subdirectory within merges mirrors the directory structure of the www source tree, allowing you to override or add files as needed. For example, here is how you might use merges to boost the default font size for Android devices:
Edit the www/index.html file, adding a link to an additional CSS file, overrides.css in this case:
Optionally create an empty www/css/overrides.css file, which would apply for all non-Android builds, preventing a missing-file error.
Create a css subdirectory within merges/android , then add a corresponding overrides.css file. Specify CSS that overrides the 12-point default font size specified within www/css/index.css , for example:
When you rebuild the project, the Android version features the custom font size, while others remain unchanged.
You can also use merges to add files not present in the original www directory. For example, an app can incorporate a back button graphic into the iOS interface, stored in merges/ios/img/back_button.png , while the Android version can instead capture backbutton events from the corresponding hardware button.
Updating Cordova and Your Project
After installing the cordova utility, you can always update it to the latest version by running the following command:
Use this syntax to install a specific version:
Run cordova -v to see which version is currently running. To find the latest released cordova version, you can run:
Источник


