- Corner radius
- Default control designs
- Corners of rectangle UI elements
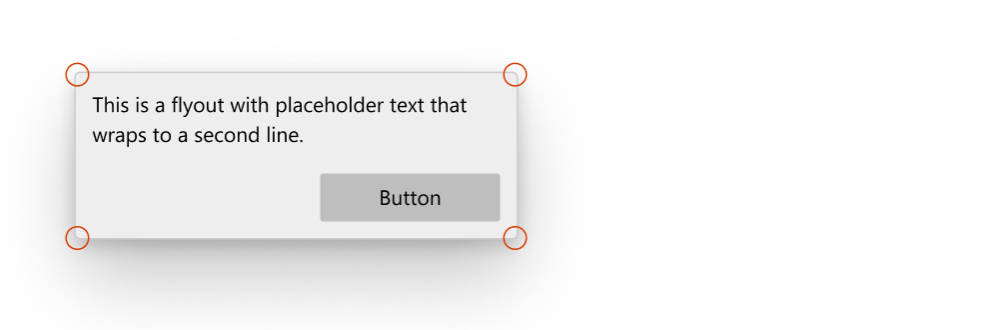
- Corners of flyout and overlay UI elements
- Bar elements
- Customization options
- When not to round
- Keyboard focus rectangle and shadow
- Rounded corners and performance
- Page or app-wide CornerRadius changes
- Per-control CornerRadius changes
- Basing custom styles on WinUI
- Windows 10 button in bottom left corner of screen will not open
- Replies (6)
- WinXCorners lets you use Mac-style Hot Corners to Windows 10
- Add Hot Corners in Windows 10
Corner radius
Starting with version 2.2 of the Windows UI Library (WinUI), the default style for many controls has been updated to use rounded corners. These new styles are intended to evoke warmth and trust, and make the UI easier for users to visually process.
Here are two Button controls, the first without rounded corners and the second using the new rounded corner style.
When you install the NuGet package for WinUI 2.2 or later, new default styles are installed for both WinUI controls and platform controls. These styles are used automatically when you use WinUI 2.2 in your app; there is no further action you need to take to use the new styles. However, later in this article we show how to customize the rounded corners if you need to do so.
Some controls are available both in the platform (Windows.UI.Xaml.Controls) and in WinUI (Microsoft.UI.Xaml.Controls); for example, TreeView or ColorPicker. When you use WinUI in your app, you should use the WinUI version of the control. Corner rounding might be applied inconsistently in the platform version when used with WinUI.
Default control designs
There are three areas of the controls where the rounded corner styles are used: rectangular elements, flyout elements, and bar elements.
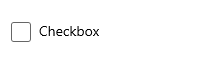
Corners of rectangle UI elements
- These UI elements include basic controls like buttons that users see on screen at all times.
- The default radius value we use for these UI elements is 2px.
Controls
- AutoSuggestBox
- Button
- ContentDialog buttons
- CalendarDatePicker
- CheckBox
- TreeView multi-select check boxes
- ComboBox
- DatePicker
- DropDownButton
- FlipView
- PasswordBox
- RichEditBox
- SplitButton
- TextBox
- TimePicker
- ToggleButton
- ToggleSplitButton
Corners of flyout and overlay UI elements
- These can be transient UI elements that appear on screen temporarily, like MenuFlyout, or elements that overlay other UI, like TabView tabs.
- The default radius value we use for these UI elements is 4px.
Controls
- CommandBarFlyout
- ContentDialog
- Flyout
- MenuFlyout
- TabView tabs
- TeachingTip
- ToolTip
- Flyout part (when open)
- AutoSuggestBox
- CalendarDatePicker
- ComboBox
- DatePicker
- DropDownButton
- MenuBar
- SplitButton
- TimePicker
- ToggleSplitButton
Bar elements
- These UI elements are shaped like bars or lines; for example, ProgressBar.
- The default radius values we use here are 2px.

Controls
- NavigationView selection indicator
- ProgressBar
- ScrollBar (when IndicatorMode=TouchIndicator )
- Slider
- ColorPicker color slider
- MediaTransportControls seek bar slider
Customization options
The default corner radii values that we provide are not set in stone and there are a few ways you can easily modify the amount of rounding on the corners. This can be done through two global resources, or through the CornerRadius property directly on the control, depending on the level of customization granularity you want.
When not to round
There are instances where the corner of a control should not be rounded, and we don’t round these by default.
- When multiple UI elements that are housed inside a container touch each other, such as the two parts of a SplitButton. There should be no space when they contact.
- When a control is housed inside another container, like a ScrollBar’s bar and buttons that are part of the ScrollBar container, which is also part of a ScrollViewer.

- When a flyout UI element is connected to a UI that invokes the flyout on one side.

Keyboard focus rectangle and shadow
Our default design does not do any special work to round the corners of the keyboard focus rectangle or control shadow. Using a higher corner radius value will not break them functionally; however, it is good to be aware of this to avoid unwanted visual glitches that could be introduced with a larger value.
Here is an example of how a larger corner radius can make the shadow look undesirable:

Rounded corners and performance
Rendering rounded corners naturally uses more drawing power than rendering square corners. When selecting the default corner radius values, we not only considered the design principles but we were also careful to ensure our default controls perform well when you use them in your apps.
When thinking about app performance in this context, you should primarily consider page load time and app launch time. Consider that rounded corners on a larger UI surface have a greater impact on performance. Avoid drawing rounded corners on a full screen app UI. This is less of an issue if the UI is displayed briefly and after the page is loaded, like a ContentDialog.
Page or app-wide CornerRadius changes
There are 2 app resources that control the corner radii of all the controls:
- ControlCornerRadius — default is 2px.
- OverlayCornerRadius — default is 4px.
If you override the value of these resources at any scope, it will affect all controls within that scope accordingly.
This means if you want to change the roundness of all controls where roundness could be applied, you can define both resources at the app level with the new CornerRadius values like this:
Alternatively, if you want to change all controls’ roundness within a particular scope, like at a page or container level, you can follow a similar pattern:
The OverlayCornerRadius resource must be defined at the app level in order to take effect.
This is because popups and flyouts are dynamic and created at the root element in the Visual Tree, so any resources that they use must also be defined there. Otherwise, they’re out of scope.
Per-control CornerRadius changes
You can modify the CornerRadius property on controls directly if you want to change the roundness of only a select number of controls.
| Default | Property modified |
|---|---|
 |  |
Not all controls’ corners will respond to their CornerRadius property being modified. To ensure that the control whose corners you wish to round will indeed respond to their CornerRadius property the way you expect, first check that the ControlCornerRadius or OverlayCornerRadius global resources affect the control in question. If they do not, check that the control you wish to round has corners at all. Many of our controls do not render actual edges and therefore cannot make proper use of the CornerRadius property.
Basing custom styles on WinUI
You can base your custom styles on the WinUI rounded corner styles by specifying the correct BasedOn attribute in your style. For example to create a custom button style based on WinUI button style, do the following:
In general, WinUI control styles follow a consistent naming convention: «DefaultXYZStyle» where «XYZ» is the name of the control. For full reference, you can browse the XAML files in the WinUI repository.
Windows 10 button in bottom left corner of screen will not open
Replies (6)
You may run the Deployment Image Servicing and Management (DISM) tool which fixes the Windows corruption error if there are any. Follow the steps:
- Press Windows+X .
- Click on Command Prompt (Admin ).
- Type the command DISM.exe /Online /Cleanup-image /Restorehealth and hit Enter.
System File Checker is a utility in Windows that allows users to scan for corruptions in Windows system files and restore corrupted files.
Please update us with the status. We will be glad to assist you.
15 people found this reply helpful
Was this reply helpful?
Sorry this didn’t help.
Great! Thanks for your feedback.
How satisfied are you with this reply?
Thanks for your feedback, it helps us improve the site.
How satisfied are you with this reply?
Thanks for your feedback.
«I click on the Windows button in the bottom left corner of the screen but it doesnt do anything. Also I cant change Microsoft Accounts on my computer, it will not allow me. Also the Xbox app says, «error, we cant sign you in right now». Please help me with all these problems!»
I am having the same problem after the new Windows 10 Creators update was installed. I left click the app icon in the lower left corner and nothing happens. I can not pull up all my installed apps. I can right click and I get a pop up menu of various things. Also, I get nothing when I click the Cortana search bar. will not turn white so I can type in a search item.
3 people found this reply helpful
Was this reply helpful?
Sorry this didn’t help.
Great! Thanks for your feedback.
How satisfied are you with this reply?
Thanks for your feedback, it helps us improve the site.
WinXCorners lets you use Mac-style Hot Corners to Windows 10
Hot Corners is a native feature in macOS using which Mac users can start screen saver, view desktop, open Launchpad, etc., by placing the mouse cursor to any of the four corners of desktop/laptop screen. This feature is pretty useful, but Windows 10 operating system doesn’t come with this feature natively. Still, it is possible to use Mac-style Hot Corners in Windows 10.
Thankfully, there exist a few third-party tools that can help us add and use Mac Style Hot Corners in Windows 10. One of those tools is ‘WinXCorners’ which we have covered in this post. This is an open-source and portable tool that lets you enable Hot Corners in Windows 10.
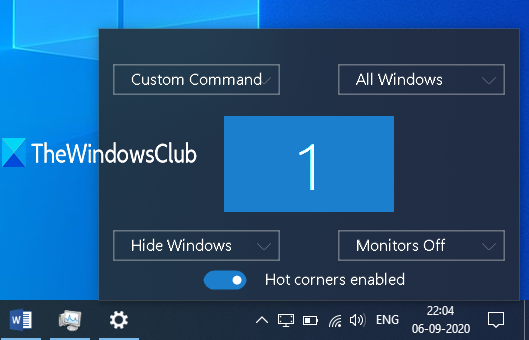
Using this WinXCorners tool, you can set any of the four corners of the Windows 10 screen to open Action Center, launch Task View mode (to preview all opened windows), hide background applications and show only foreground or active window, turn off monitor, launch Screen Saver, or turn off laptop screen or the monitor. You just have to configure this tool once and hover the mouse cursor to any of the corners of the screen. The action set by you will be triggered immediately.
What I find more useful is you can set a custom command for Hot Corners. For example, you can launch some browser, Notepad++, or some other application when moving the mouse cursor to a particular corner of the screen.
In the image above, you can see its configuration box where I have set different actions (including custom command) to all the corners of the screen.
Note: This tool is not supported for multiple screens/monitors. So, you should use it on a single screen device only.
Add Hot Corners in Windows 10
To use Hot Corners in Windows 10 using this tool, download its zip file, and extract it.
After extracting that zip, open the folder where you extracted the zip file, and execute WinXCorners.exe file.
Now the tool will start running in the system tray of Windows 10. Click that system tray icon and the Hot Corners box of this tool will open, just like you can see in the image below.
There are four drop-down menus for each corner (top left, top right, bottom left, and bottom right) of the screen. Use a drop-down menu and you can assign any of the supported actions for that corner. For example, you can use Action Center for the top left corner. Just select an action of your choice. This way, set actions for all corners, and you’re done. Whenever you will place the mouse cursor to any of the corners, the associated action is triggered quickly.
Now, this tool might create trouble sometimes. For example, you might forget the tool is running and you accidentally move the mouse cursor to any of the corners, and the action is triggered. To overcome such an issue, you can use its Hot Corners box and turn on/off Hot Corners enabled button anytime you want.
Apart from the above configuration, you can also access its Advanced Options to set the time delay for each of the corners to trigger the action. Moreover, it is also helpful to set a custom command for Hot Corners.
For that, right-click on the system tray icon of WinXCorners tool, and select Advanced option.
In the Advanced Options box, you can set time delay (in ms) for all corners separately using the given options. In the same box, there is a Custom Command (Launcher) field. Here, you can paste the path of some program or application, and then tick mark Enable Custom Command option. This will help you show the custom command option in the drop-down menus of the Hot Corners box so that you launch that particular application just by placing your mouse cursor to the associated corner.
Press OK to save the changes.
That’s all. You can download this tool here. Using this tool was an interesting experience for me!
For your information, Tiny Hot Corners is another tool thatlets you add GNOME-like Hot Corners to Windows 10.
Hope this will be useful to you and many other users who want to add and use Mac-style Hot Corners to their Windows 10 PC.


