- Corrupt pdf file when copying from Win 7 to XP
- How to repair corrupted files in Windows 10
- How do I fix corrupted files in Windows 10?
- 1. Use the SFC tool
- 2. Use the DISM tool
- 3. Run SFC scan from Safe Mode
- 4. Perform the SFC scan before Windows 10 starts
- Copy and paste in Windows 10 file explorer resulting in corrupt copies
- Windows 8 and 8.1 corrupts large files when copied or downloaded
- Как исправить PFN_LIST_CORRUPT в Windows 10
- Способы устранения ошибки PFN_LIST_CORRUPT
- Проверка оперативной памяти
- Проверка жесткого диска
- Сканирование системных файлов
- Исправление возможных ошибок в работе драйверов
- Обновление драйверов
- Устранение неполадок в реестре
- Сканирование системы антивирусом
- Временное отключение антивируса
- Восстановление системы или возврат к прошлой версии Windows
- Обновление BIOS
- Заключение
Corrupt pdf file when copying from Win 7 to XP
Using a remote desktop connection, pdf files created in Win 7 Ultimate 64-bit (remote machine) using Acrobat 9.4 as the printer are copied using right-click>copy and pasted to the desktop of an XP Pro SP3 machine (local machine) running Acrobat 9.4. When the file is opened in XP system an error is returned = «There was an error opening this document. The file is damaged and could not be repaired.»
pdf files created on the XP machine using Acrobat 9.4 and copied to the Win 7 machine are fine = no problem.
If the pdf files created on the Win 7 machine are emailed and then downloaded from Internet email to XP machine they are fine.
If the pdf files created on the Win 7 machine are zipped and the right-click>copy is used to paste to the XP machine they are fine once they are unzipped.
Tried using Reader 8 and Reader 9 on XP machine but still have the error.
Other files (excel, word, etc.) copy and paste without any problems. Only pdf created with Acrobat are an issue. Other pdfs downloaded from other sites are fine.
pdf files created without Acrobat pdf software (e.g. from Intuit applications) don’t have a problem.
Only files created with Adobe Acrobat 9 have a problem.
On the Win 7 system that created the file, the size is 307652 bytes with size on disk of 311296.
When I copy the file to the remote XP system the file size is 311296 with the size on disk being 311296.
So, something is getting messed up.
When I copy a jpg file from the Win 7 system to the XP, the file sizes parameters do not change.
When I copy a Internet downloaded pdf file to the XP system from the Win 7 system, the file size parameters do not change.
It seems only to happen with pdf files that are created using Acrobat on the Win 7 64-bit system.
If I copy an Acrobat created pdf file from the Win 7 system to the XP system and then copy it back to the Win 7 system it will not open in the Win 7 system that created it. The file size parameters do not change on the second copy. Only on the first copy.
Another strange occurrence — I created a pdf file using Acrobat on the XP system and copied it to the Win 7 system. It opened fine on the Win 7 system. I then erased it from the XP system and copied it back from the Win 7 system to the XP system where it had originated. The file was then corrupted and could not be opened on the same system that created it. All that happened was copying it back and forth. It can go one direction (XP > Win 7) but not the other (Win 7 > XP).
The file type should not matter when using the copy function. But for some reason it is only messing up the pd files that are created.
Any suggestions on how to get this working without using a workaround?
How to repair corrupted files in Windows 10

- Corrupted files in Windows 10 may bring the system to a halt so it’s imperative to repair Windows 10.
- An important method is to use some important tools for fixing corrupted files.
- It’s also a good idea to try and run the tools in Safe Mode and even before Windows starts.
- You can attempt a W indows 10 repair by replacing the files manually by following our steps below.

- Download Restoro PC Repair Tool that comes with Patented Technologies (patent available here).
- Click Start Scan to find Windows issues that could be causing PC problems.
- Click Repair All to fix issues affecting your computer’s security and performance
- Restoro has been downloaded by 0 readers this month.
Many computer problems are caused by corrupted system files. If your Windows 10 installation is corrupted, you’ll encounter instability issues and all sorts of other problems.
Fortunately, there are few ways to fix corrupted system files on your system, and today we’re going to show you how to repair Windows 10.
How do I fix corrupted files in Windows 10?
- Use the SFC tool
- Use DISM tool
- Run SFC scan from Safe Mode
- Perform SFC scan before Windows 10 starts
- Replace the files manually
- Use System Restore
- Reset your Windows 10
1. Use the SFC tool
1.1 Run System File Checker
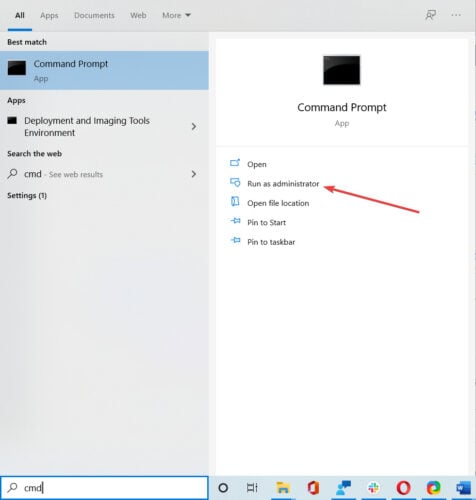
- Type cmd in the Search box and click on Run as Administrator to open an elevated Command Prompt window.

- When Command Prompt opens, enter sfc /scannow and press Enter.
- Don’t close Command Prompt or interrupt the repair process. It can take a while, so wait patiently while it completes.
After the repair process is finished, you’ll see Windows Resource Protection did not find any integrity violations message if your system files aren’t corrupted.
However, SFC tool can’t always fix corrupted files, so keep that in mind.
1.2 Check the SFC log
- Open Command Prompt as administrator as shown in the previous steps.
- Enter the following command and press Enter (By doing this, you’ll create a sfclogs.txt file on your Desktop): findstr /c:»[SR]» %windir%LogsCBSCBS.log >»%userprofile%Desktopsfclogs.txt»
- Open the sfclogs.txt and check the results of SFC scan.
Keep in mind that this log file contains only information related to SFC scan that is performed in Windows.
The SFC is a command line tool, and it will scan your PC and repair any corrupted system files. If you want to learn more about how to use it, read this comprehensive guide about the System File Checker.
2. Use the DISM tool
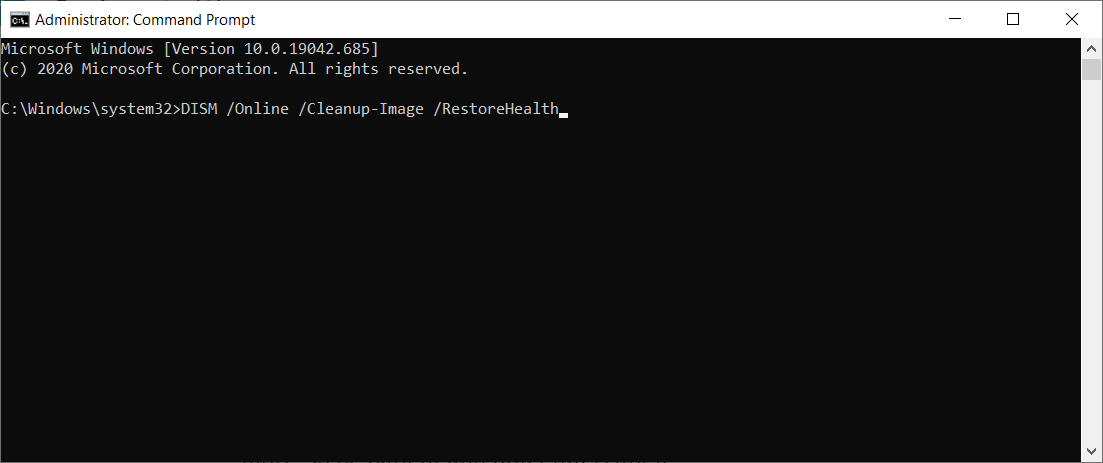
- Open Command Prompt as administrator as indicated at the first step.
- Enter the following command and press Enter: DISM /Online /Cleanup-Image /RestoreHealth
- The repair process can take 10 minutes or more, so be patient and don’t interrupt it.
- After DISM tool repairs your files, restart your PC.
When your PC restarts, you need to check if the problem is resolved. If the issue still persists, run SFC scan again.
If you can’t run SFC tool or if SFC can’t fix the problem, you can try using the DISM tool instead.
DISM stands for Deployment Image & Servicing Management tool, and it’s used to fix any corruption problems that can prevent SFC tool from running.
Just like SFC, DISM is a command-line tool that is used to repair system files.
3. Run SFC scan from Safe Mode
When Safe Mode starts, repeat the steps from Solution 1 to perform an SFC scan.
Sometimes SFC scan can’t repair your files from Windows, but if that happens, you can try running SFC tool from Safe Mode. Safe Mode is a special mode that uses only default drivers and applications.
By using the Safe Mode you’ll eliminate any possible interference from third-party apps.
4. Perform the SFC scan before Windows 10 starts

- Restart your PC by following the first three steps from the previous solution.
- When the list of options appears, select Troubleshoot.
- Choose Advanced options and select Command Prompt .
- When your PC restarts, you might be asked to enter your username and password, so be sure to do that.
- Find the letter of your Windows 10 drive. To do that, enter the following command and press Enter: wmic logicaldisk get deviceid, volumename, description
- Pay attention to Volume Name. In most cases Windows Volume Name will be assigned to the letter D. This is perfectly normal if you start Command Prompt before starting Windows, so no need to worry about it.
- Also check System Reserved drive. In most cases, it should be C.
- Enter the following command and press Enter (Be sure to use the letters that you got from the previous steps): sfc /scannow /offbootdir=C: /offwindir=D:Windows
- Wait while your system files are scanned.
- After the scan is completed, close Command Prompt and start Windows 10 normally.
Sometimes you need to scan and repair protected system files, but you can’t do that from Windows 10.
Copy and paste in Windows 10 file explorer resulting in corrupt copies
I encountered a very serious issue with trying to copy and paste files to a backup hard drive in Windows file explorer by using Ctrl+C and Ctrl+V.
Usually I determine whether my backups are complete and in agreement with each other by doing a casual comparison of the total bytes reported in the backup to the total bytes reported in the source.
I decided to check my backup collection more carefully by comparing the SHA-256 hashes of a collection of backed-up files to the SHA-256 hashes of the files on another mirror of the same collection.
After I discovered that there were numerous mismatches, I determined which mirror had file corruption by trying to open the files with hashes that were in disagreement. I opened the corrupt files in a hex editor, and I found that the sizes and filenames were correct but the contents were zero in every byte.
I deleted the corrupt files, then tried to restore them by doing a Ctrl+C and Ctrl+V transfer from the clean mirror. The copies were corrupt after the transfer. I understand that what I am describing is symptomatic of a faulty hard drive. But I’m not convinced that I have that problem. I was able to get the files to successfully transfer if I copied them one-at-a-time instead of copying a whole folder at a time.
I was also able to transfer the files successfully by using the «copy *.*» command in cmd.exe.
Is anyone else getting junk backup files by doing a copy and paste in Windows 10?
I was copying from an NTFS volume to an exFAT volume.
If I decided to copy only one file, I was informed that it would be copied without all of its attributes saved in the source volume.
During my attempt to copy large files, the progress window told me that my transfer rate was 0 bytes/sec to the destination disk.
While the transfer rate was 0 bytes/sec, the names of several large files flashed successively in the progress window.
Windows 8 and 8.1 corrupts large files when copied or downloaded
First time post so appols for any errors with post etiquette.
I would like to understand if many users are experiencing the same issues I am with the downloading and movement of large files in Windows 8 and 8.1
I have a lot of equipment and many ways to resolve the issue I am getting so have been able to resolve, however, I believe the problem is with the OS itself and would like some help finding the problem and resolving it.
When downloading or copying large files (370 MB was the last one I tried to download. (It was an MS Visio eval image)). The file seems to download/copy correctly, i.e no errors and no event log reports. However when I then try to use the file (binary specific, not tried text), I get various and spurious errors.
I had started to gather the evidence but upon reflection have realised that the issue seems to be file size only, rather than the myriad of aspects highlighted already on the forums. i.e not WebDAV related, not to do with differing SMB. blah blah blah.
It is just a failing with large files that then cause myriad and numerous cascade errors. For example with the Image download for Visio Eval mentioned earlier the system just says, «sorry there was a problem mounting the file». When I subsequently download the image on a Windows 7 workstation and copy it to a share I am able to use it fine. i.e the problem only occurs when I download or copy the large file on a win8/8.1 workstation.
In the first instance please advise if others are seeing this issue or if it just little old me in isolation.
Any insights to the issue or approaches for resolution gratefully accepted.
Как исправить PFN_LIST_CORRUPT в Windows 10
Ошибка PFN_LIST_CORRUPT, возникающая при запуске ОС Windows 10, касается базы данных жесткого диска, определяющей местоположение файлов в физической памяти. Проще говоря, связана она с неполадками в ОЗУ, а также несовместимостью некоторых драйверов. Сегодня я расскажу, какими способами можно устранить данную неполадку в Windows 10. Полезное по теме: как проверить Windows 10 на ошибки .
Способы устранения ошибки PFN_LIST_CORRUPT
Для устранения ошибки PFN_LIST_CORRUPT нужно будет проверить оперативную память и драйверы. Также допустимо влияние антивирусного приложения или наличие ошибок в жестком диске. Точно установить причину сразу не получится, поэтому надо придерживаться указанной последовательности действий. См. также: тест оперативной памяти на ошибки в Windows 10 .
Проверка оперативной памяти
Для проверки оперативной памяти надо запустить специальный инструмент – вызываю нажатием на комбинацию Win + R окно «Выполнить», даю запрос «mdsched» и жму на кнопку ОК для его подтверждения. В результате на экране появится средство проверки памяти Windows. Можно выполнить перезагрузку и проверку сейчас, либо позже, при следующем выключении.
После перезагрузки, перед переходом к системе, начнется сканирование. В результате будет либо выявлена проблема, либо выйдет сообщение о том, что она отсутствует. При проверке не нужно ничего трогать или куда-либо нажимать. Утилита после завершения работы автоматически перезагрузит компьютер.
Проверка жесткого диска
Проверить диск можно двумя методами – с помощью командной строки и специальным инструментом в свойствах раздела. В первом случае для начала надо запустить командную строку, но только с правами администратора. Вводим в строке «Поиск» на панели «Пуск» запрос и жмем на ссылку «Запуск от имени администратора».
Следом ввожу в новом открывшемся окне запрос chkdsk /f . Он запустит инструмент для сканирования жесткого диска и автоматического устранения имеющихся проблем. Компьютер перезагрузится, пройдет сканирование, и если ошибки имеются, они будут решены.
Теперь второй способ – открываю «Проводник Windows», жму по иконке системного диска правой кнопкой мыши для вызова контекстного меню, потом жму на элемент «Свойства». Во вкладке «Сервис» в новом окне будет раздел «Проверка на наличие ошибок», а в нем соответствующая кнопка. Жму на нее, добавляю во все пункты галочки и добавляю процесс в расписание. После перезапуска будет произведено автоматическое исправление.
А, и еще! Если в жестком диске ошибок не будет, инструмент выведет сообщение об их отсутствии, как на скриншоте выше.
Сканирование системных файлов
Есть еще одно средство для сканирования системных файлов, которое запускается через командную строку. Для этого надо ее открыть с правами администратора, способ я указала выше. Затем ввести запрос sfc /scannow и нажать на кнопку Enter для ее запуска. Сканирование может занять немного больше времени, чем ожидалось, так как файлов в системе не мало. Надо дождаться завершения процедуры, параллельно не запускать никаких приложений.
Исправление возможных ошибок в работе драйверов
Есть еще специальная команда для проверки драйверов на наличие ошибок. Действовать нужно примерно так же, как и в предыдущем способе – открыть командную строку и дать запрос verifier . Только после запустится новое окно, где надо выбрать «Создать стандартные параметры», следом отметить «Автоматически выбирать все драйверы, установленные на этом компьютере», и нажать на кнопку «Готово».
Утилита попросит перезагрузить ПК, надо подтвердить действие. В результате начнется сканирование, которое займет порядком много времени. Но все равно надо дождаться, когда процесс завершится. Если в каких-то драйверах будет найдена ошибка, потребуется их переустановить.
Обновление драйверов
Обновление драйверов производится через «Диспетчер устройств», а для его открытия надо лишь нажать на комбинацию Win + X и выбрать соответствующий пункт.
В списке открываю раздел «Видеоадаптеры», жму правой кнопкой мыши по встроенной карте и выбираю пункт «Обновить драйвер». Дальше еще надо будет выбрать способ – поискать их в Интернете или выбрать файл на устройстве. Во втором, конечно же, надо будет предварительно скачать драйвер с официального сайта разработчика и просто открыть его. После завершения установки надо перезагрузить компьютер и проверить, исчезла ли проблема.
Устранение неполадок в реестре
Для сканирования реестра можно использовать программу CCleaner. В ней специальный раздел, через который и производится проверка и устранение неполадок. Отмечаю галочкой нужные элементы, потом жму на кнопку «Поиск проблем». При их наличии на экране выведется подробный список с путем к файлам и их разделом в редакторе реестра. Выделяю все элементы, потом жму на кнопку «Исправить». При необходимости могу сохранить резервную копию о внесенных изменениях.
Сканирование системы антивирусом
Влияние вредоносного вирусного ПО тоже может сказываться на работе ОЗУ и драйверов. Поэтому провести сканирование антивирусным приложением тоже будет вполне целесообразно. Использую установленную в системе утилиту, выполняю тщательную проверку, и если есть в ПК вирусы, удаляю их или отправляю в карантин.
Временное отключение антивируса
Ну, можно не только отключить, но и удалить антивирус, если он сторонний. У пользователей часто бывало так, что именно после удаления программы проблема исчезала, чаще в Avast. Для начала надо, конечно, отключить антивирус и проверить работу системы. Если не помогло, тогда удаляю его.
Восстановление системы или возврат к прошлой версии Windows
В «Параметрах» системы есть специальные инструменты для восстановления системы с определенной точки (также до исходного состояния) или возврата к предыдущей версии с сохранением данных. Для этого надо открыть категорию «Обновление и безопасность» и перейти во вкладку «Восстановление». Выбираю наиболее подходящий вариант и следую указанной инструкции.
Обновление BIOS
Производить данную процедуру необходимо с максимальной внимательностью, осторожностью, и в последнюю очередь, если ничего из вышеперечисленного не помогло. А почему? Потому что при неправильной прошивке компьютер не будет нормально работать, он даже запускаться не станет, не говоря уже о нормальной работе. Для этого надо будет создать загрузочную флешку, загрузить на ПК новую версию прошивки, переписать ее на носитель и попробовать переустановить ее.
Заключение
Для решения неполадки PFN_LIST_CORRUPT не нужно сразу прибегать к крайним методам вроде восстановления, сброса данных или перепрошивки BIOS. Начинать нужно с малого, проверки отдельных компонентов. Возможно, при их сканировании и выявится причина неполадки, и она будет полностью устранена.


