- How to view CPU and memory usage
- Microsoft Windows
- Using the Task Manager
- Using a third-party utility
- macOS
- Memory Compression Process: High Memory and CPU Usage in Windows 10
- Compressed Memory in Windows 10
- System and Compressed Memory Process High CPU and RAM Usage
- How to Disable the Compressed Memory in Windows 10
- Top 10 Ways to Fix High CPU/RAM/Memory Usage after Windows 10 Update
- Many Users Got High CPU/Memory/RAM Usage Issue after Windows 10 Update
- What Causes the Windows 10 High CPU/Memory/RAM Usage
- Top 10 Ways to Fix High CPU/Memory/RAM Usage after Windows 10 Update
- Way 1. Fix Driver Issues Manually
- Way 2. Fix Driver Issues on Windows 10 with Drive Talent
- Way 3. Adjust for Best Performance
- Way 4. Check All Apps Your Are Using
- Way 5. Disable Programs Running at Startup
- Way 6. Defragment Hard Drives
- Way 7. Close As Many Applications As Possible
- Way 8. Scan to Check Third Party Programs
- Way 9. Fix High Memory Problem via Registry Hack
- Way 10. Reboot Your Computer
How to view CPU and memory usage

Your computer’s operating system is constantly allocating resources to different tasks. Consequently, CPU and memory usage fluctuates constantly. The following sections show you how to view how much of the performance these two system resources are utilizing at any given point. To proceed, select your operating system from the list below and follow the instructions.
Microsoft Windows
There are a few options for checking CPU and memory usage in Windows. Both methods below work equally well, but the second has a cleaner interface and can be set to load automatically when your computer boots.
Using the Task Manager
- Press the Windows key , type task manager, and press Enter .
- In the window that appears, click the Performance tab.
- On the Performance tab, a list of hardware devices is displayed on the left side.
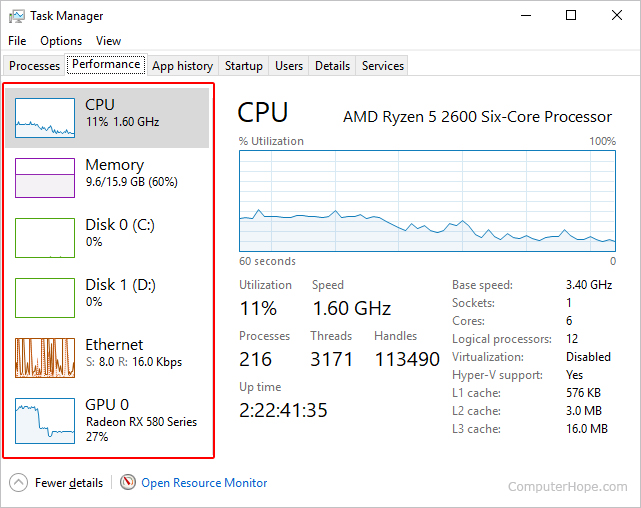
- Clicking any of these devices displays more detailed information on the right side of the window.
Using a third-party utility
There are many third-party programs that display information about your computer’s CPU and memory usage. One of our favorites is CAM by NZXT.
- Open your preferred Internet browser and go to the CAM page on the NZXT website.
- In the middle of the screen, click the button.
- Once the download has finished, install it from your browser and open the program.
- How to install software.
- How to run a computer software program.
- A window opens that looks like the image below.
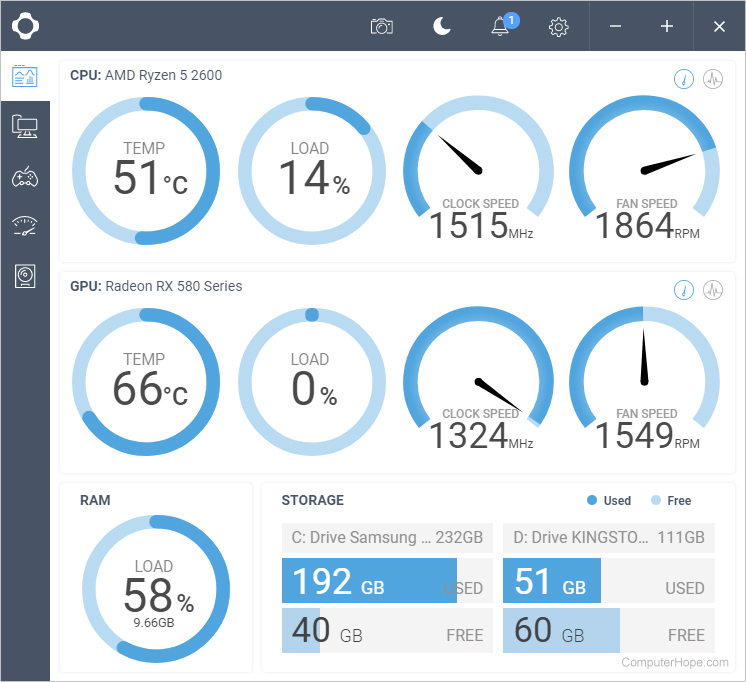
- From here, you can see various metrics about your computer, including CPU and memory usage. Furthermore, the buttons on the left side of the screen allow you to view other details, such as specifics about your computer’s hardware.
macOS
- First, click the Finder icon in the Dock.

- In the window that opens, click Applications ( A), then Utilities ( B), and then Activity Monitor ( C).
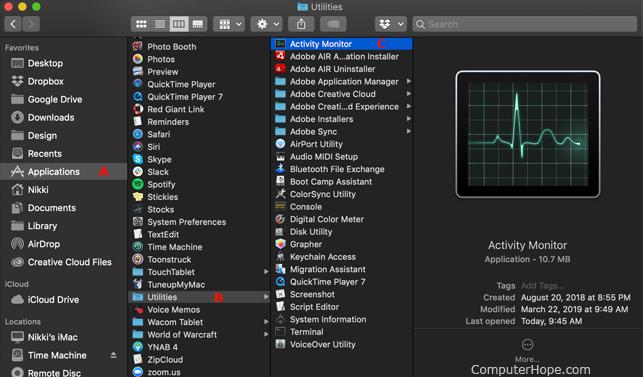
- On the next screen, click a top tabs to view the utilization of different parts of your system, including CPU and memory usage.
Memory Compression Process: High Memory and CPU Usage in Windows 10
The compressed memory feature in Windows 10 is designed to improve the performance (responsiveness) of the system due to storing part of the memory pages in RAM in a compressed form. It helps to reduce the number of read / write requests to the memory pages in the slow (compared to RAM) paging file on a hard drive. The required data are extracted from the RAM faster even though additional CPU resources are spent to compress/decompress them.
Compressed Memory in Windows 10
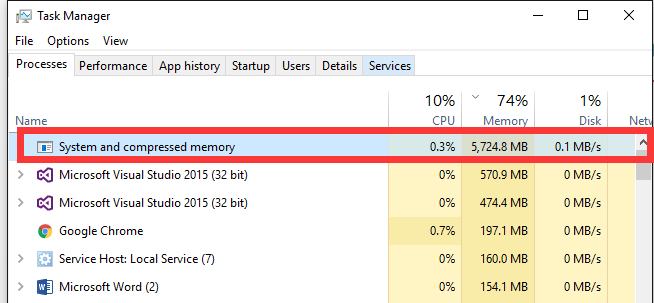
Originally, the process responsible for the compressed memory subsystem was located within the System process, which is not too convenient for troubleshooting performance issues. In Windows 10 1511 this feature became a separate process called System and compressed memory.
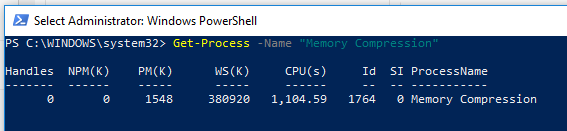
In Windows 10 Anniversary edition (1607), a separate process, Memory Compression, appeared that was hidden from the Task Manager. You can get the information about this process using Get-Process PowerShell cmdlet:
Get-Process -Name «Memory Compression»
Handles NPM(K) PM(K) WS(K) CPU(s) Id SI ProcessName
——- —— —— —— —— — — ————
0 0 1548 380920 1,104.59 1764 0 Memory Compression
Also, you can see the actual memory size used by the Memory Compression process using Process Explorer.
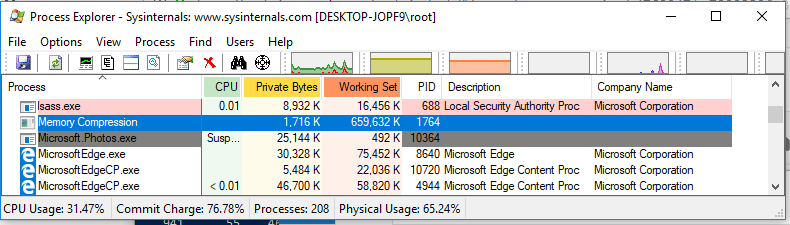
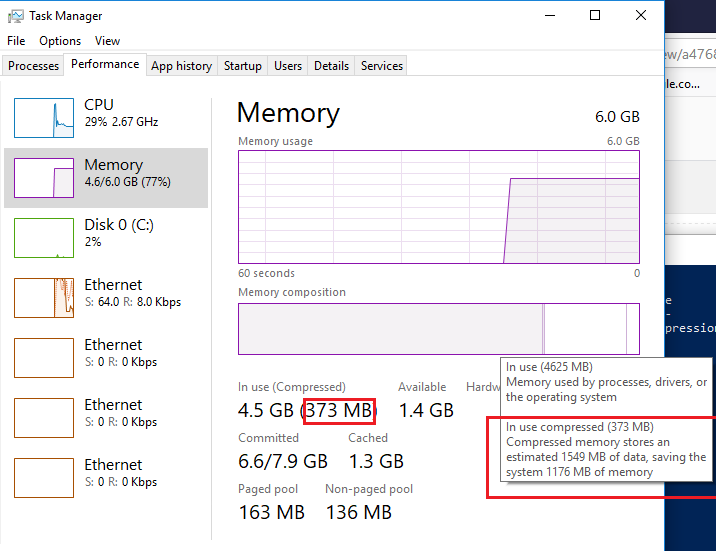
You can also get the information about using the compressed memory by the system in the Task Manager. Go to the Performance tab and select the Memory section. The current value of compressed memory usage is displayed by the value of In use (Compressed) parameter. In my example, 4.5 GB are used, of which 373 MB is compressed. To understand the actual size of data that the system is packed into a compressed block, hover the mouse over the Memory composition graph:
As you can see, the compression level reaches almost 315%, so the saving is quite significant.
In most cases, if your computer works normally and has the sufficient RAM size, the compressed memory process works well and doesn’t require any action from the administrator.
System and Compressed Memory Process High CPU and RAM Usage
Sometimes it happens that System and compressed memory process starts to use up to 100% CPU and users disks or starts to increase in size in RAM (you can see it in the Task Manager). Of course, the computer starts to work slow or hangs up.
What can you do in this case?
I will give you a couple of tips that will help you to fix the problem of high PC resources usage by the Compressed memory process
- Try to temporary disable the page file on your system (No paging file option), restart your computer, enable the paging file (Automatically manage paging file size for all drives option) and restart your computer again.
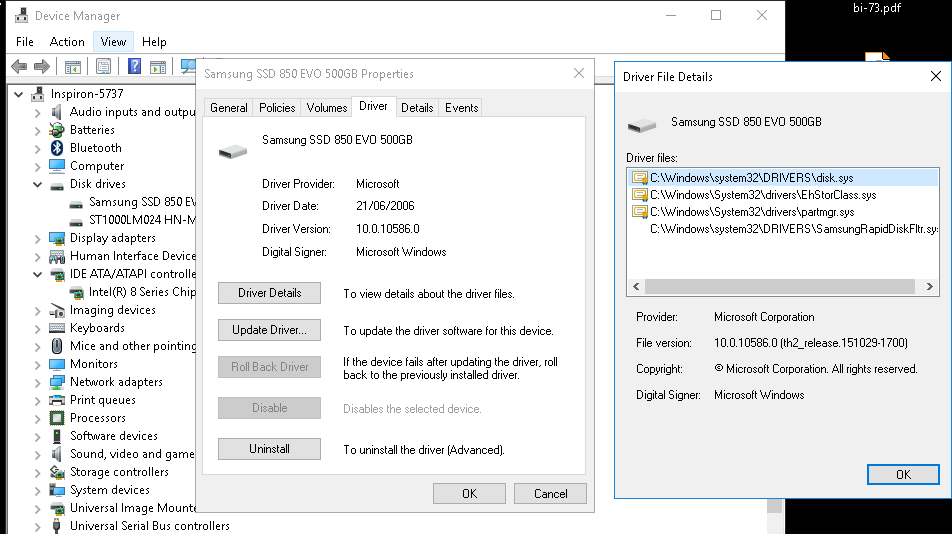
- If the problem of heavy loading of the computer by the Compressed memory process occurs only after waking from the Sleep or Hibernate mode (and disappears after the restart), try to download and install the latest versions of drivers for your disk controllers (ACPI/ AHCI / RAID / SCSI), hard drives and video card from the official websites. After that it is recommended to disable automatic driver update.

If these actions did not help, you can try to disable the compressed memory.
How to Disable the Compressed Memory in Windows 10
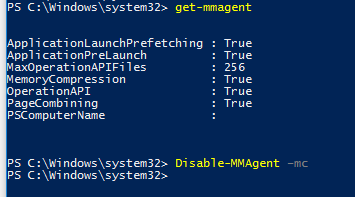
If you want to make sure that Windows 10 works stable without using the compressed memory, you can temporarily disable this feature. To do it, start PowerShell with the administrator privileges. Let’s make sure that the compressed memory is enabled:
The parameter MemoryCompression : True shows that the compressed memory is enabled.
Let’s disable the compressed memory:
And restart your computer:
After the system has booted, watch the system behavior. If the performance has improved, you can leave your Windows 10 with the compressed memory disabled.
To enable MemoryCompression, run this command:
As a rule, the Compression memory technology in Windows 10 works quite effectively and doesn’t require any interventions. If it causes any problems on your computer, it is likely that you have some troubles with system settings, hardware or drivers. If necessary, the Compressed memory can be completely disabled.
In some cases, users are recommended to fix problems with compressed memory with the following actions:
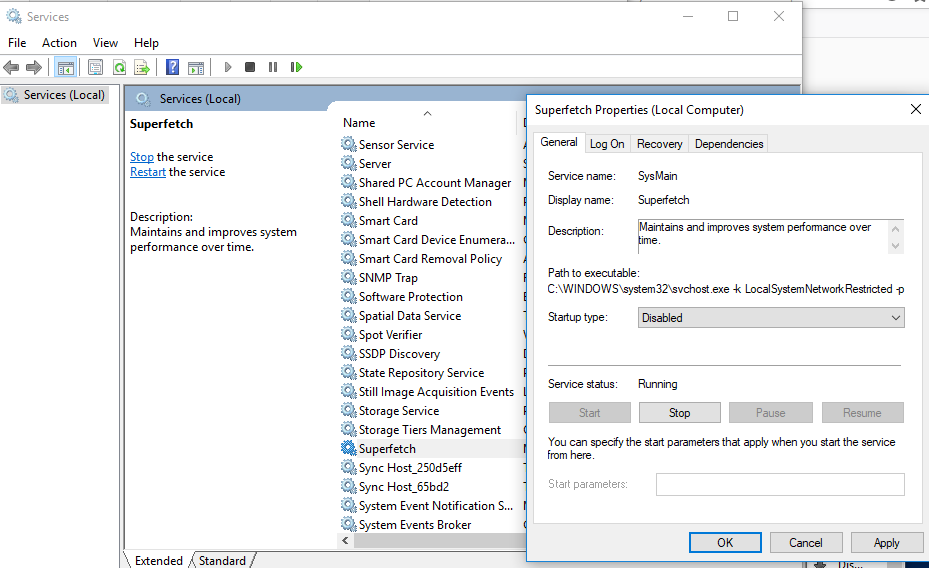
- Disable SuperFetch (services.msc -> SuperFetch -> Startup type: Disabled)
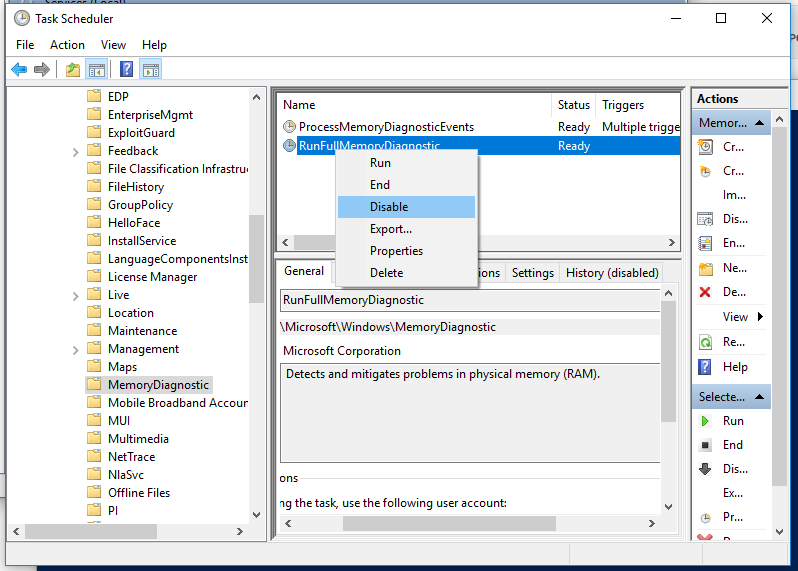
- Disable full memory diagnostic RunFullMemoryDiagnostic job in the Task Scheduler (Task Scheduler -> Task Scheduler library -> Microsoft -> Windows -> MemoryDiagnostic -> RunFullMemoryDiagnostic (Detects and mitigates problems in physical memory – RAM) -> Disable.
In some cases, these tips help to get rid of high load of the computer by the Compressed memory process, but at the same time basic subsystems that are to optimize Windows performance are disabled, which can result in other troubles with system performance.
Top 10 Ways to Fix High CPU/RAM/Memory Usage after Windows 10 Update
Dec. 10, 2020 / Updated by Bessie Shaw to Windows 10
Windows 10 update problems have affected many users. We’ve dedicated to offering workable solutions to fix all Windows 10 issues during update and after update. See below to fix the Windows 10 high CPUor high memory usage issue, also applied to Windows 10 Creators Update and Windows 10 Fall Creators Update Version 1709.
Many Users Got High CPU/Memory/RAM Usage Issue after Windows 10 Update
Many users reported that RAM and CPU usage went up after installing Windows 10. The detailed situations of this Windows 10 high RAM/CPU memory usage issue are like that
«I’m having an issue, very high memory usage by System»
«My HP laptop has Windows 10 high memory and cpu usage issue»
«Windows 10 high memory usuage»
«playing games on my computer uses almost all 4 GB usage on Windows 10»
«I installed Win 10 but got high RAM usage. It tends go up to 90% without anything substantial open»
«I updated my PC to Windows 10 but during few hours of usage memory builds up again to 70% and if not restarted it further goes to 100% and later on even freezes and crashes»
«Windows 10 running high cpu usage»
«High RAM and CPU usage after Windows 10 upgrade»,
«How to fix svchost.exe high CPU usage in Windows 10»
You might want to read these related posts:
What Causes the Windows 10 High CPU/Memory/RAM Usage
Less RAM of your computer is not the cause. Users having 4GB of RAM have less complaints, while more and more users with 8GB and even 16GB of RAM have experienced high memory usage problems after updating to Windows 10. There are several key reasons why the memory usage runs out after installing Windows 10.
Windows 10 memory leak. Windows 10 is experiencing driver incompatibility issues. A faulty or outdated driver can lead to a Memory leak.
Windows 10 and the applications you have installed on it needs a few more RAM memory to operate.
Registry hack settings can lead to high RAM usage on Windows 10.
This Windows 10 high memory memory usage or high RAM usage issue may cause a slower and slower running PC, Windows system crashes or other issues. Bad performance. Luckily, there are easy solutions to solve this high CPU/memory/RAM usage issue on Windows 10.
Top 10 Ways to Fix High CPU/Memory/RAM Usage after Windows 10 Update
We’ve summed up 10 best solutions to help you fix this Windows 10 high CPU usage, high memory usage or high RAM usage. You can try any of them on your laptop, desktop PC or notebook computer of Lenovo, Asus, Acer, Dell, HP, ThinkPad, Toshiba, IBM, Sony, Gateway, Samsung, IBM, etc..
Way 1. Fix Driver Issues Manually
Step 1. Download and install Windows Driver Kit from Microsoft official website.
Step 2. Go to the “Start” menu from Windows key and open «Command Prompt». Right click on the resulting icon and select «Run as Administrator» from the drop-down men.
Step 3. Type «cd C:Program Files (x86)Windows Kits8.1Toolsx64» and press «Enter» to go to the directory in the command prompt where WDK was installed
Step 4. Type «poolmon.exe» and then press «Enter». When the utility opens up, press «P» to sort via pooltype and then «B» to sort it according to number of bytes.
Step 5. Note down the pooltag of the item which is using a majority of the memory. Open another command prompt to check which driver the tag belongs to. For this type f indstr / s then the tag which you have noted
Step 6. The command will point to a specific sys file. Open the file properties to check which driver the file belongs to.
When you find out the driver, head over to the Microsoft site to download the official driver for Windows 10. Alternatively, try Driver Talent to install the Windows 10 drivers (all drivers are official and WHQL ones from manufacturers and from Microsoft).
Way 2. Fix Driver Issues on Windows 10 with Drive Talent
It’s really hard to check the driver issues manually, but there is one all-in-one driver fix tool, Driver Talent (formerly called DriveTheLife), which helps you 1 click to find out the driver problems and then fix them 1 click. You can try this tool to repair the corrupted, damaged, or incompatible drivers, download and install the best-matched drivers if they are missing, and update to the latest drivers if them are outdated.
Download and install Driver Talent on your computer.
Step 1. Run Driver Talent to scan your computer to identify all driver issues.

Step 2. Fix the driver issues by clicking on the buttons of «Repair», «Update», «Reinstall», «Install», etc..
Step 3. Restart the computer after all the drivers are fixed.
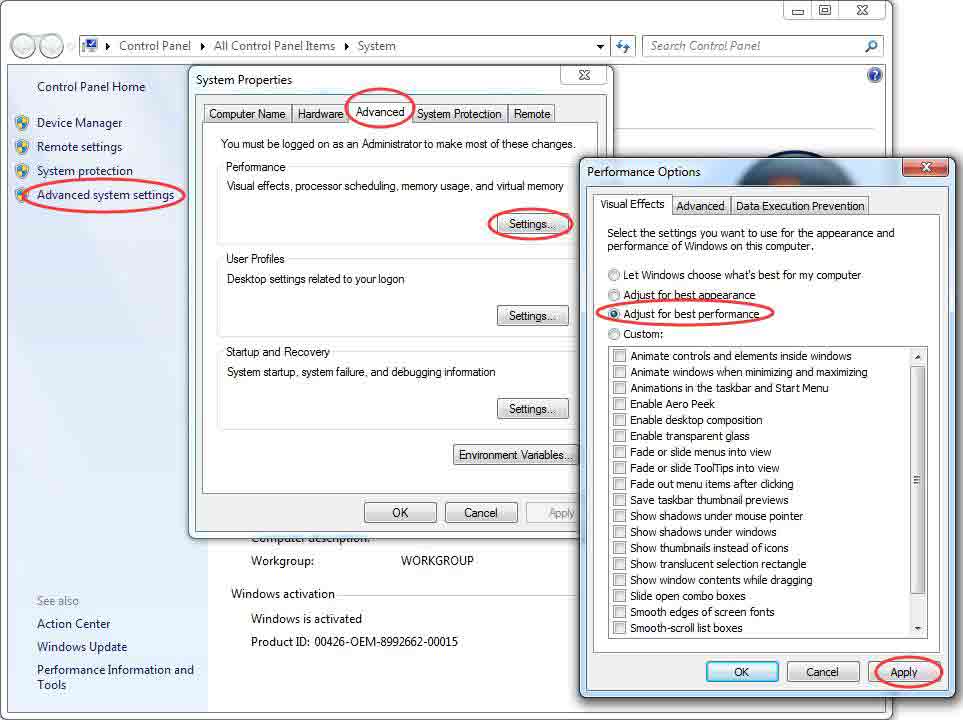
Way 3. Adjust for Best Performance
Step 1. On the start screen of Windows 10, click on the «Desktop» icon.
Step 2. Right click on «Computer» icon and select «Properties».
Step 3. Select «Advanced System settings» to go to the «System properties» windows.
Step 4. Select «Settings», «Adjust for best performance» and «Apply».
Step 5. Click “OK”. Restart your compuer.
Way 4. Check All Apps Your Are Using
Open the task manager and look into the process tab to check if one of your apps is using more RAM memory then it is supposed to.
Uninstall the apps that you are not using resolve the Windows 10 high memory usuage issue.
Way 5. Disable Programs Running at Startup
It’s suggested that you’d better disable as many programs as possible that are running at startup on Windows 10. This helps to save lots of CPU memory usage.
Step 1. Press the Windows button and «R» at the same time.
Step 2. Type “msconfig” without the quotes in the run window and press «Enter» of the keyboard.
Step 3. The Task manager window pops up. Click on the «Startup» tab and you will see a list of programs that run at startup.
Step 4. Right click on the applications that you don’t want to run at startup and select «Disable».
Way 6. Defragment Hard Drives
Step 1. Press the Windows button and «R» at the same time.
Step 2. Type «dfrgui» without the quotes in the run window and press «Enter» of the keyboard.
Step 3. In the new window click on the hard drives you want to defragment.
Step 3. Click «Optimize» and follow the instructions on the screen to finish the defragment process.
Step 4. Restart your computer.
Way 7. Close As Many Applications As Possible
Only open the applications you need on Windows 10. Close other applications that you don’t use at that time, especially when you update to Windows 10 on older computer.
Way 8. Scan to Check Third Party Programs
Run a full system virus to scan on your Windows 10 computer to make sure that you don’t have any third party programs that make your system RAM take up more usage.
Way 9. Fix High Memory Problem via Registry Hack
In fact high memory usage not only occurs in Windows 10, but also happens in Window 8 and Windows 8.1. The Windows 8/8.1 registry hack can fix this high memory issue in Windows 10.
Step 1. Hit Windows Key + R Type in Regedit and then hit Enter.
Step 2. Go to: HKEY_LOCAL_MACHINE\SYSTEM\CurrentControlSet\Control\Session Manager\Memory Management in the editor.
Step 3. Find ClearPageFileAtShutDown and change its value to 1.
Step 4. Restart the computer.
Way 10. Reboot Your Computer
This is simple but always helpful, especially when the Windows 10 operating system is not working at the speed you think it should be. Rebooting your computer can ensure that you don’t have blocked applications in your process.
Updated: Another useful solution you can try is to get another hard drive. This can help to ease the uptight CPU usage. Thank you for all the readers who share workable methods with us.
See Also:
These methods can ensure that your Windows 10 only uses the necessary RAM or CPU memory and that the computer is working at the speed it should be. Try any of them till you fix the high CPU /memory/RAM usage issue after Windows 10 update on your computer. If you have any problem, leave it in your comment, or click the left menu for more help.


