- Download and install Windows support software on your Mac
- Install the latest macOS updates
- Format a USB flash drive
- Download the Windows support software
- Install the Windows support software
- Learn more
- Install Windows 10 on your Mac with Boot Camp Assistant
- What you need to install Windows 10 on Mac
- How to install Windows 10 on Mac
- 1. Check your Secure Boot setting
- 2. Use Boot Camp Assistant to create a Windows partition
- 3. Format the Windows (BOOTCAMP) partition
- 4. Install Windows
- 5. Use the Boot Camp installer in Windows
- How to switch between Windows and macOS
- Learn more
- Как запустить любое Windows-приложение прямо в macOS
- Что такое Wine
- Преимущества и недостатки Wine
- Как отключить SIP
- Как установить Wine
- Как установить приложение или игру через Wine
Download and install Windows support software on your Mac
After using Boot Camp Assistant to install or upgrade Microsoft Windows on your Mac, you may also need to install the latest Windows support software (drivers) from Apple.
When you install Microsoft Windows on your Mac, Boot Camp Assistant automatically opens the Boot Camp installer, which installs the latest Windows support software (drivers). If that doesn’t happen or you experience any of the following issues while using Windows on your Mac, follow the steps in this article.
- Your Apple mouse, trackpad or keyboard isn’t working in Windows.
Force Touch isn’t designed to work in Windows. - You can’t hear audio from the built-in speakers of your Mac in Windows.
- The built-in microphone or camera of your Mac isn’t recognised in Windows.
- One or more screen resolutions are unavailable for your display in Windows.
- You can’t adjust the brightness of your built-in display in Windows.
- You’re having issues with Bluetooth or Wi-Fi in Windows.
- You’ve received an alert stating that Apple Software Update has stopped working.
- You’ve received a message stating that your PC has a driver or service that isn’t ready for this version of Windows.
- Your Mac starts up to a black or blue screen after you’ve installed Windows.
If your Mac has an AMD video card and is having graphics issues in Windows, you may need to update your AMD graphics drivers instead.

Install the latest macOS updates
Before proceeding, install the latest macOS updates, which can include updates to Boot Camp.
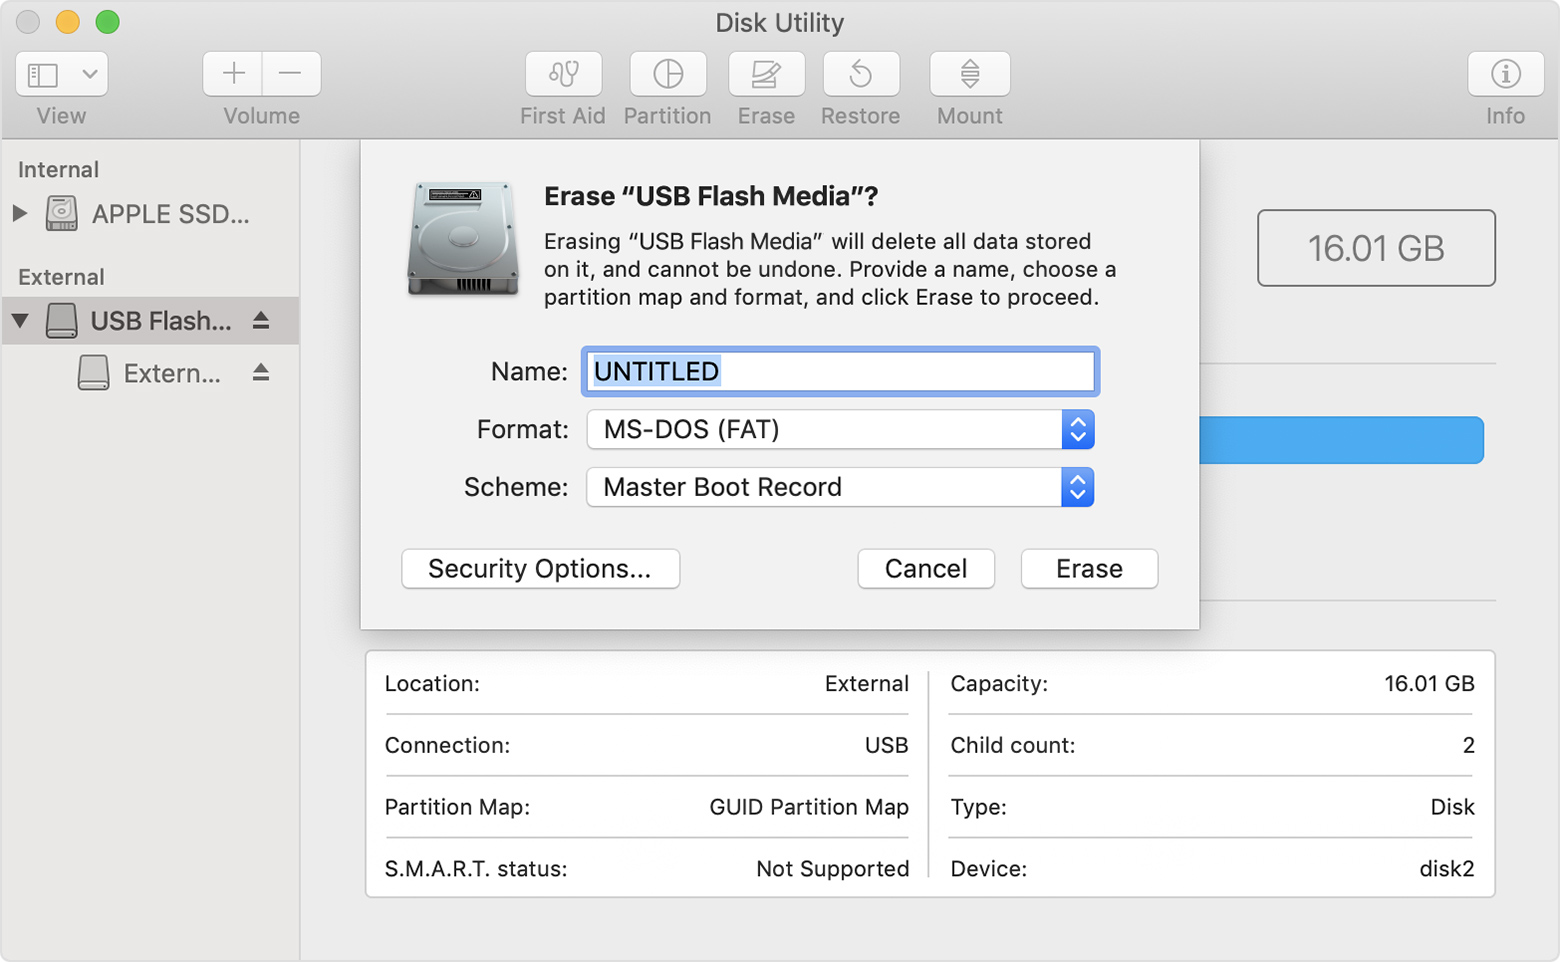
Format a USB flash drive
To install the latest Windows support software, you need a 16 GB or larger USB flash drive formatted as MS-DOS (FAT).
- Start your Mac from macOS.
- Plug the USB flash drive into your Mac.
- Open Disc Utility, which is in the Utilities folder of your Applications folder.
- Choose View > Show All Devices from the menu bar.
- From the sidebar in Disc Utility, select your USB flash drive. (Select the drive name, not the volume name beneath it.)

- Click the Erase button or tab.
- Choose MS-DOS (FAT) as the format and Master Boot Record as the scheme.
- Click Erase to format the drive. When it’s finished, quit Disk Utility.
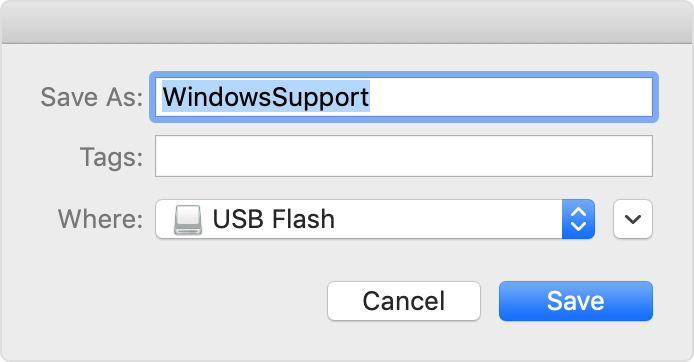
Download the Windows support software
- Make sure your Mac is connected to the Internet.
- Open Boot Camp Assistant, which is in the Utilities folder of your Applications folder.
- From the menu bar at the top of your screen, choose Action > Download Windows Support Software, then choose your USB flash drive as the destination to save to. When the download has been completed, quit Boot Camp Assistant.
Install the Windows support software
After downloading the Windows support software to your flash drive, follow these steps to install the software. (If you’re attempting to resolve issues with a Bluetooth mouse or keyboard, it may be easier to use a USB mouse or keyboard until these steps have been completed.)
- Make sure the USB flash drive is plugged into your Mac.
- Start up your Mac in Windows.
- From File Explorer, open the USB flash drive, then open Setup or setup.exe, which is in the WindowsSupport folder or BootCamp folder. When you’re asked to allow Boot Camp to make changes to your device, click Yes.
- Click Repair to begin installation. If you receive an alert stating that the software hasn’t passed Windows Logo testing, click Continue Anyway.
- After the installation has been completed, click Finish, then click Yes when you’re asked to restart your Mac.
Learn more
If you can’t download or save the Windows support software:
- If the assistant states that the Windows support software could not be saved to the selected drive or that the USB flash drive can’t be used, make sure your USB flash drive has a storage capacity of at least 16 GB and has been formatted correctly.
- If the assistant can’t see your USB flash drive, click Go Back and make sure the drive has been connected directly to the USB port on your Mac – not to a display, hub or keyboard. Disconnect and reconnect the drive, then click Continue.
- If the assistant states that it can’t download the software because of a network problem, make sure your Mac is connected to the Internet.
- Make sure your Mac meets the system requirements to install Windows using Boot Camp.
If a Mac feature still doesn’t work after updating the Windows support software, search for your symptom on the Apple support website or Microsoft support website. Some features of your Mac aren’t designed to work in Windows.
Information about products not manufactured by Apple, or independent websites not controlled or tested by Apple, is provided without recommendation or endorsement. Apple assumes no responsibility with regard to the selection, performance or use of third-party websites or products. Apple makes no representations regarding third-party website accuracy or reliability. Contact the vendor for additional information.
Install Windows 10 on your Mac with Boot Camp Assistant
With Boot Camp, you can install Microsoft Windows 10 on your Mac, then switch between macOS and Windows when restarting your Mac.
What you need to install Windows 10 on Mac
- MacBook introduced in 2015 or later
- MacBook Air introduced in 2012 or later
- MacBook Pro introduced in 2012 or later
- Mac mini introduced in 2012 or later
- iMac introduced in 2012 or later 1
- iMac Pro (all models)
- Mac Pro introduced in 2013 or later
The latest macOS updates, which can include updates to Boot Camp Assistant. You will use Boot Camp Assistant to install Windows 10.
64GB or more free storage space on your Mac startup disk:
- Your Mac can have as little as 64GB of free storage space, but at least 128GB of free storage space provides the best experience. Automatic Windows updates require that much space or more.
- If you have an iMac Pro or Mac Pro with 128GB of memory (RAM) or more, your startup disk needs at least as much free storage space as your Mac has memory. 2
An external USB flash drive with a storage capacity of 16GB or more, unless you’re using a Mac that doesn’t need a flash drive to install Windows.
A 64-bit version of Windows 10 Home or Windows 10 Pro on a disk image (ISO) or other installation media. If installing Windows on your Mac for the first time, this must be a full version of Windows, not an upgrade.
- If your copy of Windows came on a USB flash drive, or you have a Windows product key and no installation disc, download a Windows 10 disk image from Microsoft.
- If your copy of Windows came on a DVD, you might need to create a disk image of that DVD.
![]()
How to install Windows 10 on Mac
To install Windows, use Boot Camp Assistant, which is included with your Mac.
1. Check your Secure Boot setting
Learn how to check your Secure Boot setting. The default Secure Boot setting is Full Security. If you changed it to No Security, change it back to Full Security before installing Windows. After installing Windows, you can use any Secure Boot setting without affecting your ability to start up from Windows.
2. Use Boot Camp Assistant to create a Windows partition
Open Boot Camp Assistant, which is in the Utilities folder of your Applications folder. Follow the onscreen instructions.
- If you’re asked to insert a USB drive, plug your USB flash drive into your Mac. Boot Camp Assistant will use it to create a bootable USB drive for Windows installation.
- When Boot Camp Assistant asks you to set the size of the Windows partition, remember the minimum storage-space requirements in the previous section. Set a partition size that meets your needs, because you can’t change its size later.
3. Format the Windows (BOOTCAMP) partition
When Boot Camp Assistant finishes, your Mac restarts to the Windows installer. If the installer asks where to install Windows, select the BOOTCAMP partition and click Format. In most cases, the installer selects and formats the BOOTCAMP partition automatically.
4. Install Windows
Unplug any external devices that aren’t necessary during installation. Then click Next and follow the onscreen instructions to begin installing Windows.
5. Use the Boot Camp installer in Windows
After Windows installation completes, your Mac starts up in Windows and opens a ”Welcome to the Boot Camp installer” window. Follow the onscreen instructions to install Boot Camp and Windows support software (drivers). You will be asked to restart when done.
- If the Boot Camp installer never opens, open the Boot Camp installer manually and use it to complete Boot Camp installation.
- If you have an external display connected to a Thunderbolt 3 port on your Mac, the display will be blank (black, gray, or blue) for up to 2 minutes during installation.
How to switch between Windows and macOS
Restart, then press and hold the Option (or Alt) ⌥ key during startup to switch between Windows and macOS.
Learn more
If you have one of these Intel-based Mac models using OS X El Capitan or later, you don’t need a USB flash drive to install Windows:
- MacBook introduced in 2015 or later
- MacBook Air introduced in 2017 or later 3
- MacBook Pro introduced in 2015 or later 3
- iMac introduced in 2015 or later
- iMac Pro (all models)
- Mac Pro introduced in late 2013 or later
For more information about using Windows on your Mac, open Boot Camp Assistant and click the Open Boot Camp Help button.
1. If you’re using an iMac (Retina 5K, 27-inch, Late 2014) or iMac (27-inch, Late 2013) or iMac (27-inch, Late 2012) with a 3TB hard drive and macOS Mojave or later, learn about an alert you might see during installation.
2. For example, if your Mac has 128GB of memory, its startup disk must have at least 128GB of storage space available for Windows. To see how much memory your Mac has, choose Apple menu > About This Mac. To see how much storage space is available, click the Storage tab in the same window.
3. These Mac models were offered with 128GB hard drives as an option. Apple recommends 256GB or larger hard drives so that you can create a Boot Camp partition of at least 128GB.
Information about products not manufactured by Apple, or independent websites not controlled or tested by Apple, is provided without recommendation or endorsement. Apple assumes no responsibility with regard to the selection, performance, or use of third-party websites or products. Apple makes no representations regarding third-party website accuracy or reliability. Contact the vendor for additional information.
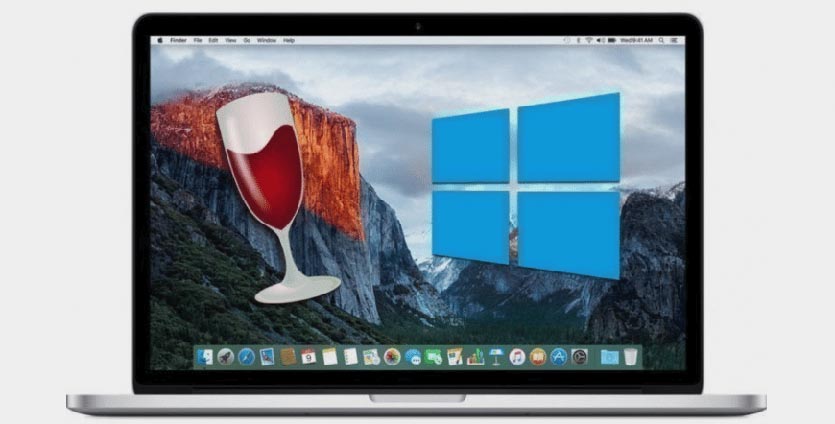
Как запустить любое Windows-приложение прямо в macOS
Для операционной системы Windows существует большое количество специализированного и профильного ПО, аналогов которому нет на macOS.
Не все знают, что есть еще один способ запускать Windows-приложения прямо на Mac без дополнительных операционных систем и виртуальных машин. Работает это благодаря технологии Wine, которая не первый год выручает пользователей.
Что такое Wine
Wine — это свободно распространяемое ПО, которое предназначено для запуска 16-, 32- и 64- битных приложений, которые создавались для Microsoft Windows, в UNIX-подобных операционных системах.
Существуют сборки программы для Linux, macOS и даже Windows (чтобы запускать устаревшие программы и игры для “винды”). Wine основан на альтернативной реализации Windows API и не является эмулятором или виртуальной машиной.
Первые стабильные версии Wine появились в середине 2008 года. С того времени среда активно развивалась, части кода Wine использовались в разных программных продуктах и сборках операционных систем.
На данный момент при помощи Wine можно запустить практически любое приложение или игру из операционной системы Windows на Mac.
Преимущества и недостатки Wine
Прежде чем начать работу со средой Wine, следует изучить ее основные преимущества и недостатки. Возможно, в вашем случае уместнее использовать другой способ запуска Windows-программ.
✅ Windows приложения запаковываются в специальную “обертку” и работают как программы для macOS.
✅ Не требуется место, как для виртуальной машины, Boot Camp или дистрибутива Windows.
✅ Приложение запускается быстро и работает очень отзывчиво. Получится даже поиграть в динамичные игры.
✅ Среда имеет большое количество настроек графики и производительности, что позволяет добиться комфортной работы в большинстве случаев.
❌ Wine практически не взаимодействует с подключенными к компьютеру устройствами. Использовать Windows ПО, например, для работы с подключенным iPhone не получится.
❌ Каждое запакованное приложение будет занимать не менее пары ГБ, ведь будет включать в себя все необходимые API. Если нужно запускать таким способом более 5-6 программ, проще установить виртуальную машину.
❌ Некоторые программы и игры банально не запускаются в Wine, но при этом работают в виртуальной машине или Boot Camp.
Как отключить SIP
Для начала потребуется временно отключить защиту SIP (System Integrity Protection). Это необходимо для изменения системных файлов во время установки Wine и его компонентов.
1. Перезагрузите Mac.
2. Во время включения компьютера зажмите сочетание клавиш Command + R для загрузки в режиме восстановления.
Для этого нужно использовать оригинальную беспроводную клавиатуру Apple или любую проводную. Беспроводные клавиатуры других производителей могу подключаться к Mac уже после начала запуска ОС и не позволят загрузиться в любом служебном режиме.
3. После загрузки в режиме восстановления в строке меню выбираем Утилиты – Терминал.
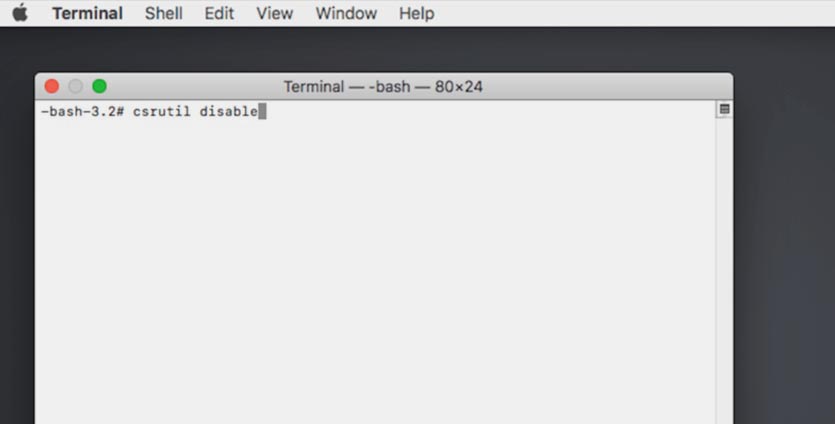
4. Водим следующе команду и нажимаем Ввод:
5. Перезагружаем Mac в обычном режиме. Сделать это можно из строки меню или при помощи команды “reboot”.
После завершения установки Wine и загрузки необходимых приложений можно заново включить защиту SIP. Для этого проделываем аналогичные действия, только для включения используем команду “csrutil enable”.
Как установить Wine
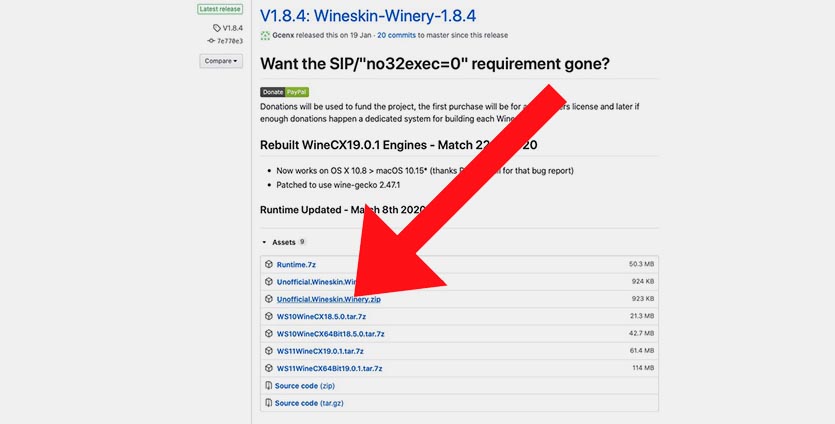
1. Скачайте последнюю неофициальную версию Wine с GitHub. Этот апдейт поддерживает работу с последними релизами macOS, которые еще за бортом официальных версий.
2. Извлеките приложение из архива и запустите его.
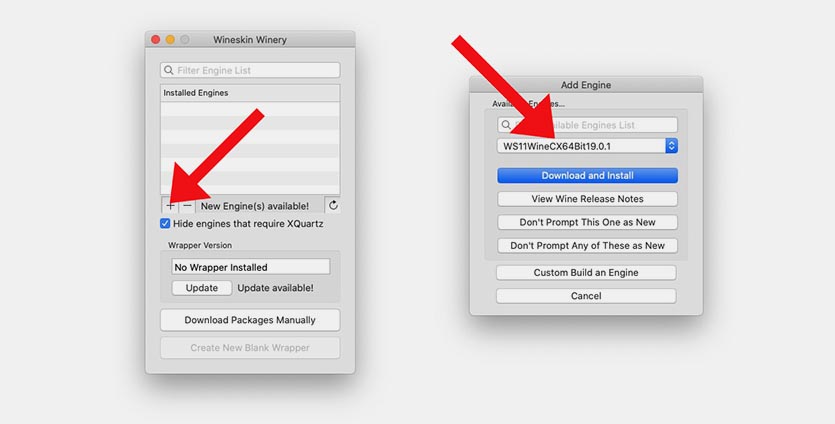
3. Нажмите “+” для добавления нового движка и найдите в списке WS11WineCX64Bit19.01.
Это самая актуальная версия с поддержкой 32-битных приложений.
4. Нажмите Download and Install и дождитесь окончания процесса установки.
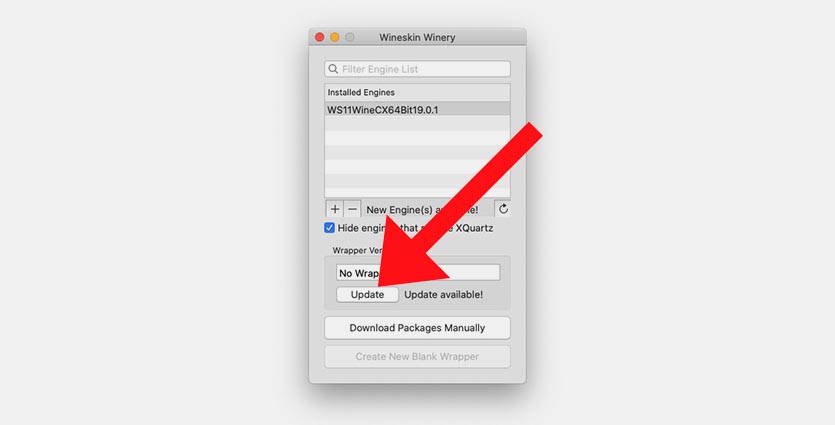
5. Нажмите кнопку Update и дождитесь окончания обновления модуля.
Все. Среда Wine готова для установки приложений. Скачайте подходящие установочные пакеты для операционной системы Windows.
Как установить приложение или игру через Wine
Описанные в предыдущем пункте манипуляции проводятся один раз. После этого для добавления новой программы или игры нужно сделать следующее:
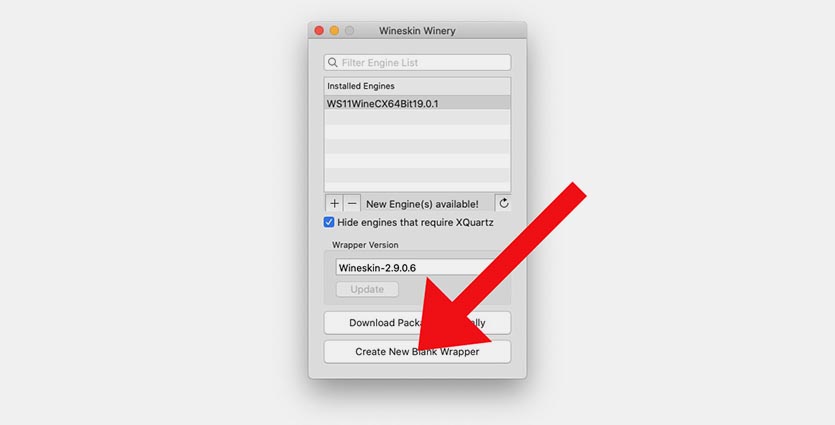
1. Нажмите кнопку Create New Blank Wrapper.
2. Укажите название будущего приложения, нажмите Ok и дождитесь окончания процесса.
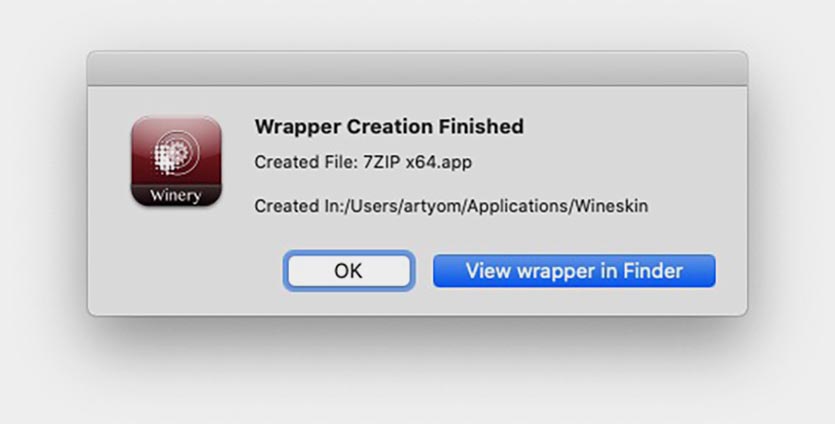
3. В последнем диалоговом окне нажмите View wrapper in Finder.
4. Запустите созданную заготовку будущего приложения.
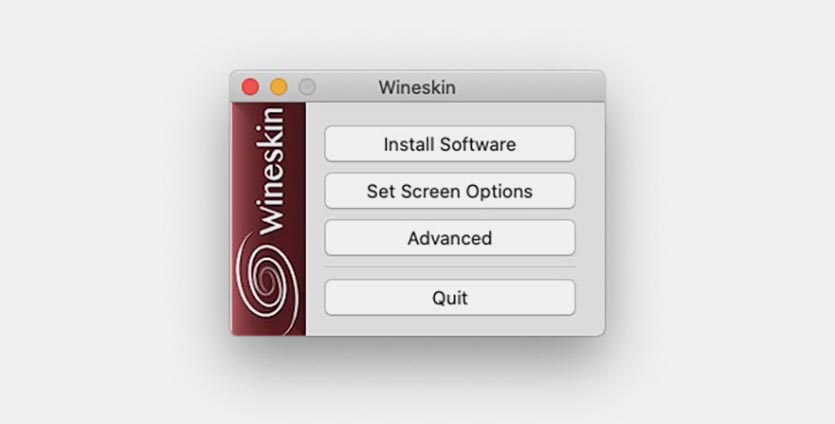
5. Нажмите кнопку Install software.
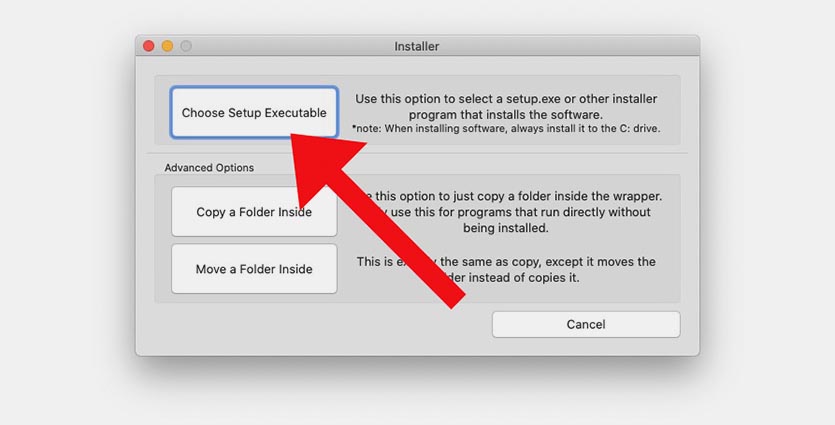
6. Выберите пункт Choose Setup Executable.
7. Укажите установочный покет для ОС Windows и произведите привычную установку программы.
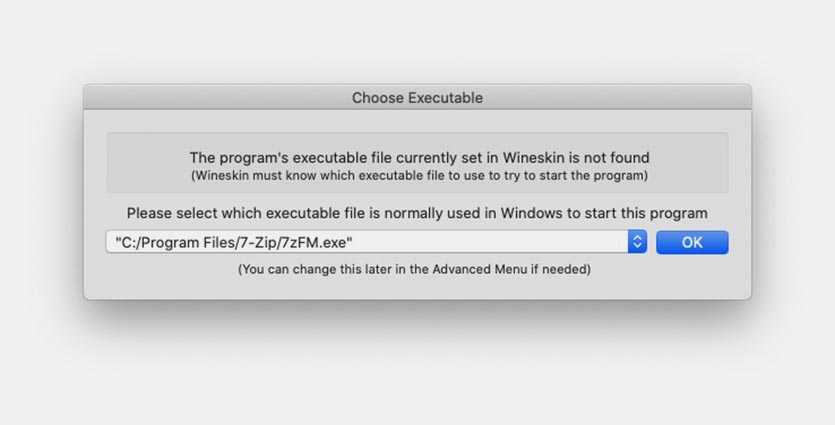
8. После установки укажите правильный *.exe файл для запуска программы и нажмите Ok. Приложение может подхватить не сам исполняемый файл, а, например, файл для деинсталляции программы.
9. Нажмите кнопку Advanced в меню Wineskin.
10. В настройках на вкладке Configuration можете изменить иконку приложения. На вкладке Options отключите все установленные флаги.
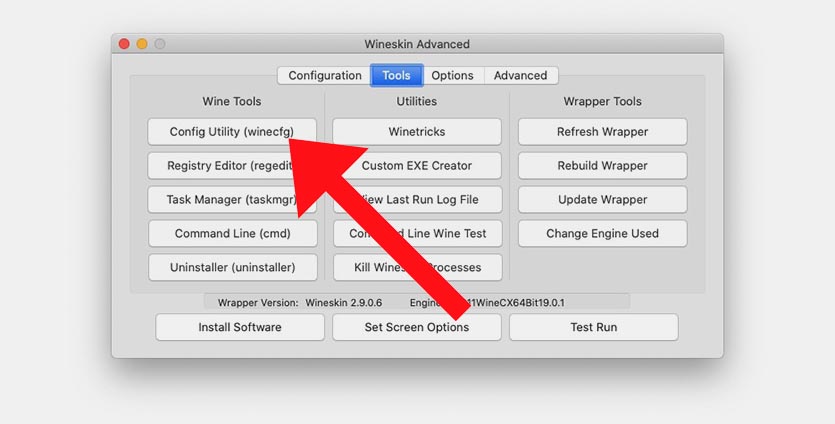
11. Перейдите на вкладку Tools и нажмите Config Utility (winecfg).
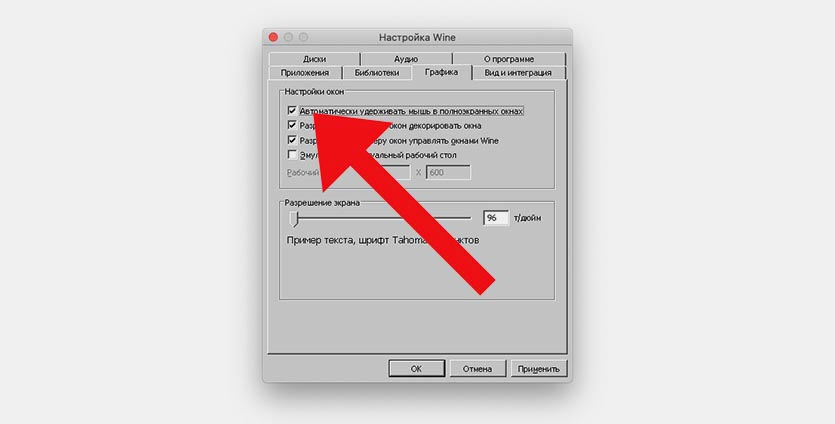
12. На вкладке Графика включите самую верхнюю опцию, нажмите Применить и закройте окно.
Готово! Теперь можете запускать созданное приложение. Оно будет доступно в папке /Applications/Wineskin или в Launchpad.
Вот так можно запросто запускать на Mac большинство Windows приложений. Кстати, можете установить 32-битные Windows-игры, аналоги которых для macOS не обновили под 64-битную архитектуру.


