- Создание файла Установщика приложений вручную Create an App Installer file manually
- Пример файла установщика приложения App Installer file example
- Инструкции по созданию файла Установщика приложений. How to create an App Installer file
- Шаг 1. Создание файла *.appinstaller Step 1: Create the *.appinstaller file
- Шаг 2. Добавление базового шаблона Step 2: Add the basic template
- Шаг 3. Добавление сведений об основном пакете Step 3: Add the main package information
- Шаг 4. Добавление дополнительных пакетов Step 4: Add the optional packages
- Шаг 5. Добавление зависимостей Step 5: Add dependencies
- Шаг 6. Добавление параметра обновления Step 6: Add Update setting
- Walkthrough: Create a traditional Windows Desktop application (C++)
- Prerequisites
- Create a Windows desktop project
- To create a Windows desktop project in Visual Studio 2019
- To create a Windows desktop project in Visual Studio 2017
- To create a Windows desktop project in Visual Studio 2015
- Create the code
- To start a Windows desktop application
- To add functionality to the WinMain function
- To add functionality to the WndProc function
- Build the code
- To build this example
Создание файла Установщика приложений вручную Create an App Installer file manually
В этой статье показано, как вручную создать файл установщика приложения, который определяет связанный набор. This article shows how to manually create an App Installer file that defines a related set. Связанный набор — это не один объект, а сочетание основного и дополнительных пакетов. A related set is not one entity, but rather a combination of a main package and optional packages.
Чтобы получить возможность установить связанный набор как один объект, необходимо указать основной и дополнительные пакеты как один объект. To be able to install a related set as one entity, we must be able to specify the main package and optional package as one. Для этого необходимо создать XML-файл с расширением appinstaller , чтобы определить связанный набор. To do this, we will need to create an XML file with an .appinstaller extension to define a related set. Установщик приложения использует файл appinstaller и позволяет пользователю установить все определенные пакеты одним щелчком. App Installer consumes the .appinstaller file and allows the user to install all of the defined packages with a single click.
Пример файла установщика приложения App Installer file example
Прежде чем мы перейдем к более подробной информации, ниже приведен полный пример файла msixbundle *. appinstaller: Before we go in to more detail, here is a complete sample msixbundle *.appinstaller file:
При развертывании файл Установщика приложений сверяется с пакетами приложений, на которые ссылается элемент Uri . During deployment, the App Installer file is validated against the app packages referenced in the Uri element. таким образом, значения Name , Publisher и Version должны соответствовать элементу Package/Identity в манифесте пакета приложения. So, the Name , Publisher and Version should match the Package/Identity element in the app package manifest.
Инструкции по созданию файла Установщика приложений. How to create an App Installer file
Для распределения связанного набора как одного объекта необходимо создать файл Установщика приложений, содержащий элементы, которые требуются соответствующей схеме Установщика приложений. To distribute your related set as one entity, you must create an App Installer file that contains the elements that are required by that appinstaller schema.
Шаг 1. Создание файла *.appinstaller Step 1: Create the *.appinstaller file
Используя текстовый редактор, создайте файл (который будет содержать XML) и назовите его .appinstaller Using a text editor, create a file (which will contain XML) and name it .appinstaller
Шаг 2. Добавление базового шаблона Step 2: Add the basic template
Базовый шаблон включает в себя сведения о файле Установщика приложений. The basic template includes the App Installer file information.
Шаг 3. Добавление сведений об основном пакете Step 3: Add the main package information
Если основным пакетом приложения является файл. msix или. appx, используйте , как показано ниже. If the main app package is an .msix or .appx file, then use , as shown below. Обязательно включите ProcessorArchitecture, так как он обязателен для пакетов, не относящихся к пакету. Be sure to include the ProcessorArchitecture, as it is mandatory for non-bundle packages.
Если основным пакетом приложения является msixbundle или appxbundle или файл, используйте вместо, как показано ниже. If the main app package is an .msixbundle or .appxbundle or file, then use the in place of as shown below. Для пакетов ProcessorArchitecture не требуется. For bundles, ProcessorArchitecture is not required.
Сведения в атрибуте или должны совпадать с элементом Package/Identity в манифесте пакета приложений или пакета приложения соответственно. The information in the or attribute should match the Package/Identity element in the app bundle manifest or app package manifest respectively.
Шаг 4. Добавление дополнительных пакетов Step 4: Add the optional packages
Как и атрибут основного пакета приложений, если дополнительный пакет может являться пакетом приложения или пакетом приложений, дочерний элемент с атрибутом должен являться
или . Similar to the main app package attribute, if the optional package can be either an app package or an app bundle, the child element within the attribute should be
or respectively. Сведения о пакете в дочерних элементах должны соответствовать элементу идентификатора в манифеста пакета приложений или пакета приложения. The package information in the child elements should match the identity element in the bundle or package manifest.
Шаг 5. Добавление зависимостей Step 5: Add dependencies
В элементе зависимостей можно указать требуемые пакеты платформы для основного пакета или дополнительных пакетов. In the dependencies element, you can specify the required framework packages for the main package or the optional packages.
Шаг 6. Добавление параметра обновления Step 6: Add Update setting
В файле Установщика приложений можно также указать параметр обновления, чтобы связанные наборы автоматически обновлялись при публикации нового файла Установщика приложений. The App Installer file can also specify update setting so that the related sets can be automatically updated when a newer App Installer file is published. является необязательным элементом. is an optional element. В параметре OnLaunch указывает, что проверки обновлений должны выполняться при запуске приложения, а хаурсбетвинупдатечеккс = «12» указывает, что проверка обновлений должна выполняться каждые 12 часов. Within the OnLaunch option specifies that update checks should be made on app launch, and HoursBetweenUpdateChecks=»12″ specifies that an update check should be made every 12 hours. Если параметр HoursBetweenUpdateChecks не задан, интервал проверки обновлений по умолчанию — 24 часа. If HoursBetweenUpdateChecks is not specified, the default interval used to check for updates is 24 hours. Дополнительные типы обновлений, например фоновые обновления, можно найти в схемепараметров обновления. Дополнительные типы обновлений для запуска, такие как обновления с запросом, можно найти в схеме OnLaunch. Additional types of updates, like background updates can be found in the Update Settings schema; Additional types of on-launch updates like updates with a prompt can be found in the OnLaunch schema
Полные сведения о схеме XML см. в разделе Справочник по файлу Установщика приложений. For all of the details on the XML schema, see App Installer file reference.
Тип файла установщика приложений является новым в Windows 10, версия 1709 (Windows 10 Creators Update). The App Installer file type is new in Windows 10, version 1709 (the Windows 10 Fall Creators Update). Развертывание приложений Windows 10 с помощью файла установщика приложения в предыдущих версиях Windows 10 не поддерживается. There is no support for deployment of Windows 10 apps using an App Installer file on previous versions of Windows 10. Элемент хаурсбетвинупдатечеккс доступен начиная с Windows 10, версия 1803. The HoursBetweenUpdateChecks element is available starting in Windows 10, version 1803.
Walkthrough: Create a traditional Windows Desktop application (C++)
This walkthrough shows how to create a traditional Windows desktop application in Visual Studio. The example application you’ll create uses the Windows API to display «Hello, Windows desktop!» in a window. You can use the code that you develop in this walkthrough as a pattern to create other Windows desktop applications.
The Windows API (also known as the Win32 API, Windows Desktop API, and Windows Classic API) is a C-language-based framework for creating Windows applications. It has been in existence since the 1980s and has been used to create Windows applications for decades. More advanced and easier-to-program frameworks have been built on top of the Windows API. For example, MFC, ATL, the .NET frameworks. Even the most modern Windows Runtime code for UWP and Store apps written in C++/WinRT uses the Windows API underneath. For more information about the Windows API, see Windows API Index. There are many ways to create Windows applications, but the process above was the first.
For the sake of brevity, some code statements are omitted in the text. The Build the code section at the end of this document shows the complete code.
Prerequisites
A computer that runs Microsoft Windows 7 or later versions. We recommend Windows 10 for the best development experience.
A copy of Visual Studio. For information on how to download and install Visual Studio, see Install Visual Studio. When you run the installer, make sure that the Desktop development with C++ workload is checked. Don’t worry if you didn’t install this workload when you installed Visual Studio. You can run the installer again and install it now.

An understanding of the basics of using the Visual Studio IDE. If you’ve used Windows desktop apps before, you can probably keep up. For an introduction, see Visual Studio IDE feature tour.
An understanding of enough of the fundamentals of the C++ language to follow along. Don’t worry, we don’t do anything too complicated.
Create a Windows desktop project
Follow these steps to create your first Windows desktop project. As you go, you’ll enter the code for a working Windows desktop application. To see the documentation for your preferred version of Visual Studio, use the Version selector control. It’s found at the top of the table of contents on this page.
To create a Windows desktop project in Visual Studio 2019
From the main menu, choose File > New > Project to open the Create a New Project dialog box.
At the top of the dialog, set Language to C++, set Platform to Windows, and set Project type to Desktop.
From the filtered list of project types, choose Windows Desktop Wizard then choose Next. In the next page, enter a name for the project, for example, DesktopApp.
Choose the Create button to create the project.
The Windows Desktop Project dialog now appears. Under Application type, select Desktop application (.exe). Under Additional options, select Empty project. Choose OK to create the project.
In Solution Explorer, right-click the DesktopApp project, choose Add, and then choose New Item.

In the Add New Item dialog box, select C++ File (.cpp). In the Name box, type a name for the file, for example, HelloWindowsDesktop.cpp. Choose Add.
 Visual C plus plus selected and the C plus plus File option highlighted.» title=»Add .cpp file to DesktopApp Project» data-linktype=»relative-path»>
Your project is now created and your source file is opened in the editor. To continue, skip ahead to Create the code.
To create a Windows desktop project in Visual Studio 2017
On the File menu, choose New and then choose Project.
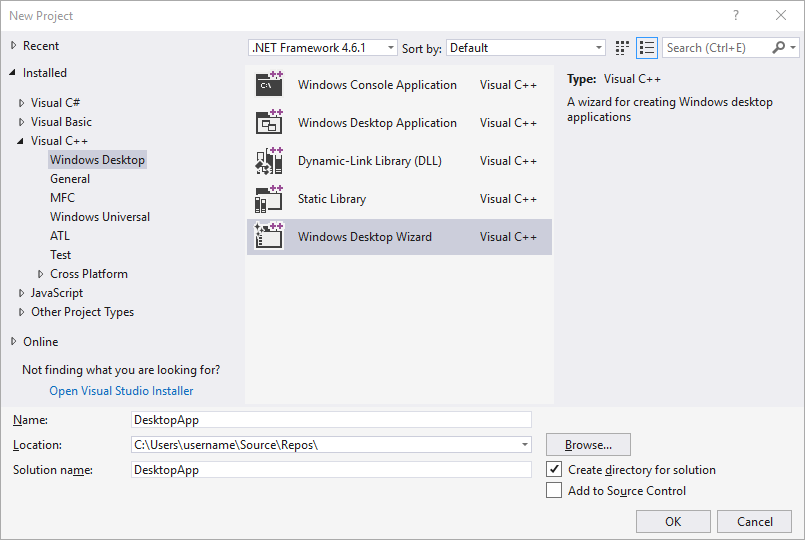
In the New Project dialog box, in the left pane, expand Installed > Visual C++, then select Windows Desktop. In the middle pane, select Windows Desktop Wizard.
In the Name box, type a name for the project, for example, DesktopApp. Choose OK.
 Visual C plus plus > Windows Desktop selected, the Windows Desktop Wizard option highlighted, and DesktopApp typed in the Name text box.» title=»Name the DesktopApp project» data-linktype=»relative-path»>
In the Windows Desktop Project dialog, under Application type, select Windows application (.exe). Under Additional options, select Empty project. Make sure Precompiled Header isn’t selected. Choose OK to create the project.
In Solution Explorer, right-click the DesktopApp project, choose Add, and then choose New Item.
In the Add New Item dialog box, select C++ File (.cpp). In the Name box, type a name for the file, for example, HelloWindowsDesktop.cpp. Choose Add.
Visual C plus plus selected and the C plus plus File option highlighted.» title=»Add .cpp file to DesktopApp Project» data-linktype=»relative-path»>
Your project is now created and your source file is opened in the editor. To continue, skip ahead to Create the code.
To create a Windows desktop project in Visual Studio 2015
On the File menu, choose New and then choose Project.
In the New Project dialog box, in the left pane, expand Installed > Templates > Visual C++, and then select Win32. In the middle pane, select Win32 Project.
In the Name box, type a name for the project, for example, DesktopApp. Choose OK.
 Templates > Visual C plus plus > Win32 selected, the Win32 Project option highlighted, and DesktopApp typed in the Name text box.» title=»Name the DesktopApp project» data-linktype=»relative-path»>
On the Overview page of the Win32 Application Wizard, choose Next.

On the Application Settings page, under Application type, select Windows application. Under Additional options, uncheck Precompiled header, then select Empty project. Choose Finish to create the project.
In Solution Explorer, right-click the DesktopApp project, choose Add, and then choose New Item.

In the Add New Item dialog box, select C++ File (.cpp). In the Name box, type a name for the file, for example, HelloWindowsDesktop.cpp. Choose Add.
 Visual C plus plus selected and the C plus plus File option highlighted.» title=»Add .cpp file to DesktopApp Project» data-linktype=»relative-path»>
Your project is now created and your source file is opened in the editor.
Create the code
Next, you’ll learn how to create the code for a Windows desktop application in Visual Studio.
To start a Windows desktop application
Just as every C application and C++ application must have a main function as its starting point, every Windows desktop application must have a WinMain function. WinMain has the following syntax.
For information about the parameters and return value of this function, see WinMain entry point.
What are all those extra words, such as CALLBACK , or HINSTANCE , or _In_ ? The traditional Windows API uses typedefs and preprocessor macros extensively to abstract away some of the details of types and platform-specific code, such as calling conventions, __declspec declarations, and compiler pragmas. In Visual Studio, you can use the IntelliSense Quick Info feature to see what these typedefs and macros define. Hover your mouse over the word of interest, or select it and press Ctrl+K, Ctrl+I for a small pop-up window that contains the definition. For more information, see Using IntelliSense. Parameters and return types often use SAL Annotations to help you catch programming errors. For more information, see Using SAL Annotations to Reduce C/C++ Code Defects.
Windows desktop programs require . defines the TCHAR macro, which resolves ultimately to wchar_t if the UNICODE symbol is defined in your project, otherwise it resolves to char . If you always build with UNICODE enabled, you don’t need TCHAR and can just use wchar_t directly.
Along with the WinMain function, every Windows desktop application must also have a window-procedure function. This function is typically named WndProc , but you can name it whatever you like. WndProc has the following syntax.
In this function, you write code to handle messages that the application receives from Windows when events occur. For example, if a user chooses an OK button in your application, Windows will send a message to you and you can write code inside your WndProc function that does whatever work is appropriate. It’s called handling an event. You only handle the events that are relevant for your application.
For more information, see Window Procedures.
To add functionality to the WinMain function
In the WinMain function, you populate a structure of type WNDCLASSEX. The structure contains information about the window: the application icon, the background color of the window, the name to display in the title bar, among other things. Importantly, it contains a function pointer to your window procedure. The following example shows a typical WNDCLASSEX structure.
For information about the fields of the structure above, see WNDCLASSEX.
Register the WNDCLASSEX with Windows so that it knows about your window and how to send messages to it. Use the RegisterClassEx function and pass the window class structure as an argument. The _T macro is used because we use the TCHAR type.
Now you can create a window. Use the CreateWindow function.
This function returns an HWND , which is a handle to a window. A handle is somewhat like a pointer that Windows uses to keep track of open windows. For more information, see Windows Data Types.
At this point, the window has been created, but we still need to tell Windows to make it visible. That’s what this code does:
The displayed window doesn’t have much content because you haven’t yet implemented the WndProc function. In other words, the application isn’t yet handling the messages that Windows is now sending to it.
To handle the messages, we first add a message loop to listen for the messages that Windows sends. When the application receives a message, this loop dispatches it to your WndProc function to be handled. The message loop resembles the following code.
For more information about the structures and functions in the message loop, see MSG, GetMessage, TranslateMessage, and DispatchMessage.
At this point, the WinMain function should resemble the following code.
To add functionality to the WndProc function
To enable the WndProc function to handle the messages that the application receives, implement a switch statement.
One important message to handle is the WM_PAINT message. The application receives the WM_PAINT message when part of its displayed window must be updated. The event can occur when a user moves a window in front of your window, then moves it away again. Your application doesn’t know when these events occur. Only Windows knows, so it notifies your app with a WM_PAINT message. When the window is first displayed, all of it must be updated.
To handle a WM_PAINT message, first call BeginPaint, then handle all the logic to lay out the text, buttons, and other controls in the window, and then call EndPaint. For the application, the logic between the beginning call and the ending call displays the string «Hello, Windows desktop!» in the window. In the following code, the TextOut function is used to display the string.
HDC in the code is a handle to a device context, which is used to draw in the window’s client area. Use the BeginPaint and EndPaint functions to prepare for and complete the drawing in the client area. BeginPaint returns a handle to the display device context used for drawing in the client area; EndPaint ends the paint request and releases the device context.
An application typically handles many other messages. For example, WM_CREATE when a window is first created, and WM_DESTROY when the window is closed. The following code shows a basic but complete WndProc function.
Build the code
As promised, here’s the complete code for the working application.
To build this example
Delete any code you’ve entered in HelloWindowsDesktop.cpp in the editor. Copy this example code and then paste it into HelloWindowsDesktop.cpp:
On the Build menu, choose Build Solution. The results of the compilation should appear in the Output window in Visual Studio.

To run the application, press F5. A window that contains the text «Hello, Windows desktop!» should appear in the upper-left corner of the display.

Congratulations! You’ve completed this walkthrough and built a traditional Windows desktop application.


