- Exporting kernel headers for use by userspace
- How to Install Kernel Headers in Ubuntu and Debian
- Install Kernel Headers in Ubuntu and Debian
- If You Appreciate What We Do Here On TecMint, You Should Consider:
- Как установить заголовочные файлы ядра в Linux
- Установка заголовочных файлов ядра в Debian, Ubuntu или Linux Mint
- Установка заголовочных файлов ядра в Fedora, CentOS или RHEL
- Kernel Headers from Source
- Article Details
- Customization to .config
- Compiling Kernel Options
- Optional for Other Distributions
Exporting kernel headers for use by userspace
The “make headers_install” command exports the kernel’s header files in a form suitable for use by userspace programs.
The linux kernel’s exported header files describe the API for user space programs attempting to use kernel services. These kernel header files are used by the system’s C library (such as glibc or uClibc) to define available system calls, as well as constants and structures to be used with these system calls. The C library’s header files include the kernel header files from the “linux” subdirectory. The system’s libc headers are usually installed at the default location /usr/include and the kernel headers in subdirectories under that (most notably /usr/include/linux and /usr/include/asm).
Kernel headers are backwards compatible, but not forwards compatible. This means that a program built against a C library using older kernel headers should run on a newer kernel (although it may not have access to new features), but a program built against newer kernel headers may not work on an older kernel.
The “make headers_install” command can be run in the top level directory of the kernel source code (or using a standard out-of-tree build). It takes two optional arguments:
ARCH indicates which architecture to produce headers for, and defaults to the current architecture. The linux/asm directory of the exported kernel headers is platform-specific, to see a complete list of supported architectures use the command:
INSTALL_HDR_PATH indicates where to install the headers. It defaults to “./usr”.
An вЂinclude’ directory is automatically created inside INSTALL_HDR_PATH and headers are installed in вЂINSTALL_HDR_PATH/include’.
© Copyright The kernel development community.
Источник
How to Install Kernel Headers in Ubuntu and Debian
In our last article, we have explained how to install kernel headers in CentOS 7. Kernel Headers contain the C header files for the Linux kernel, which offers the various function and structure definitions required when compiling any code that interfaces with the kernel, such as kernel modules or device drivers and some user programs.
It is very important to note that the kernel headers package you install should match with the currently installed kernel version on your system. If your kernel version ships with the default distribution installation or you have upgraded your Kernel using dpkg or apt package manager from the Ubuntu or Debian base repositories, then you must install matching kernel headers using package manager only. And if you’ve compiled kernel from sources, you must also install kernel headers from sources.
In this article, we will explain how to install Kernel Headers in Ubuntu and Debian Linux distributions using default package manager.
Install Kernel Headers in Ubuntu and Debian
First check your installed kernel version as well as kernel header package that matches your kernel version using following commands.
![]() Check Kernel Version and Kernel Headers in Ubuntu
Check Kernel Version and Kernel Headers in Ubuntu
On Debian, Ubuntu and their derivatives, all kernel header files can be found under /usr/src directory. You can check if the matching kernel headers for your kernel version are already installed on your system using the following command.
![]() Check Kernel Headers in Ubuntu
Check Kernel Headers in Ubuntu
From the above output, it’s clear that the matching kernel header directory doesn’t exist, meaning the package is not yet installed.
Before you can install the appropriate kernel headers, update your packages index, in order to grab information about the latest package releases, using the following command.
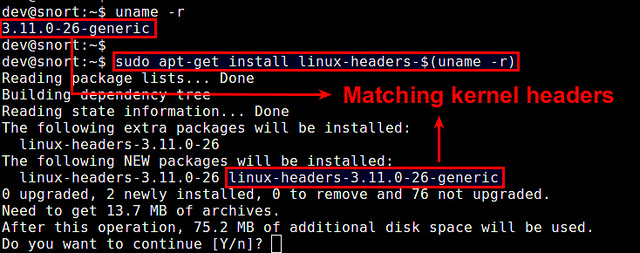
Then run the following command that follows to install the Linux Kernel headers package for your kernel version.
![]() Install Kernel Headers in Ubuntu
Install Kernel Headers in Ubuntu
Next, check if the matching kernel headers have been installed on your system using the following command
![]() Verify Installed Kernel Headers in Ubuntu
Verify Installed Kernel Headers in Ubuntu
That’s all! In this article, we have explained how to install kernel headers in Ubuntu and Debian Linux and other distributions in the Debian family tree.
Always keep in mind that to compile a kernel module, you will need the Linux kernel headers. If you have any quires, or thoughts to share, use the comment form below to reach us.
If You Appreciate What We Do Here On TecMint, You Should Consider:
TecMint is the fastest growing and most trusted community site for any kind of Linux Articles, Guides and Books on the web. Millions of people visit TecMint! to search or browse the thousands of published articles available FREELY to all.
If you like what you are reading, please consider buying us a coffee ( or 2 ) as a token of appreciation.

We are thankful for your never ending support.
Источник
Как установить заголовочные файлы ядра в Linux
Когда вы компилируете драйвер устройства как модуль ядра, вам необходимы установленные заголовочные файлы ядра. Также они требуются, если вы собираете пользовательское приложение, которое взаимодействует напрямую с ядром. При установке заголовочных файлов ядра, необходимо убедиться, что их версия совпадает с версией ядра установленного в системе.
Если версия вашего ядра не менялась после установки дистрибутива, или вы обновляли его с использованием системного менеджера пакетов (то есть apt-get, aptitude или yum) из системных репозиториев, то заголовочные файлы вы также можете установить с помощью пакетного менеджера. Однако если вы скачивали исходный код ядра и компилировали его самостоятельно, то заголовочные файлы необходимо устанавливать с помощью команды make.
Здесь мы предполагаем, что ваше ядро установлено из основного системного репозитория вашего дистрибутива, и вы хотите установить соответствующие заголовочные файлы ядра.
Установка заголовочных файлов ядра в Debian, Ubuntu или Linux Mint
Если вы не компилировали ядро вручную, то можете установить соответствующие заголовочные файлы ядра с помощью команды apt-get.
Сначала проверьте, не установлены ли уже требуемые заголовочные файлы с помощью команды:
Теперь установите заголовочные файлы, как показано ниже.
Проверьте, что установка прошла успешно.
По умолчанию в Debian, Ubuntu или Linux Mint заголовочные файлы находятся в /usr/src.
Установка заголовочных файлов ядра в Fedora, CentOS или RHEL
Если вы не обновляли ядро вручную, то можете установить соответствующие заголовочные файлы ядра с помощью команды yum.
Сначала проверьте, не установлены ли уже требуемые заголовочные файлы. По умолчанию заголовочные файлы ядра расположены в /usr/src/kernels/.
Если подходящих заголовочных файлов не установлено, вы можете установить их с помощью команды yum. Она автоматически найдет подходящий пакет.
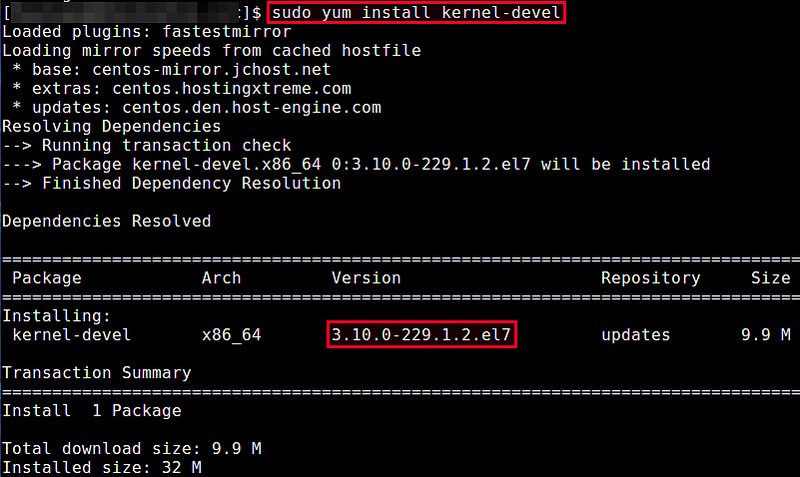
Если заголовочные файлы ядра, установленные с помощью вышеприведенной команды, не соответствуют установленному в системе ядре, значит оно устарело. В этом случае обновите ядро системы до последней версии с помощью приведенной ниже команды. После обновления необходимо перезагрузить систему.
Теперь проверьте, что установлены заголовочные файлы соответствующей версии с помощью команды:
Источник
Kernel Headers from Source


Article Details
The article shows how to install kernel source headers.
Why do you need headers?
The «make headers_install» command exports the kernel’s header files in a form suitable for use by userspace programs.
Showing current arch type
If you need GCC v5 as your default compiler
Make gcc v5 your default compiler
Verify GCC and G++
You can also use arch to find the arch type of your distribution
If you need to specify i386 the below command works to create header
OR for arm architecture type
Header install script location what make uses
Checking Source Headers
Headers install documentation which is also on kernel.org website under the documentation area.
Command line we use to create headers from source and compile kernel, change into your kernel source and type
Defining firmware installation path by typing
.
INSTALL /lib/firmware/sb16/ima_adpcm_init.csp
INSTALL /lib/firmware/keyspan/usa19qi.fw
INSTALL /lib/firmware/keyspan/usa19w.fw
INSTALL /lib/firmware/keyspan/usa28x.fw
INSTALL /lib/firmware/keyspan/usa19.fw
INSTALL /lib/firmware/keyspan/usa28xa.fw
INSTALL /lib/firmware/r128/r128_cce.bin
INSTALL /lib/firmware/keyspan/usa28.fw
INSTALL /lib/firmware/dsp56k/bootstrap.bin
INSTALL /lib/firmware/myricom/lanai.bin
INSTALL /lib/firmware/vicam/firmware.fw
INSTALL /lib/firmware/yamaha/yss225_registers.bin
INSTALL /lib/firmware/keyspan/usa49wlc.fw
INSTALL /lib/firmware/keyspan/usa28xb.fw
INSTALL /lib/firmware/sb16/mulaw_main.csp
INSTALL /lib/firmware/keyspan/usa18x.fw
INSTALL /lib/firmware/qlogic/sd7220.fw
INSTALL /lib/firmware/keyspan/usa49w.fw
INSTALL /lib/firmware/keyspan/usa19qw.fw
.
You may need lib6-dev during compiling kernel headers in Debian related distributions
Customization to .config
make savedefconfig — Create a new default configuration
make defconfig — Set all options to default values
make allnoconfig — Set all yes/no options to «n»
make allyesconfig — Set all yes/no options to «y»
make allmodconfig — Set all yes/no options to «y» and all «yes/module/no» options to «m»
make randconfig — Set each option randomly (for debugging purposes).
make oldconfig — Update a .config file from a previous version of the kernel to work with the current version.
Compiling Kernel Options
Optional for Other Distributions
Build your new kernel — optional options
make clean – clean sources from object files and previous build mess
make bzImage – build kernel and compress it with bzip
make modules – build kernel modules files, parts of kernel you marked with «M» sign
make vmlinux — build bare kernel
make fdimage — build bootable 1.44 MB floppy
make isoimage — build bootable iso image
make help — for more options
Install kernel image
First we install modules, firmware and kernel binary from our new kernel
make modules_install – install kernel modules to /lib/modules/
Cleaning targets:
clean — Remove most generated files but keep the config and
enough build support to build external modules
mrproper — Remove all generated files + config + various backup files
distclean — mrproper + remove editor backup and patch files
Configuration targets:
config — Update current config utilising a line-oriented program
nconfig — Update current config utilising a ncurses menu based
program
menuconfig — Update current config utilising a menu based program
xconfig — Update current config utilising a Qt based front-end
gconfig — Update current config utilising a GTK+ based front-end
oldconfig — Update current config utilising a provided .config as base
localmodconfig — Update current config disabling modules not loaded
localyesconfig — Update current config converting local mods to core
silentoldconfig — Same as oldconfig, but quietly, additionally update deps
defconfig — New config with default from ARCH supplied defconfig
savedefconfig — Save current config as ./defconfig (minimal config)
allnoconfig — New config where all options are answered with no
allyesconfig — New config where all options are accepted with yes
allmodconfig — New config selecting modules when possible
alldefconfig — New config with all symbols set to default
randconfig — New config with random answer to all options
listnewconfig — List new options
olddefconfig — Same as silentoldconfig but sets new symbols to their
default value
kvmconfig — Enable additional options for kvm guest kernel support
xenconfig — Enable additional options for xen dom0 and guest kernel support
tinyconfig — Configure the tiniest possible kernel
Other generic targets:
all — Build all targets marked with [*]
* vmlinux — Build the bare kernel
* modules — Build all modules
modules_install — Install all modules to INSTALL_MOD_PATH (default: /)
firmware_install- Install all firmware to INSTALL_FW_PATH
(default: $(INSTALL_MOD_PATH)/lib/firmware)
dir/ — Build all files in dir and below
dir/file.[ois] — Build specified target only
dir/file.lst — Build specified mixed source/assembly target only
(requires a recent binutils and recent build (System.map))
dir/file.ko — Build module including final link
modules_prepare — Set up for building external modules
tags/TAGS — Generate tags file for editors
cscope — Generate cscope index
gtags — Generate GNU GLOBAL index
kernelrelease — Output the release version string (use with make -s)
kernelversion — Output the version stored in Makefile (use with make -s)
image_name — Output the image name (use with make -s)
headers_install — Install sanitised kernel headers to INSTALL_HDR_PATH
(default: ./usr)
Static analysers
checkstack — Generate a list of stack hogs
namespacecheck — Name space analysis on compiled kernel
versioncheck — Sanity check on version.h usage
includecheck — Check for duplicate included header files
export_report — List the usages of all exported symbols
headers_check — Sanity check on exported headers
headerdep — Detect inclusion cycles in headers
coccicheck — Check with Coccinelle.
Kernel selftest
kselftest — Build and run kernel selftest (run as root)
Build, install, and boot kernel before
running kselftest on it
kselftest-clean — Remove all generated kselftest files
kselftest-merge — Merge all the config dependencies of kselftest to existed
.config.
Kernel packaging:
rpm-pkg — Build both source and binary RPM kernel packages
binrpm-pkg — Build only the binary kernel RPM package
deb-pkg — Build both source and binary deb kernel packages
bindeb-pkg — Build only the binary kernel deb package
tar-pkg — Build the kernel as an uncompressed tarball
targz-pkg — Build the kernel as a gzip compressed tarball
tarbz2-pkg — Build the kernel as a bzip2 compressed tarball
tarxz-pkg — Build the kernel as a xz compressed tarball
perf-tar-src-pkg — Build perf-4.11.8.tar source tarball
perf-targz-src-pkg — Build perf-4.11.8.tar.gz source tarball
perf-tarbz2-src-pkg — Build perf-4.11.8.tar.bz2 source tarball
perf-tarxz-src-pkg — Build perf-4.11.8.tar.xz source tarball
Documentation targets:
Linux kernel internal documentation in different formats (Sphinx):
htmldocs — HTML
latexdocs — LaTeX
pdfdocs — PDF
epubdocs — EPUB
xmldocs — XML
linkcheckdocs — check for broken external links (will connect to external hosts)
cleandocs — clean all generated files
make SPHINXDIRS=»s1 s2″ [target] Generate only docs of folder s1, s2
valid values for SPHINXDIRS are: core-api media doc-guide admin-guide gpu process security dev-tools driver-api
make SPHINX_CONF=
configuration. This is e.g. useful to build with nit-picking config.
Linux kernel internal documentation in different formats (DocBook):
htmldocs — HTML
pdfdocs — PDF
psdocs — Postscript
xmldocs — XML DocBook
mandocs — man pages
installmandocs — install man pages generated by mandocs
cleandocs — clean all generated DocBook files
make DOCBOOKS=»s1.xml s2.xml» [target] Generate only docs s1.xml s2.xml
valid values for DOCBOOKS are: z8530book.xml kernel-hacking.xml kernel-locking.xml writing_usb_driver.xml networking.xml kernel-api.xml filesystems.xml lsm.xml kgdb.xml gadget.xml libata.xml mtdnand.xml librs.xml rapidio.xml genericirq.xml s390-drivers.xml scsi.xml sh.xml w1.xml writing_musb_glue_layer.xml
make DOCBOOKS=»» [target] Don’t generate docs from Docbook
This is useful to generate only the ReST docs (Sphinx)
Architecture specific targets (x86):
* bzImage — Compressed kernel image (arch/x86/boot/bzImage)
install — Install kernel using
(your)
/bin/installkernel or
(distribution) /sbin/installkernel or
install to $(INSTALL_PATH) and run lilo
fdimage — Create 1.4MB boot floppy image (arch/x86/boot/fdimage)
fdimage144 — Create 1.4MB boot floppy image (arch/x86/boot/fdimage)
fdimage288 — Create 2.8MB boot floppy image (arch/x86/boot/fdimage)
isoimage — Create a boot CD-ROM image (arch/x86/boot/image.iso)
bzdisk/fdimage*/isoimage also accept:
FDARGS=». » arguments for the booted kernel
FDINITRD=file initrd for the booted kernel
i386_defconfig — Build for i386
x86_64_defconfig — Build for x86_64
make V=0|1 [targets] 0 => quiet build (default), 1 => verbose build
make V=2 [targets] 2 => give reason for rebuild of target
make O=dir [targets] Locate all output files in «dir», including .config
make C=1 [targets] Check all c source with $CHECK (sparse by default)
make C=2 [targets] Force check of all c source with $CHECK
make RECORDMCOUNT_WARN=1 [targets] Warn about ignored mcount sections
make W=n [targets] Enable extra gcc checks, n=1,2,3 where
1: warnings which may be relevant and do not occur too often
2: warnings which occur quite often but may still be relevant
3: more obscure warnings, can most likely be ignored
Multiple levels can be combined with W=12 or W=123
Execute «make» or «make all» to build all targets marked with [*]
For further info see the ./README file
You can also use man which means manual
NAME
make — GNU make utility to maintain groups of programs
SYNOPSIS
make [OPTION]. [TARGET].
DESCRIPTION
The make utility will determine automatically which pieces of a large program need to be recompiled, and issue the commands to recompile them. The manual describes the GNU implementation
of make, which was written by Richard Stallman and Roland McGrath, and is currently maintained by Paul Smith. Our examples show C programs, since they are very common, but you can use
make with any programming language whose compiler can be run with a shell command. In fact, make is not limited to programs. You can use it to describe any task where some files must be
updated automatically from others whenever the others change.
To prepare to use make, you must write a file called the makefile that describes the relationships among files in your program, and the states the commands for updating each file. In a
program, typically the executable file is updated from object files, which are in turn made by compiling source files.
Once a suitable makefile exists, each time you change some source files, this simple shell command:
suffices to perform all necessary recompilations. The make program uses the makefile description and the last-modification times of the files to decide which of the files need to be
updated. For each of those files, it issues the commands recorded in the makefile.
make executes commands in the makefile to update one or more target names, where name is typically a program. If no -f option is present, make will look for the makefiles GNUmakefile,
makefile, and Makefile, in that order.
Normally you should call your makefile either makefile or Makefile. (We recommend Makefile because it appears prominently near the beginning of a directory listing, right near other
important files such as README.) The first name checked, GNUmakefile, is not recommended for most makefiles. You should use this name if you have a makefile that is specific to GNU
make, and will not be understood by other versions of make. If makefile is ‘-‘, the standard input is read.
make updates a target if it depends on prerequisite files that have been modified since the target was last modified, or if the target does not exist.
OPTIONS
-b, -m
These options are ignored for compatibility with other versions of make.
-B, —always-make
Unconditionally make all targets.
-C dir, —directory=dir
Change to directory dir before reading the makefiles or doing anything else. If multiple -C options are specified, each is interpreted relative to the previous one: -C / -C etc is
equivalent to -C /etc. This is typically used with recursive invocations of make.
-d Print debugging information in addition to normal processing. The debugging information says which files are being considered for remaking, which file-times are being compared and
with what results, which files actually need to be remade, which implicit rules are considered and which are applied—everything interesting about how make decides what to do.
—debug[=FLAGS]
Print debugging information in addition to normal processing. If the FLAGS are omitted, then the behavior is the same as if -d was specified. FLAGS may be a for all debugging out‐
put (same as using -d), b for basic debugging, v for more verbose basic debugging, i for showing implicit rules, j for details on invocation of commands, and m for debugging while
remaking makefiles. Use n to disable all previous debugging flags.
-e, —environment-overrides
Give variables taken from the environment precedence over variables from makefiles.
-f file, —file=file, —makefile=FILE
Use file as a makefile.
-i, —ignore-errors
Ignore all errors in commands executed to remake files.
-I dir, —include-dir=dir
Specifies a directory dir to search for included makefiles. If several -I options are used to specify several directories, the directories are searched in the order specified.
Unlike the arguments to other flags of make, directories given with -I flags may come directly after the flag: -Idir is allowed, as well as -I dir. This syntax is allowed for com‐
patibility with the C preprocessor’s -I flag.
-j [jobs], —jobs[=jobs]
Specifies the number of jobs (commands) to run simultaneously. If there is more than one -j option, the last one is effective. If the -j option is given without an argument, make
will not limit the number of jobs that can run simultaneously.
-k, —keep-going
Continue as much as possible after an error. While the target that failed, and those that depend on it, cannot be remade, the other dependencies of these targets can be processed
all the same.
-l [load], —load-average[=load]
Specifies that no new jobs (commands) should be started if there are others jobs running and the load average is at least load (a floating-point number). With no argument, removes a
previous load limit.
-L, —check-symlink-times
Use the latest mtime between symlinks and target.
-n, —just-print, —dry-run, —recon
Print the commands that would be executed, but do not execute them (except in certain circumstances).
-o file, —old-file=file, —assume-old=file
Do not remake the file file even if it is older than its dependencies, and do not remake anything on account of changes in file. Essentially the file is treated as very old and its
rules are ignored.
-O[type], —output-sync[=type]
When running multiple jobs in parallel with -j, ensure the output of each job is collected together rather than interspersed with output from other jobs. If type is not specified or
is target the output from the entire recipe for each target is grouped together. If type is line the output from each command line within a recipe is grouped together. If type is
recurse output from an entire recursive make is grouped together. If type is none output synchronization is disabled.
-p, —print-data-base
Print the data base (rules and variable values) that results from reading the makefiles; then execute as usual or as otherwise specified. This also prints the version information
given by the -v switch (see below). To print the data base without trying to remake any files, use make -p -f/dev/null.
-q, —question
«Question mode». Do not run any commands, or print anything; just return an exit status that is zero if the specified targets are already up to date, nonzero otherwise.
-r, —no-builtin-rules
Eliminate use of the built-in implicit rules. Also clear out the default list of suffixes for suffix rules.
-R, —no-builtin-variables
Don’t define any built-in variables.
-s, —silent, —quiet
Silent operation; do not print the commands as they are executed.
-S, —no-keep-going, —stop
Cancel the effect of the -k option. This is never necessary except in a recursive make where -k might be inherited from the top-level make via MAKEFLAGS or if you set -k in MAKE‐
FLAGS in your environment.
-t, —touch
Touch files (mark them up to date without really changing them) instead of running their commands. This is used to pretend that the commands were done, in order to fool future invo‐
cations of make.
—trace
Information about the disposition of each target is printed (why the target is being rebuilt and what commands are run to rebuild it).
-v, —version
Print the version of the make program plus a copyright, a list of authors and a notice that there is no warranty.
-w, —print-directory
Print a message containing the working directory before and after other processing. This may be useful for tracking down errors from complicated nests of recursive make commands.
—no-print-directory
Turn off -w, even if it was turned on implicitly.
-W file, —what-if=file, —new-file=file, —assume-new=file
Pretend that the target file has just been modified. When used with the -n flag, this shows you what would happen if you were to modify that file. Without -n, it is almost the same
as running a touch command on the given file before running make, except that the modification time is changed only in the imagination of make.
—warn-undefined-variables
Warn when an undefined variable is referenced.
EXIT STATUS
GNU make exits with a status of zero if all makefiles were successfully parsed and no targets that were built failed. A status of one will be returned if the -q flag was used and make
determines that a target needs to be rebuilt. A status of two will be returned if any errors were encountered.
SEE ALSO
The full documentation for make is maintained as a Texinfo manual. If the info and make programs are properly installed at your site, the command
should give you access to the complete manual.
BUGS
See the chapter «Problems and Bugs» in The GNU Make Manual.
AUTHOR
This manual page contributed by Dennis Morse of Stanford University. Further updates contributed by Mike Frysinger. It has been reworked by Roland McGrath. Maintained by Paul Smith.
COPYRIGHT
Copyright © 1992-1993, 1996-2013 Free Software Foundation, Inc. This file is part of GNU make.
GNU Make is free software; you can redistribute it and/or modify it under the terms of the GNU General Public License as published by the Free Software Foundation; either version 3 of the
License, or (at your option) any later version.
GNU Make is distributed in the hope that it will be useful, but WITHOUT ANY WARRANTY; without even the implied warranty of MERCHANTABILITY or FITNESS FOR A PARTICULAR PURPOSE. See the
GNU General Public License for more details.
Источник


