- Create mount point linux
- 3.1.2.3. Mount points
- create new mount point in ubuntu
- 1 Answer 1
- Creating mounting point
- 4 Answers 4
- SQLShack
- Move SQL databases to a different mount point: Create a new mount point in Linux
- Add a new virtual disk
- Create a new partition
- Mount the disk
- Create required directories in the /SQLDatabases mount point
- Summary
Create mount point linux

 | ||
3.1.2.3. Mount pointsAll partitions are attached to the system via a mount point. The mount point defines the place of a particular data set in the file system. Usually, all partitions are connected through the root partition. On this partition, which is indicated with the slash (/), directories are created. These empty directories will be the starting point of the partitions that are attached to them. An example: given a partition that holds the following directories: We want to attach this partition in the filesystem in a directory called /opt/media. In order to do this, the system administrator has to make sure that the directory /opt/media exists on the system. Preferably, it should be an empty directory. How this is done is explained later on in this chapter. Then, using the mount command, the administrator can attach the partition to the system. When you look at the content of the formerly empty directory /opt/media, it will contain the files and directories that are on the mounted medium (hard disk or partition of a hard disk, CD, DVD, flash card, USB or other storage device). During system startup, all the partitions are thus mounted, as described in the file /etc/fstab. Some partitions are not mounted by default, for instance if they are not constantly connected to the system, such like the storage used by your digital camera. If well configured, the device will be mounted as soon as the system notices that it is connected, or it can be user-mountable, i.e. you don’t need to be system administrator to attach and detach the device to and from the system. There is an example in Section 9.3. On a running system, information about the partitions and their mount points can be displayed using the df command (which stands for disk full or disk free). In Linux, df is the GNU version, and supports the -h or human readable option which greatly improves readability. Note that commercial UNIX machines commonly have their own versions of df and many other commands. Their behavior is usually the same, though GNU versions of common tools often have more and better features. The df command only displays information about active non-swap partitions. These can include partitions from other networked systems, like in the example below where the home directories are mounted from a file server on the network, a situation often encountered in corporate environments. Источник create new mount point in ubuntuI have already installed ubuntu in one of my server and it looks like below Here i want to create a new mount point called «/app» from the storage of «/home» How can i do this in ubuntu server? 1 Answer 1There are 3 ways to do this. And I’m guessing here because it’s hard to understand what exactly you want.
Senario 1. We have /home mounted with all our disk storage, and now we want /app to just use the same directory as /home. Well just create a symbolic link. Now When you go into /app you will be in /home. Just know that symlink is treated like a file not directory. In case you need to monitor it from a script etc. Senario 2. You require it to be mounted, then we can use the «bind» feature of mount. You create a bind mount like this. Now /app is the same as /home on a disk level/ mount level. Also remember that if you want it to be more permanently as mounting it at boot time you need to add it to /etc/fstab Senario 3. Let’s say you have all the storage space available at /home, and you need /app to be a separate mount point with it own storage. You could use the bind function to etc. mount /home/app to /app. This makes most sense. But you could also create a disk image file to hold your partition. This last method is not recommended but included to cover most options. This will mount you disk image as /app and the «image» is contained on your main storage device. Hope this helps, I recommend scenario/option 1 and 2. PS. Also you could look into shrinking your /home partition to free up partition table space and create a new separate for /app. But I don’t recommend this for someone who don’t know much about disk tables. This could potentially lead to loss of data. Источник Creating mounting pointI am mounting an image, and just realized that I have to create the directory for mounting point first. The command mount won’t mount to a non-existing directory. But I seem to remember in some cases, when I insert some external device, such as external HDD and CD, I don’t have to create mounting point myself. So I wonder when mounting points are required to be created by myself and when not? Is it correct that mounting point directories can be created anywhere? Then what is the purposes of the directories /mnt and /media ? Aren’t they for hosting mounting points of devices? PS: I am under Ubuntu 12.04.
4 Answers 4You can indeed create a mount point directory anywhere. /mnt and /media are conventions, not technical requirements, just like e.g., /home . /media is used in particular for auto-mounting. Some part of your desktop environment (possibly udisks) auto-mounts removable media when its connected. It does so by creating a directory under /media , and running mount (just like you would by hand). An image isn’t «connected» (unlike a USB thumb drive, for example), so the desktop environment isn’t noticing it and auto-mounting it. /mnt is often used for remote file servers. Unlike /media , your desktop environment won’t automatically mount stuff there. If you’re not using /mnt for remote file servers, its a perfectly good place for your temporary mount. You can see descriptions of the conventions for these directories in the Filesystem Hierarchy Standard.
You always need to create the mount point if you’re going to be the one running mount ; it won’t do it for you. In the case of external devices, some distros will detect when they’re plugged in, automatically make the mount point, and then mount the device there (udev is common for this), but they’re still making the directory first if it doesn’t exist As for where the mount point should be, /mnt and /media are just conventions; they can appear anywhere. I commonly mount things at /tmp/whatever if I’m only going to need them for a minute Mount points can be created anywhere. In fact, inspect your system with mount (with no arguments) or cat /proc/mounts . On a typical Linux system, you will see many “technical” filesystems mounted at various locations: /dev , /dev/shm , /lib/init/rw , /proc , /run , /sys , etc. You might also find GVFS (the Gnome virtual filesystem wrapper) mounted at /.gvfs (with Samba, SSHfs and other mounts below it), AVFS at The Linux convention defined in the filesystem hierarchy standard is to have two system directories: /mnt left to the discretion of the system administrator, and /media containing one subdirectory per mounted or potentially-mountable filesystem. /media was conceived because there were two opposing traditions for /mnt : either as a temporary mount point, or as a directory containing mount points. On some systems, you’ll see directories such as /home that are mount points (if home directories are on a central server). You might see a mount point at /boot on systems where the bootloader can’t access the OS root directory. It’s rare nowadays, but a separate, read-only /usr used to be more common. The mount command requires an existing directory for a mount point. The directory should be empty; this is not required, but mounting hides any data that was in that directory. Other commands and system components (pmount, udev, …) create the requisite directory automatically and typically remove it when done. Since they do the mounting, they might as well create the directory while they’re at it. Источник SQLShack
Move SQL databases to a different mount point: Create a new mount point in LinuxThis article is the 1 st article of the Move SQL Database to different mount point series. This article focuses on creating a new partition using the fdisk command and formatting it with an ext4 file system using the mkfs command. In my previous article, Move SQL database files in SQL Server 2019 on Linux, I have explained different ways to move the databases to another directory of Linux. In this article, I am going to cover the following topics:
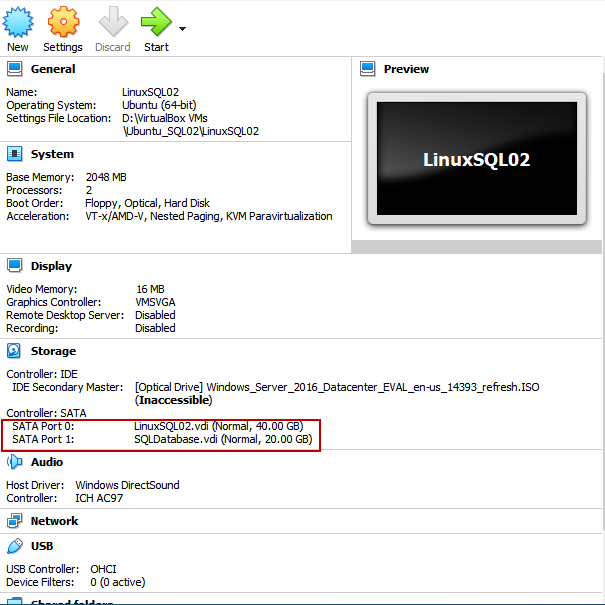
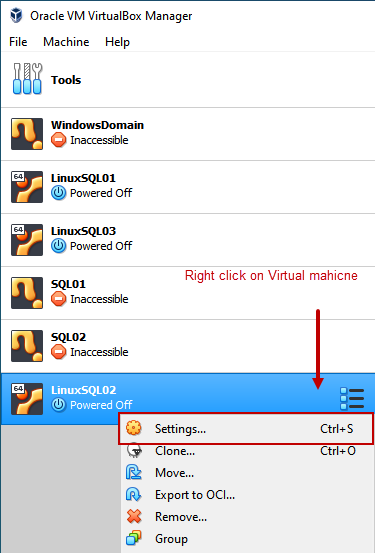
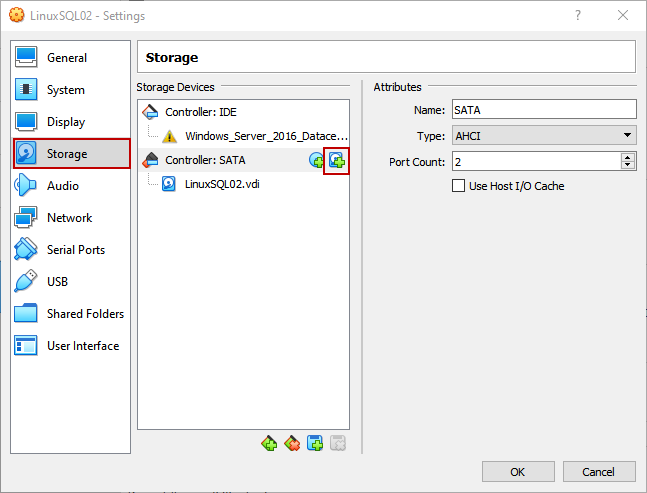
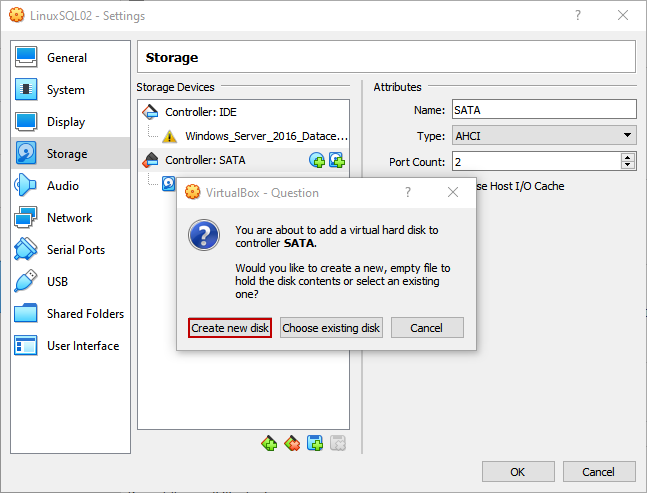
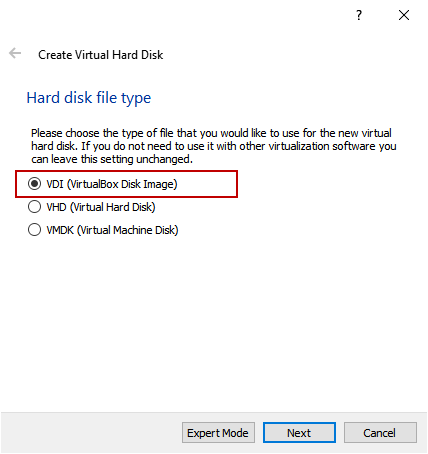
For the demonstration, I have created a virtual machine using Oracle VM virtual box. I have installed Ubuntu 18.04 and SQL Server 2019 on it. First, let’s create a new mount point. Add a new virtual diskI have attached a new virtual hard disk to my existing virtual machine. To add a disk, On the VirtualBox Manager screen, right-click on Virtual Machine and select Settings. On the virtual machine settings screen, click on the Storage option. Click on Controller: SATA and click on the Hard-disk icon. A dialog box opens that option to create a new disk or choose an existing disk. We are creating a new drive, so click on Create new disk. A wizard to create virtual hard disk starts. We are creating a VirtualBox Disk Image, so choose VDI (VirtualBox Disk Image) and click on Next. We can create two types of virtual disks
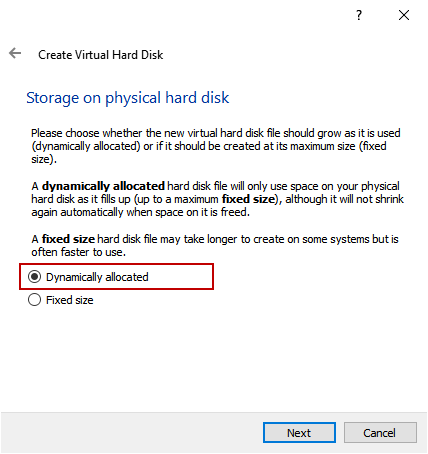
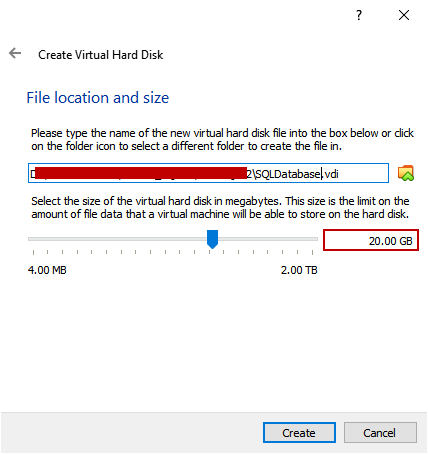
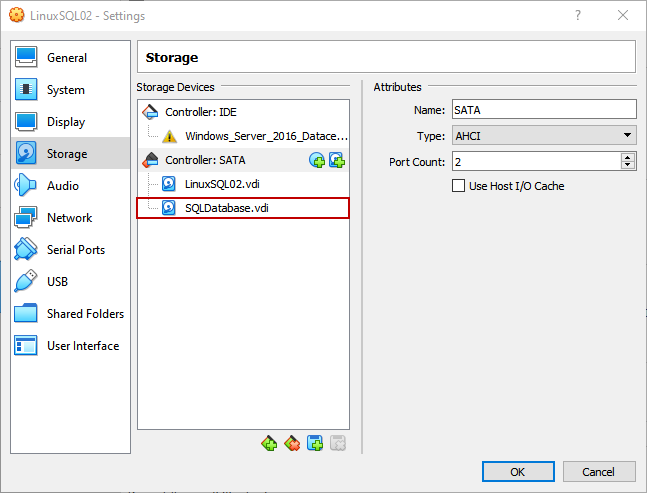
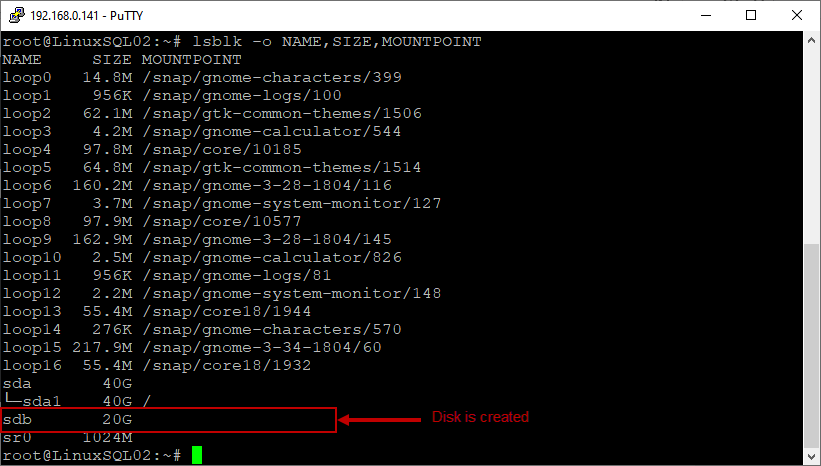
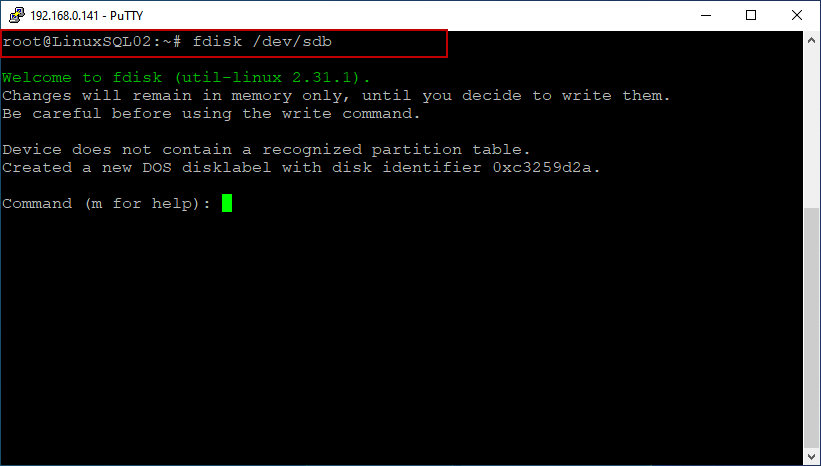
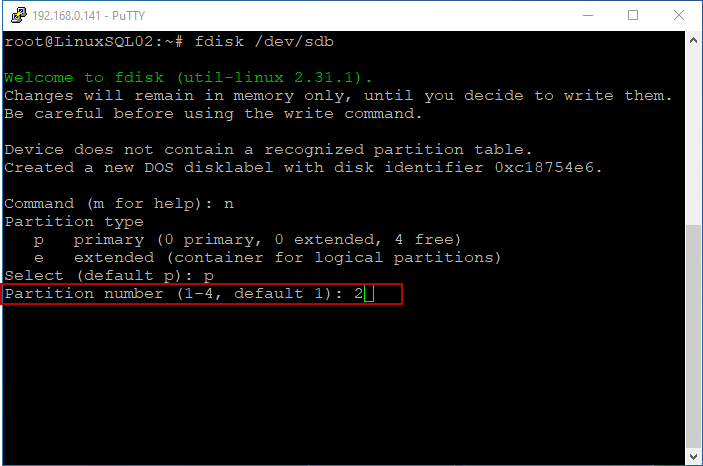
We will create a Dynamically allocated disk, so select Dynamically allocated and click on Next. On the File location and size screen, I have specified the location to save the new *.VDI file. The name of the *.VDI file is SQLDatabase.vdi. The maximum size of the disk is set to 20 GB. Click Create. The new disk is added to the SATA controller. The new disk is visible in the storage screen of settings of the virtual machine, which indicates that the disk has been created successfully. You can see the new disk in VirtualBox Manager. Now, let us create a partition. Start the virtual machine. Create a new partitionI am not explaining the process of adding a virtual drive. After adding a new hard disk, we must create a partition. First, let us view the existing block devices using the lsblk command. The lsblk command shows the information about specific or all the block devices except RAM disks. It uses the sysfs file to collect the information of block devices. Execute the below command to view the Name of the block device, size, and mount point. # lsblk -o NAME,SIZE,MOUNTPOINT As you can see in the above screenshot, the command’s output returns a lot of information. In the list of block devices, you can see the new disk /dev/sdb. To use the disk, we must create a disk partition, then format it, and mount it on a specific directory. To create a partition, I am using the fdisk command. To create a new partition, we must specify the disk name in the fdisk command. To invoke it, run the below command.
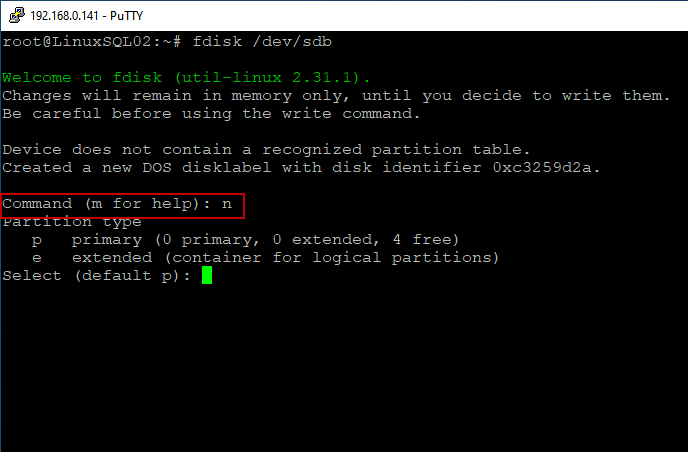
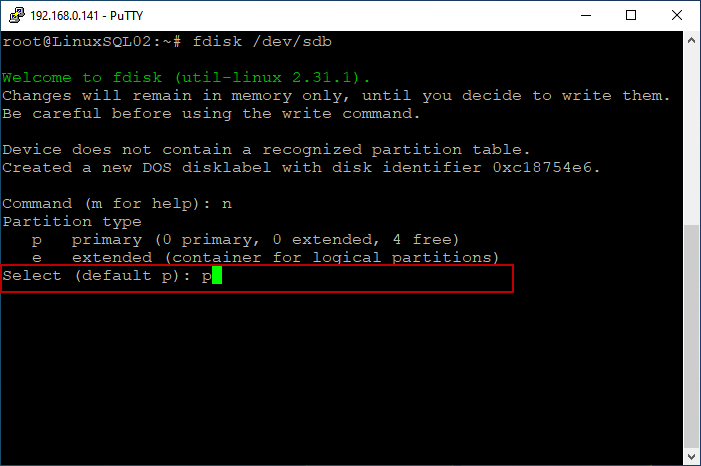
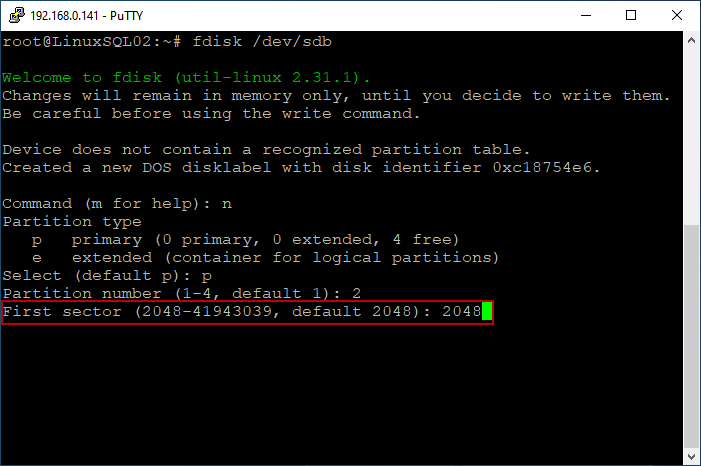
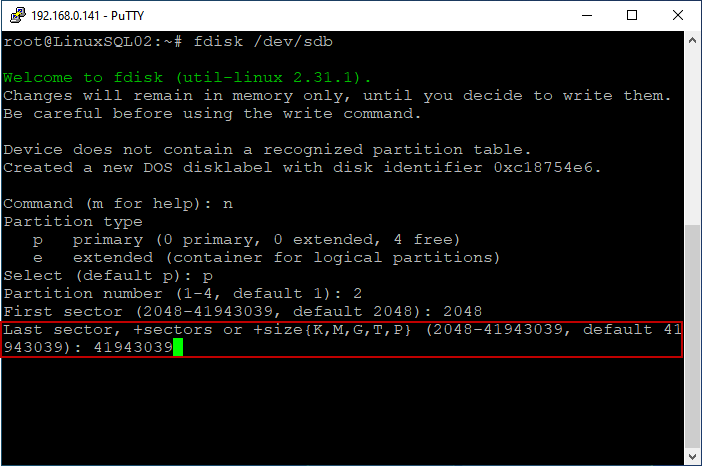
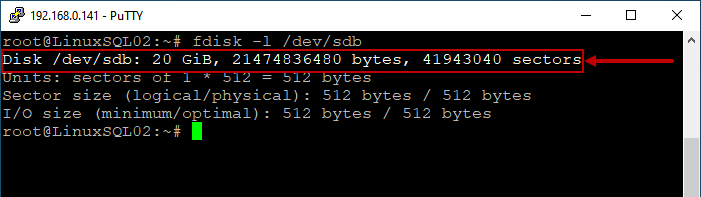
To create a new partition, enter the n option. We want to create another primary partition, so enter P. The new partition number is 2, so enter 2. We do not want to change the first sector, so specify 2048 (default) or press the Enter key to continue to the next step. We do not want to change the value of the last sector as well, so specify 41943039 (default) or press the Enter key to continue to the next step. The new partition has been created successfully. Once the partition has been created, we must format it. Press the Ctrl+C key to exit from the fdisk utility. To view the new partition, run the following command As you can see, the new partition has been created. Now let us format it as an ext4 file system. To format the partition, we will use the mkfs command. The full name of the mkfs is Make File System. It is used to make a file system on a storage device or a partition on a hard disk. Using the mkfs command, we can create Linux compatible partitions (ext2, ext3, and ext4) and Windows compatible partition. The mkfs command creates a FAT partition that can be utilized by the windows operating system.
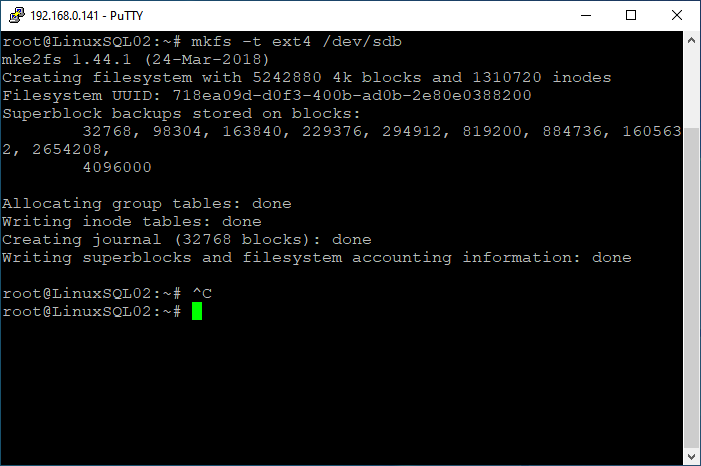
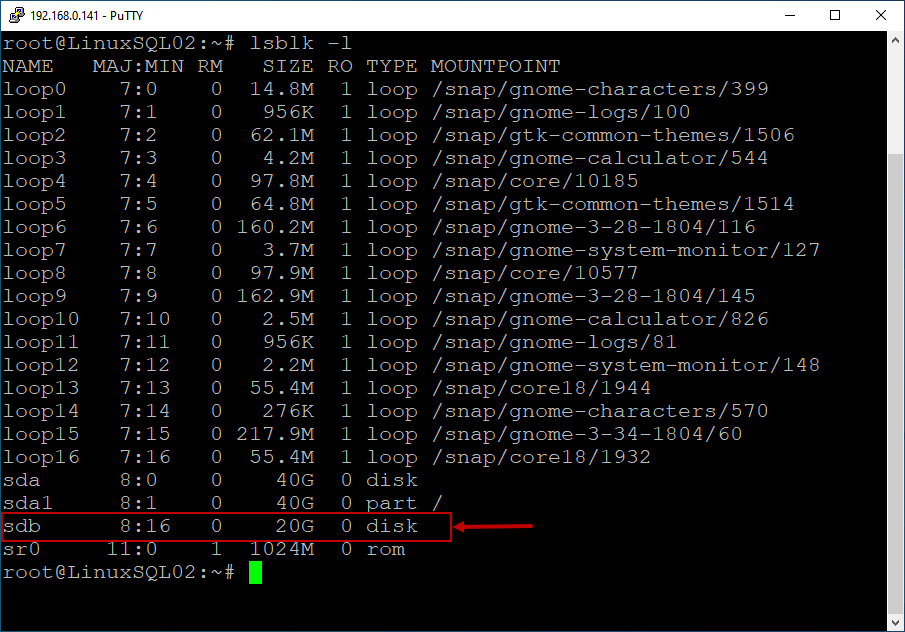
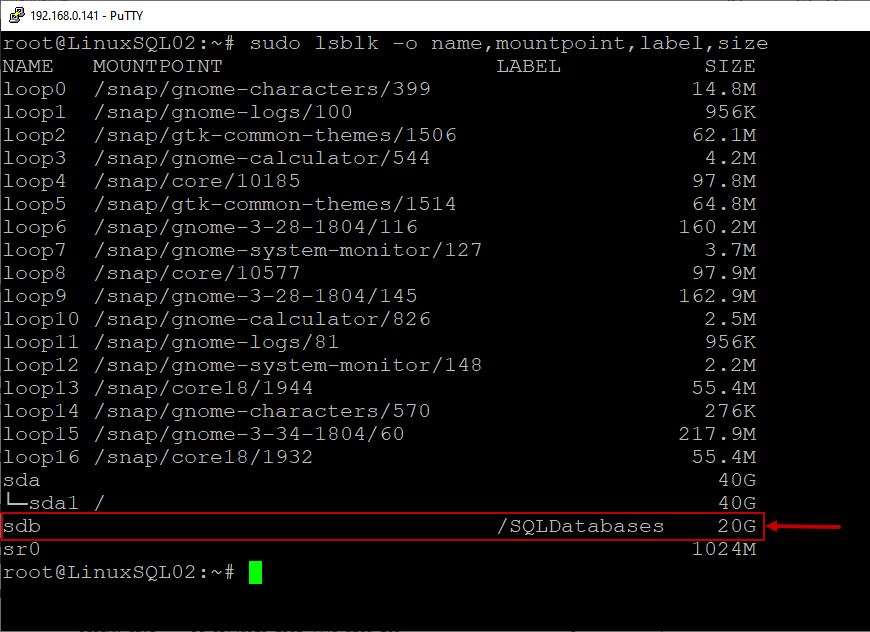
Run the below command to format the /dev/sdb partition in the ext4 filesystem. # mkfs -t ext4 /dev/sdb The command has been executed successfully. Now, to view the new partition, use the lsblk -l command. As you can see, the new partition has been created. Now, we will assign a label to the partition. To do that, we are using the e2label command. The label of the partition is SQLDatabases. # e2label /dev/sdb /SQLDatabases The updated label can be viewed by executing the lsblk command. # sudo lsblk -o name,mountpoint,label,size When we boot the machine, the operating system reads the volume and partition information from the fstab file, so we must add the details of the new partition in fstab. Open the file using VI editor. After the file opens, to edit the file, press “I”, add the following lines. LABEL=/SQLDatabases /SQLDatabases ext4 defaults 1 2 Screenshot of fstab file
Press Esc and then:wq to Save and close the files. Now let us mount the disk on /SQLDatabases directory. Mount the diskFirst, to mount the disk on the/SQLDatabases directory, create a directory named SQLDatabases in the root directory. If required, change the ownership of the directory. # chown nisarg /SQLDatabases Now, to run the MOUNT command to mount the disk on /SQLDatabases directory. root@LinuxSQL02:/# mount /dev/sdb /SQLDatabases Run lsblk -l command to verify that the disk has been mounted or not. root@LinuxSQL02:/# lsblk -o name,label,size,mountpoint /dev/sdb As you can see, the disk is successfully mounted, and it is ready to use. Create required directories in the /SQLDatabases mount pointNow, we will create directories on the new partition to save the database files. The details are the following: Database file location Primary data file location Secondary data file location TempDB data files location I am using the mkdir command to create the directories on /SQLDatabases mount point. Command to create the /SQLDatabases/Data directory: root@LinuxSQL02:/# mkdir /SQLDatabases/Data Command to create the /SQLDatabases/Log directory root@LinuxSQL02:/# mkdir /SQLDatabases/Log Command to create the /SQLDatabases/TempDB directory root@LinuxSQL02:/# mkdir /SQLDatabases/TempDB Command to create the /SQLDatabases/Backup directory root@LinuxSQL02:/# mkdir /SQLDatabases/Backup Once the directories have been created, we will grant the users the appropriate permissions to access the directories. SummaryIn this article, we have learned how we can add a new virtual disk to an existing virtual machine. I have also covered how we can create a new ext4 partition in Linux using fstab and mkfs utility. In my next article, I will explain how we can grant the directory level permission, move the user database and system database files to the new mount point. Additionally, I will explain how we can change the default location of the data file, log file, TempDB files, and backup files by using the configuration file named mssql-config file. Источник | ||