- How to create a network drive in Windows to access a USB drive connected to a router
- How to map or add a Network Location or Map FTP Drive in Windows 10
- Map FTP Drive
- Add Network Location
- Map a Network Drive using Command Line
- Map a Network Drive using PowerShell
- Related Posts
- How to Turn On or Off Use Speech Recognition in Windows Mixed Reality in Windows 10
- How to change Desktop and Windows Mixed Reality Input Switching in Windows 10
- How to disable Windows Mobility Centre in Windows 10
- [email protected]
- Primary Sidebar
- How to Map a Network Drive in Windows 10
- Running Out of Room on Your PC? How to Set Up and Use a Network Drive
- Set Up a Drive in Windows
- Find Your IP Address
- Customize Your Drive
- Using a Wireless Hard Drive
- Ready to Go
- Map Network Drive
- Set Up a Drive in macOS
How to create a network drive in Windows to access a USB drive connected to a router
I have a Keenetic router with a USB drive connected. How can I set it up so that it automatically mounts like a regular logical drive in the File Explorer or in ‘This PC’ window? What should I do to be able to work in a usual way without having to fill in the name or IP address of the router each time?
1. First of all, it’s necessary to make the initial setup of a USB drive connection to a Keenetic device according to the instruction specified in the article ‘Connecting USB drive to the Keenetic router’ (i.e. allow access to the connected drive).
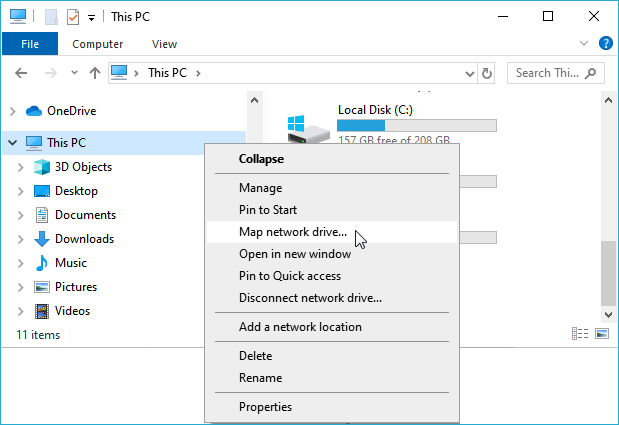
2. To add a network drive to the This PC menu, you need to use the Windows operating system function — Map network drive. (This article gives an example of how to connect a network drive in Windows 10). Run the File Explorer. Right-click the This PC icon and select Map network drive from the context menu.
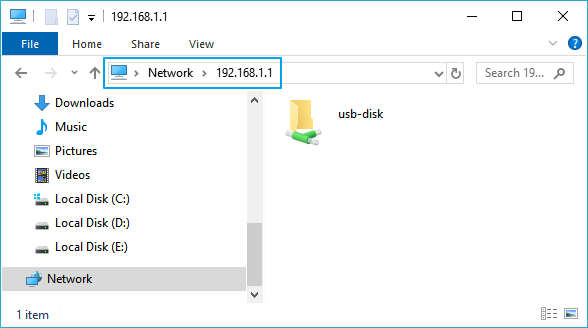
3. In the opened Map Network Drive window, you will need to specify the drive letter to connect and the full path to the network folder.
To get the full pathname of the network folder you need to enter it via File Explorer and copy the path from the address bar (in our example 192.168.1.1 — the default IP address of the router).
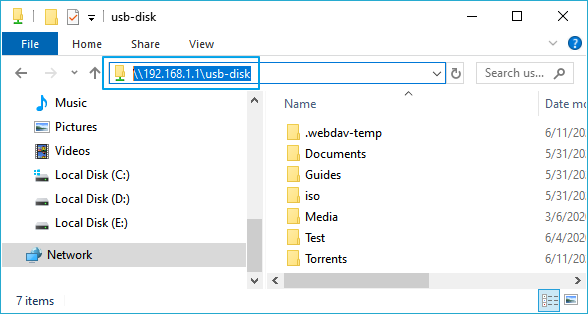
Insert the pathname in the Map Network Drive window in the Folder field.
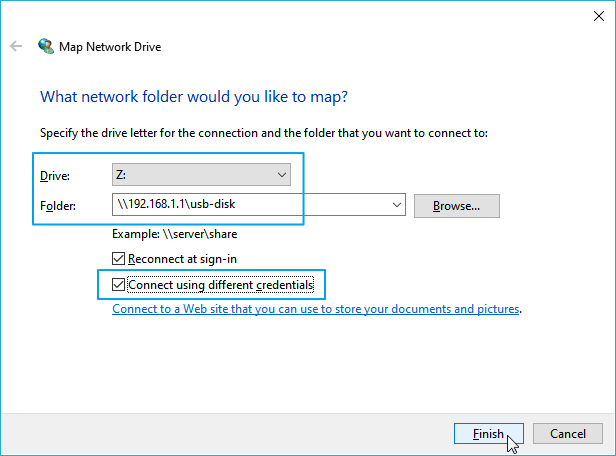
Important! Tick the Connect using different credentials box, otherwise, the system will only try to connect to the network drive with the current account used to log in to Windows.
Check the Reconnect at sign-in box if you want to automatically connect the specified network drive every time you log on to the operating system (this function is available if the USB drive is permanently connected to the router).
4. After entering the data and clicking Finish, the system will request a login and password to access the drive of the Keenetic device. This can be any router account with authorized access to the cifs service and the specified password. For information on configuring access rights to a USB drive connected to the Keenetic router, see the article ‘Configuring access rights to a network drive connected to the Keenetic router’.
Important! Windows OS does not allow you to connect network drives using accounts without a password. You can connect either without authorization or using an account with a login and password.
In our example, we use the admin system account with the defined password.
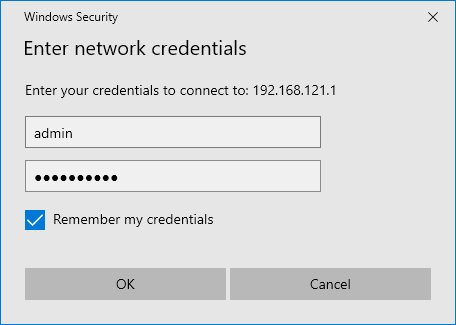
Tick the Remember my credentials box to avoid entering a username and password each time.
5. After clicking OK, the network drive will be added to Windows and will appear in the drive list.
How to map or add a Network Location or Map FTP Drive in Windows 10
If you are looking for a way to add a network location or map an FTP drive and access files & folders on an FTP server, in Windows, natively, then this post may help you. You will be able to have one-click easy access to your files on networked locations via the Windows File Explorer.
Map FTP Drive
You can create or map a drive directly to your FTP site from within Windows. To do so, open File Explorer > Computer (This PC). Right-click and select Map Network Drive.
You can also use the Map network drive button:
It offers options to:
- Map network drive
- Disconnect network drive.
In the box which opens, type the FTP address or the path to your Network drive or browse to it using the Browse button. Your folder Properties must be set to Shared in order to map it as a network drive. You will get the setting under Properties > Sharing tab > Advanced Sharing > Check the Share this folder option.
Check the Reconnect at sign-in option to make the mapping permanent. If you plan to use credentials from the networked computer to access the shared folder, check the Connect using different credentials option and click OK. You will be asked to enter the username and password Next.
You will now have to enter the credentials for the user account, using the following format in the username name field so that your system knows which networked computer it is going to connect to – Computer\Username. Browse to your network folder for mapping and click OK.
Once you have done this, you will be able to see it in Explorer.
To map an FTP site, click on the Connect to a website that you can use to store your documents and pictures link to open the Add Network Location wizard.
Here you have to choose a custom network location and specify the location of your website, specify the login credentials that may be required and name the mapped FTP drive.
Add Network Location
Uncheck Log for anonymously and give the username & password. Click on Next. Give a name to the networked location, when asked. Click Next again. Now select Open this network location when I click Finish.
You will be asked to enter your credentials, and once you do so, you will be connected to your network drive or your FTP drive or your website.
This is quite useful if you need to connect your computers together for sharing files, store files online or run a website.
TIP: See this post if you are Unable to map Network drive.
Map a Network Drive using Command Line
To map Network Drives using the command line, in an elevated command prompt, you have to run the following command:
Here x is the drive letter, and the /persistent:yes parameter makes it permanent.
You can read more about the Net use command, which lets you connect a computer to a shared resource on Technet.
Map a Network Drive using PowerShell
To map Network Drives using Powershell, you have to run the following command:
You can read more about New-PSDrive, which helps you create mapped network drives on MSDN.
NOTES:
- The folders you map should be set to SHARE before you can access them via drive letters
- If you are trying to access a drive from another computer, it should be ON and running; even if the computer is sleeping, you cannot access that drive
- You should know the credentials of the folder, computer, or website you are trying to map or connect as a network drive
- Download FTP Drive tool from KillProg.com. It makes several things including adding a drive letter easier
- You may want also to check out FtpUse, a free tool that helps you map an FTP server as a Local Disk Drive.
- Use Network Drive Control to make Windows automatically map network drives by network name when you log in
- Visual Subst is a free tool that lets you easily create Virtual Drives for your Folders & map Cloud Storage as Virtual Drives.
If you want, you can also download and use one of these free FTP Clients for your Windows PC. How to set up and use SIP Server on Windows may also interest some of you.
Date: January 20, 2020 Tags: Features, FTP
Related Posts
How to Turn On or Off Use Speech Recognition in Windows Mixed Reality in Windows 10
How to change Desktop and Windows Mixed Reality Input Switching in Windows 10
How to disable Windows Mobility Centre in Windows 10
[email protected]
Anand Khanse is the Admin of TheWindowsClub.com, a 10-year Microsoft MVP (2006-16) & a Windows Insider MVP. Please read the entire post & the comments first, create a System Restore Point before making any changes to your system & be careful about any 3rd-party offers while installing freeware.
Primary Sidebar
 report this ad
How to Map a Network Drive in Windows 10
By Melanie Pinola 29 April 2019
You can easily create a shortcut to another drive or folder shared on your network by mapping that location. When you map a network drive, it will show up as a new drive under This PC in File Explorer, so you can quickly access the shared files you need, just like you would your local hard drive. Here’s how to make that network drive shortcut in Windows 10.

How to Map a Network Drive in Windows 10
1. Open File Explorer and select This PC.
2. Click the Map network drive drop-down in the ribbon menu at the top, then select «Map network drive.» (This is under the Computer tab, which should open automatically when you go to This PC, as above.)
3. Select the drive letter you want to use for the network folder, then hit Browse.
4. If you receive an error message, then you’ll need to turn on network discovery. To do so, open the Control Panel, select Network and Sharing Center and choose Change advanced sharing settings from the top-left corner. From there, select Turn on network discovery. Save changes.
choose network folder
5. Navigate to the folder you want to map and hit OK after selecting it.
6. Confirm your selection and click Finish. You can choose to reconnect to the folder every time you sign in so it’s always available. You can even use a different user account to connect to the folder if needed.
7. When you’re done, you should see the new drive letter under This PC and will be able to access its contents like you would any other folder. If you want to disconnect the network drive, right-click on it and select Disconnect.
Running Out of Room on Your PC? How to Set Up and Use a Network Drive
Turn an external hard drive into a network drive to access your files, even when your computer is turned off.


Are you running out of space on your computer? If the only way to access your photos, videos, songs, and files is to keep your PC constantly running, a network drive may be the best solution. Through a network drive, you can keep all those files on a hard drive, access them even when your computer is turned off, and make them accessible to the entire household.
A Network Attached Storage (NAS) device is another option for storing files on a home network, and one that provides more features and capabilities. However, a network drive can be a less expensive and simpler approach if all you need is quick and convenient file storage, and you already have the right type of drive. Here’s how to set up and use an external hard drive as a network drive in both Windows and macOS.
Set Up a Drive in Windows
Find Your IP Address
If you choose to use a wired external hard drive, plug it into your router’s USB port. From there, use your browser to sign into your router’s firmware, typically via an IP address of 192.168.1.1. If that address doesn’t work, and you don’t know your router’s IP address, open a command prompt and type ipconfig. Look for the entry for Default Gateway and the number you see is your router’s IP address.
In Windows 10, you can also go to Settings > Network & Internet > Status and click the View hardware and connection properties link. The next screen will display details for your different network connections. Again, look for Default Gateway to find your router’s IP address.
Customize Your Drive
After logging into your router, check for an entry for USB storage. You should see the external drive listed. Typically, you can edit the settings for the drive to change its name and drive letter and set up a password for accessing it. Save any changes and then exit your router’s firmware.
Using a Wireless Hard Drive
With a wireless hard drive, make sure it’s fully charged or running off external power. Fire up the drive and follow the instructions in the manual to set up a wireless connection between it and your computer or mobile device. You will likely need to install and open the software for the drive if you want to change the name or establish passwords for access.
Ready to Go
After setting up your new network drive, you can now use it just like any other drive. You can create folders, copy and move files, or retrieve any stored photos, videos, and songs. Only now the drive is active and available at all times, letting you and anyone else in the household access it from any PC, Mac, or mobile device.
Map Network Drive
If you’ve created folders on the drive, you can also map a drive letter to a specific folder from File Explorer or Windows Explorer, depending on the version of Windows you run. In Windows 10 and 8.1, select This PC > Computer > Map network drive. On Windows 7, it’s Computer > Map network drive.
From the Map Network Drive window, choose the drive letter you wish to use. Check Reconnect at sign-in if you want to map the drive each time you log into Windows. If you set up a username and password for the drive different from the ones for your Windows account, check Connect using different credentials. Then either type the UNC path for the drive and folde—e.g., \\drive\folder—or click the Browse button.
Using the Browse option, click the name for the network drive and then click the folder for which you want to create the drive mapping and click OK. Enter the username and password for your network drive, if necessary. Your new drive mapping should now show up. Click Finish to close the Map Network Drive window.
Now click the new drive letter in File Explorer or Windows Explorer, and you’ll be able to access that folder to view and work with the files contained within.
Set Up a Drive in macOS
To find the IP address of your router on a Mac, click the Apple icon in the upper-left corner and select System Preferences. Go to Network > Advanced > TCP/IP. The router’s address appears on this screen. Sign in to the router, then look for the USB storage entry. Edit the settings for the drive, if necessary. Save any changes and exit your router’s firmware.
After setting up your network drive, you can then map a letter to a specific folder from your Mac. To do this, click the Go menu and select Go to Server. Either type the UNC path for the network drive and folder or click the Browse button.
With the Browse option, click the name for the network drive, and then click the folder for which you want to create the drive mapping. Click the Connect As button and enter the username and password for your network drive, if necessary, and click Connect.
The mapped network should now appear under Locations in the left pane of the Finder window. From there, you can move it to the desktop as well.
To permanently mount the network share so that it’s always available, go to System Preferences > Users & Groups, select your user account, and click Login Items. Click the plus (+) button, then select your network share and click the Add button.


