- Команда fdisk в Linux
- Опции и синтаксис fdisk
- Примеры использования команды fdisk
- 2. Интерактивный режим
- 3. Просмотр таблицы разделов
- 4. Создание таблицы разделов
- 5. Создание разделов
- 6. Тип раздела
- 7. Удаление раздела
- 8. Загрузочный раздел
- 9. Применение изменений
- Выводы
- How to Create a Disk Partitions in Linux
- Creating a Disk Partition in Linux
- If You Appreciate What We Do Here On TecMint, You Should Consider:
- how to create a new partition in linux
- How tO DELETE this Partion?
Команда fdisk в Linux
В Linux существует множество способов разметки диска, создания на нём разделов и просмотра уже существующих. Это утилиты parted и cfdisk в терминале и графическая утилита gparted. Однако сегодня мы поговорим про самую простую утилиту для разметки диска в терминале — fdisk.
Именно она используется чаще всего, если надо посмотреть как диски и разделы доступны на компьютере. Далее рассмотрим основные опции утилиты, её синтаксис, а также примеры использования.
Опции и синтаксис fdisk
Синтаксис утилиты ничем не отличается от других команд Linux:
$ fdisk опции устройство
Ей надо передать опции, согласно действия, которое вы хотите выполнить, а также раздел диска или устройство к которому эти действия надо применить. Давайте теперь рассмотрим опции fdisk:
- -B, —protect-boot — не стирать первые 512 байт диска чтобы не повредить загрузочную запись;
- -L, —color — настройка цветного вывода, возможные значения auto, never или always;
- -l, —list — вывести все разделы на выбранных устройствах или если устройств не задано, то на всех устройствах;
- -o, —output — указывает какие поля данных надо показывать в выводе программы, доступные поля рассмотрим ниже;
- -u, —units — настраивает формат вывода размера разделов, доступные значения: cylinders, sectors, по умолчанию используется sectors;
- -w, —wipe — режим стирания файловой системы или RAID с диска, возможные значения auto, never или always по умолчанию используется auto;
- -W, —wipe-partition — режим стирания файловой системы или RAID из только что созданного раздела. Возможные значения аналогичны предыдущей опции;
- -h, —help — показать справку по утилите;
- -v, —version — опция выводит версию утилиты.
Опции используются для настройки работы утилиты, мы рассмотрели только самые главные, которые могут вам пригодится, теперь перейдём к командам:
- a — включение или выключения флага boot для раздела;
- d — удалить раздел;
- F — показать свободное место;
- l — вывести список известных типов разделов;
- n — создать новый раздел;
- p — вывести таблицу разделов;
- t — изменение типа раздела;
- i — вывести информацию о разделе;
- I и O — записать или загрузить разметку в файл сценария sfdisk;
- w — записать новую таблицу разделов на диск;
- q — выйти без сохранения;
- g — создать пустую таблицу разделов GPT;
- o — создать пустую таблицу разделов MBR.
Теперь вы знаете основные опции и команды fdisk, давайте рассмотрим использование программы.
Примеры использования команды fdisk
1. Список дисков и разделов
Чтобы посмотреть список доступных вам дисков и разделов на них используйте опцию -l:
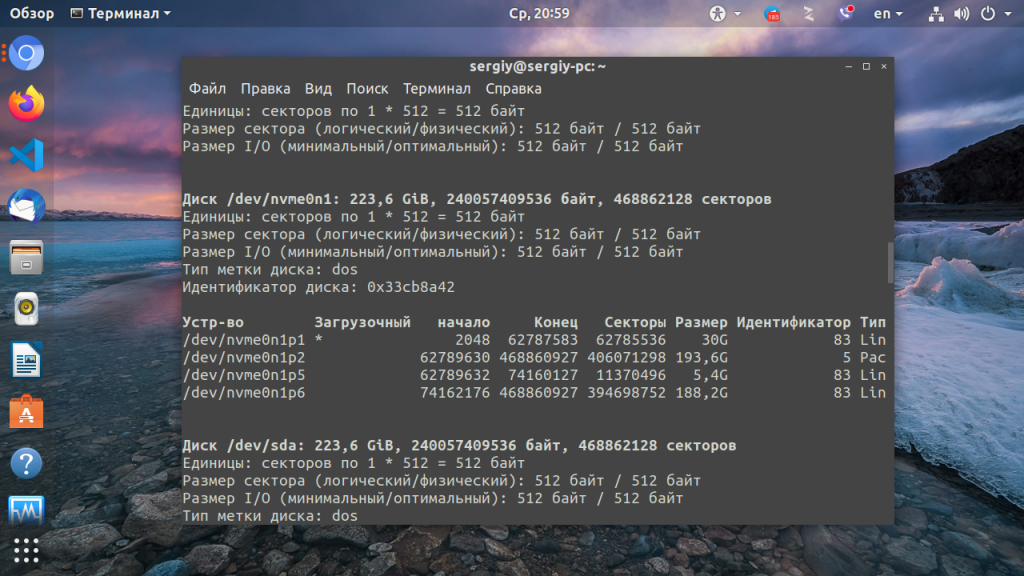
Утилита покажет все блочные устройства. На снимке есть /dev/sda, это обычный жесткий диск и /dev/nvme0n1 — это M.2 накопитель, а также там есть есть несколько /dev/loop* устройств, созданных ядром, которые лучше не трогать.
2. Интерактивный режим
Большинство операций fdisk по разметке дисков выполняются в интерактивном режиме. Чтобы запустить fdisk в интерактивном режиме передайте утилите блочное устройство которое надо разметить. В моём примере, это /dev/nvme0n1:
sudo fdisk /dev/nvme0n1
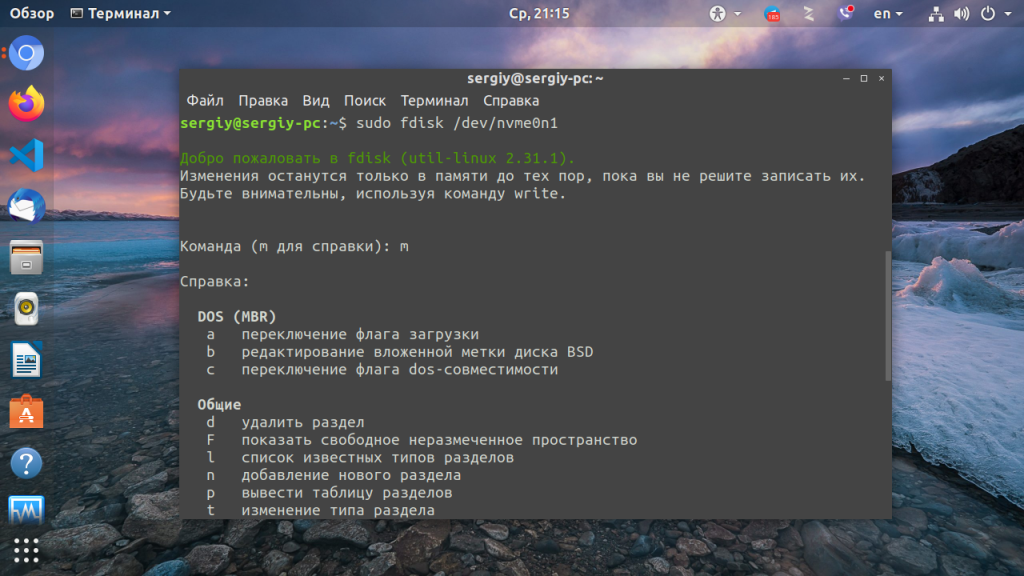
Вам не обязательно возвращаться к этой статье, когда вы захотите снова поработать с программой, посмотреть доступные команды можно выполнив команду m:
3. Просмотр таблицы разделов
Чтобы посмотреть текущий тип таблицы разделов, а также доступные разделы на диске используйте команду p:
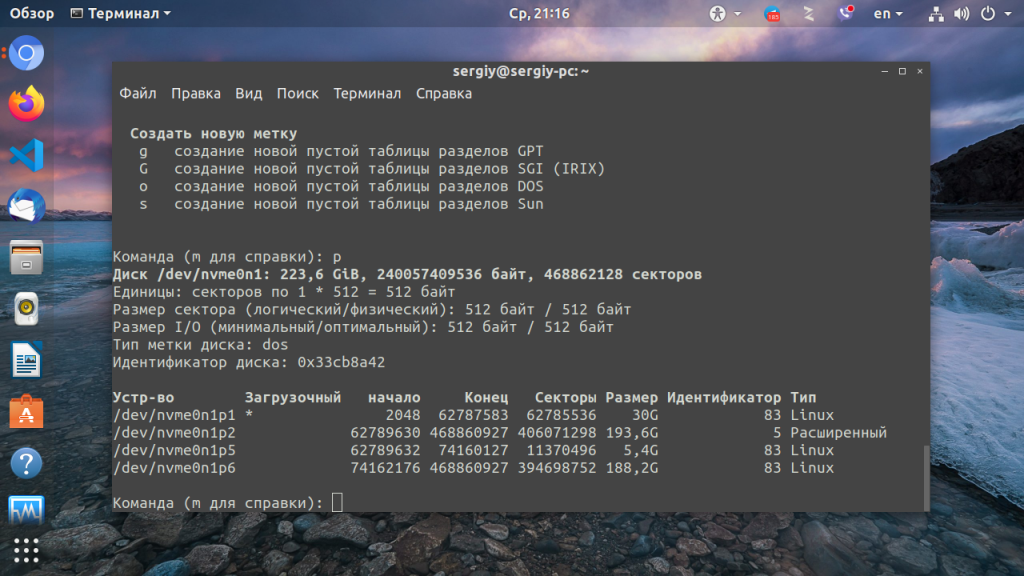
В данном примере на диске уже есть несколько разделов, а таблица разделов используется MBR (dos).
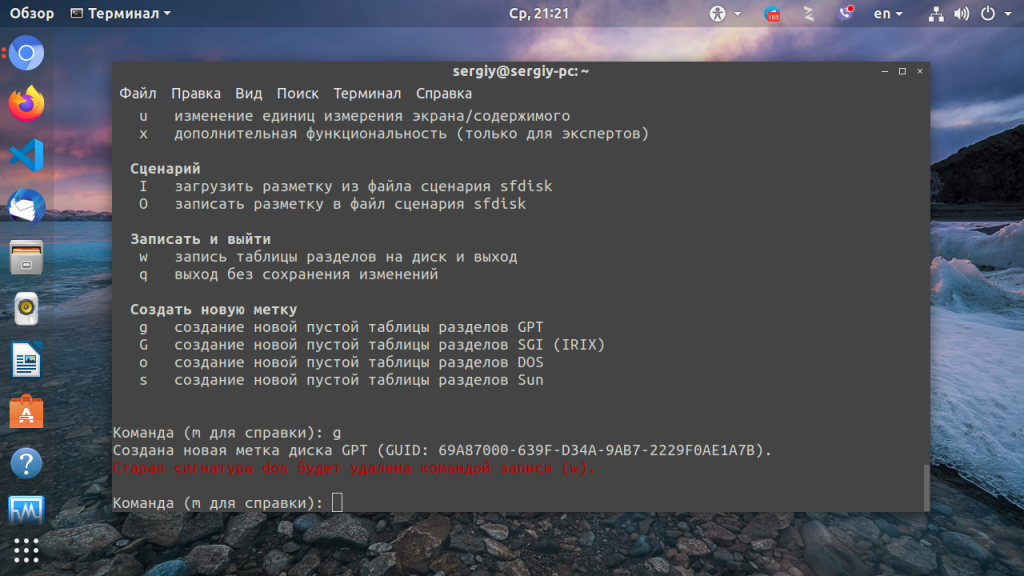
4. Создание таблицы разделов
Давайте создадим новую таблицу разделов GPT. Для этого используйте команду g. Для таблицы разделов MBR нам бы понадобилась команда o.
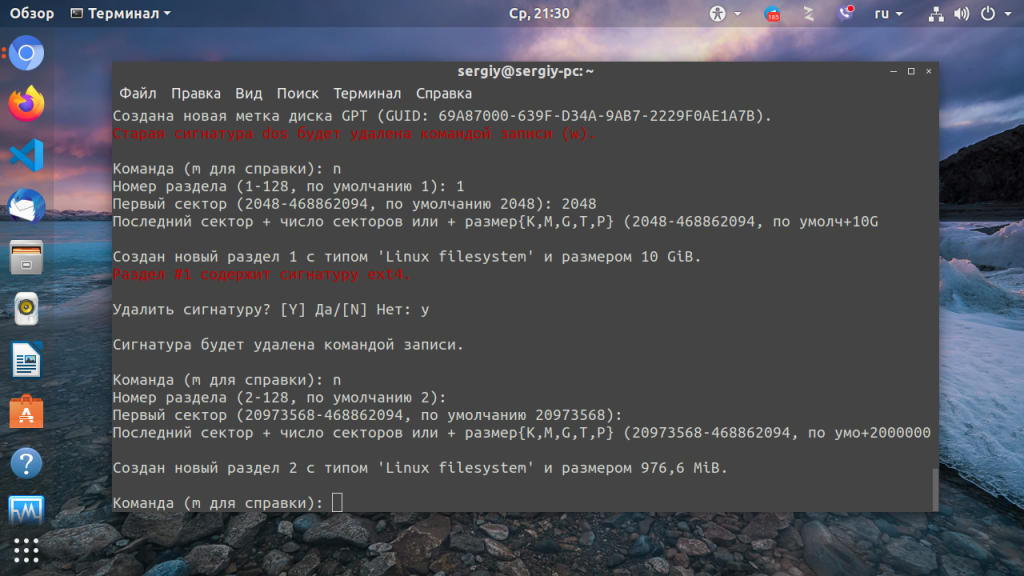
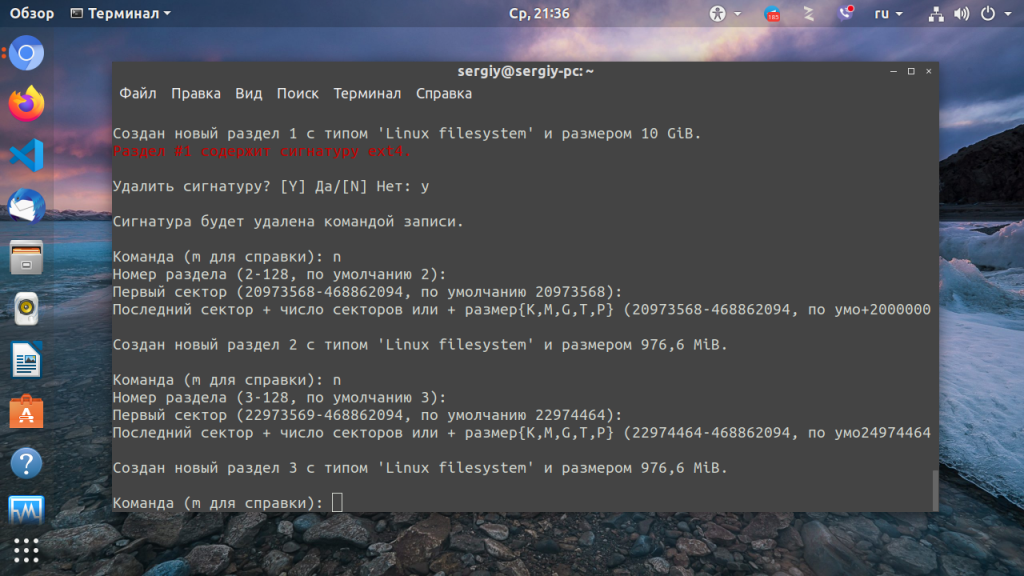
5. Создание разделов
Чтобы создать раздел используйте команду n. Команда спросит какой номер раздела надо присвоить этому разделу, затем спросит сектор начала раздела, эти значения можно оставить по умолчанию, так как утилита предлагает минимальные доступные. Далее надо указать размер раздела. Это можно сделать тремя способами:
- указать количество секторов раздела;
- указать последний сектор раздела;
- указать размер раздела в килобайтах, мегабайтах или гигабайтах, обозначения стандартные K,M,G.
Давайте создадим три раздела разными способами:
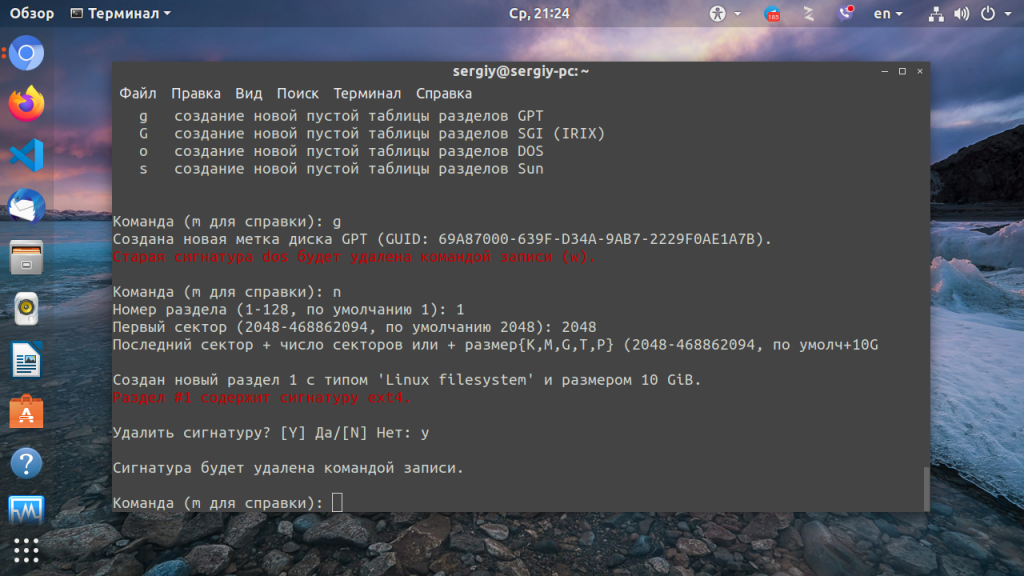
Первый раздел создадим с помощью обычных единиц измерения. Перед ними надо ставить плюс, так как это место, которое добавляется к первому сектору раздела.
Во втором способе укажем размер раздела в секторах. Для получения раздела размером 1 гигабайт нам понадобится примерно 2 000 000 секторов. По умолчанию размер сектора 512 байт, поэтому 2 000 000 * 512 получится примерно 1024 000 000 байт:
И в третьем способе с помощью калькулятора добавим к первому сектору раздела те же два миллиона:
На этом создание разделов fdisk завершено. А вот форматирование разделов в fdisk невозможно, для этого придется воспользоваться утилитой mkfs.
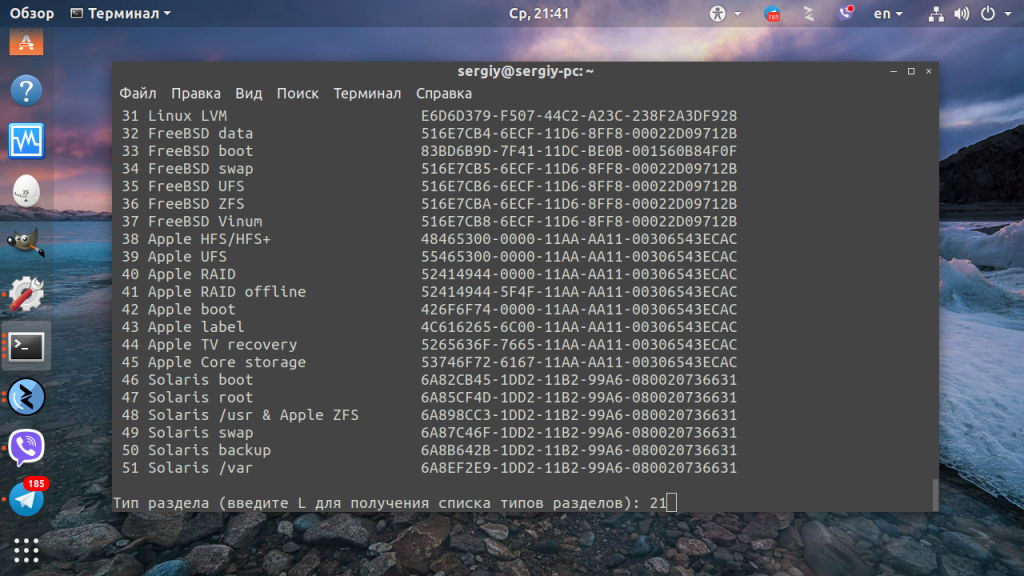
6. Тип раздела
Кроме обычных разделов для пользовательских файлов существуют и другие типы разделов, например раздел EFI, BIOS boot, Windows Recovery, Linux swap, этот тип влияет на назначение раздела, например, раздел EFI не будет использоваться пока для него не будет выбран правильный тип. Чтобы изменить тип раздела используйте команду t:
Для вывода всех доступных типов и их номеров используйте команду L:
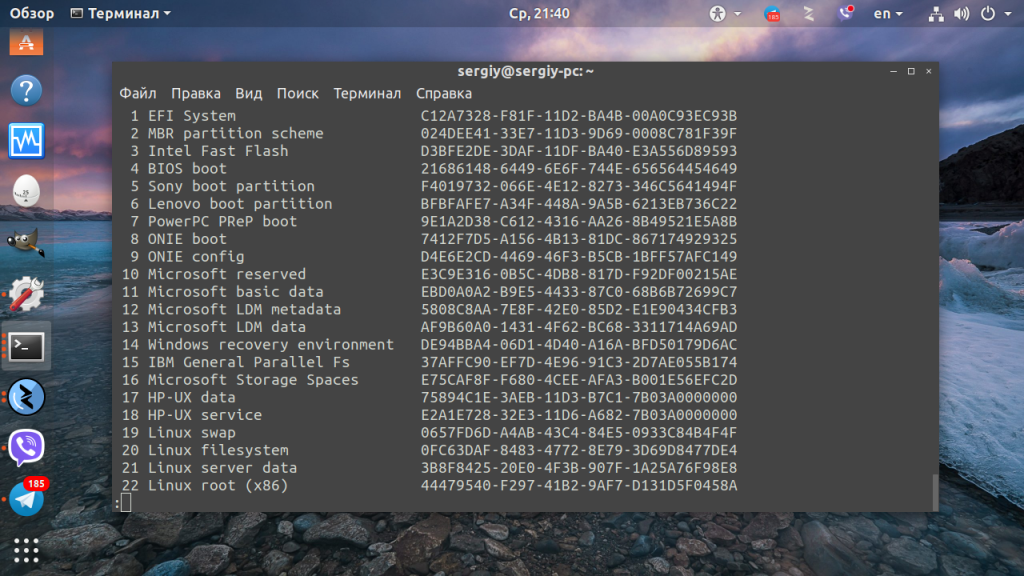
Для выхода из списка разделов нажмите q, а затем просто наберите номер нужного типа:
7. Удаление раздела
Чтобы удалить раздел выполните команду d, а затем введите его номер:
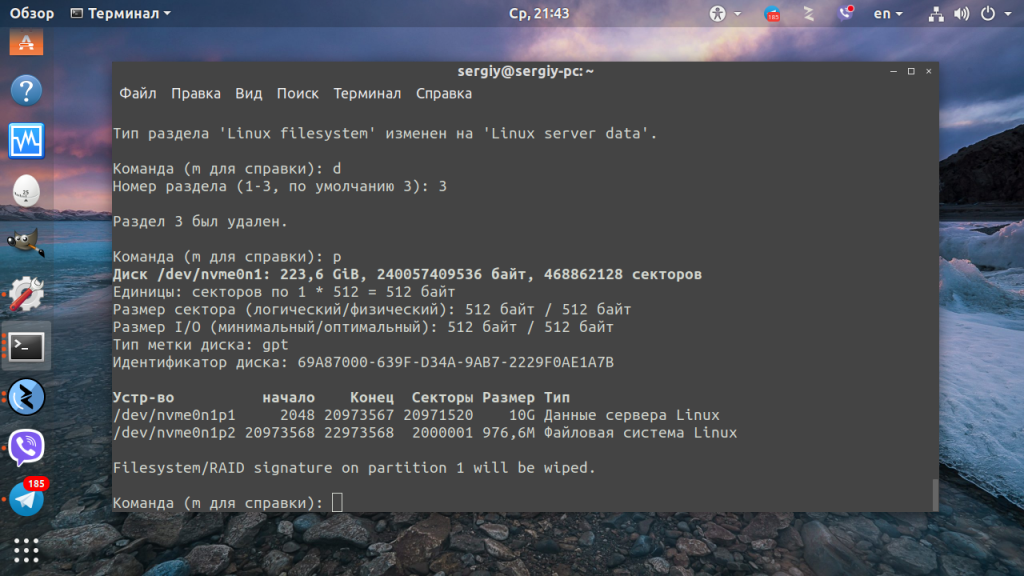
Вот так просто выполняется удаление.
8. Загрузочный раздел
При загрузке компьютера с диска, на котором используется таблица разделов MBR, BIOS ищет раздел, отмеченный как загрузочный и начинает искать загрузчик именно на нём. Чтобы сделать раздел загрузочным если он ещё не загрузочный или наоборот сделать его не загрузочным используйте команду a:
Загрузочность отмечается звездочкой в выводе команды p. В таблице разделов GPT для записи загрузчика используется раздел с типом BIOS boot, а флага загрузочности здесь уже нет.
9. Применение изменений
Все изменения, которые вы сейчас вносили, ещё не записаны на диск. Для их записи надо выполнить команду w:
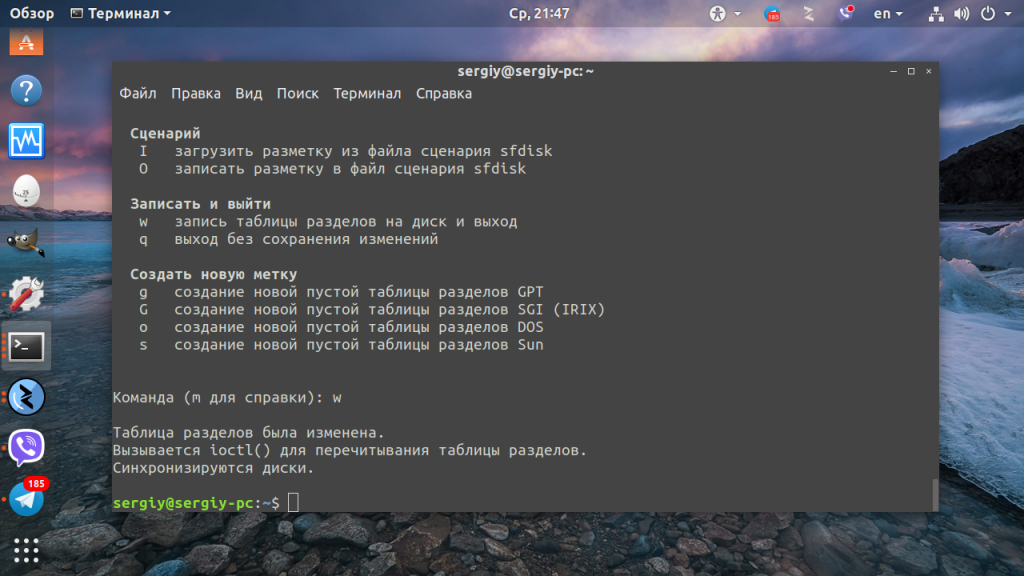
После записи изменений программа завершится.
Выводы
В этой статье мы рассмотрели как пользоваться fdisk в Linux, как создавать разделы с помощью этой утилиты, а также как выбрать тип диска. Несмотря на все возможности утилиты намного удобнее пользоваться gparted или же cfdisk если надо разметить диск в терминале. Последнюю мы разберем в одной из следующих статей.
Источник
How to Create a Disk Partitions in Linux
In order to effectively use storage devices such as hard drives and USB drives on your computer, you need to understand and know how to structure them before using in Linux. In most cases, big storage devices are split into separate portions called partitions.
Partitioning enables you to split your hard drive into multiple parts, where each part acts as its own hard drive and this is useful when you are installing multiple operating systems in the same machine.
In this article, we will explain how to partition a storage disk in Linux systems such as CentOS, RHEL, Fedora, Debian and Ubuntu distributions.
Creating a Disk Partition in Linux
In this section, we will explain how to partition a storage disk in Linux using the parted command.
The first step is to view the partition table or layout on all block devices. This helps you identify the storage device you want to partition. You can do this using parted or fdisk command. We will use the former for purposes of demonstration, as follows, where the -l flag means list partition layout on all block devices.
![]() List Partitions in Linux
List Partitions in Linux
From the output of the above command, there are two hard disks attached to the test system, the first is /dev/sda and the second is /dev/sdb .
In this case, we want to partition hard disk /dev/sdb . To manipulate disk partitions, open the hard disk to start working on it, as shown.
At the parted prompt, make a partition table by running mklabel msdos or gpt, then enter Y/es to accept it.
![]() Make Disk Label
Make Disk Label
Important: Make sure to specify the correct device for partition in the command. If you run parted command without a partition device name, it will randomly pick a storage device to modify.
Next, create a new primary partition on the hard disk and print the partition table as shown.
![]() Create Partition in Linux
Create Partition in Linux
You can create another partition for the reaming space as shown.
![]() Create Another Partition
Create Another Partition
To quit, issue the quit command and all changes are automatically saved.
Next, create the file system type on each partition, you can use the mkfs utility (replace ext4 with the file system type you wish to use).
![]() Create Filesystem Type on Partition
Create Filesystem Type on Partition
Last but not least, to access the storage space on the partitions, you need to mount them by creating the mount points and mount the partitions as follows.
To check if the partitions are actually mounted, run the df command to report file system disk space usage.
![]() Check Partitions Disk Space Usage
Check Partitions Disk Space Usage
Important: You may need to update /etc/fstab file to mount newly created partitions automatically at boot time.
You might also like to read these following related articles:
That’s all! In this article, we have shown how to partition a storage disk, create a file system type on a partition and mount it in Linux systems. You can ask questions or share you thoughts with us via the comment form below.
If You Appreciate What We Do Here On TecMint, You Should Consider:
TecMint is the fastest growing and most trusted community site for any kind of Linux Articles, Guides and Books on the web. Millions of people visit TecMint! to search or browse the thousands of published articles available FREELY to all.
If you like what you are reading, please consider buying us a coffee ( or 2 ) as a token of appreciation.

We are thankful for your never ending support.
Источник
how to create a new partition in linux


Creating and deleting new partitions in linux a very normal practice. In this post we will be going through simple steps to create a new partition in linux, format it and mount it at your required mount point.
This article will also take you through the steps to delete your required partition, view your hard drive geometry,display existing partition table,display the UUID of a partition and many more about partition creation ,view,help, partitioning command line help and troubleshooting.
The tools used in this tutorial are very as mentioned below.
Step1: (Device identification)
First check the partition table using fdisk command.
Using Fdisk command one can identify his device that whether it is your internal Hard disk or external hard disk .
we have seen that already partition up to /dev/sda5 has been created.
So now we have to create a new partion that will start from /dev/sda6
Before Partition we need to know about our hard disk in use. We use here some commands to know the detail information of hard disk we are using and we are going to partitioning.
]# lspci|grep -i ide
00:1f.1 IDE interface: Intel Corporation 82801G (ICH7 Family) IDE Controller (rev 01)
00:1f.2 IDE interface: Intel Corporation 82801GB/GR/GH (ICH7 Family) SATA IDE Controller (rev 01)
]# cat /proc/scsi/scsi
Attached devices:
Host: scsi0 Channel: 00 Id: 00 Lun: 00
Vendor: ATA Model: ST3160215AS Rev: 4.AA ——>> My hard Disk
Type: Direct-Access ANSI SCSI revision: 05
Host: scsi4 Channel: 00 Id: 00 Lun: 00
Vendor: Kingston Model: DataTraveler G2 Rev: 1.00 —->> My usb Device
Type: Direct-Access ANSI SCSI revision: 02
Host: scsi8 Channel: 00 Id: 00 Lun: 00
Vendor: HUAWEI Model: Mass Storage Rev: 2.31 —->> My HUWAEI USb Modem
Type: CD-ROM ANSI SCSI revision: 02
Host: scsi9 Channel: 00 Id: 00 Lun: 00
Vendor: HUAWEI Model: MMC Storage Rev: 2.31
Type: Direct-Access ANSI SCSI revision: 02
Step2: See how to create a new Partiton using fdisk tool.(Partitioning Device)
We do partition or you can say disks are partitioned to make a separate File System according our need.
note: here we have taken sda because fdisk -l show us our hard disk is sda type not hda or hdb.
:n this will create a new partition
:l this will create a logical partition
: just press enter to take default
cylinder value.
:+2000M this mean we want to create a partion of size 2gb approx ie 2000Mb.
:w write the changes and save it and exit
Step3:Why we use partprobe in linux?
If You don’t want to reboot your linux system for making update for the changes you have made in the partition table above just use partprobe command.
Step4:How to make a file system in Linux?
Mkfs or mke2fs command is used to create file system in linux.
So Create an ext3 file system.(Make File System so that it get recognized by OS)
#mke2fs -j /dev/sda6
#mkfs -t ext3 /dev/sda6
This will format the /dev/sda6 partition and create journal file system ext3 which can be regognised by our Linux operation System .
step5:Mount point
Now make a new directory and mount /dev/sda6 newly created partion on it.
mountpoint are directories where file systems are mapped.
#mount /dev/sda6 /new
Now above command will mount /dev/sda6 on /new directory.
So now whatever you write in new directory will be saved in newly created partition /dev/sda6
Step6:To verify whether the filesystem has been mounted or not.
this will show you clearly that your /dev/sda6 is mounted on /new directory
Step7:Make File system permanent after reboot.
To make this change exist after reboot or to make it permanent we have to make a entry in /etc/fstab file.
#vim /etc/fstab
/dev/sda6 /new ext3 defaults 0 0
save and exit
the file
and thats it.
You have created a new partion /dev/sda6 and now its working.
How tO DELETE this Partion?
stepwise Explanation of partition deletion.
Step1:
First unmount the partition and remove the entry from /etc/fstab u have made above
Step2:
Then use fdisk command to delete the partition
:d here d is used to delete the partion
:6 it means delete the partion /dev/sda6
:w save the abve changes and exit
Step3: update change without a reboot.
Step4:Now check the partition table whether it is updated or not.
You will find /dev/sda6 has been deleted.
How to see the filesystem type creation command exists for your system?
How to See your Hard Disk Geometry?
]# fdisk -v
fdisk (util-linux 2.13-pre7)
]# parted /dev/sda print
Model: ATA ST3160215AS (scsi)
Disk /dev/sda: 160GB
Sector size (logical/physical): 512B/512B
Partition Table: msdos
Number Start End Size Type File system Flags
1 1049kB 106MB 105MB primary ntfs boot
2 106MB 31.5GB 31.4GB primary ntfs
3 31.5GB 94.4GB 62.9GB primary ntfs
4 94.4GB 160GB 65.7GB extended
5 94.4GB 155GB 60.8GB logical ext3
Information: Don’t forget to update /etc/fstab, if necessary.
How to Display UUID of a partition?
]# blkid /dev/sda5
/dev/sda5: LABEL=»/1″ UUID=»b8b36258-6c3f-43d9-9c4b-063070945c5c» TYPE=»ext3″ SEC_TYPE=»ext2″
How to see the size of existing file system?
]# fdisk -s /dev/sda
156290904
How to create a vfat filesystem in linux?
View the existing aprtition table first by using fdisk -l command.
Disk /dev/sda: 160.0 GB, 160041885696 bytes
255 heads, 63 sectors/track, 19457 cylinders
Units = cylinders of 16065 * 512 = 8225280 bytes
Device Boot Start End Blocks Id System
/dev/sda1 * 1 13 102400 7 HPFS/NTFS
Partition 1 does not end on cylinder boundary.
/dev/sda2 13 3825 30617600 7 HPFS/NTFS
/dev/sda3 3825 11474 61440000 7 HPFS/NTFS
/dev/sda4 11475 19457 64123447+ 5 Extended
/dev/sda5 11475 18868 59392273+ 83 Linux
You have new mail in /var/spool/mail/root
Now apply fdisk command to create a new partition.
The number of cylinders for this disk is set to 19457.
There is nothing wrong with that, but this is larger than 1024,
and could in certain setups cause problems with:
1) software that runs at boot time (e.g., old versions of LILO)
2) booting and partitioning software from other OSs
(e.g., DOS FDISK, OS/2 FDISK)
Command (m for help): n
First cylinder (18869-19457, default 18869):
Using default value 18869
Last cylinder or +size or +sizeM or +sizeK (18869-19457, default 19457): +100M
Command (m for help): w
The partition table has been altered!
Calling ioctl() to re-read partition table.
WARNING: Re-reading the partition table failed with error 16: Device or resource busy.
The kernel still uses the old table.
The new table will be used at the next reboot.
Syncing disks.
Now use partprobe command to update the partition table without a system reboot.
Now check whether your system support vfat file system or not ?
]# mkfs
mkfs mkfs.cramfs mkfs.ext2 mkfs.ext3 mkfs.msdos mkfs.vfat
Now Create vfat partition using mkfs.vfat command.
Format /dev/sda6 using mkfs.vfat command.
]# mkfs.vfat /dev/sda6
mkfs.vfat 2.11 (12 Mar 2005)
Create a mount point for newly created partition i.e for /dev/sda6 partition.
Now mount the newly created partition using mount command.
]# mount /dev/sda6 /newone/
List or check whether partion got mounted or not by using df -h command.
]# df -h
Filesystem Size Used Avail Use% Mounted on
/dev/sda5 55G 19G 34G 36% /
tmpfs 502M 0 502M 0% /dev/shm
/dev/sda6 102M 0 102M 0% /newone
Check whether your partition created or not?
]# parted /dev/sda print
Model: ATA ST3160215AS (scsi)
Disk /dev/sda: 160GB
Sector size (logical/physical): 512B/512B
Partition Table: msdos
Number Start End Size Type File system Flags
1 1049kB 106MB 105MB primary ntfs boot
2 106MB 31.5GB 31.4GB primary ntfs
3 31.5GB 94.4GB 62.9GB primary ntfs
4 94.4GB 160GB 65.7GB extended
5 94.4GB 155GB 60.8GB logical ext3
6 155GB 155GB 107MB logical fat16
Information: Don’t forget to update /etc/fstab, if necessary.
]# file -sL /dev/sda6
/dev/sda6: x86 boot sector, mkdosfs boot message display, code offset 0x3c, OEM-ID » mkdosfs», sectors/cluster 4, root entries 512, Media descriptor 0xf8, sectors/FAT 204, heads 255, sectors 208782 (volumes > 32 MB) , serial number 0x517ba11a, label: » «, FAT (16 bit)
How to check the File System Type of your created partition?
]# fsck -N /dev/sda6
fsck 1.39 (29-May-2006)
[/sbin/fsck.vfat (1) — /dev/sda6] fsck.vfat /dev/sda6
Check whether any error or not on newly created file system using fsck command.
]# fsck /dev/sda6
fsck 1.39 (29-May-2006)
dosfsck 2.11, 12 Mar 2005, FAT32, LFN
/dev/sda6: 0 files, 0/52085 clusters
if errors are found on the filesystem fcsk will run.
How to create an ext2 Filesystem.
Now Mount this ext2 filesystem.
first create a directory and then mount it.
Now check the mounted filesystem.
you can see in above output that filesystem type for /dev/sda6 is ext2 and is mounted on /shivangi.
Now Convert this ext2 filesystem to ext3 filesystem.
Upgrading of File system /dev/sda6 here.
- First unmount the mounted filesystem.
- then convert is or upgrade it using tune2fs command.
- then mount it back.
- then check the filesystem type uding df command.
Check for bad blocks on newly created partition /dev/sda6 here.
Forcefully create a filesystem on a mounted device.
Источник


