- Create a user account in Windows
- Create a Microsoft account
- Create a local account
- My computer is on a domain
- My computer is in a workgroup
- Create mandatory user profiles
- Profile extension for each Windows version
- Mandatory user profile
- How to create a default user profile
- How to make the user profile mandatory
- Apply a mandatory user profile to users
- How to apply a mandatory user profile to users
- Apply policies to improve sign-in time
- Create a local user or administrator account in Windows 10
Create a user account in Windows
Create a Microsoft account
Swipe in from the right edge of the screen, tap Settings, and then tap Change PC settings. (If you’re using a mouse, point to the lower-right corner of the screen, move the mouse pointer up, click Settings, and then click Change PC settings.)
Tap or click Accounts, and then tap or click Other accounts.
Tap or click Add an account.
Enter the account info for this person to sign in to Windows. There are four ways to do this:
If the person you’re adding already has a Microsoft account, enter it now.
If the person you’re adding doesn’t have a Microsoft account, you can use their email address to create one. Enter the email address that person uses most frequently.
If the person you’re adding doesn’t have an email address, tap or click Sign up for a new email address. It’s free.
If the person you’re adding is a child, tap or click Add a child’s account.
Follow the instructions to finish setting up the account.
Create a local account
Swipe in from the right edge of the screen, tap Settings, and then tap Change PC settings.
(If you’re using a mouse, point to the lower-right corner of the screen, move the mouse pointer up, click Settings, and then click Change PC settings.)
Tap or click Accounts, and then tap or click Other accounts.
Tap or click Add an account, and then tap or click Sign in without a Microsoft account (not recommended).
Tap or click Local account.
Enter a user name for the new account.
If you want this person to sign in with a password, enter and verify the password, add a password hint, and then tap or click Next.
If your PC is on a domain, depending on the domain’s security settings, you might be able to skip this step and tap or click Next, if you prefer.
Tap or click Finish.
My computer is on a domain
Open Microsoft Management Console by clicking the Start button  , typing mmc into the search box, and then pressing Enter.
  If you’re prompted for an administrator password or confirmation, type the password or provide confirmation.
In the left pane of Microsoft Management Console, click Local Users and Groups.
If you don’t see Local Users and Groups, it’s probably because that snap-in hasn’t been added to Microsoft Management Console. Follow these steps to install it:
In Microsoft Management Console, click the File menu, and then click Add/Remove Snap-in.
Click Local Users and Groups, and then click Add.
Click Local computer, click Finish, and then click OK.
Click the Users folder.
Click Action, and then click New User.
Type the appropriate information in the dialog box, and then click Create.
When you are finished creating user accounts, click Close.
My computer is in a workgroup
To open User Accounts, click the Start button , click Control Panel, click User Accounts and Family Safety, and then click User Accounts.
Click Manage another account. If you’re prompted for an administrator password or confirmation, type the password or provide confirmation.
Click Create a new account.
Type the name you want to give the user account, click an account type, and then click Create Account.
Create mandatory user profiles
Applies to
A mandatory user profile is a roaming user profile that has been pre-configured by an administrator to specify settings for users. Settings commonly defined in a mandatory profile include (but are not limited to): icons that appear on the desktop, desktop backgrounds, user preferences in Control Panel, printer selections, and more. Configuration changes made during a user’s session that are normally saved to a roaming user profile are not saved when a mandatory user profile is assigned.
Mandatory user profiles are useful when standardization is important, such as on a kiosk device or in educational settings. Only system administrators can make changes to mandatory user profiles.
When the server that stores the mandatory profile is unavailable, such as when the user is not connected to the corporate network, users with mandatory profiles can sign in with the locally cached copy of the mandatory profile, if one exists. Otherwise, the user will be signed in with a temporary profile.
User profiles become mandatory profiles when the administrator renames the NTuser.dat file (the registry hive) of each user’s profile in the file system of the profile server from NTuser.dat to NTuser.man . The .man extension causes the user profile to be a read-only profile.
Profile extension for each Windows version
The name of the folder in which you store the mandatory profile must use the correct extension for the operating system it will be applied to. The following table lists the correct extension for each operating system version.
| Client operating system version | Server operating system version | Profile extension |
|---|---|---|
| Windows XP | Windows Server 2003 Windows Server 2003 R2 | none |
| Windows Vista Windows 7 | Windows Server 2008 Windows Server 2008 R2 | v2 |
| Windows 8 | Windows Server 2012 | v3 |
| Windows 8.1 | Windows Server 2012 R2 | v4 |
| Windows 10, versions 1507 and 1511 | N/A | v5 |
| Windows 10, versions 1607, 1703, 1709, 1803, 1809, 1903 and 1909 | Windows Server 2016 and Windows Server 2019 | v6 |
Mandatory user profile
First, you create a default user profile with the customizations that you want, run Sysprep with CopyProfile set to True in the answer file, copy the customized default user profile to a network share, and then you rename the profile to make it mandatory.
How to create a default user profile
Sign in to a computer running Windows 10 as a member of the local Administrator group. Do not use a domain account.
Use a lab or extra computer running a clean installation of Windows 10 to create a default user profile. Do not use a computer that is required for business (that is, a production computer). This process removes all domain accounts from the computer, including user profile folders.
Configure the computer settings that you want to include in the user profile. For example, you can configure settings for the desktop background, uninstall default apps, install line-of-business apps, and so on.
Unlike previous versions of Windows, you cannot apply a Start and taskbar layout using a mandatory profile. For alternative methods for customizing the Start menu and taskbar, see Related topics.
Create an answer file (Unattend.xml) that sets the CopyProfile parameter to True. The CopyProfile parameter causes Sysprep to copy the currently signed-on user’s profile folder to the default user profile. You can use Windows System Image Manager, which is part of the Windows Assessment and Deployment Kit (ADK) to create the Unattend.xml file.
Uninstall any application you do not need or want from the PC. For examples on how to uninstall Windows 10 Application see Remove-AppxProvisionedPackage. For a list of uninstallable applications, see Understand the different apps included in Windows 10.
It is highly recommended to uninstall unwanted or unneeded apps as it will speed up user sign-in times.
At a command prompt, type the following command and press ENTER.
(Sysprep.exe is located at: C:\Windows\System32\sysprep. By default, Sysprep looks for unattend.xml in this same folder.)
If you receive an error message that says «Sysprep was not able to validate your Windows installation», open %WINDIR%\System32\Sysprep\Panther\setupact.log and look for an entry like the following:

Use the Remove-AppxProvisionedPackage and Remove-AppxPackage -AllUsers cmdlet in Windows PowerShell to uninstall the app that is listed in the log.
The sysprep process reboots the PC and starts at the first-run experience screen. Complete the set up, and then sign in to the computer using an account that has local administrator privileges.
Right-click Start, go to Control Panel (view by large or small icons) > System > Advanced system settings, and click Settings in the User Profiles section.
In User Profiles, click Default Profile, and then click Copy To.
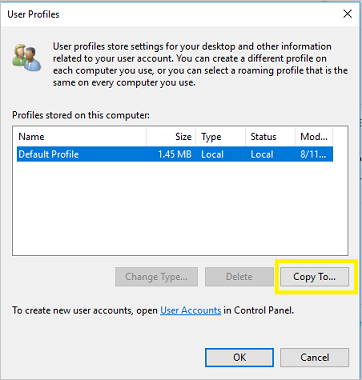
In Copy To, under Permitted to use, click Change.

In Select User or Group, in the Enter the object name to select field, type everyone , click Check Names, and then click OK.
In Copy To, in the Copy profile to field, enter the path and folder name where you want to store the mandatory profile. The folder name must use the correct extension for the operating system version. For example, the folder name must end with «.v6» to identify it as a user profile folder for Windows 10, version 1607.
- If the device is joined to the domain and you are signed in with an account that has permissions to write to a shared folder on the network, you can enter the shared folder path.

- If the device is not joined to the domain, you can save the profile locally and then copy it to the shared folder location.
Click OK to copy the default user profile.
How to make the user profile mandatory
In File Explorer, open the folder where you stored the copy of the profile.
If the folder is not displayed, click View > Options > Change folder and search options. On the View tab, select Show hidden files and folders, clear Hide protected operating system files, click Yes to confirm that you want to show operating system files, and then click OK to save your changes.
Rename Ntuser.dat to Ntuser.man .
Apply a mandatory user profile to users
In a domain, you modify properties for the user account to point to the mandatory profile in a shared folder residing on the server.
How to apply a mandatory user profile to users
Open Active Directory Users and Computers (dsa.msc).
Navigate to the user account that you will assign the mandatory profile to.
Right-click the user name and open Properties.
On the Profile tab, in the Profile path field, enter the path to the shared folder without the extension. For example, if the folder name is \\server\profile.v6, you would enter \\server\profile.
Click OK.
It may take some time for this change to replicate to all domain controllers.
Apply policies to improve sign-in time
When a user is configured with a mandatory profile, Windows 10 starts as though it was the first sign-in each time the user signs in. To improve sign-in performance for users with mandatory user profiles, apply the Group Policy settings shown in the following table. (The table shows which operating system versions each policy setting can apply to.)
| Group Policy setting | Windows 10 | Windows Server 2016 | Windows 8.1 | Windows Server 2012 |
|---|---|---|---|---|
| Computer Configuration > Administrative Templates > System > Logon > Show first sign-in animation = Disabled |  | | | |
| Computer Configuration > Administrative Templates > Windows Components > Search > Allow Cortana = Disabled | | |  | |
| Computer Configuration > Administrative Templates > Windows Components > Cloud Content > Turn off Microsoft consumer experience = Enabled | | | | |
The Group Policy settings above can be applied in Windows 10 Professional edition.
Create a local user or administrator account in Windows 10
You can create a local user account (an offline account) for anyone who will frequently use your PC. The best option in most cases, though, is for everyone who uses your PC to have a Microsoft account.
If needed, the local user account can have administrator permissions; however, it’s better to just create a local user account whenever possible.
Caution: A user with an administrator account can access anything on the system, and any malware they encounter can use the administrator permissions to potentially infect or damage any files on the system. Only grant that level of access when absolutely necessary and to people you trust.
As you create an account, remember that choosing a password and keeping it safe are essential steps. Because we don’t know your password, if you forget it or lose it, we can’t recover it for you.
If you’re using Windows 10, version 1803 and later, you can add security questions as you’ll see in step 4 under Create a local user account. With answers to your security questions, you can reset your Windows 10 local account password. Not sure which version you have? You can check your version.
Create a local user account
Select Start > Settings > Accounts and then select Family & other users. (In some versions of Windows you’ll see Other users.)
Select Add someone else to this PC.
Select I don’t have this person’s sign-in information, and on the next page, select Add a user without a Microsoft account.
Enter a user name, password, or password hint—or choose security questions—and then select Next.
Change a local user account to an administrator account
Select Start > Settings > Accounts .
Under Family & other users, select the account owner name (you should see «Local Account» below the name), then select Change account type.
Note: If you choose an account that shows an email address or doesn’t say «Local account», then you’re giving administrator permissions to a Microsoft account, not a local account.
Under Account type, select Administrator, and then select OK.
Sign in with the new administrator account.


