- Виртуальный сетевой интерфейс в linux. TAP vs TUN
- Создаем виртуальный интерфейс в linux вручную
- Создаем интерфейс типа tun
- Создаем интерфейс типа tap
- Создаем интерфейс типа dummy
- Создаем виртуальный интерфейс в linux с помощью systemd-networkd
- Создаем интерфейс типа tun
- Создаем интерфейс типа tap
- Создаем интерфейс типа dummy
- Creating tap/tun devices with IP tuntap and tunctl as detailed in Linux network tools
- tunctl
- install
- ip tuntap
- install
- summary
- Tap interfaces and /dev/net/tun device, using ip tuntap command
- 2 Answers 2
- Create tap device linux
- Create tap device linux
- tunctl
- installation
- ip tuntap
- installation
- to sum up
Виртуальный сетевой интерфейс в linux. TAP vs TUN
Читатели, не нуждающиеся в теоретическом изложении концепции виртуальных сетевый интерфейсов Linux, могут сразу перейти к настройке по ссылкам:
Создавать сетевые интерфейсы в linux нам позволяют различные модули ядра. Но там, где для реальных железных сетевых карт эти модули ядра, или как их еще называют — драйверы, обеспечивают прием данных от стека TCP/IP и их формирование уже в виде электрического сигнала на сетевой карте, драйверы виртуальных сетевых интерфейсов (loopback) могут лишь, приняв эти данные, отдать их какому-нибудь приложению для дальнейшей обработки. Такая функциональность может быть востребована, если на вашем сервере установлены программы, использующие стек TCP/IP для обмена данными и, понятно, не нуждающиеся в выводе этих данных в реальную сеть. Пример: веб-сайт на drupal связывается с базой данных, установленной на этом же сервере:

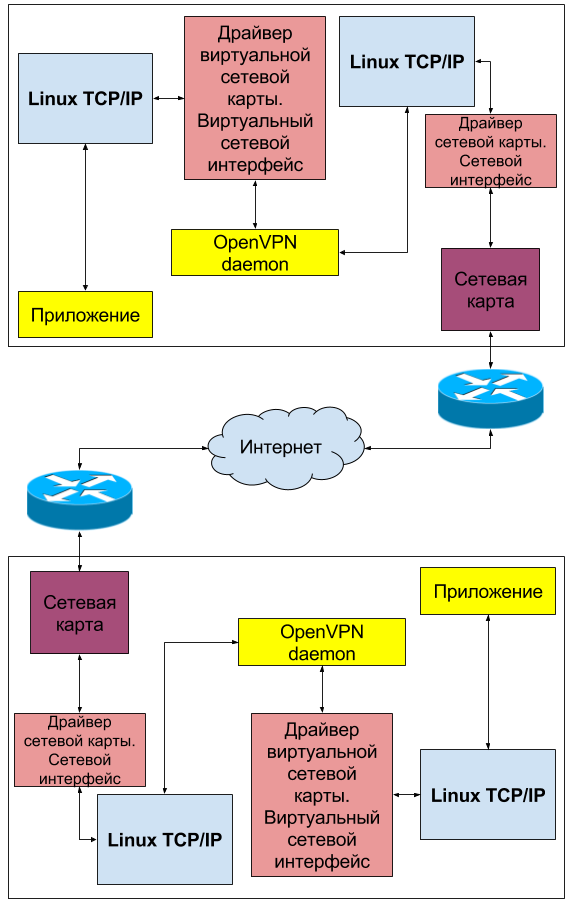
Другим распростаренным примером использования виртуальных сетевых интерфейсов (loopback) в linux может быть их использование для целей построения виртуальных частных сетей — VPN. Вы наверняка слышали о таких технологиях как OpenVPN, GRE, WireGuard и т.д. Каждый из этих демонов создает виртуальный сетевой интерфейс который служит для прозрачной маршрутизации данных между узлами, находящимися на удалении друг от друга и не имеющих возможности прямого взаимодействия. Рассмотрим общую сетевую топологию на примере OpenVPN:
От используемого драйвера зависит тип интерфейса, его скорость, допустимый размер MTU и т. д. Совсем даже не обязательно, что загружать драйвер в ядро вам придется самостоятельно. Скорее всего, создавая интерфейс нужного типа, система сама подберет и загрузит требуемый драйвер. Вам лишь останется сконфигурировать уже работающий loopback интерфейс. В данной статье мы рассмотрим 3 возможных на конец 2016 года типа виртуальных интерфейсов в linux: tun, tap и dummy. Отличие интерфейсов tun и tap заключается в том, что tap старается больше походить на реальный сетевой интерфейс, а именно он позволяет себе принимать и отправлять ARP запросы, обладает MAC адресом и может являться одним из интерфейсов сетевого моста, так как он обладает полной поддержкой ethernet — протокола канального уровня (уровень 2). Интерфейс tun этой поддержки лишен, поэтому он может принимать и отправлять только IP пакеты и никак не ethernet кадры. Он не обладает MAC-адресом и не может быть добавлен в бридж. Зато он более легкий и быстрый за счет отсутствия дополнительной инкапсуляции и прекрасно подходит для тестирования сетевого стека или построения виртуальных частных сетей (VPN). Виртуальный интерфейс типа dummy очень похож на tap, разница лишь в том, что он реализуется другим модулем ядра.
Создаем виртуальный интерфейс в linux вручную
Создавать и удалять интерфейсы, назначать IP и MAC адреса, изменять MTU и многое другое нам помогает утилита ip. Пользоваться ip удобно и легко, но помните, что произведенные изменения будут потеряны после перезагрузки компьютера. Используйте ip в целях тестирования.
Создаем интерфейс типа tun
ip tuntap add dev tun0 mode tun
ip address add 192.168.99.1/30 dev tun0
ip address show tun0
2: tun0:
mtu 1500 qdisc noop state DOWN group default qlen 500
link/none
inet 192.168.99.1/30 scope global tun0
valid_lft forever preferred_lft forever
Как видим у нас теперь есть виртуальный интерфейс с именем «tun0», у него есть IP-адрес, и ни слова о MAC-адресе — всё, как мы и рассчитывали. Его уже можно пинговать, и на нем уже можно запускать слушающие сервисы. Но что будет, если мы попытаемся добавить этот интерфейс в бридж?
ip link set dev tun0 master br0
RTNETLINK answers: Invalid argument
Команда ip логичным образом выдала ошибку — нет никакого смысла добавлять в бридж интерфейс, не обладающий поддержкой ethernet.
Создаем интерфейс типа tap
ip tuntap add dev tap0 mode tap
ip address add 192.168.99.5/30 dev tap0
ip address show tap0
3: tap0:
mtu 1500 qdisc noop state DOWN group default qlen 1000
link/ether d6:1c:67:cd:6f:80 brd ff:ff:ff:ff:ff:ff
inet 192.168.99.5/30 scope global tap0
valid_lft forever preferred_lft forever
У нас теперь появился новый виртуальный интерфейс с именем «tap0», у него есть как IP-адрес, так и MAC-адреса. Его также можно пинговать, и на нем также можно запускать слушающие сервисы. Команда, добавляющая интерфейс в бридж уже не выдаст ошибку, потому что это интерфейс, обладающий поддержкой ethernet:
ip link set dev tap0 master br0
Создаем интерфейс типа dummy
ip link add dev dum0 type dummy
ip address add 192.168.99.9/30 dev dum0
ip address show dum0
4: dum0:
mtu 1500 qdisc noop master br0 state DOWN group default qlen 1000
link/ether 1a:37:3b:0f:da:be brd ff:ff:ff:ff:ff:ff
inet 192.168.99.9/30 scope global dum0
valid_lft forever preferred_lft forever
Вы наверняка заметили, что команда для добавления интерфейса изменилась. Ничего необычного. Так написана утилита «ip». Ну и конечно, виртуальный интерфейс типа dummy можно легко добавить в бридж:
ip link set dev dum0 master br0
Создаем виртуальный интерфейс в linux с помощью systemd-networkd
В systemd-networkd за создание интерфейсов отвечают одни конфигурационные файлы, имеющие суффикс «.netdev», а за их настройку другие, имеющие суффикс «.network». Соответственно нам понадобиться в /etc/systemd/network создать по паре конфигурационных файлов для каждого из исследуемых типов интерфейсов
Создаем интерфейс типа tun
Создадим соответственно файлы tun0.netdev с содержимым:
[NetDev]
Name=tun0
Kind=tun
Создаем интерфейс типа tap
Создадим соответственно файлы tap0.netdev с содержимым:
[NetDev]
Name=tap0
Kind=tap
Создаем интерфейс типа dummy
Создадим соответственно файлы dum0.netdev с содержимым:
[NetDev]
Name=dum0
Kind=dummy
Стоит отметить, что если вы планируете маршрутизировать траффик через виртуальные интерфейсы ( а, используя их для цели создания виртуальных частных сетей (VPN), вы точно этого хотите), то в конфигурационный файл в секии «Network» следует добавить диррективу «IPForward=yes».
Источник
Creating tap/tun devices with IP tuntap and tunctl as detailed in Linux network tools
This article was first published in my public number.CloudDeveloper(ID: cloud_dev)Focus on dry goods sharing. There are a lot of books and videos in the number. Backstage reply「1024」You can get it. Welcome your attention. Two-dimensional code can be scanned at the end.
In the previous article, we have introduced the basic principles of tap/tun, and this article will show you how to use tools. tunctl and ip tuntap To create and use tap/tun devices.
tunctl
install
First of all centos Installation in Environment tunctl 。
ubuntu yes apt-get install uml-utilities 。
man tunctl See tunctl The manual is used as follows:
- – The u parameter specifies the user name, indicating that the interface is only controlled by the user, and that what happens to the interface does not affect the interface of the system.
- – G Specifies a set of users
- – t specifies the tap / Tun device name to create.
- – B Simple Print Created Interface Name
- – n Create Tun devices
- – P creates a tap device, which is created by default
- – F tun-clone-device specifies the file name corresponding to the Tun device by default /dev/net/tun Some systems are /dev/misc/net/tun 。
- – D interfacename deletes the specified interface
Common usage:
Create tap interface by default:
The above is equivalent to tunctl -p
For users user Create a tap interface:
Create Tun interface:
Configure IP for the interface and enable:
Add routing to the interface:
ip tuntap
install
Command line input ip help See ip Is the command supported? tuntap Tools, if supported, will be displayed tuntap Options:
Upgrade or download the latest if not supported iproute2 Toolkit, or use the one described above tunctl Tools.
input ip tuntap help View the Detailed Use Commands:
Common usage:
Create tap/tun devices:
Delete tap/tun devices:
PS: user and group Parameters and tunctl The – U and – G parameters are the same.
We recommend using the above two tools. ip tuntap One is because iproute2 More complete updates have gradually replaced some of the older tools. Another reason is that tunctl In some Debian Class is not fully supported on the system.
summary
tunctl and ip tuntap Common usage.
More recommended ip tuntap Tools.
My Public NumberCloudDeveloper(ID: cloud_dev)There are a lot of books and videos in the number. Backstage reply「1024」You can get it. The content you share includes but is not limited to cloud computing virtualization, container, OpenStack, K8S, fog computing, network, tools, SDN, OVS, DPDK, Linux, Go, Python, C/C++ programming technology and so on. Welcome your attention.
Источник
Tap interfaces and /dev/net/tun device, using ip tuntap command
I’m using ip tuntap to create a tap interface, like this:
Afterwards, I set the interface up and address it with the common IP commands. I can see then my interface up and addressed with a simple ifconfig .
Now, I was told by a teacher that by creating a tap interface (named tap0 in that case), I would find a /dev/net/tap0 node, and that I would be able to write in it or to read it. However, I can’t find it. I «just» have a /dev/net/tun .
Do I have to deal with this tun node, or am I supposed to really have a tap0 node?

2 Answers 2
It’s been a long time since the question was asked, but I thought it would be a good idea to post an actual answer for future reference.
Tap interfaces, as well as tun interfaces, are virtual interfaces provided by the in-kernel TUN/TAP device driver. The only interface this driver provides initially is the character device /dev/net/tun mentioned in the question.
we instruct ip tuntap to create a network interface named tap0 , which is accomplished using the proper ioctl(2) calls on the aforementioned device file /dev/net/tun to talk to the underlying TUN/TAP device driver, as we can observe in ip tuntap ‘s source code.
One of these ioctl(2) calls (the one with TUNSETIFF option, which is called first) returns a file descriptor associated with the new virtual interface that was created and can be used by processes.
Do I have to deal with this tun node, or am I supposed to really have a tap0 node?
The /dev/net/tun device file is only used as a starting point to create both tap and tun interfaces, by userspace utilities like iproute2 . In the context of this question, there’s no need to deal with it as ip tuntap does this job for us.
Any extra /dev/net/tap0 device files are not needed or expected to be created for the processes to use the tap interfaces.
Источник
Create tap device linux
TUN / TAP role and difference
Tun equipment is a virtual network device that can easily simulate network behavior by this device. Tun simulation is a three-layer device, which can handle data from the network layer, more popular, through it, we can handle IP packets.
The TAP device is a two-layer device, which is more deeper than Tun, and the MAC layer packet can be sent and received by the / dev / tapx file. That is, the data link layer, the MAC layer function can be made with the physical network card, support MAC layer broadcast.
TAP equipment is exactly the same as TUN equipment, and the difference is:
(1) TUN device is a three-layer device, which simulates the IP layer, that is, the network layer we can send and receive the IP layer packet via / dev / tunx file. It cannot be Bridge with the physical network card, but can be exchanged through three-layer exchange ( If IP_FORWARD is connected to the physical network card. You can use commands such as IFConfig to set the IP address.
(2) Similarly, we can also set an IP address to the TAP device through commands such as ifconfig. If you prefer, we can set the MAC address.
1. Create a TUN / TAP device
2, delete TUN / TAP equipment
Note: The user and group parameters are the same as the -u, -g parameter of TunctL.
The above two tools are more recommended to use IP Tuntap, one is because iProute2 is more fully updated, and has gradually replaced some tools; the other is because TunctL is not supported on some Debian classes.
Источник
Create tap device linux
This article will introduce how to use the tool tunctl with ip tuntap To create and use tap/tun devices.
tunctl
installation
First in centos Installation in an environment tunctl 。
ubuntu Yes apt-get install uml-utilities 。
man tunctl View tunctl Manual, usage is as follows:
- The -u parameter specifies the user name, indicating that this interface is only controlled by the user, and what happens on this interface will not affect the system interface.
- -g specifies a group of users
- -t specifies the name of the tap/tun device to be created.
- -b simply print the interface name created
- -n create tun device
- -p Create a tap device, which is created by default
- -f tun-clone-device Specify the file name corresponding to the tun device, the default is /dev/net/tun , Some systems are /dev/misc/net/tun 。
- -d interfacename delete the specified interface
Common usage:
The tap interface is created by default:
The above is equivalent to tunctl -p
For users user Create a tap interface:
Create the tun interface:
Configure IP for the interface and enable:
Add a route to the interface:
Delete the interface:
ip tuntap
installation
Command line input ip help View ip Whether the command is supported tuntap Tools, it will be displayed if supported tuntap Options:
If it is not supported, please upgrade or download the latest iproute2 Toolkit, or use the one described above tunctl Tools.
Input ip tuntap help View detailed usage commands:
Common usage:
Create tap/tun device:
Remove tap/tun device:
PS: user with group Parameters and tunctl The -u and -g parameters are the same.
We recommend the above two tools ip tuntap , One is because iproute2 It is more fully updated and has gradually replaced some old tools, the other is because tunctl In certain Debian There is incomplete support on such systems.
to sum up
tunctl with ip tuntap Common methods of use.
Источник


