- Create temporary directory windows
- Answered by:
- Question
- Answers
- Creating and Using a Temporary File
- Fatal error: Cannot create temporary directory on Windows PCs [FIX]
- What to do if you can’t create a temporary directory on PC
- Solution 1: Select Run as administrator
- Solution 2: Create a new Temp folder and change the variables
- Run a System Scan to discover potential errors
- Solution 3: Change the control over the TEMP folder
- Solution 4: Confirm the Include inheritable permissions in the Temp folder
- internal error cannot create temporary directory
- Replies (3)
- Create temporary directory windows
- About
Create temporary directory windows
This forum has migrated to Microsoft Q&A. Visit Microsoft Q&A to post new questions.
![]()
Answered by:
![]()
Question
![]()
![]()
I want to create a random temporary folder in C#. Is there an easy way to do this using any.Net Library? I don’t want to use the FileSystemObject and I want to avoid implementing my own function.
Do you have a sample code you can share?
Answers
![]()
![]()
Thank you for your answer! GetRandomFileName will work. I am not sure how I missed that. This is the code that works like GetTempFileName, but instead creates a directory,
public string GetTempDirectory() <
string path = Path .GetRandomFileName();
Directory .CreateDirectory( Path .Combine( Path .GetTempPath(), path));
Creating and Using a Temporary File
Applications can obtain unique file and path names for temporary files by using the GetTempFileName and GetTempPath functions. The GetTempFileName function generates a unique file name, and the GetTempPath function retrieves the path to a directory where temporary files should be created.
The following procedure describes how an application creates a temporary file for data manipulation purposes.
To create and use a temporary file
- The application opens the user-provided source text file by using CreateFile.
- The application retrieves a temporary file path and file name by using the GetTempPath and GetTempFileName functions, and then uses CreateFile to create the temporary file.
- The application reads blocks of text data into a buffer, converts the buffer contents to uppercase using the CharUpperBuffA function, and writes the converted buffer to the temporary file.
- When all of the source file is written to the temporary file, the application closes both files, and renames the temporary file to «allcaps.txt» by using the MoveFileEx function.
Each of the previous steps is checked for success before moving to the next step, and a failure description is displayed if an error occurs. The application will terminate immediately after displaying the error message.
Note that text file manipulation was chosen for ease of demonstration only and can be replaced with any desired data manipulation procedure required. The data file can be of any data type, not only text.
The GetTempPath function retrieves a fully qualified path string from an environment variable but does not check in advance for the existence of the path or adequate access rights to that path, which is the responsibility of the application developer. For more information, see GetTempPath. In the following example, an error is regarded as a terminal condition and the application exits after sending a descriptive message to standard output. However, many other options exist, such as prompting the user for a temporary directory or simply attempting to use the current directory.
The GetTempFileName function does not require that the GetTempPath function be used.
The following C++ example shows how to create a temporary file for data manipulation purposes.
Fatal error: Cannot create temporary directory on Windows PCs [FIX]


- Download Restoro PC Repair Tool that comes with Patented Technologies (patent available here).
- Click Start Scan to find Windows issues that could be causing PC problems.
- Click Repair All to fix issues affecting your computer’s security and performance
- Restoro has been downloaded by 0 readers this month.
As usual, mostly for new users, there are a lot of errors messages and notifications encountered every day, especially on Windows 10. This particular fix has to do with helping you resolve the error encountered when trying to create a temporary directory on Windows 10.
Having an error when trying to create a temporary directory connotes that there is a challenge with the permissions of your user account. This error is usually displayed with a message – unable to execute files in the temporary directory.
This issue is usually encountered when a software solution is installed through an executable file. When the error message is displayed, you just have to close it, but this won’t permit you to proceed with the installation. This error can be encountered on Windows 7, 8, and 10.
This error message means that your system had been configured to block the setup. No need to panic, because this is only a configuration error and not a major error. Nevertheless, to enable you to continue with the installation process, there are a few things that you can do to fix this error. Below are few methods that can be utilized to clear off the error message.
What to do if you can’t create a temporary directory on PC
Solution 1: Select Run as administrator
This should be a very quick fix for you in case you are in a hurry to get your installation done and have no time for more extensive solutions. As said earlier, the error signal means there is a problem with the permissions.
This can be easily bypassed with these few steps:
- Look for the executable file that you want to install
- Right click on it and from the context menu, select Run as administrator.

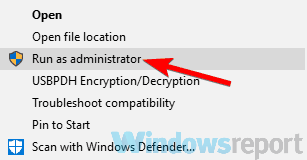
This solution should be able to help you clear the error message and make you install your software without any issue.
Solution 2: Create a new Temp folder and change the variables
Run a System Scan to discover potential errors


Creating a new Temp folder and changing the variables is the best option if the error signal clearly says that there is a problem with the temporary directory. Follow these steps carefully and get the error out of your way:
- Enter the C: drive and create a new folder, rename it as Temp (switch C: with the drive your OS is installed)
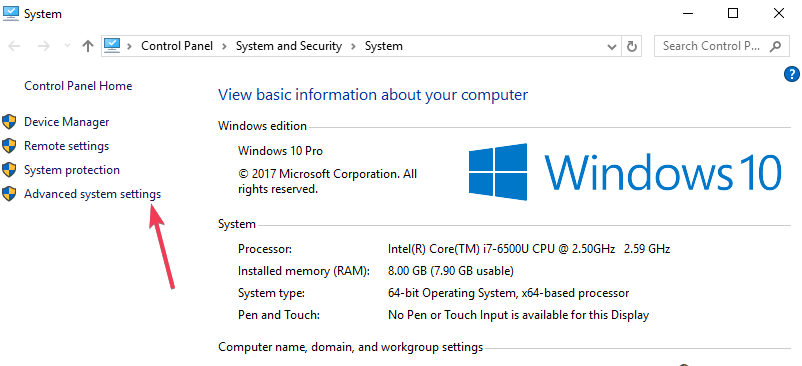
- Right-click on This PC and select Properties from the menu context
- You’ll see an Advanced Settings link on the left side, click on it
- Click on the Advanced Tab in the window, and click on the Environment Variables
- Double click TMP in the User variables
- The value you will see should be %USERPROFILE%AppDataLocalTemp. Change that to C:Temp. Then, close the window by pressing OK.

After all, try to install the program, it should be able to work perfectly without any issue.
Solution 3: Change the control over the TEMP folder
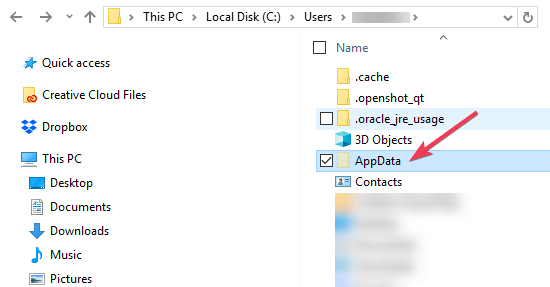
- In the drive where your OS is installed, enter your user’s folder and search for the AppData folder, in which you will find a local in the, if your OS is installed in the C: partition and your username will be User, also the address in the File Explorer should be “C:UsersUserAppDataLocal”
- Search for the Temp folder inside, right-click and select properties from the menu
- In the properties window, click on Security
- In the security window, click on Everyone
- Click on Edit and ensure that all the Full Control box is selected, then click on OK to save.
This should give you full access to the Temp folder and resolve the error 5 permission problem.
Solution 4: Confirm the Include inheritable permissions in the Temp folder
Just like the previous solution, follow these steps:
- In the drive where your OS is installed, enter your user’s folder and search for the AppData folder, in which you will find a local in the, if your OS is installed in the C: partition and your username will be User, also the address in the File Explorer should be “C:UsersUserAppDataLocal”
- Search for the Temp folder inside, right-click and select properties from the menu
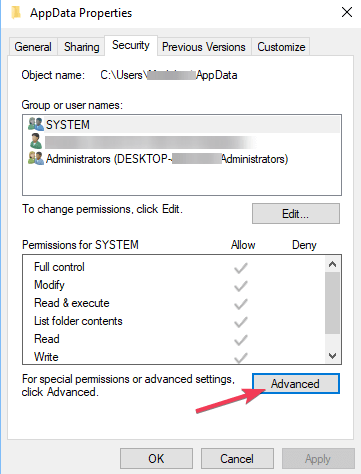
- In the properties window, click on Security
- Click on Advanced to view the permissions.
- In the permissions, there should be SYSTEM, Administrator and User. All these must have full control and inherited from the C:UsersUser
- Look for the Include inheritable permissions from this object’s parent selection, click Continue, click on Apply and then press OK to save the setting.
By now, you should already have access to write to the directory which provides you an instant remedy this error.
Handling Windows’ permissions can be very complicated for an individual that doesn’t know much about it. Being able to set up permissions properly will help you not allow you against making serious damage to the OS.
Notwithstanding, these proffered solutions, when followed properly will enable you to fix the error of not being able to create temporary directory encountered on Windows 10.
RELATED GUIDES YOU NEED TO CHECK OUT:
internal error cannot create temporary directory
Hi, I am using Windows 8.1 with update installed. I recently experienced «internal error cannot create temporary directory» every time I boot up my laptop. So I am wondering how to fix it. This issue makes me unable to open Chrome and Norton Internet Security, and I can not even do Windows updates now (keeps pops out errors «There was a problem downloading updates»).
Replies (3)
As you are facing multiple issues I would suggest you to perform a system restore and check if it helps. Follow the steps given in the link below.
How to refresh, reset or restore your PC
Important: The System Restore restores the computer back to an earlier point in time, called a restore point. System Restore doesn’t change your personal files, but it might remove recently installed apps and drivers and also reset the recently changed settings on the computer.
Let us know the status of the issue, we will assist you further.
3 people found this reply helpful
Was this reply helpful?
Sorry this didn’t help.
Great! Thanks for your feedback.
How satisfied are you with this reply?
Thanks for your feedback, it helps us improve the site.
How satisfied are you with this reply?
Thanks for your feedback.
Was this reply helpful?
Sorry this didn’t help.
Great! Thanks for your feedback.
How satisfied are you with this reply?
Thanks for your feedback, it helps us improve the site.
How satisfied are you with this reply?
Thanks for your feedback.
Thank you for the reply.
As you have mentioned that you do not have any restore point at that time, I would suggest you to check if you have any restore point prior to that. If you still face this issue then perform an Automatic Repair. Follow the steps given below to perform an Automatic Repair.
You need Windows 8 installation disk to perform the steps given below, if you do not have the disk you can create a disk using the steps given below.
Create installation media for Windows 8.1
You can follow the steps given below to perform Automatic repair.
The Automatic repair can detect and fix the issues that prevent the computer from starting normally. You will need the Windows 8 installation disc to perform an Automatic repair. If you don’t have a Windows 8 disc, I would suggest you to download the Windows 8 installation files from another computer through this link and choose to create an installation media when the upgrade assistant prompts.
After you have a Windows 8 installation disc, follow these steps:
- When your computer starts, wait for the manufacturer logo to check the option for boot menu, it will usually be F12.
- The boot menu key might differ with each manufacturer. If you are unable to find the boot menu key, you may refer the user manual.
- Restart the computer, when the manufacturer’s logo is displayed, keep pressing the Boot menu option key to enter the boot menu and change the boot option to CD\DVD ROM.
- After you boot your computer using Windows DVD or System Repair Disc, a black screen appears with gray text «Press any key to boot from CD or DVD«. Press any key.
- Select the correct time and Keyboard type.
- Click Repair your computer in the lower left corner
- Click on Troubleshooting, advanced option and then click start up repair.
Create temporary directory windows
Quickly create, use and delete temporary directories

![]()
![]()

This package allows you to quickly create, use and delete a temporary directory in the system’s temporary directory.
Here’s a quick example on how to create a temporary directory and delete it:

We invest a lot of resources into creating best in class open source packages. You can support us by buying one of our paid products.
We highly appreciate you sending us a postcard from your hometown, mentioning which of our package(s) you are using. You’ll find our address on our contact page. We publish all received postcards on our virtual postcard wall.
You can install the package via composer:
Creating a temporary directory
To create a temporary directory simply call the create method on a TemporaryDirectory object. By default the temporary directory will be created in a timestamped directory in your system’s temporary directory (usually /tmp ).
Naming your temporary directory
If you want to use a custom name for your temporary directory instead of the timestamp call the name method with a string $name argument before the create method.
By default an exception will be thrown if a directory already exists with the given argument. You can override this behaviour by calling the force method in combination with the name method.
Setting a custom location for a temporary directory
You can set a custom location in which your temporary directory will be created by passing a string $location argument to the TemporaryDirectory constructor.
Optionally you can call the location method with a $location argument.
Determining paths within the temporary directory
You can use the path method to determine the full path to a file or directory in the temporary directory:
Emptying a temporary directory
Use the empty method to delete all the files inside the temporary directory.
Deleting a temporary directory
Once you’re done processing your temporary data you can delete the entire temporary directory using the delete method. All files inside of it will be deleted.
Please see CHANGELOG for more information on what has changed recently.
Please see CONTRIBUTING for details.
Please review our security policy on how to report security vulnerabilities.
You’re free to use this package, but if it makes it to your production environment we highly appreciate you sending us a postcard from your hometown, mentioning which of our package(s) you are using.
Our address is: Spatie, Kruikstraat 22, 2018 Antwerp, Belgium.
We publish all received postcards on our company website.
The MIT License (MIT). Please see License File for more information.
About
A simple class to work with a temporary directory


