- Создание загружаемого установщика для macOS
- Что нужно для создания загружаемого установщика:
- Загрузка macOS
- Использование команды createinstallmedia в приложении «Терминал»
- Creating bootable USB from ISO in MacOS
- Windows 10 bootable USB vs Linux ISO USB
- Step 1: Confirm partitions before inserting USB
- Step 2: Insert USB stick an re-run diskutil list
- Creating Windows bootable USB
- Step 3: format USB stick for Windows boot
- Step 4: Mount Windows ISO
- Step 5: Copy Windows files onto USB stick
- Step 6: Boot USB stick on your PC
- Creating Linux bootable USB
- Step 3: convert ISO into bootable DMG
- Step 4: write DMG image onto USB stick with dd
- Step 5: Boot USB stick on your PC
- Create bootable USB stick from ISO in Mac OS X
- Convert the ISO to UDRW format
- Prepare the USB stick
- Copy the image to the USB stick
- 4 Ways to Burn ISO to USB on macOS Catalina /Mojave/Sierra and Big Sur M1
- Method 1. Burn ISO to USB on Mac with Terminal
- Method 2. Burn ISO to USB on macOS with WonderISO
- WonderISO
- Method 3. Burn ISO to USB on Mac with Virtualbox
- Method 4. Copy ISO File to USB on Mac using UNetBootin
Создание загружаемого установщика для macOS
В качестве загрузочного диска для установки операционной системы на компьютер Mac можно использовать внешний диск или дополнительный том.
Эти расширенные инструкции предназначены в первую очередь для системных администраторов и других пользователей, имеющих опыт работы с командной строкой. Загружаемый установщик не требуется для обновления macOS или переустановки macOS, но он может оказаться удобен, если требуется выполнить установку на несколько компьютеров, не загружая установщик заново каждый раз.
Что нужно для создания загружаемого установщика:
- USB-накопитель или другой дополнительный том, отформатированный в Mac OS Extended, на котором есть не менее 14 ГБ свободного пространства;
- загруженный установщик для macOS Big Sur, Catalina, Mojave, High Sierra или El Capitan.
Загрузка macOS
- Загрузка macOS Big Sur, macOS Catalina, macOS Mojave или macOS High Sierra
Эти элементы загружаются в папку «Программы» в виде приложения с именем «Установка macOS [ название версии ]». Если после загрузки запустится установщик, завершите его работу без продолжения установки. Чтобы получить подходящий установщик, выполняйте загрузку с компьютера Mac, на котором используется macOS Sierra 10.12.5 или более поздней версии либо El Capitan 10.11.6. Корпоративным администраторам следует производить загрузку с сайта Apple, а не с сервера обновления ПО, размещенного в локальной сети. - Загрузка OS X El Capitan
В результате этого действия загрузится образ диска с именем InstallMacOSX.dmg. На компьютере Mac, совместимом с El Capitan, откройте образ диска и запустите с него установщик с именем InstallMacOSX.pkg. Приложение с именем «Установка OS X El Capitan» будет установлено в папку «Программы». Загружаемый установщик создается именно из этого приложения, а не из образа диска или установщика .pkg.
Использование команды createinstallmedia в приложении «Терминал»
- Подключите USB-накопитель или другой том, используемый для загружаемого установщика.
- Откройте приложение «Терминал» в подпапке «Утилиты» папки «Программы».
- Введите или вставьте в приложение «Терминал» одну из следующих команд. Предполагается, что установщик находится в папке «Программы», а имя MyVolume обозначает USB-накопитель или другой используемый вами том. Укажите вместо MyVolume имя своего тома в следующих командах.
Big Sur*:
Catalina*:
Mojave*:
High Sierra*:
El Capitan:
* Если на компьютере Mac установлена операционная система macOS Sierra или более ранней версии, включите аргумент —applicationpath и путь установки аналогично тому, как это делается в случае команды для El Capitan.
После набора команды
- Нажмите «Ввод», чтобы ввести команду.
- При появлении запроса введите пароль администратора и нажмите клавишу «Ввод» еще раз. При вводе пароля приложение «Терминал» не отображает вводимые символы.
- При появлении запроса нажмите клавишу Y , чтобы подтвердить удаление всех данных на томе, затем клавишу «Ввод». Приложение «Терминал» показывает прогресс по мере стирания тома.
- После стирания тома может быть отображено предупреждение о том, что приложению «Терминал» требуется доступ к файлам на съемном томе. Нажмите «OK», чтобы продолжить копирование.
- Когда приложение «Терминал» сообщит о завершении процесса, имя тома будет совпадать с именем загруженного установщика, например «Установка macOS Big Sur». После этого можно закрыть приложение «Терминал» и извлечь том.


Источник
Creating bootable USB from ISO in MacOS
 macOS High Sierra
I needed to reinstall one of my Windows PCs at home recently, and realised that I only have Windows 7 DVDs, but no Windows 10s.
Since it’s possible to boot and install Windows 10 from USB, that’s what I decided to do: download Window 10 ISO and burn it one of the USB sticks I have. This approach will be simpler for any other ISO image like Ubuntu or CentOS, so there’s a separate Steps 3-5 for them at the end of the post.
Here are the steps I had to take on my MacBook, originally procedure was written in macOS High Sierra, but I tested it in MacOS Mojave 10.14.2 as well. All of these need to be done in the Terminal app.
Windows 10 bootable USB vs Linux ISO USB
Windows 10 is a very specific bootable media, so the process is a bit involved. For generic Linux installation ISOs this procedure would be simpler. So the first two steps are the same, then Windows and Linux have separate procedure.
Here’s what we will do for Windows ISO:
- erase USB stick and create MBR (master boot record)
- format USB stick with FAT-32 filesystem
- mount Windows 10 ISO image as a folder
- copy all the files from that folder onto the USB stick
Here’s what we would do for Linux ISO:
- use dd command to burn Linux installation ISO onto USB stick
Step 1: Confirm partitions before inserting USB
Use the diskutil command to list all disks and partitions on your Mac. This is simply so that you can run the same command again after inserting USB and easily spot the USB device.
Step 2: Insert USB stick an re-run diskutil list
This time I can see there’s a disk9 showing up, with 64GB of size which matches my USB stick size:
Chances are, your USB stick has a PC standard FAT16/FAT32 filesytem, and will be mounted automatically. Let’s check:
Sure enough, it’s mounted as /Volumes/NONAME!
Creating Windows bootable USB
IMPORTANT: these steps are only needed for Windows ISOs. If you’re burning a Linux ISO, skip this and go to the Creating Linux bootable USB section below, it has its own steps.
Step 3: format USB stick for Windows boot
This single command will erase the USB stick, make it bootable by adding a Master Boot Record (MBR) and create a Windows-friendly filesystem (FAT) on it:
You’ll have the new filesystem mounted automatically, as you can see it’s empty (1.1MB used of 14GB):
Great stuff, now we’re moving to the next phase: we need to mount the Windows ISO image as a folder and then copy all the files onto the freshly formatted /Volumes/WIN10 USB stick.
Step 4: Mount Windows ISO
Simply go to the directory where you have the ISO image and run the open command for it:
You’ll have the MacOS Finder window with Windows ISO content pop-up, just ignore it and go back to the terminal.
You should now have it mounted under folder like this:
Go into that folder and do ls to make sure you can see Windows DVD files there:
Step 5: Copy Windows files onto USB stick
Right, now we have to copy all the files from DVD ISO image onto our new USB stick.
IMPORANT: you should be in the /Volumes/CCSA_X64FRE_EN-US_DV5 directory when running this command below. That’s exactly where you are if you just completed Step 4.
The copy will take good 10-15min:
There should be no errors returned.
If you remember, in Step 3 we did the df command and the USB filesystem /Volumes/WIN10 was empty.
Just to get an idea that the copy was successful, let’s run the df command again to make sure the USB stick has roughly the same amount taken up now – 4.1GB as per output fragments in previous step.
Looks good! What’s left now is to eject the USB stick:
and to boot it on the PC as shown below.
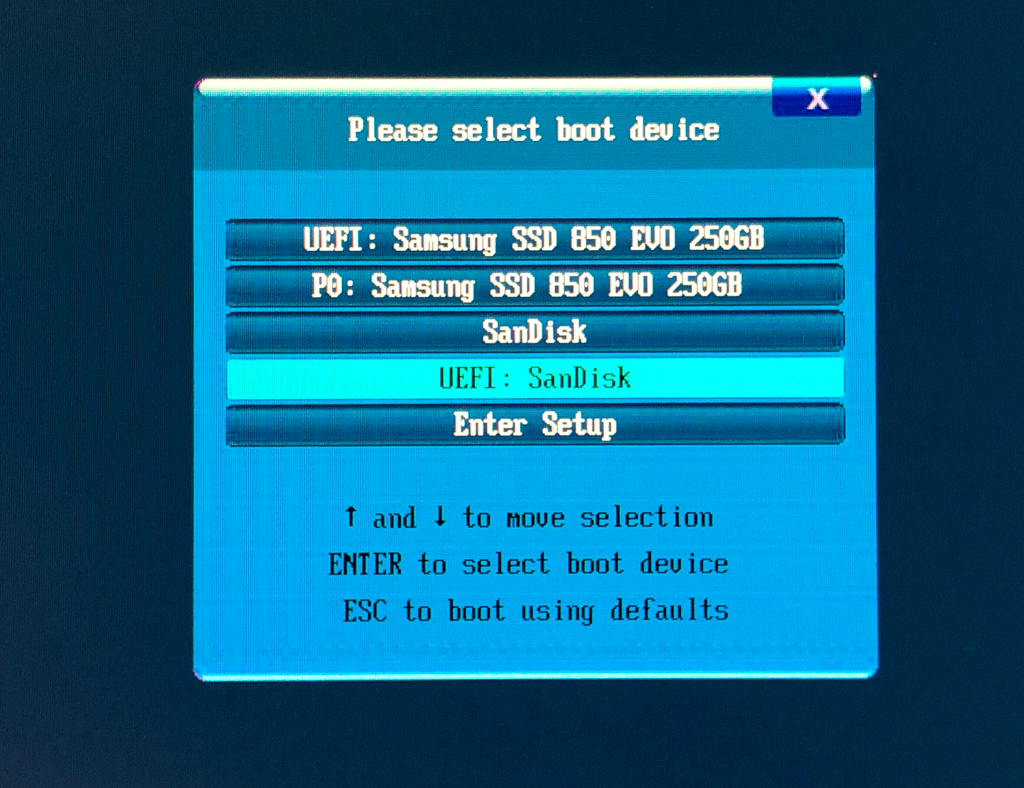
Step 6: Boot USB stick on your PC
IMPORTANT: recent enough PCs will likely offer you both legacy boot and UEFI boot. The rule of thumb is to boot UEFI if it’s available, especially if you’re booting Windows USB stick:
Creating Linux bootable USB
As I said earlier, non-Windows ISOs are much easier to deal with! So after the first 2 generic steps at the start of this post, we’ll be taking separate steps for Linux as shown below.
We need to unmount the USB disk we found in Step 2. It’s /dev/disk9 in our case:
Step 3: convert ISO into bootable DMG
WARNING: this is an important step, without it your USB stick won’t boot.
So I have this DVD ISO of the CentOS 7.4, let’s convert it before burning onto the USB stick.
Step 4: write DMG image onto USB stick with dd
Exellent, now we are ready to burn the ISO image. Let’s cd into the directory with all the ISOs that you have and burn it using the dd command.
dd command runs with the help of 3 command line parameters:
- if – specifying source data, that’s our ISO image file
- of – specifying the destination file or device, /dev/disk9 in our case
- bs – block size, just needs to be something big enough like 1m (meaning 1 megabyte)
Depending on the ISO size and the USB stick speed, you’ll have to wait 10-20min for this to complete.
Useful tip (cheers Jim!): if you want to confirm your current process, press Ctrl+t in the Terminal app and it should update output with dd progress (I highlighted the output below every tipe I pressed Ctrl+t):
finally, dd will complete a message like this:
Step 5: Boot USB stick on your PC
That’s it, we’re done! Eject the USB stick (no need to run any diskutil commands as it wasn’t mounted automaticaly) and boot on your PC.
IMPORTANT: recent enough PCs will likely offer you both legacy boot and UEFI boot. The rule of thumb is to boot UEFI if it’s available:
Источник
Create bootable USB stick from ISO in Mac OS X
Booting from a USB stick is nowadays more and more important. More and more PCs (and servers) are delivered by default without a CD/DVD drive. To install the OS of your choice, USB sticks provide you the easiest possibility. In fact, it can even work out cheaper than burning a CD or DVD that you just throw away once the version is outdated.
For most Linux distributions the ISO for burning a CD/DVD is available freely on the internet. In this post I’ll assume you have already downloaded the bootable ISO image for the OS of your choice, but how to get the ISO image onto the USB stick?
The ISO file you have downloaded contains an image of the entire media. It includes all the files necessary to boot your PC/server. This image format is sadly not directly usable to copy onto the USB stick. We first need to convert the image from an ISO to a UDRW (Read/Write Universal Disk Image Format) which we can copy to the USB stick.
Some of the steps to create a bootable USB stick could be done in the GUI as well, but as some of them can’t and you have to go to the shell anyway, I decided to do all of the steps in the shell.
Convert the ISO to UDRW format
Mac OS X provides all the tools needed to convert the ISO image to UDRW. The following command will convert the ISO image to the UDRW format.
You will notice that the destination_file.img from the command will create the file destination_file.img.dmg really. This is because the hdiutil program automatically adds the dmg file extension. This is not a problem as the file extension won’t affect the format of the image.
Prepare the USB stick
Check your USB stick and make a backup if there is any important data on it, as the next steps are going to delete everything on it.
To prepare the USb stick we are going to delete all the partitions on the stick and create an empty partition. To do this we need to know the device name of the USB stick. Open a terminal and execute the following command:
You will see a list of disks and partitions. The goal is to identify the USB stick in this output. Depending on your system configuration your output might look different from this one. This appears to show 3 physical discs but it does not. The /dev/disk1 is a virtual disk created because of the partition encryption (FileVault 2) I enabled in Mac OS X.
As shown in the output above, the connected USB stick is a small 2.0 GB drive with a FAT partition on it. We are now going to remove this partition in the next step. For the following steps we will need the name of the disk which in this case is “/dev/disk2”.
With the following command the data on the disk (your USB stick) will be deleted!
With this command the USB stick was re-partitioned to have 1 partition without formatting and 100% of the size of the stick. If you check it again with “diskutil list” you will see the changes already, also the USB stick will no longer be shown in the Finder.
Copy the image to the USB stick
Now we can copy the disk image we created to the USB stick. This is done via the dd(1) command. This command will copy the image to the disk (substitute the appropriate disk name for your USB stick here, as with the re-partitioning command):
The dd command does not show any output before it has finished the copy process, so be patient and wait for it to complete.
To eject the USB stick, use the above command. After this is done, the bootable USB stick is ready to be used.
Источник
4 Ways to Burn ISO to USB on macOS Catalina
/Mojave/Sierra and Big Sur M1
Copying ISO to USB on macOS is is not a simple matter because you may encounter a variety of strange issues in the production process, whichever way you do it, such as «couldn’t validate source» when burning ISO with Disk Utility, Bootcamp doesn’t work or USB won’t boot. Many of the problems you face is because macOS X doesn’t natively read the particular ISO image file, which is likely NTFS file. So, if you intend to burn a Windows 10 ISO image file into a bootable USB installer on a macOS without Bootcamp and less error-prone. you will need to find the most reliable and simplest way to burn ISO image to USB drive.
Fortunately, there are many tools with free trail can do it, like command line with dd, WonderISO, UNetbootin, Vitualbox and more. What might be easier, however, is depending on your computer skill levels and effect levels. In this article, you’ll find detailed instructions and answers to your questions on copy ISO to USB on macOS.
Method 1. Burn ISO to USB on Mac with Terminal
The first way I recommend is by using dd commend-line under Utilities, which is able to make a byte-for-byte copy of ISO image and partition table, you should know dd is a command line-only interface, which is somewhat advanced and might not suitable for the low skilled mac users. Here the entire steps.
Step1. Back up your USB drive first as your USB drive will be erased completely before you start.
Step 2. Connect your USB to mac computer, then perform Format or Erase for your USB drive by using Disk Utility (under Application/Utilities). Note, you can select MS-DOS (FAT) for the Format.
Step 3. Launch the Terminal and type the following command to list volumes.
Locate the name of the USB drive. It should be something’like /dev/disk0, ./dev/disk1, /dev/disk2. It might be different on your Mac.
$ diskutil list
/dev/disk0
#: TYPE NAME SIZE IDENTIFIER
0: GUID_partition_scheme *251.0 GB disk0
1: EFI EFI 209.7 MB disk0s1
2: Apple_CoreStorage 250.1 GB disk0s2
3: Apple_Boot Recovery HD 650.1 MB disk0s3
/dev/disk1
#: TYPE NAME SIZE IDENTIFIER
0: Apple_HFS Macintosh HD *249.8 GB disk1
Logical Volume on disk0s2
Unlocked Encrypted
/dev/disk3
#: TYPE NAME SIZE IDENTIFIER
0: partition_scheme *5.3 MB disk3
1: partition_map 32.3 KB disk3s1
2: FAT_32 THE_DESTINATION 8.2 GB disk3s2
/dev/disk4
#: TYPE NAME
Step 4. make sure you’ve selected the right volume name, then start to unmount it by typing the command:
diskutil unmountDisk /dev/disk2
It should show something like this: Unmount of all volumes on disk2 was successful.
Step 5 . Now you will be asked to erase your USB drive by replacing the ISO image, make sure you’ve select the right identifier to avoid the unintended data loss.
sudo dd if=/path/to/win-iso-file of=/dev/disk2 bs=1m
In this command line, /path/to/win-iso-file is the full path of your ISO image file, make sure you type the full path. And the ‘r’ signifier should be placed in front of the disk identifier, while the’bs=1m’ should be placed at the end of blocksize.
Step 6. Make sure all of the syntax you typed are correct, then press Enter it and high return, you may be asked to enter the admin password. Then the process will start immediately,
Step 7. There is no progress bar, but it’s burning ISO to USB on Mac in the background, and stop any operations but wait it out. It might take 10 to 45 minutes.
Step 8. Once it’s done, you can see the output records in/out and bytes transferred. Then eject the volume by following command.
diskutil eject /dev/disk2
Now, If nothing else, you should get a bootable USB installer. You can re-insert your USB drive to computer and check if there are some files and folders contained in it, especially a setup.exe and an autorun.inf file. Be careful with dd comamnd, as if you get the device wrong or execute the wrong command, you could overwrite your OSX drive.
Method 2. Burn ISO to USB on macOS with WonderISO
The second I highly recommend is WonderISO tool, which is a top alternative solution for having your ISO bootable without involving complex command line. It should be used by either invoices or experts since it comes with a intuitive interface, there are 5 functions especially designed to handle ISO image file that can meet different customer needs. They are «Burn ISO», «Extract ISO», «Create ISO», «Edit ISO», «Copy ISO from Disc». To burn ISO to USB on macOS with bootable info (UEFI or MBR), just click «Burn ISO» option, import your Windows ISO and select boot type, that’s all! I’ve tested it twice and it was be able to boot up my Win 10 ISO on another computer and there is no shortage of necessary drivers.
WonderISO
- An all-in-one ISO Burner tool that lets you burn ,extract, crate and edit ISO image file straightforwardly!
- Compatible with all Windows system including the latest version of Windows 10.
- Support UEIF+MBR and UEFI+GPU boot mode.
- Works with both USB flash drives and CD/DVDs.
- Support macOS Big Sur M1.
Steps to Burn ISO to USB on macOS Catalina or Mojave.
Step 1. Like most of other desktop software, you will first need to download and install the WonderISO for Mac version on your Mac computer (Catalina or Mojave). After installation, launch it, the main interface should be like this:
Step 2. For burning ISO to USB on macOS, we need to take advantage of «Burn» function. Just click «Burn» button to enter the «Burn» Window, then load your Windows ISO image, and select your USB drive letter. You can also select the boot style:UEFI or MBR based on your target computer.
Step 3. Make sure all settings are complete correctly, just click BURN button to start copying ISO file to USB on maOS byte-by-byte. This may take you anything from 5 minutes to 20 minutes, depending on the writing speed of your USB drive.
Once it’s completed you can exit WodnerISO tool and remove the USB key from your OS X machine,now, your USB drive should be bootable with Windows ISO. You can boot up your ISO on on another Windows computer.
As you see, copying ISO to USB on mac can be done within 3 steps without using complex settings or command. After test, I was obliged to admit the fact that WonderISO is consistently reliable in creating bootable USB drive. I suggest you to give it a try.
Method 3. Burn ISO to USB on Mac with Virtualbox
VirtualBox is a free software allowing you to use physical disks as virtual hard disks, and it also allows users to attach and boot USB drive in VirtualBox. If you’ve installed virtualBox on your Mac then that would be a great and fast method to burn ISO to USB on macOS, you can install Windows on your virtualBox then use windows tools to write ISO to USB.
Step 1. Assume that you have Windows installed Parallel or Vmware on your Mac, then run it. I’m not going to introduce how to install VirtualBox on a Mac here as we will nake it as a special in the future.
Step 2. In addition to Parallel or Vmware, you can also use Windows virtual machines that published by Microsoft to create a bootable USB drive on Mac.
Step 3. Please note that the Mac with USB 3.0 ports are not currently supported under VirtualBox , so you may find your Windows won’t read the USB 2.0 port, that’s because your system lacks of VirtualBox Extension Pack, download and install it on your Windows (VirtualBox ) , then click Ports from the settings in the virtual machine, just enable the USB 2.0 EHCI.
Step 4. When you attach your USB drive to you mac, it will be identified by mac OS X but VirtualBox, that’s because only one OS can be able to control a USB port at a time. To fix this, what you need to do is just eject it from your mac OS, then VirtualBox will automatically recognize your USB drive, namely you can see your USB in the Windows OS.
Step 5. As long as Windows VirtualBox recognizes your USB drive then there are lots of tools allowing your to burn ISO to USB on Mac OS. Like rufus, Windows 7 USB DVD Download Tool.
Method 4. Copy ISO File to USB on Mac using UNetBootin
UNetbootin is another way used to burn ISO file to USB on macOS, it’s compatible with all Windows ISO and Linux distributions. The approach is to attach a physical drive to a machine using the command-line tool that comes bundled with UNetbootin. Note that you must use the UEFI boot option when picking the USB instead of Legeacy boot option.
Step 1. Like the Method 1, you will also need to check the path name of your USB flash drive by executing the following command:
Step 2. Download the UNetbootin tool on your macOS and install it. Then move the DMG file to the /application folder. You can also install it by the following command.
brew cask install —appdir=»/Applications» unetbootin
Step 3. Open the UNetbootin tool, select the ISO in the Diskimage option and load your Windows ISO files by clicking the . select the USB in the type option. Then click OK button and wait to the process end.
Someone had reported that the method for using UNetbootin did not work, if so, please try to change another USB drive with enough space.
Yo may be suffering the trouble because your Windows computer has to face the fact of being reinstalled, even though you’ve tried everything to get it back to normal. However, burning ISO to USB on mac is not as easy as the way you do on windows because macOS lacks of working ISO burning tools. dd command line is the traditional and official way that only can be used by those who are comfortable with command line. So, what choices will you make If you’re a computer novices, I will highly recommend choosing WonderISO tool to do the entire job, no risk, no command and easy to use!
Источник


