- venv — Creation of virtual environments
- Creating virtual environments
- An example of extending EnvBuilder В
- Использование виртуальных сред venv и virtualenv для создания окружения Python
- Для чего нужно виртуальные среды?
- Установка и создания окружения с virtualenv
- Активация и выход из окружения
- Управление средами через virtualenvwrapper
- Настройки для Linux
- Настройки для Windows
- Основные команды
- Создание виртуальных сред со встроенным пакетом Python venv
- Создание виртуального окружения в Pycharm
- Создание списка установленных пакетов Requirements.txt
venv — Creation of virtual environments
New in version 3.3.
Source code: Lib/venv/
The venv module provides support for creating lightweight “virtual environments” with their own site directories, optionally isolated from system site directories. Each virtual environment has its own Python binary (which matches the version of the binary that was used to create this environment) and can have its own independent set of installed Python packages in its site directories.
See PEP 405 for more information about Python virtual environments.
Creating virtual environments
Creation of virtual environments is done by executing the command venv :
Running this command creates the target directory (creating any parent directories that don’t exist already) and places a pyvenv.cfg file in it with a home key pointing to the Python installation from which the command was run (a common name for the target directory is .venv ). It also creates a bin (or Scripts on Windows) subdirectory containing a copy/symlink of the Python binary/binaries (as appropriate for the platform or arguments used at environment creation time). It also creates an (initially empty) lib/pythonX.Y/site-packages subdirectory (on Windows, this is Lib\site-packages ). If an existing directory is specified, it will be re-used.
Deprecated since version 3.6: pyvenv was the recommended tool for creating virtual environments for Python 3.3 and 3.4, and is deprecated in Python 3.6.
Changed in version 3.5: The use of venv is now recommended for creating virtual environments.
On Windows, invoke the venv command as follows:
Alternatively, if you configured the PATH and PATHEXT variables for your Python installation :
The command, if run with -h , will show the available options:
Changed in version 3.9: Add —upgrade-deps option to upgrade pip + setuptools to the latest on PyPI
Changed in version 3.4: Installs pip by default, added the —without-pip and —copies options
Changed in version 3.4: In earlier versions, if the target directory already existed, an error was raised, unless the —clear or —upgrade option was provided.
While symlinks are supported on Windows, they are not recommended. Of particular note is that double-clicking python.exe in File Explorer will resolve the symlink eagerly and ignore the virtual environment.
On Microsoft Windows, it may be required to enable the Activate.ps1 script by setting the execution policy for the user. You can do this by issuing the following PowerShell command:
PS C:> Set-ExecutionPolicy -ExecutionPolicy RemoteSigned -Scope CurrentUser
The created pyvenv.cfg file also includes the include-system-site-packages key, set to true if venv is run with the —system-site-packages option, false otherwise.
Unless the —without-pip option is given, ensurepip will be invoked to bootstrap pip into the virtual environment.
Multiple paths can be given to venv , in which case an identical virtual environment will be created, according to the given options, at each provided path.
Once a virtual environment has been created, it can be “activated” using a script in the virtual environment’s binary directory. The invocation of the script is platform-specific ( must be replaced by the path of the directory containing the virtual environment):
Command to activate virtual environment
PS C:\> \Scripts\Activate.ps1
When a virtual environment is active, the VIRTUAL_ENV environment variable is set to the path of the virtual environment. This can be used to check if one is running inside a virtual environment.
You don’t specifically need to activate an environment; activation just prepends the virtual environment’s binary directory to your path, so that “python” invokes the virtual environment’s Python interpreter and you can run installed scripts without having to use their full path. However, all scripts installed in a virtual environment should be runnable without activating it, and run with the virtual environment’s Python automatically.
You can deactivate a virtual environment by typing “deactivate” in your shell. The exact mechanism is platform-specific and is an internal implementation detail (typically a script or shell function will be used).
New in version 3.4: fish and csh activation scripts.
New in version 3.8: PowerShell activation scripts installed under POSIX for PowerShell Core support.
A virtual environment is a Python environment such that the Python interpreter, libraries and scripts installed into it are isolated from those installed in other virtual environments, and (by default) any libraries installed in a “system” Python, i.e., one which is installed as part of your operating system.
A virtual environment is a directory tree which contains Python executable files and other files which indicate that it is a virtual environment.
Common installation tools such as setuptools and pip work as expected with virtual environments. In other words, when a virtual environment is active, they install Python packages into the virtual environment without needing to be told to do so explicitly.
When a virtual environment is active (i.e., the virtual environment’s Python interpreter is running), the attributes sys.prefix and sys.exec_prefix point to the base directory of the virtual environment, whereas sys.base_prefix and sys.base_exec_prefix point to the non-virtual environment Python installation which was used to create the virtual environment. If a virtual environment is not active, then sys.prefix is the same as sys.base_prefix and sys.exec_prefix is the same as sys.base_exec_prefix (they all point to a non-virtual environment Python installation).
When a virtual environment is active, any options that change the installation path will be ignored from all distutils configuration files to prevent projects being inadvertently installed outside of the virtual environment.
When working in a command shell, users can make a virtual environment active by running an activate script in the virtual environment’s executables directory (the precise filename and command to use the file is shell-dependent), which prepends the virtual environment’s directory for executables to the PATH environment variable for the running shell. There should be no need in other circumstances to activate a virtual environment; scripts installed into virtual environments have a “shebang” line which points to the virtual environment’s Python interpreter. This means that the script will run with that interpreter regardless of the value of PATH . On Windows, “shebang” line processing is supported if you have the Python Launcher for Windows installed (this was added to Python in 3.3 — see PEP 397 for more details). Thus, double-clicking an installed script in a Windows Explorer window should run the script with the correct interpreter without there needing to be any reference to its virtual environment in PATH .
The high-level method described above makes use of a simple API which provides mechanisms for third-party virtual environment creators to customize environment creation according to their needs, the EnvBuilder class.
class venv. EnvBuilder ( system_site_packages=False, clear=False, symlinks=False, upgrade=False, with_pip=False, prompt=None, upgrade_deps=False ) В
The EnvBuilder class accepts the following keyword arguments on instantiation:
system_site_packages – a Boolean value indicating that the system Python site-packages should be available to the environment (defaults to False ).
clear – a Boolean value which, if true, will delete the contents of any existing target directory, before creating the environment.
symlinks – a Boolean value indicating whether to attempt to symlink the Python binary rather than copying.
upgrade – a Boolean value which, if true, will upgrade an existing environment with the running Python — for use when that Python has been upgraded in-place (defaults to False ).
with_pip – a Boolean value which, if true, ensures pip is installed in the virtual environment. This uses ensurepip with the —default-pip option.
prompt – a String to be used after virtual environment is activated (defaults to None which means directory name of the environment would be used). If the special string «.» is provided, the basename of the current directory is used as the prompt.
upgrade_deps – Update the base venv modules to the latest on PyPI
Changed in version 3.4: Added the with_pip parameter
New in version 3.6: Added the prompt parameter
New in version 3.9: Added the upgrade_deps parameter
Creators of third-party virtual environment tools will be free to use the provided EnvBuilder class as a base class.
The returned env-builder is an object which has a method, create :
Create a virtual environment by specifying the target directory (absolute or relative to the current directory) which is to contain the virtual environment. The create method will either create the environment in the specified directory, or raise an appropriate exception.
The create method of the EnvBuilder class illustrates the hooks available for subclass customization:
Creates the environment directory and all necessary directories, and returns a context object. This is just a holder for attributes (such as paths), for use by the other methods. The directories are allowed to exist already, as long as either clear or upgrade were specified to allow operating on an existing environment directory.
Creates the pyvenv.cfg configuration file in the environment.
Creates a copy or symlink to the Python executable in the environment. On POSIX systems, if a specific executable python3.x was used, symlinks to python and python3 will be created pointing to that executable, unless files with those names already exist.
Installs activation scripts appropriate to the platform into the virtual environment.
Upgrades the core venv dependency packages (currently pip and setuptools ) in the environment. This is done by shelling out to the pip executable in the environment.
New in version 3.9.
A placeholder method which can be overridden in third party implementations to pre-install packages in the virtual environment or perform other post-creation steps.
Changed in version 3.7.2: Windows now uses redirector scripts for python[w].exe instead of copying the actual binaries. In 3.7.2 only setup_python() does nothing unless running from a build in the source tree.
Changed in version 3.7.3: Windows copies the redirector scripts as part of setup_python() instead of setup_scripts() . This was not the case in 3.7.2. When using symlinks, the original executables will be linked.
In addition, EnvBuilder provides this utility method that can be called from setup_scripts() or post_setup() in subclasses to assist in installing custom scripts into the virtual environment.
install_scripts ( context, path ) В
path is the path to a directory that should contain subdirectories “common”, “posix”, “nt”, each containing scripts destined for the bin directory in the environment. The contents of “common” and the directory corresponding to os.name are copied after some text replacement of placeholders:
__VENV_DIR__ is replaced with the absolute path of the environment directory.
__VENV_NAME__ is replaced with the environment name (final path segment of environment directory).
__VENV_PROMPT__ is replaced with the prompt (the environment name surrounded by parentheses and with a following space)
__VENV_BIN_NAME__ is replaced with the name of the bin directory (either bin or Scripts ).
__VENV_PYTHON__ is replaced with the absolute path of the environment’s executable.
The directories are allowed to exist (for when an existing environment is being upgraded).
There is also a module-level convenience function:
venv. create ( env_dir, system_site_packages=False, clear=False, symlinks=False, with_pip=False, prompt=None ) В
Create an EnvBuilder with the given keyword arguments, and call its create() method with the env_dir argument.
New in version 3.3.
Changed in version 3.4: Added the with_pip parameter
Changed in version 3.6: Added the prompt parameter
An example of extending EnvBuilder В
The following script shows how to extend EnvBuilder by implementing a subclass which installs setuptools and pip into a created virtual environment:
This script is also available for download online.
Использование виртуальных сред venv и virtualenv для создания окружения Python

Виртуальные среды (окружения) используются в Python 3 контроля версионности пакетов. Кроме контроля версий среды используют для использования разных интерпретаторов. Самих пакетов, которые создают виртуальные окружения много. В этой статье речь пойдет про venv, virtualenv и virtualenvwrapper.
Навигация по посту
Для чего нужно виртуальные среды?
При создании скрипта или программы вы часто используете сторонние модули (пакеты). Если в последующем потребуется перенос программы на другой компьютер, то вы можете столкнуться с двумя проблемами:
- Нужные пакеты отсутствуют на новом компьютере и придется проверять каждый файл программы для их поиска. Либо получить список установленных пакетов через «pip list» на старом компьютере, который выведет множество лишних модулей.
- Даже если количество пакетов или файлов программ маленькое, или вы его создали отдельно, то вы все равно можете столкнуться с проблемами в версиях. Пакеты могли быть обновлены, а методы и классы изменены.
Использование виртуальных сред избавляет вас от этих проблем. В таком виртуальной среде находится свой интерпретатор, свой pip и все пакеты относятся только к нему. Так же, весь проект, можно перенести как папку на другой компьютер без ошибок.
Кроме этого вы можете запускать разные версии Python в разных виртуальных средах, что сильно упрощает работу.
Установка и создания окружения с virtualenv
Самый популярный пакет, который используется для создания виртуальных сред в Python, это virtualenv. Для его установки на Windows выполните:
Для установки на Linux системах, для Python 3, понадобится выполнить такую команду:
Если вы не будете использовать sudo, то в зависимости от версии ОС у вас появятся разные ошибки. В CentOS установка не выполнится вовсе, а в Ubuntu не будет добавлен путь в переменную окружения:
- PermissionError: [Errno 13] Permission denied: ‘/usr/local/lib/python3.6’
- Command ‘virtualenv’ not found, but can be installed with: sudo apt install virtualenv
Далее, вне зависимости от того используете ли вы Linux или Windows, вы можете выполнить команду получения справки:
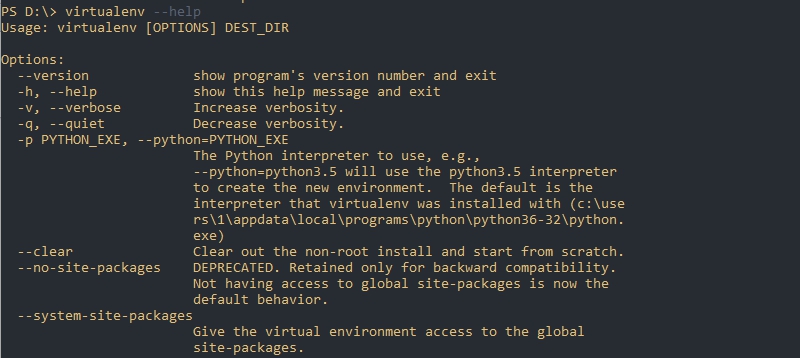
Я использую Python 3.6, и так я создам окружение в папке projectname/venv:
Способ выше устанавливает окружение относительно текущего пути. Если нужно установить на другом диске или каталоге, то можно использовать абсолютный путь. Так же не обязательно указывать параметр «-p» если вы используете одну версию Python. Вариант как это может быть сделано на Windows:
Само расположение виртуального окружения рекомендуется создавать в одной папке вместе разрабатываемым приложением. Такую структуру будет легче сопровождать. Я обычно придерживаюсь такой структуры:
Активация и выход из окружения
Для того что бы виртуальное окружения начало работать его нужно активировать. В разных ОС это делается по-разному.
В случаях с Linux указываем полный путь до venv/bin/activate:
Для активации в Windows, в папке venv\Scripts есть несколько файлов:
- activate.ps1 — для активации через Powershell;
- activate.bat — для активации через CMD.
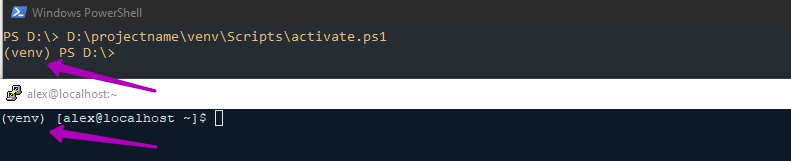
Для активации просто укажите полный путь до файла. Например:
О том что вы находитесь в виртуальном окружении свидетельствуют следующие надписи:
Вы так же можете сравнить количество установленных пакетов внутри виртуального окружения с тем, что установлено вне:

Теперь вы можете устанавливать пакеты, которые будут работать только в этой среде.
Для выхода из окружения, за исключением запуска с помощью CMD, используйте команду:
Для CMD нужно указать путь до файла «venv\Scripts\deactivate.bat».
Управление средами через virtualenvwrapper
Если вы создаете множество виртуальных сред, например для тестирования в разных версиях Python, вы можете использовать virtualenvwrapper. Этот пакет представляет собой надстройку для virtualenv для более удобной работы и устанавливается отдельно.
Благодаря этому пакету мы сможем запускать ваши окружения так:
Для Windows нужно установить следующий пакет:
Для Linux нужно так же использовать sudo:
Настройки для Linux
Virtualenvwrapper хранит все окружения в одном месте. Это место определяется через переменную WORKON_HOME в Linux и по умолчанию равно директории ‘/home/пользователь/.virtualenvs’. Если вы хотите изменить это расположение — выполните команду экспорта с нужным путем:
Следующая команда добавит скрипты в домашний каталог для удобной работы:
При выполнении предыдущей команды у меня появилась ошибка:
virtualenvwrapper.sh: There was a problem running the initialization hooks. If Python could not import the module virtualenvwrapper.hook_loader
Она исправилась добавлением переменной в env с путем до нужного интерпретатора:
Настройки для Windows
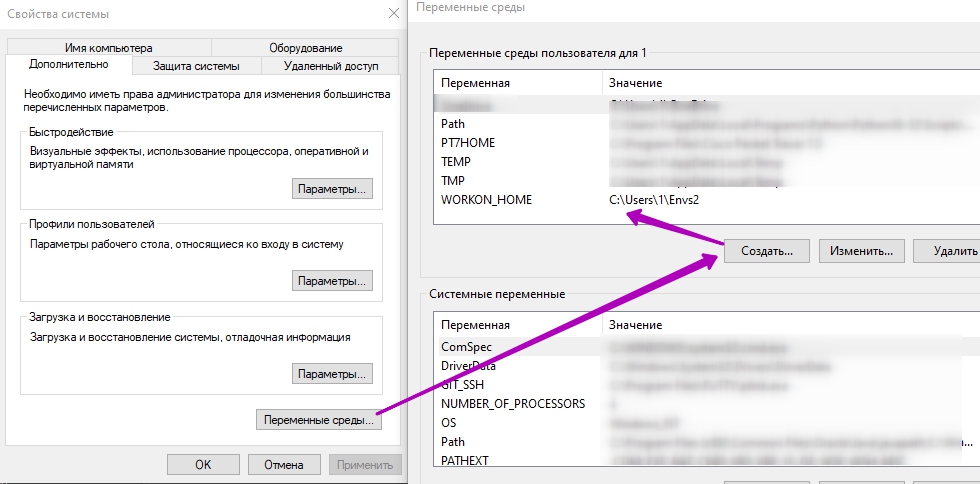
Все виртуальные среды, которые будут созданы, по умолчанию будут располагаться по пути «C:\Users\%USERNAME%\Envs». Если вам нужно изменить расположение, то создайте переменную WORKON_HOME с нужной директорией:
Важный момент, в случае с Windows, команды virtualenvwrapper не будут выполняться Powershell. Команды работают только через CMD.
Основные команды
Далее мы можем использовать следующие команды (основные):
- mkvirtualenv — создание окружения;
- lsvirtualenv — отображение списка окружений;
- rmvirtualenv — удаление;
- workon — переключение между виртуальными средами;
- deactivate — выход из текущего окружения.
Так мы создадим виртуальную среду:

Так выйдем из созданной среды:

Если нужно использовать другую версию Python:
Создание виртуальных сред со встроенным пакетом Python venv
Ранее, до версии Python >= 3.6 базовая установка интерпретатора шла вместе с пакетом pyenv, но на данный момент он считается устаревшим и более не поддерживается. На его смену пришел venv. В некоторых версиях ОС (Ubuntu/Debian) может потребоваться его отдельная установка:
Проверить, то что пакет venv установлен, можно так:

Следующая команда создаст виртуальную среду:
Выбранная версия Python и стандартные библиотеки будут скопированы в указанную папку.
Активация окружения выполняется следующим образом:
Для выхода из окружения:

Создание виртуального окружения в Pycharm
В некоторых IDE, например Pycharm, консоль встроенная и по умолчанию у вас будет запускаться интерпретатор выбранный в настройках. В Pycharm вы можете создать или изменить проект привязав его к определенному интерпретатору.
Виртуальную среду можно создать при создании нового проекта. Для этого нужно зайти по следующему пути:
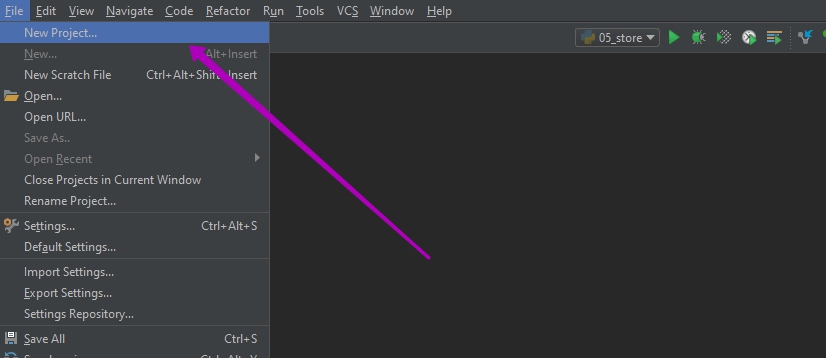
В новом окне выбрать название проекта, место для копирования, интерпретатор и нажать кнопку создания окружения:

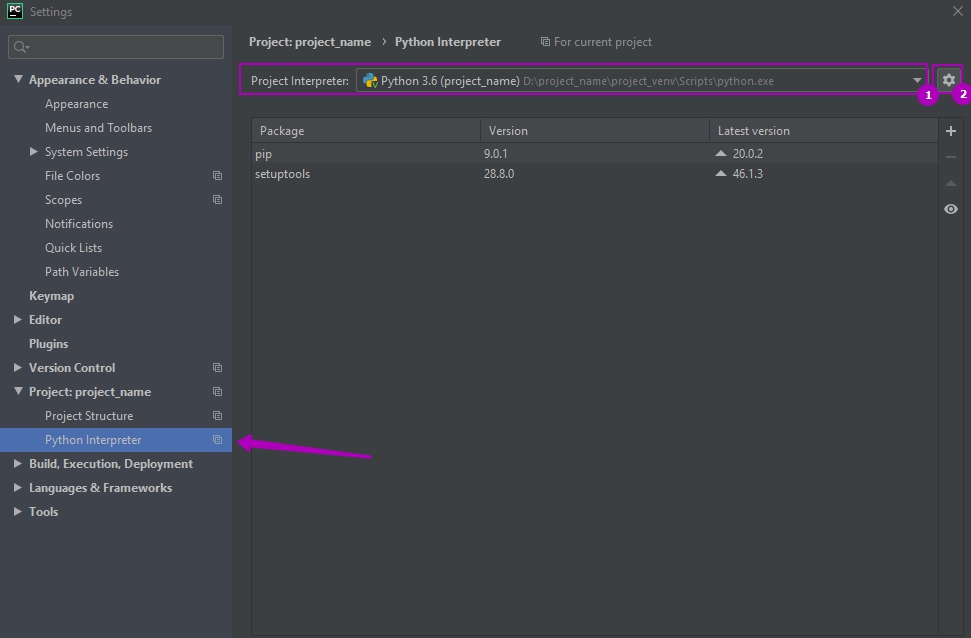
Для настройки окружения для старых проектов нужно зайти в настройки:
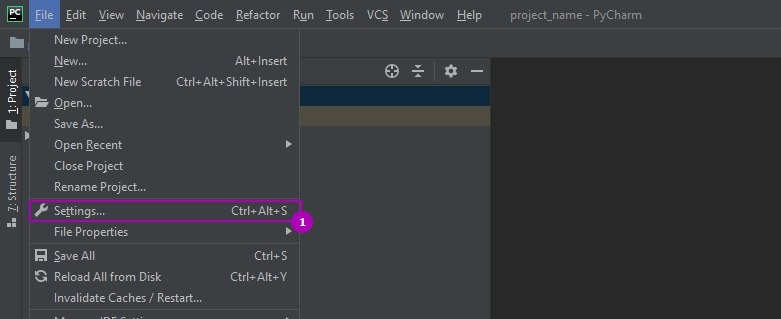
Во вкладе «Python Interpreter» будет выбор из существующих интерпретаторов (1). Либо можно создать новый (2):
Создание списка установленных пакетов Requirements.txt
Используя виртуальные окружения можно легко создавать файл, в котором будут собраны все названия и версии пакетов для определенного проекта. Этот подход используется для удобства работы, так как одной программой мы сразу установим нужные пакеты.
Так мы получим список пакетов, установленных в виртуальном окружении, в формате читаемом pip:

Следующим способом мы экспортируем этот список в файл Requirements.txt (способ подходит для Bash/CMD/Powershell):
На другом компьютере/среде мы можем этот список быстро проверить и установить отсутствующие пакеты следующей командой:


