- Create a Windows virtual machine from a Resource Manager template
- Create a virtual machine
- Connect to the virtual machine
- Next Steps
- Create Virtual Machine with Hyper-V on Windows 10
- Create a Virtual Machine with Hyper-V Manager
- Create a Virtual Machine with PowerShell
- Complete the Operating System Deployment
- Create a Virtual Machine with Hyper-V
- Windows 10 Fall Creators Update (Windows 10 version 1709)
- Windows 10 Creators Update (Windows 10 version 1703)
- Before Windows 10 Creators Update (Windows 10 version 1607 and earlier)
- Create a virtual machine in Hyper-V
- Create a virtual machine by using Hyper-V Manager
- Create a virtual machine by using Windows PowerShell
- Options in Hyper-V Manager New Virtual Machine Wizard
Create a Windows virtual machine from a Resource Manager template
Learn how to create a Windows virtual machine by using an Azure Resource Manager template and Azure PowerShell from the Azure Cloud shell. The template used in this article deploys a single virtual machine running Windows Server in a new virtual network with a single subnet. For creating a Linux virtual machine, see How to create a Linux virtual machine with Azure Resource Manager templates.
An alternative is to deploy the template from the Azure portal. To open the template in the portal, select the Deploy to Azure button.

Create a virtual machine
Creating an Azure virtual machine usually includes two steps:
- Create a resource group. An Azure resource group is a logical container into which Azure resources are deployed and managed. A resource group must be created before a virtual machine.
- Create a virtual machine.
The following example creates a VM from an Azure Quickstart template. Here is a copy of the template:
To run the PowerShell script, Select Try it to open the Azure Cloud shell. To paste the script, right-click the shell, and then select Paste:
If you choose to install and use the PowerShell locally instead of from the Azure Cloud shell, this tutorial requires the Azure PowerShell module. Run Get-Module -ListAvailable Az to find the version. If you need to upgrade, see Install Azure PowerShell module. If you’re running PowerShell locally, you also need to run Connect-AzAccount to create a connection with Azure.
In the previous example, you specified a template stored in GitHub. You can also download or create a template and specify the local path with the —template-file parameter.
Here are some additional resources:
- To learn how to develop Resource Manager templates, see Azure Resource Manager documentation.
- To see the Azure virtual machine schemas, see Azure template reference.
- To see more virtual machine template samples, see Azure Quickstart templates.
Connect to the virtual machine
The last PowerShell command from the previous script shows the virtual machine name. To connect to the virtual machine, see How to connect and sign on to an Azure virtual machine running Windows.
Next Steps
- If there were issues with the deployment, you might take a look at Troubleshoot common Azure deployment errors with Azure Resource Manager.
- Learn how to create and manage a virtual machine in Create and manage Windows VMs with the Azure PowerShell module.
To learn more about creating templates, view the JSON syntax and properties for the resources types you deployed:
Create Virtual Machine with Hyper-V on Windows 10
Learn how to create a virtual machine and install an operating system in your new virtual machine. You will need an .iso file for the operating system that you would like to run. If needed, grab an evaluation copy of Windows 10 from the TechNet Evaluation Center.
Create a Virtual Machine with Hyper-V Manager
Open Hyper-V Manager by either pressing the Window’s key and typing «Hyper-V Manager» or by finding Hyper-V Manager in your applications.
In Hyper-V Manager, click Action > New > Virtual Machine to bring up the New Virtual Machine Wizard.
Review the вЂBefore You Begin’ content and click Next.
Give the virtual machine a name.
Note: This is the name Hyper-V uses for the virtual machine, not the computer name given to the guest operating system that will be deployed inside the virtual machine.
- Choose a location where the virtual machine files will be stored such as c:\virtualmachine. You can also accept the default location. Click Next when done.

- Select a generation for the machine and click Next.
Generation 2 virtual machines were introduced with Windows Server 2012 R2 and provide a simplified virtual hardware model and some additional functionality. You can only install a 64-bit operating system on a Generation 2 virtual machine. For more information on Generation 2 virtual machines, see the Generation 2 Virtual Machine Overview.
If the new virtual machine is configured as Generation 2 and will be running a Linux distribution, secure boot will need to be disabled. For more information on secure boot, see Secure Boot.
- Select 2048 MB for the Startup Memory value and leave Use Dynamic Memory selected. Click the Next button.
Memory is shared between a Hyper-V host and the virtual machine running on the host. The number of virtual machines that can run on a single host is in part dependent on available memory. A virtual machine can also be configured to use Dynamic Memory. When enabled, dynamic memory reclaims unused memory from the running virtual machine. This allows more virtual machines to run on the host. For more information on Dynamic Memory, see the Hyper-V Dynamic Memory Overview.
On the Configure Networking wizard, select a virtual switch for the virtual machine and click Next. For more information, see Create a Virtual Switch.
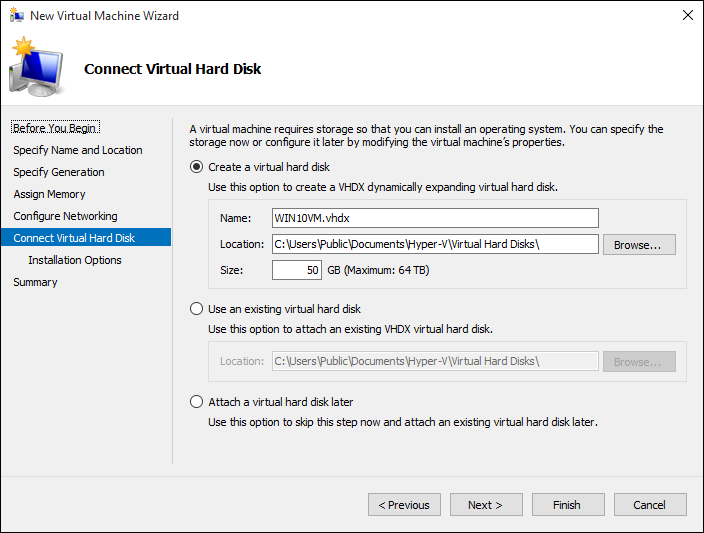
Give the virtual hard drive a name, select a location or keep the default, and finally specify a size. Click Next when ready.
A virtual hard drive provides storage for a virtual machine similar to a physical hard drive. A virtual hard drive is required so that you can install an operating system on the virtual machine.
- On the Installation Options wizard, select Install an operating system from a bootable image file and then select an operating system .iso file. Click Next once completed.
When creating a virtual machine, you can configure some operating system installation options. The three options available are:
Install an operating system later – this option makes no additional modification to the virtual machine.
Install an operating system from a bootable image file – this is similar to inserting a CD into the physical CD-ROM drive of a physical computer. To configure this option, select a .iso image. This image will be mounted to the virtual CD-ROM drive of the virtual machine. The boot order of the virtual machine is changed to boot first from the CD-ROM drive.
Install an operating system from a network-based installation server – This option is not available unless you have connected the virtual machine to a network switch. In this configuration, the virtual machine attempts to boot from the network.
- Review the virtual machine details and click Finish to complete the virtual machine creation.
Create a Virtual Machine with PowerShell
Open up the PowerShell ISE as Administrator.
Run the following script.
Complete the Operating System Deployment
In order to finish building your virtual machine, you need to start the virtual machine and walk through the operating system installation.
In Hyper-V Manager, double-click on the virtual machine. This launches the VMConnect tool.
In VMConnect, click on the green Start button. This is like pressing the power button on a physical computer. You may be prompted to вЂPress any key to boot from CD or DVD’. Go ahead and do so.
Note: You may need to click inside the VMConnect window to ensure that your keystrokes are sent to the virtual machine.
- The virtual machine boots into setup and you can walk through the installation like you would on a physical computer.

Note: Unless you’re running a volume-licensed version of Windows, you need a separate license for Windows running inside a virtual machine. The virtual machine’s operating system is independent of the host operating system.
Create a Virtual Machine with Hyper-V
Create a virtual machine and install its operating system.
We’ve been building new tools for creating virtual machines so the instructions have changed significantly over the past three releases.
Pick your operating system for the right set of instructions:
Let’s get started.
Windows 10 Fall Creators Update (Windows 10 version 1709)
In Fall Creators Update, Quick Create expanded to include a virtual machine gallery that can be launched independently from Hyper-V Manager.
To create a new virtual machine in Fall Creators Update:
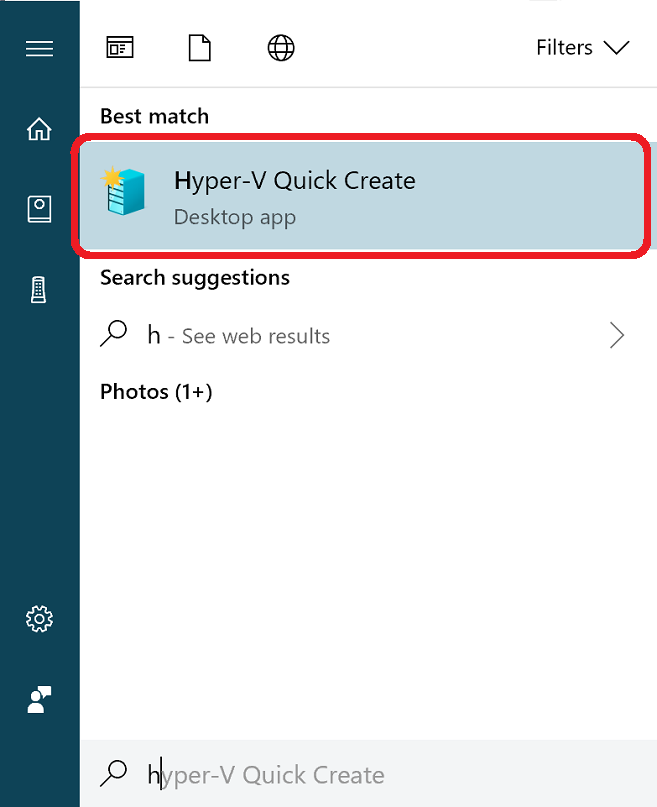
Open Hyper-V Quick Create from the start menu.
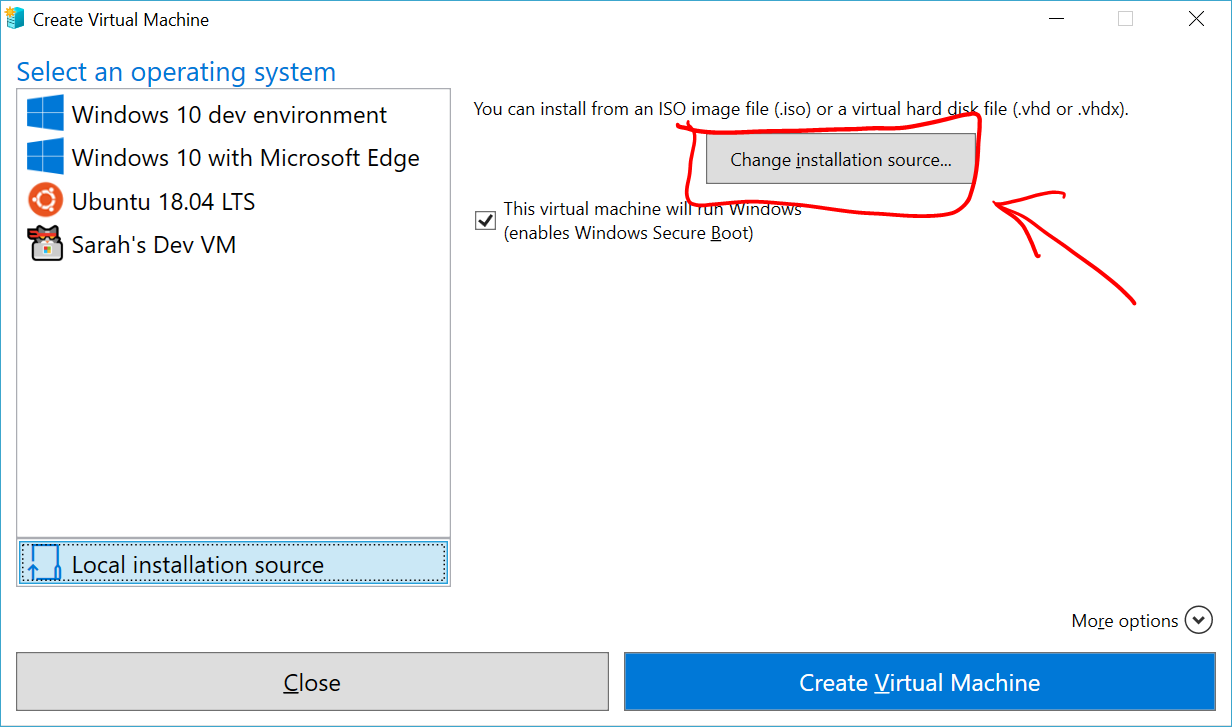
Select an operating system or choose your own by using a local installation source.

- If you want to use your own image to create the virtual machine, select Local Installation Source.
- Select Change Installation Source.

- Pick the .iso or .vhdx that you want to turn into a new virtual machine.
- If the image is a Linux image, deselect the Secure Boot option.
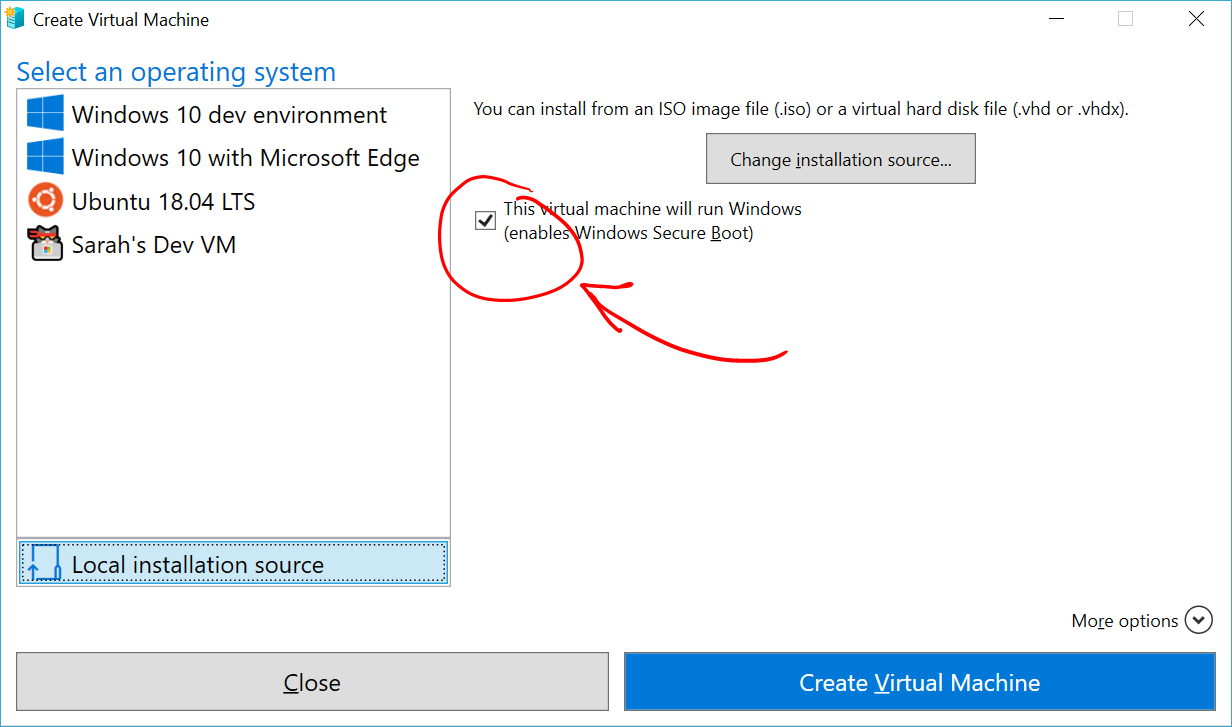
Select «Create Virtual Machine»
That’s it! Quick Create will take care of the rest.
Windows 10 Creators Update (Windows 10 version 1703)
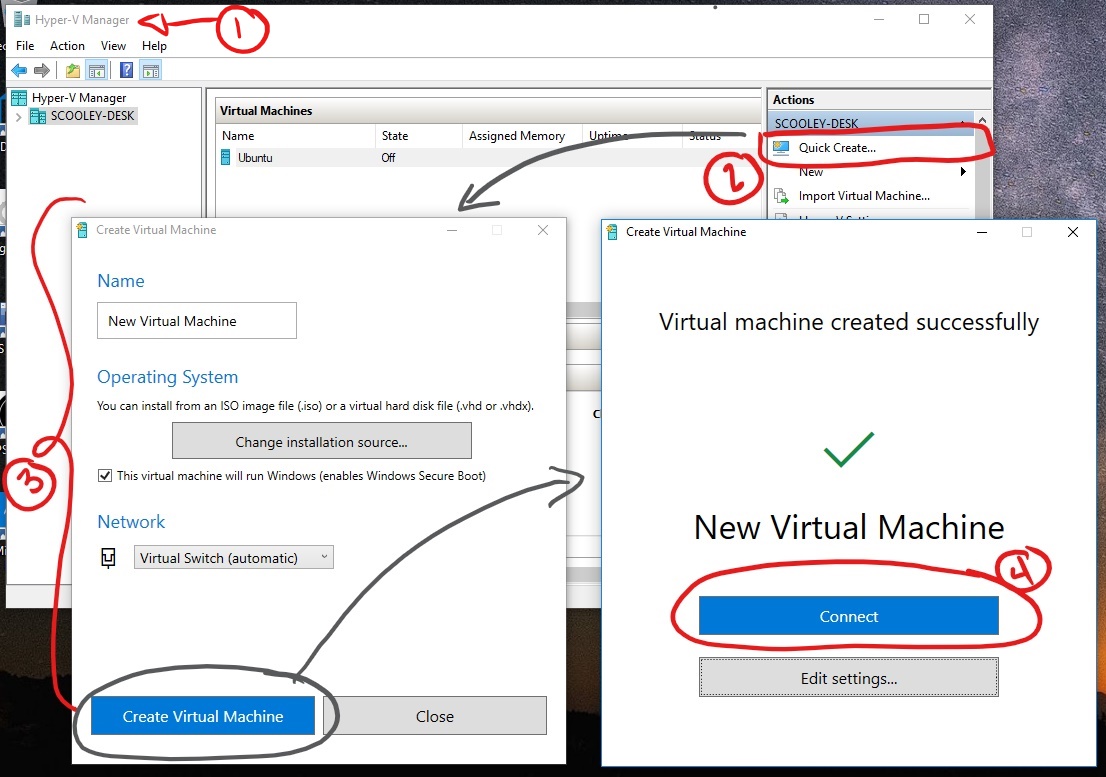
Open Hyper-V Manager from the start menu.
In Hyper-V Manager, Find Quick Create in the right hand Actions menu.
Customize your virtual machine.
- (optional) Give the virtual machine a name.
- Select the installation media for the virtual machine. You can install from a .iso or .vhdx file. If you are installing Windows in the virtual machine, you can enable Windows Secure Boot. Otherwise leave it unselected.
- Set up network. If you have an existing virtual switch, you can select in the network dropdown. If you have no existing switch, you will see a button to set up an automatic network, which will automatically configure a virtual network.
Click Connect to start your virtual machine. Don’t worry about editing the settings, you can go back and change them any time.
You may be prompted to вЂPress any key to boot from CD or DVD’. Go ahead and do so. As far as it knows, you’re installing from a CD.
Congratulations, you have a new virtual machine. Now you’re ready to install the operating system.
Your virtual machine should look something like this:
Note: Unless you’re running a volume-licensed version of Windows, you need a separate license for Windows running inside a virtual machine. The virtual machine’s operating system is independent of the host operating system.
Before Windows 10 Creators Update (Windows 10 version 1607 and earlier)
If you aren’t running Windows 10 Creators Update or later, follow these instructions using New Virtual Machine Wizard instead:
Create a virtual machine in Hyper-V
Applies To: Windows 10, Windows Server 2016, Microsoft Hyper-V Server 2016, Windows Server 2019, Microsoft Hyper-V Server 2019
Learn how to create a virtual machine by using Hyper-V Manager and Windows PowerShell and what options you have when you create a virtual machine in Hyper-V Manager.
Create a virtual machine by using Hyper-V Manager
Open Hyper-V Manager.
From the Action pane, click New, and then click Virtual Machine.
From the New Virtual Machine Wizard, click Next.
Make the appropriate choices for your virtual machine on each of the pages. For more information, see New virtual machine options and defaults in Hyper-V Manager later in this topic.
After verifying your choices in the Summary page, click Finish.
In Hyper-V Manager, right-click the virtual machine and select connect.
In the Virtual Machine Connection window, select Action > Start.
Create a virtual machine by using Windows PowerShell
On the Windows desktop, click the Start button and type any part of the name Windows PowerShell.
Right-click Windows PowerShell and select Run as administrator.
Get the name of the virtual switch that you want the virtual machine to use by using Get-VMSwitch. For example,
Use the New-VM cmdlet to create the virtual machine. See the following examples.
If you may move this virtual machine to a Hyper-V host that runs Windows Server 2012 R2, use the -Version parameter with New-VM to set the virtual machine configuration version to 5. The default virtual machine configuration version for Windows Server 2016 isn’t supported by Windows Server 2012 R2 or earlier versions. You can’t change the virtual machine configuration version after the virtual machine is created. For more information, see Supported virtual machine configuration versions.
Existing virtual hard disk — To create a virtual machine with an existing virtual hard disk, you can use the following command where,
-Name is the name that you provide for the virtual machine that you’re creating.
-MemoryStartupBytes is the amount of memory that is available to the virtual machine at start up.
-BootDevice is the device that the virtual machine boots to when it starts like the network adapter (NetworkAdapter) or virtual hard disk (VHD).
-VHDPath is the path to the virtual machine disk that you want to use.
-Path is the path to store the virtual machine configuration files.
-Generation is the virtual machine generation. Use generation 1 for VHD and generation 2 for VHDX. See Should I create a generation 1 or 2 virtual machine in Hyper-V?.
-Switch is the name of the virtual switch that you want the virtual machine to use to connect to other virtual machines or the network. See Create a virtual switch for Hyper-V virtual machines.
This creates a generation 2 virtual machine named Win10VM with 4GB of memory. It boots from the folder VMs\Win10.vhdx in the current directory and uses the virtual switch named ExternalSwitch. The virtual machine configuration files are stored in the folder VMData.
New virtual hard disk — To create a virtual machine with a new virtual hard disk, replace the -VHDPath parameter from the example above with -NewVHDPath and add the -NewVHDSizeBytes parameter. For example,
New virtual hard disk that boots to operating system image — To create a virtual machine with a new virtual disk that boots to an operating system image, see the PowerShell example in Create virtual machine walkthrough for Hyper-V on Windows 10.
Start the virtual machine by using the Start-VM cmdlet. Run the following cmdlet where Name is the name of the virtual machine you created.
Connect to the virtual machine by using Virtual Machine Connection (VMConnect).
Options in Hyper-V Manager New Virtual Machine Wizard
The following table lists the options you can pick when you create a virtual machine in Hyper-V Manager and the defaults for each.
| Page | Default for Windows Server 2016 and Windows 10 | Other options |
|---|---|---|
| Specify Name and Location | Name: New Virtual Machine. Location: C:\ProgramData\Microsoft\Windows\Hyper-V\. | You can also enter your own name and choose another location for the virtual machine. This is where the virtual machine configuration files will be stored. |
| Specify Generation | Generation 1 | You can also choose to create a Generation 2 virtual machine. For more information, see Should I create a generation 1 or 2 virtual machine in Hyper-V?. |
| Assign Memory | Startup memory: 1024 MB Dynamic memory: not selected | You can set the startup memory from 32MB to 5902MB. You can also choose to use Dynamic Memory. For more information, see Hyper-V Dynamic Memory Overview. |
| Configure Networking | Not connected | You can select a network connection for the virtual machine to use from a list of existing virtual switches. See Create a virtual switch for Hyper-V virtual machines. |
| Connect Virtual Hard Disk | Create a virtual hard disk Location: C:\Users\Public\Documents\Hyper-V\Virtual Hard Disks\ |


