- Как создать загрузочный USB для Windows 10 в Linux
- Сделать загрузочную Windows 10 USB на Linux
- 1] Во-первых, вам нужно установить WoeUSB
- 2] Приступить к созданию загрузочного USB
- How to Create a Windows 10 Installer USB from Linux
- Formatting your USB stick
- Create a Windows 10 USB Installer on Debian 10 using dd
- Create a Windows 10 USB Installer on Debian 10 using UNebootin
- Related articles:
- About the author
- David Adams
- How to Easily Create Windows 10 Bootable USB on Ubuntu or Any Linux Distro
- What you need
- Download Windows 10 ISO
- Creating a Windows 10 Bootable USB for UEFI Firmware
- Boot Windows 10 ISO Installer without USB (BIOS & UEFI)
- Creating a Windows 10 Bootable USB for Legacy BIOS Using WoeUSB
- How to Use WoeUSB From the Command Line
Как создать загрузочный USB для Windows 10 в Linux
Вы все в значительной степени знакомы с процедурой создания загрузочного носителя Windows 10 на компьютерах с операционной системой Windows. В этом посте мы покажем вам процедуру создания загрузочного USB / CD с Windows 10 на компьютерах с операционной системой Linux.
Все слишком известный процесс создания загрузочного USB / CD с Windows 10 с помощью Media Creation Tool (MCT) работает только в операционной системе Microsoft, Windows 10. Следовательно, необходимо показать вам, как выполнить то же действие на компьютере с Linux.
Некоторые могут спросить, действительно ли этот учебник необходим. Ответ на этот вопрос — да. Эта процедура для создания загрузочного носителя Windows 10 на компьютере с Linux будет полезна, если, например, ваш рабочий компьютер с Windows 10 упаковывается, и вам нужно подготовить другой компьютер на лету, но все компьютеры, к которым у вас есть доступ, — все Машины Linux, на которых вы не можете создать загрузочный носитель Windows 10 обычным способом. Итак, это ценные технические ноу-хау, которые вы должны иметь в своем наборе.
Сделать загрузочную Windows 10 USB на Linux
Для успешного создания загрузочного USB для Windows 10 в Linux вам потребуется следующее;
- Флешка
- Компьютер под управлением ОС Linux
- Windows 10 ISO
- WoeUSB, простой инструмент, который позволяет вам создать свой собственный установщик Windows USB-накопитель из образа ISO или реального DVD.
Примечание . Если вы загружаетесь в устаревшем режиме (BIOS) и эта процедура не работает, вместо создания загрузочного USB-устройства используйте загруженный ISO-образ и запишите его на DVD-диск, а затем продолжите загрузку компьютера с Windows 10 с него. после того, как вы убедились, что сначала установите BIOS для загрузки с DVD-привода.
1] Во-первых, вам нужно установить WoeUSB
Если вы используете Ubuntu или дистрибутив на основе Ubuntu, такой как Linux Mint , сначала добавьте PPA с помощью следующей команды:
Если вы получили сообщение о том, что «add-apt-repository» не найден, перейдите к установке с помощью следующей команды:
Затем снова запустите указанную выше команду « add-apt-repository ».
Если следующая команда « apt install woeusb » не работает, потому что она не может найти пакет, сделайте это вручную, используя следующую команду:
Затем установите WoeUSB с помощью этой команды:
В Fedora установите с помощью команды:
На OpenSUSE вы можете получить WoeUSB отсюда.
2] Приступить к созданию загрузочного USB
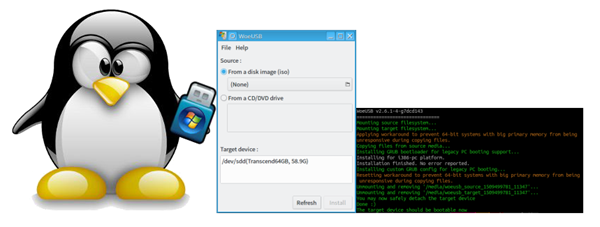
Подключите USB и запустите WoeUSB GUI из меню запуска. Если вы не можете найти его там, вызовите его с помощью этой команды:
Если на вашем USB-устройстве есть файловая система, она будет автоматически смонтирована операционной системой. Откройте браузер файлов и размонтируйте его, нажав на стрелку извлечения рядом с ним.
Теперь выберите поле в поле « Из образа диска (iso)» и перейдите в папку, в которую вы загрузили ISO-образ Windows.
Далее в разделе « Файловая система» выберите переключатель для NTFS .
Наконец, в разделе «Целевое устройство» нажмите на свое USB-устройство.
Нажмите «Установить» и дождитесь завершения процесса. Не закрывайте приложение и не извлекайте USB-устройство, пока не получите сообщение об успешном завершении операции.
И вот как вы можете создать загрузочный USB для Windows 10 на компьютере с Linux.
Источник
How to Create a Windows 10 Installer USB from Linux
Formatting your USB stick
This step is only necessary for users using the dd technique without additional space on their USB devices, if you are using the graphical method to create a booteable USB stick with UNebootin or have enough space for the Windows installer on an used USB stick you can omit this step.
To begin, before plugging in the USB device check the current disks attached to your computer by running:
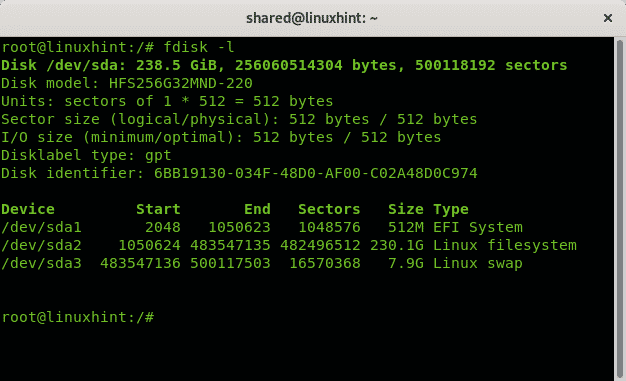
As you see in the output above the only device is /dev/sda with 3 partitions, /dev/sda1, /dev/sda2 and /dev/sda3. Now plug in your USB stick into your computer and run fdisk again:
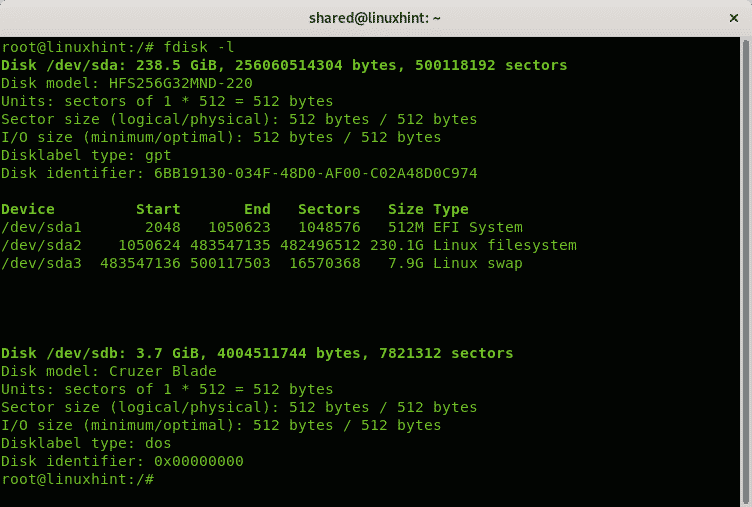
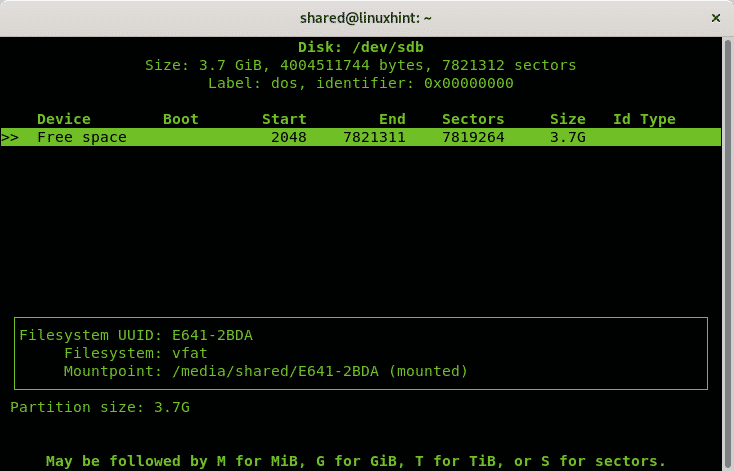
You can see the new device /dev/sdb model Cruzer Blade of 3.7GB, that’s the pendrive on which Windows installer will be installed.
Since it is a small USB disk, I will format it to guarantee space for Windows, the dd command we’ll use to copy the ISO image to the pendrive won’t remove existing information on it, this step is not mandatory and if you have a big pendrive with existing information and available space you can omit it leaving all the data together inside the disk.
If you want to proceed with the format, before formatting the pendrive run:
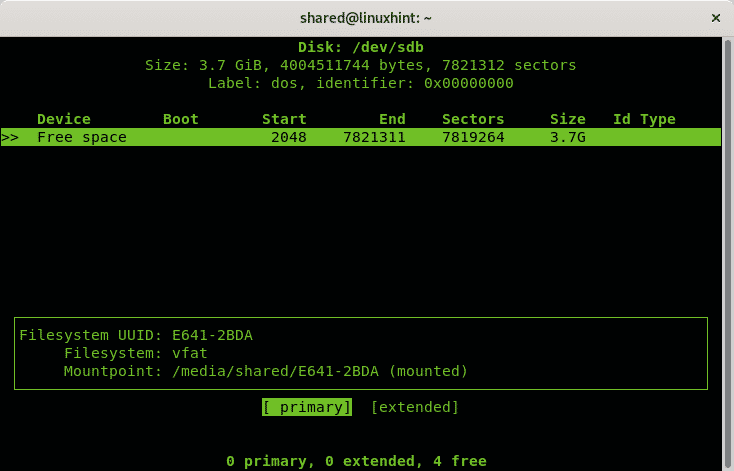
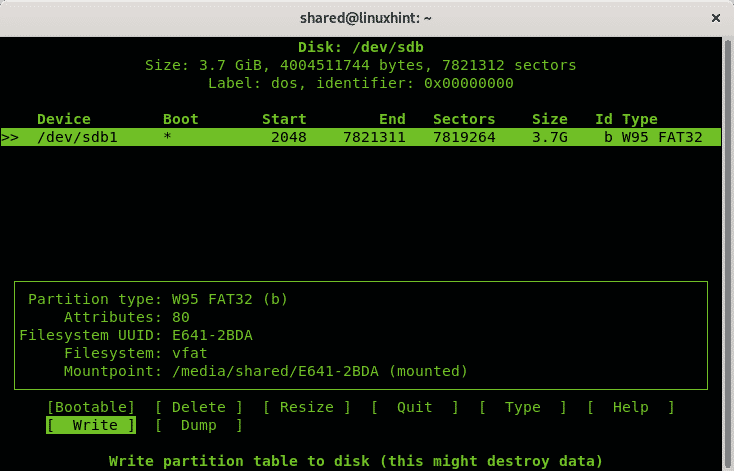
Once started cfdisk will show the chosen disk (sdb in my case) and the existing partitions, in my case all the space is free. To create a FAT 32 partition select NEW and press ENTER.
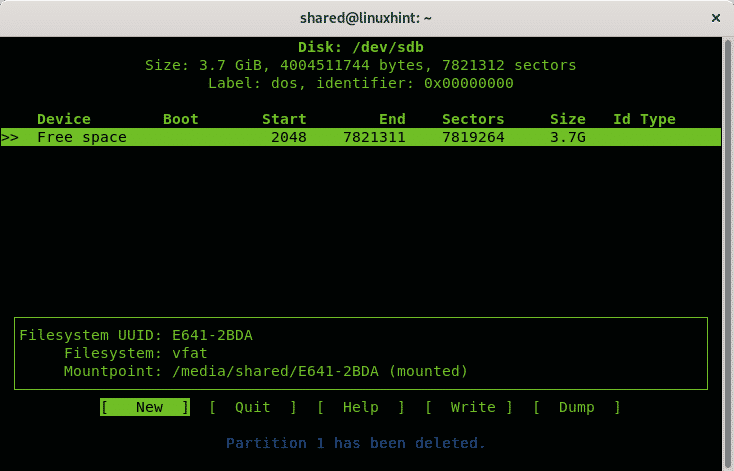
Select the space for the fat partition, you can leave the entire disk, press ENTER.
Then select primary and press ENTER again.
Once back in the main menu select the option TYPE and press ENTER.
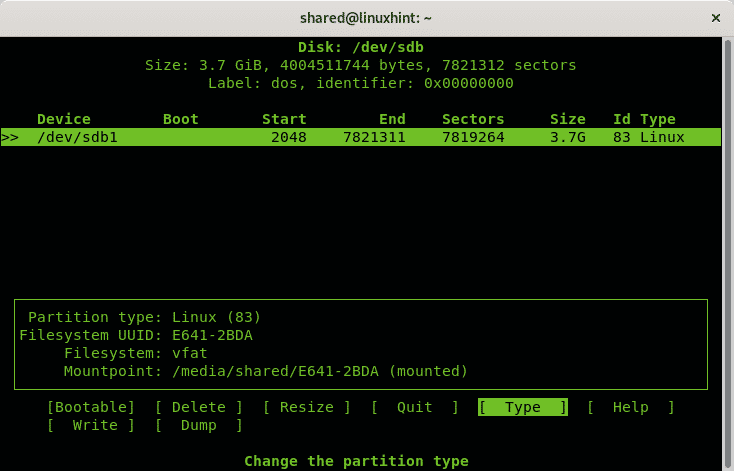
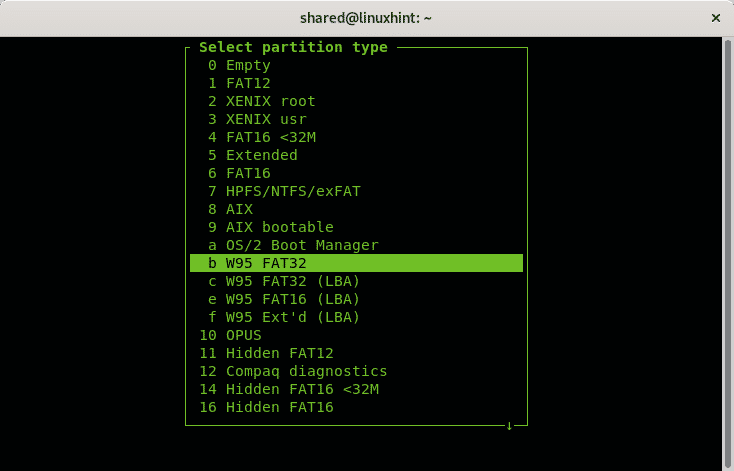
Select the option “b W95 FAT 32” and press ENTER.
In the main menu select “Booteable” and press ENTER.

Finally press on “Write” to save all changes on the USB drive.
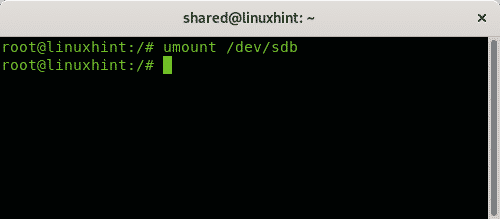
Now umount the disk by running:
Once unmounted to format the USB stick creating a FAT filesystem run:
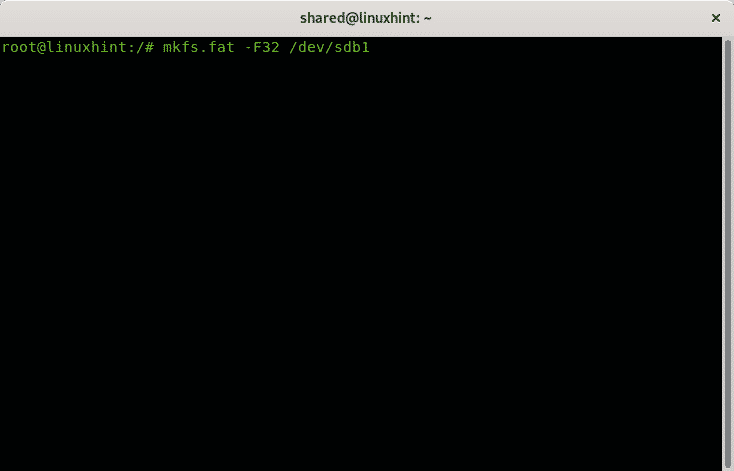
Depending on your device the process may take a while, once finished it will let you know the process ended successfully.
Create a Windows 10 USB Installer on Debian 10 using dd
should be replaced for your Windows ISO image path and for your device letter.
In my case I run:

Where:
bs: read and write bytes
if: reads the indicated file as origin
of: writes the indicated file as destination
conv=fdatasync: assures the data will be written in destination before the operation ends.
status=progress: will show progress in real time, otherwise dd doesn’t show progress.
At the end of the process the program will let you know the operation ended successfully.

NOTE: when you reboot your computer to boot make sure your BIOS is configured to boot from the USB stick or press the proper key to allow selecting the boot device on boot.
Create a Windows 10 USB Installer on Debian 10 using UNebootin
While the previous method is the recommended there is a graphical option for users who dislike the text mode, the software explained in this tutorial is UNebootin and it is available for Linux, Windows and Mac at https://unetbootin.github.io/linux_download.html.
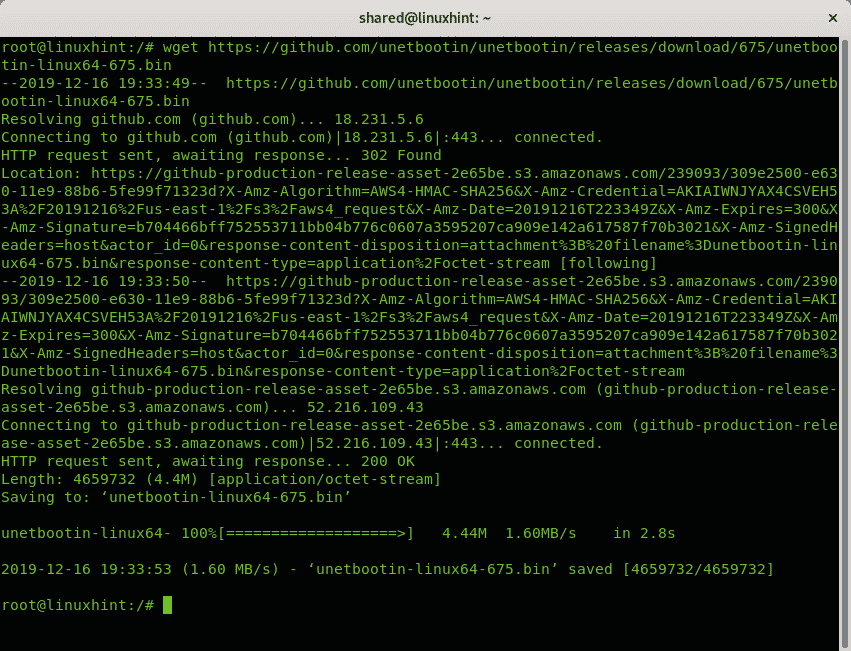
To download the 64x version you can use wget, run:
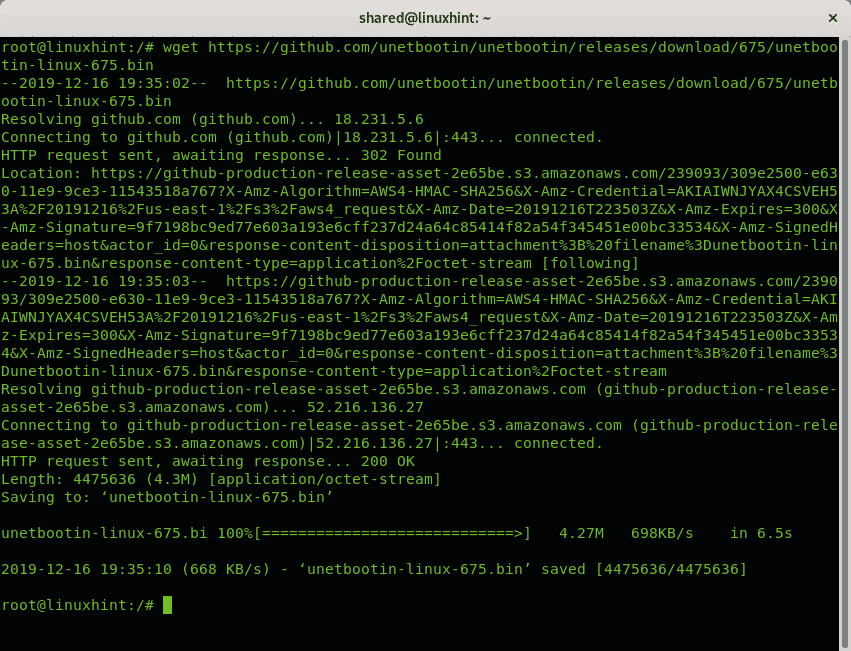
To download the 32x version using wget run:
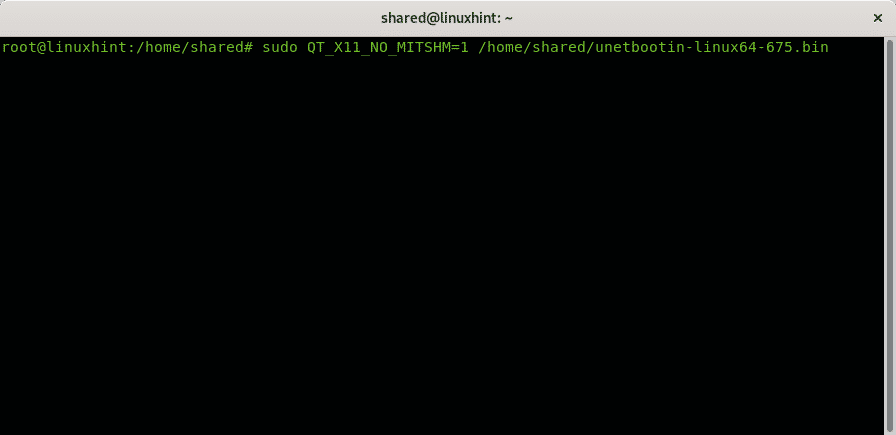
In my case I got the 64 bits version, once downloaded you need to give execution rights to the file by running:

Then as normal user run
And as root run:
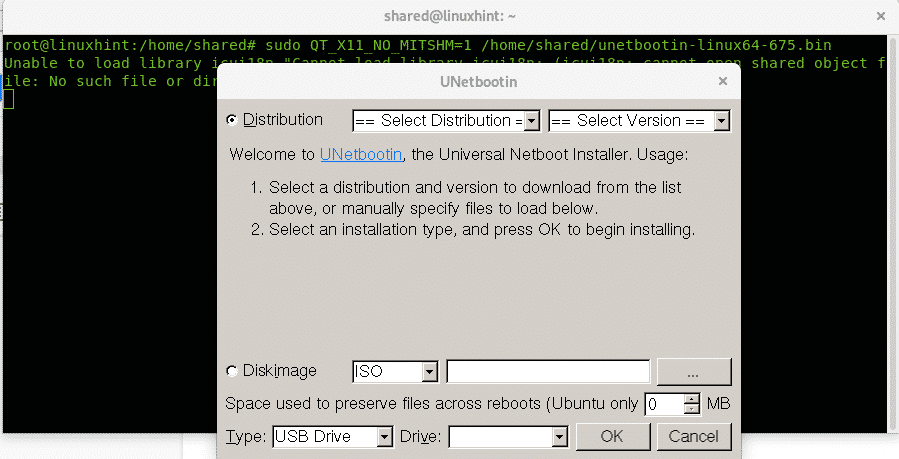
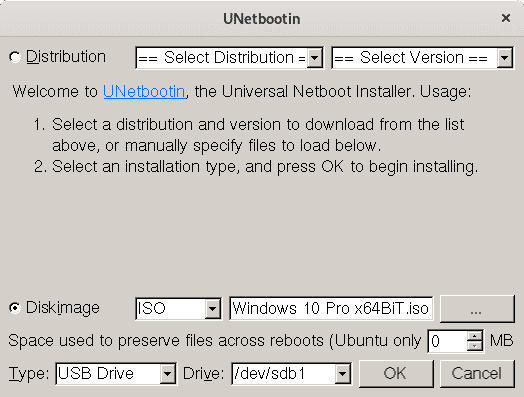
UNetbootin will prompt, unselect “Distribution” and instead select “Disk Image” and select your ISO’s path, the disk type and the drive:
The process may take several minutes showing the steps of the image below: 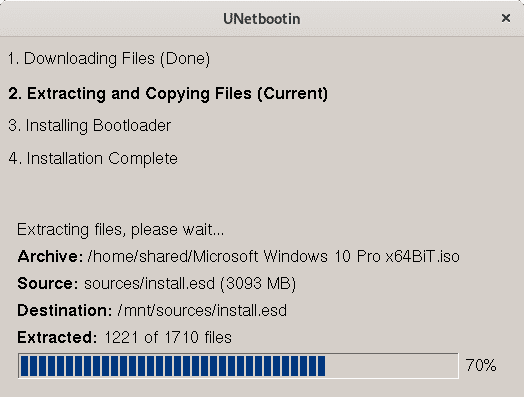
Once finished you can reboot as instructed in the final screen:
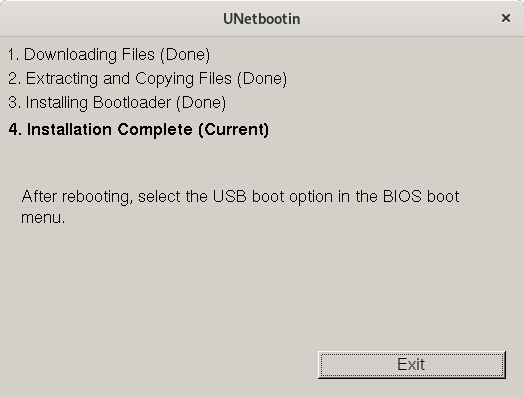
Now you can reboot your system, make sure your BIOS is configured to boot from USB devices.
I hope you found this brief tutorial on Windows booteable USB sticks useful, thank you for reading it and consider using LinuxHint support channel in case you need help with any of the steps described above or any Linux or networking related issue.
Keep following LinuxHint for additional updates and tips on Linux and Networking.
Related articles:
About the author
David Adams
David Adams is a System Admin and writer that is focused on open source technologies, security software, and computer systems.
Источник
How to Easily Create Windows 10 Bootable USB on Ubuntu or Any Linux Distro
This tutorial is going to show you an easy way to create a Windows 10 bootable USB on Linux. I use Ubuntu 20.04 as an example. The method applies to any Linux distribution. I use Windows to do online banking because my bank doesn’t support Linux and sometimes play games that can’t run on Linux.
What you need
- A computer running Linux
- A USB flash drive at least 8GB
- Windows 10 ISO
Download Windows 10 ISO
First, you should download Windows 10 ISO from Microsoft official download link. Note that you might not be able to download the ISO from this link on a Windows computer. This download link is visible to users on Linux computer. Once downloaded, follow the instructions below.
Note: It’s recommended to download the Windows 10 April 2018 update ISO, because the October Update ISO contains a file that is larger than 4GB, which can not be copied to a FAT32 partition.

Update: Microsoft doesn’t allow you to download the Windows 10 April 2018 Update ISO from their website anymore. You can download the ISO via this link: Win10 1803 English x64 ISO
Creating a Windows 10 Bootable USB for UEFI Firmware
This method works for UEFI firmware and is very simple. You create a GUID partition table on your USB stick, create a FAT32 file system on it, and then mount Windows 10 ISO image and copy those Windows 10 files to your USB stick and you are done. The following is a step-by-step guide.
First, install GParted partition editor on your Linux distribution. Ubuntu users run the following command.
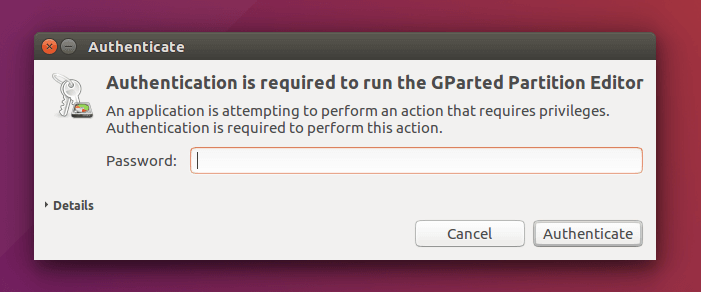
Then insert your USB stick to your computer. Make sure you back up important files in your USB stick if there’s any. Next, launch Gparted. You will need to enter your password in order to use GParted.
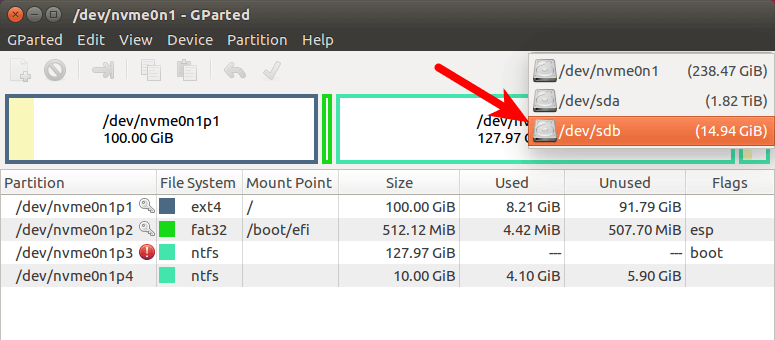
Select your USB stick from the drop-down menu on the upper-right corner. My USB stick is /dev/sdb . Yours may be different.
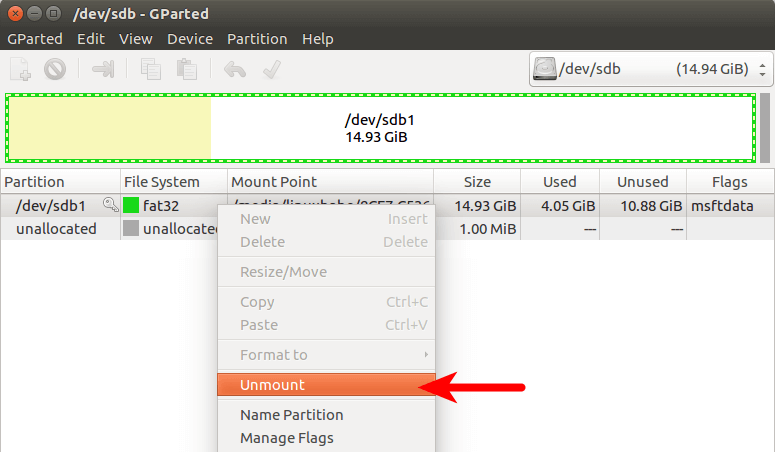
If there’s a key icon after the partition name, that means the partition is mounted. Make sure all partitions on your USB stick are unmounted. To unmount a partition, simply right-click on it and select unmount.
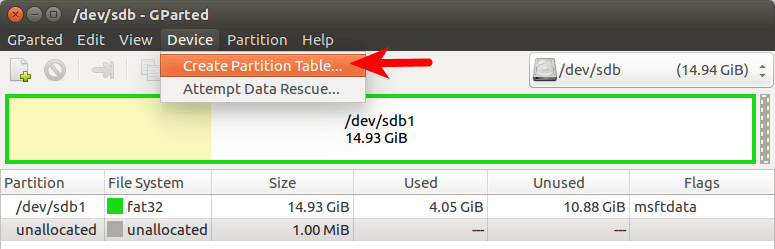
Next, on the menu bar, select Device > Create partition table.
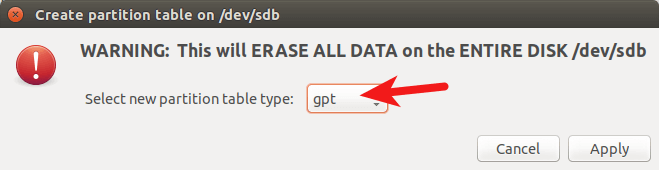
Choose GPT as the partition table type and click Apply.
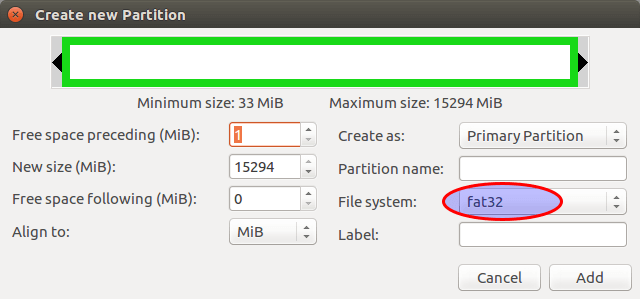
Then right-click on the unallocated space and select New to create a new partition.

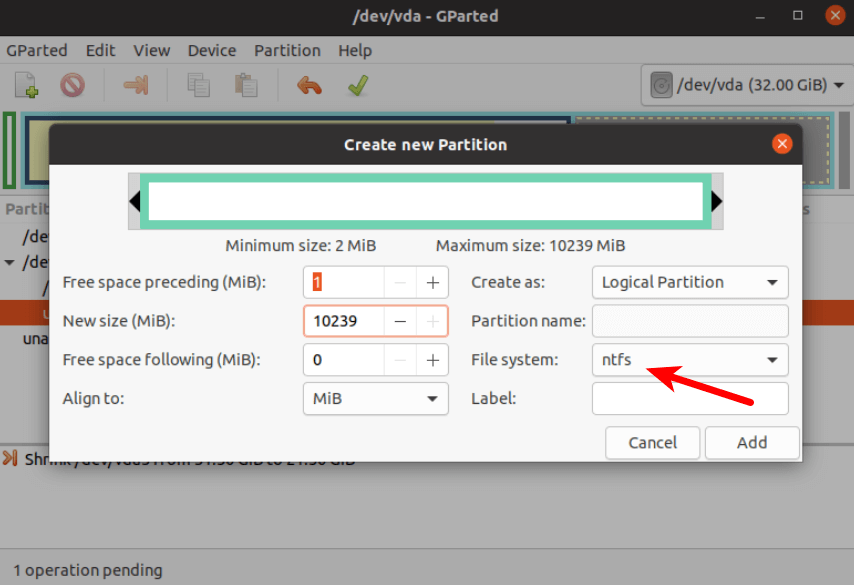
Change file system type from ext4 to fat32 and click Add.
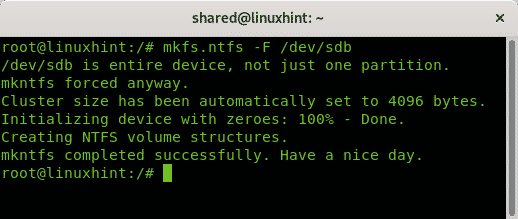
Note: The install.wim file in Windows 10 October 2018 update ISO is 4.1G, so if you downloaded this ISO image, you need to change ext4 to ntfs . If you downloaded Windows 10 April 2018 Update ISO, which contains a 3.9G size install.wim file, you can change ext4 to fat32
Update: It is my observation that my NTFS formatted USB stick isn’t bootable on my old laptop, which was bought in 2012. However, it is bootable on my desktop computer, which was bought in 2017. It has a graphical UEFI firware (I can use my mouse to configure firmware settings).
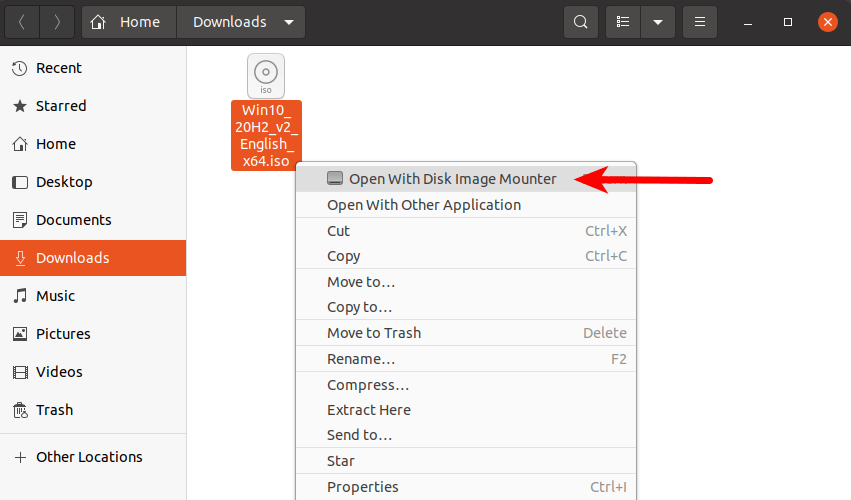
Next, click the green check button on the toolbar to apply this operation. Once that’s done, close GParted (This is important), then find your Windows 10 ISO in file manager. Open it with disk image mounter.
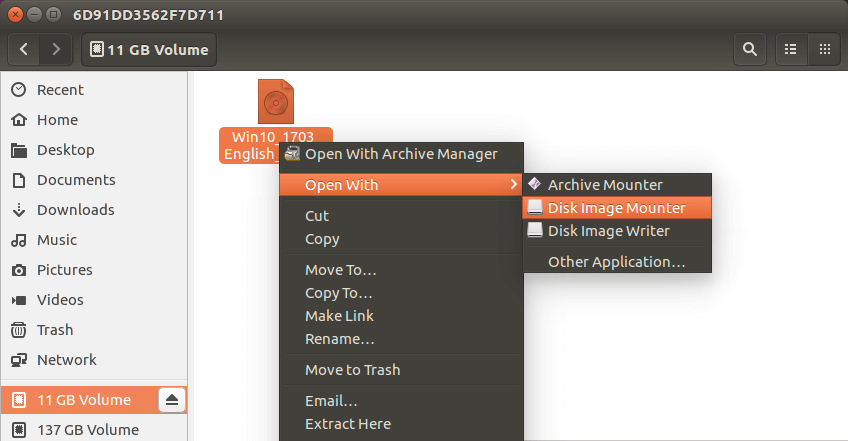
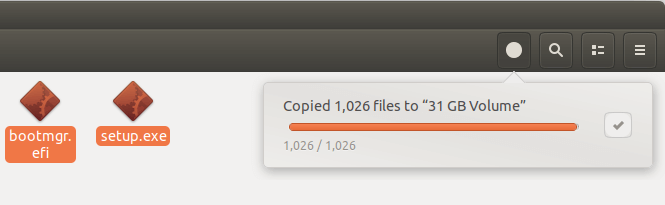
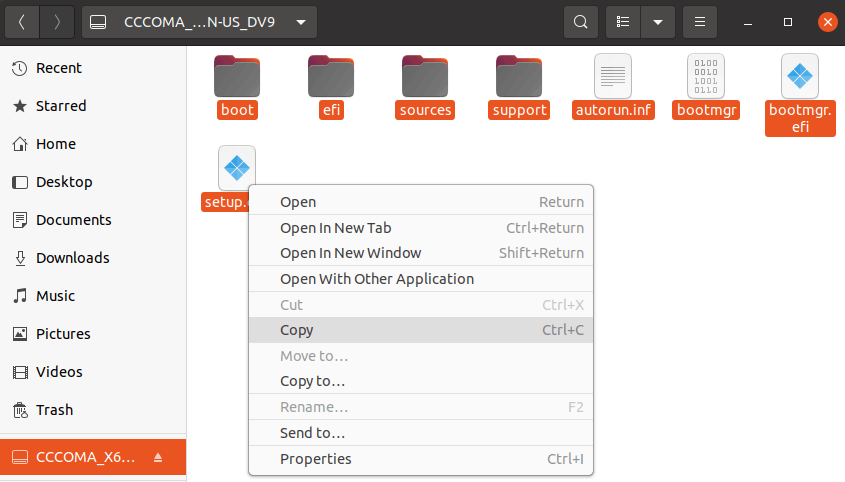
Open the mounted file system. Select all files and folders and copy them to your USB stick.
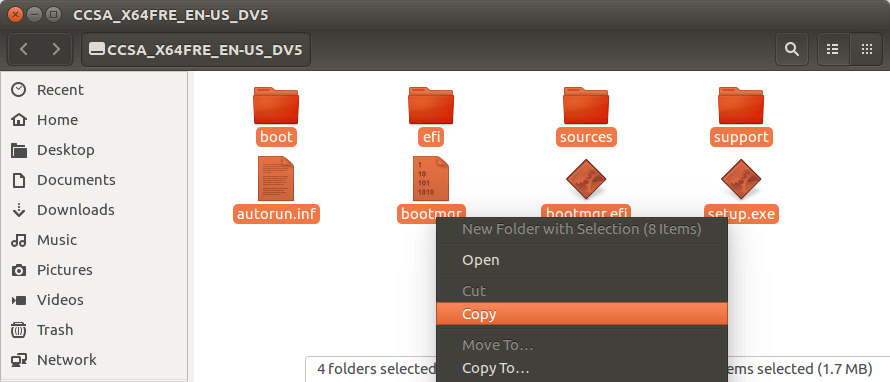
Sometimes the file manager on Ubuntu hangs and it seems that the copy operation has stopped. Actually it’s working, just be patient. When you see a check mark, it means the copy operation has finished.
If your file manager doesn’t have the Disk image mounter in the context menu, then you can use the following commands to mount. The first command will create a mount point for Windows 10 ISO and the second command will mount Windows 10 ISO under that mount point.
Now in your file manager, go to /mnt/windows10/ and copy all files and folders to your USB stick.
Once the file and folders are copied, your windows 10 bootable USB is created! You can shut down your computer, boot it from this USB stick and install Windows 10 in UEFI mode. Keep in mind that you may need to disable compatibility support module (CSM) in the firmware in order to boot in UEFI mode. You may also need to remove USB stick from your computer and insert it back in order for the firmware to detect the boot loader on your USB stick.
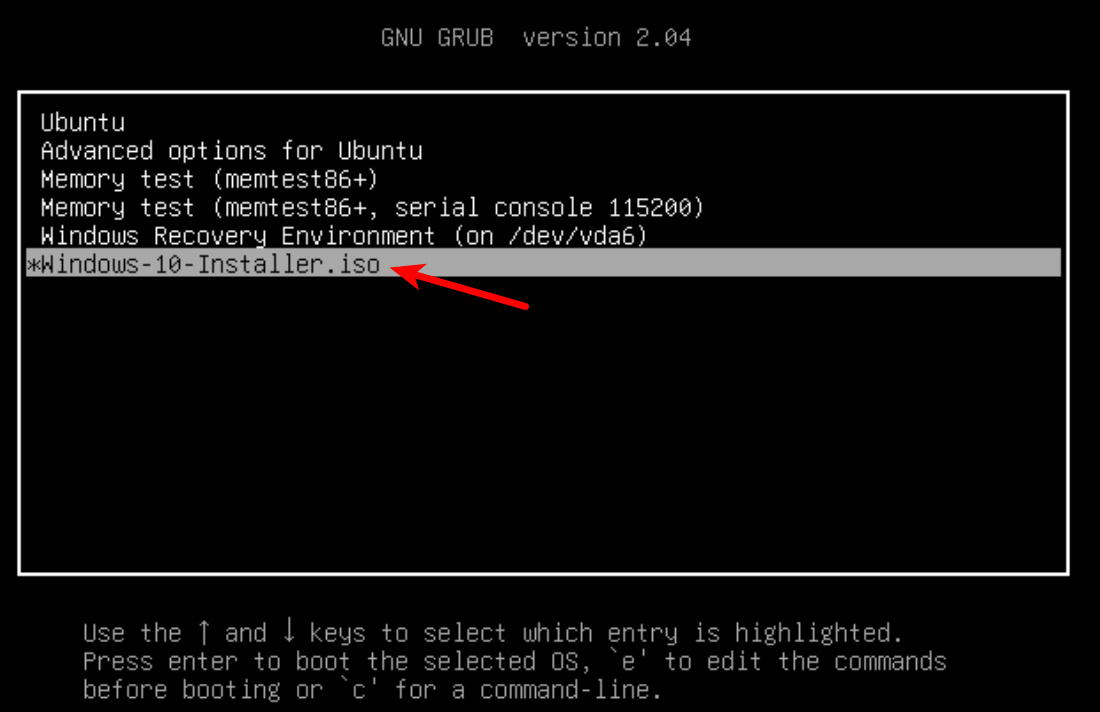
Boot Windows 10 ISO Installer without USB (BIOS & UEFI)
Ever wondered if you can boot Windows 10 ISO installer without a USB flash drive? Yes, you can do it with GRUB2, which is the standard boot loader on Linux.
GRUB2 can not boot Windows 10 ISO directly. You need to create a separate NTFS partition on your hard disk or SSD with a partition editor like GParted and extract the Windows 10 ISO to that partition. Download the Windows 10 ISO file. The latest Windows 10 ISO file is 5.8G. The new NTFS partition should be at least 7G and it should not be used to store any other files.
Then find your Windows 10 ISO in file manager. Open it with disk image mounter.
Open the mounted file system. Select all files and folders and copy them to the NTFS partition.
Sometimes the file manager on Ubuntu hangs and it seems that the copy operation has stopped. Actually, it’s working. Just be patient. When you see a checkmark, it means the copy operation has finished.
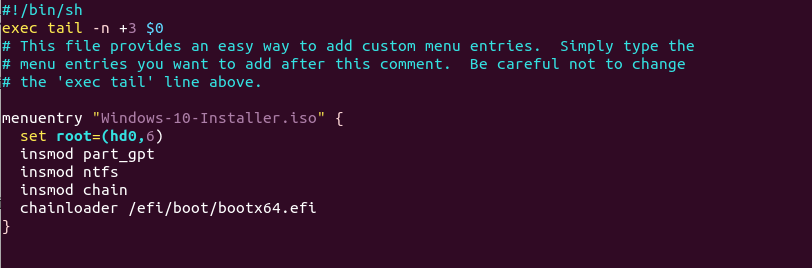
Next, open up a terminal window and edit the /etc/grub.d/40_custom file with a text editor such as Nano.
In this file, we can add custom entries to the GRUB boot menu. In this case, we want to add an entry to boot the Windows 10 installer. If your computer still uses the traditional BIOS firmware, then add the following lines in this file.
My NTFS partition is the 6th partition on my first disk, so I use (hd0,6) as the root. You can run sudo parted -l command to check your NTFS partition number. If your computer has multiple hard drives, use the drivemap command to set the partition (hd0,6) as the first hard disk, so Windows will be able to boot.
If your computer uses UEFI firmware, then add the following text in this file.
Save and close the file. (Press Ctrl+O , then press Enter to save a file in Nano text editor. Press Ctrl+X to exit.)
Then update GRUB boot menu.
Next, set GRUB to boot the Windows 10 installer for the next boot with the following command.
Unplug all your external USB storage devices, then reboot your computer. GRUB will choose the Windows 10 installer.
GRUB2 can also boot Linux ISO files stored on the hard drive, so you don’t need to create Linux live USB.
Creating a Windows 10 Bootable USB for Legacy BIOS Using WoeUSB
WoeUSB is a fork of WinUSB. Both of them are open-source software (licensed in GPL) for making Windows bootable USB sticks on Linux platform, but the latter hasn’t been updated since 2012. You may be wondering why it’s named WoeUSB. The author said it’s a GNU convention to abbreviate software that support Windows to “woe”.
To install WoeUSB on Ubuntu 14.04/16.04/17.04, you can use the following PPA. Simply open up a terminal window and run the following commands one by one. Other Linux distro users can compile this software by following the instructions on the Github project page.
This PPA contains many other software. If you don’t need them, you can now remove this PPA from your system.
You can launch WoeUSB from Unity Dash or your application menu.
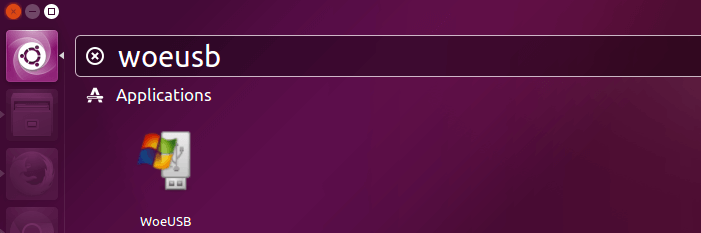
You can also start it from command line with:
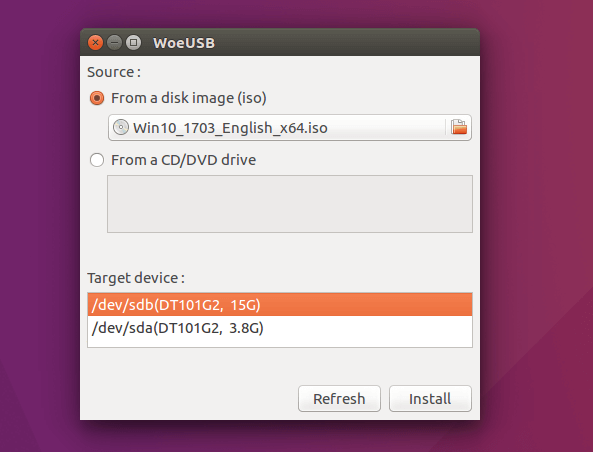
It’s very easy to use the WoeUSB GUI. Select Windows ISO image and your target USB device. Make sure your data on the USB device is backed up before hitting the Install button.
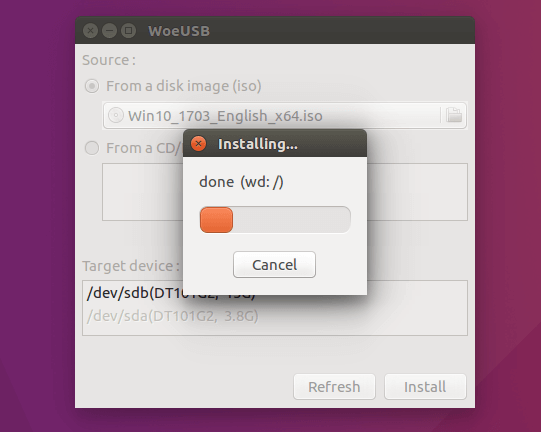
Then wait for the installation to complete.
Once done, you can use the bootable USB to install Windows 10 on your computer.
How to Use WoeUSB From the Command Line
First, find the device name of your USB stick using the following command.
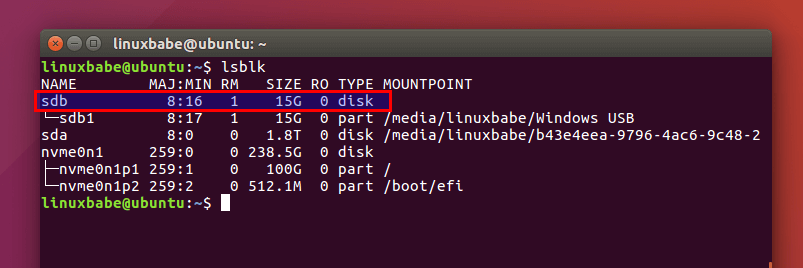
Mine is /dev/sdb . Make sure your USB is unmounted with the following command. Replace /dev/sdb1 with your own partition name.
Then create a bootable Windows 10 USB like below. Red texts shoudl be adapted to your own ISO file name and USB device name. The -v (—verbose) option will give more detailed output.
In my test, the Windows 10 USB created with WoeUSB can boot in both legacy and UEFI mode on my old computer. On my new computer, it can boot in legacy mode but failed in UEFI mode. I don’t know the exact reason, but it’s probably because of bug in this software.
That’s it! I hope this tutorial helped you create windows 10 bootable USB on Ubuntu or any Linux distribution. As always, if you found this post useful, then subscribe to our free newsletter to get new tutorials.
Источник


