- Create a Bootable USB Flash Drive
- To create a bootable USB flash drive
- Создание загрузочного USB-устройства флэш-памяти Create a Bootable USB Flash Drive
- Создание загрузочного USB-устройства флэш-памяти To create a bootable USB flash drive
- 3 Methods to Create Bootable USB Windows 10 [Full Guide]
- Why create a bootable USB in Windows 10?
- 3 Methods to make a bootable USB drive for Window 10
- 1. Create bootable USB Windows 10 via CMD
- 2. Make bootable Win 10 USB via Windows USB/DVD Download Tool
- 3. Make bootable USB via MediaCreationTool
- Further study: create bootable USB to run Win 10 from flash drive
- Summary
Create a Bootable USB Flash Drive
Applies To: Windows Server 2016 Essentials, Windows Server 2012 R2 Essentials, Windows Server 2012 Essentials
You can create a bootable USB flash drive to use to deploy Windows Server Essentials. The first step is to prepare the USB flash drive by using DiskPart, which is a command-line utility. For information about DiskPart, see DiskPart Command-Line Options.
To create a bootable USB flash drive for use in recovering or reinstalling Windows on a PC instead of a server, see Create a recovery drive.
For additional scenarios in which you may want to create or use a bootable USB flash drive, see the following topics:
To create a bootable USB flash drive
Insert a USB flash drive into a running computer.
Open a Command Prompt window as an administrator.
In the new command line window that opens, to determine the USB flash drive number or drive letter, at the command prompt, type list disk , and then click ENTER. The list disk command displays all the disks on the computer. Note the drive number or drive letter of the USB flash drive.
At the command prompt, type select disk , where X is the drive number or drive letter of the USB flash drive, and then click ENTER.
Type clean , and the click ENTER. This command deletes all data from the USB flash drive.
To create a new primary partition on the USB flash drive, type create partition primary , and then click ENTER.
To select the partition that you just created, type select partition 1 , and then click ENTER.
To format the partition, type format fs=ntfs quick , and then click ENTER.
If your server platform supports Unified Extensible Firmware Interface (UEFI), you should format the USB flash drive as FAT32 rather than as NTFS. To format the partition as FAT32, type format fs=fat32 quick , and then click ENTER.
Type active , and then click ENTER.
Type exit , and then click ENTER.
When you finish preparing your custom image, save it to the root of the USB flash drive.
Создание загрузочного USB-устройства флэш-памяти Create a Bootable USB Flash Drive
Область применения: Windows Server 2016 Essentials, Windows Server 2012 R2 Essentials, Windows Server 2012 Essentials Applies To: Windows Server 2016 Essentials, Windows Server 2012 R2 Essentials, Windows Server 2012 Essentials
Вы можете создать загрузочный USB-накопитель, который будет использоваться для развертывания Windows Server Essentials. You can create a bootable USB flash drive to use to deploy Windows Server Essentials. Первым этапом является подготовка USB-устройства флэш-памяти с помощью служебной программы командной строки DiskPart. The first step is to prepare the USB flash drive by using DiskPart, which is a command-line utility. Сведения о DiskPart см. в статье Параметры командной строки DiskPart. For information about DiskPart, see DiskPart Command-Line Options.
Сведения о создании загрузочного флэш-накопителя USB для использования при восстановлении или переустановке Windows на компьютере вместо сервера см. в разделе Создание диска восстановления. To create a bootable USB flash drive for use in recovering or reinstalling Windows on a PC instead of a server, see Create a recovery drive.
Дополнительные сценарии, в которых вам может понадобиться создание или использование загрузочного USB-устройства флэш-памяти, см. в следующих темах: For additional scenarios in which you may want to create or use a bootable USB flash drive, see the following topics:
Создание загрузочного USB-устройства флэш-памяти To create a bootable USB flash drive
Вставьте USB-устройство флэш-памяти в работающий компьютер. Insert a USB flash drive into a running computer.
Откройте окно командной строки с правами администратора. Open a Command Prompt window as an administrator.
Введите diskpart . Type diskpart .
В открывшемся новом окне командной строки введите list disk , чтобы указать номер загрузочного USB-устройства флэш-памяти или букву диска, затем нажмите клавишу ВВОД. In the new command line window that opens, to determine the USB flash drive number or drive letter, at the command prompt, type list disk , and then click ENTER. Команда list disk отображает все диски компьютера. The list disk command displays all the disks on the computer. Запишите номер диска или букву диска USB-устройства флэш-памяти. Note the drive number or drive letter of the USB flash drive.
В командной строке введите select disk , где X — номер диска или букву диска USB-устройства флэш-памяти, а затем нажмите клавишу ВВОД. At the command prompt, type select disk , where X is the drive number or drive letter of the USB flash drive, and then click ENTER.
Введите clean и нажмите клавишу ВВОД. Type clean , and the click ENTER. Эта команда удаляет все данные с USB-устройства флэш-памяти. This command deletes all data from the USB flash drive.
Чтобы создать новый основной раздел на USB-устройстве флэш-памяти, введите create partition primary , и нажмите клавишу ВВОД. To create a new primary partition on the USB flash drive, type create partition primary , and then click ENTER.
Чтобы выбрать созданный раздел, введите select partition 1 и нажмите клавишу ВВОД. To select the partition that you just created, type select partition 1 , and then click ENTER.
Чтобы отформатировать раздел, введите format fs=ntfs quick и нажмите клавишу ВВОД. To format the partition, type format fs=ntfs quick , and then click ENTER.
Если серверная платформа поддерживает Единый интерфейс EFI (UEFI), следует отформатировать USB-устройство флэш-памяти в файловой системе FAT32, а в NTFS. If your server platform supports Unified Extensible Firmware Interface (UEFI), you should format the USB flash drive as FAT32 rather than as NTFS. Чтобы отформатировать раздел в файловой системе FAT32, введите format fs=fat32 quick и нажмите клавишу ВВОД. To format the partition as FAT32, type format fs=fat32 quick , and then click ENTER.
Введите active и нажмите клавишу ВВОД. Type active , and then click ENTER.
Введите exit и нажмите клавишу ВВОД. Type exit , and then click ENTER.
После завершения подготовки настраиваемого образа сохраните его в корневом каталоге USB-устройства флэш-памяти. When you finish preparing your custom image, save it to the root of the USB flash drive.
3 Methods to Create Bootable USB Windows 10 [Full Guide]
Here, we collect three different methods to help you create bootable USB in Windows 10 easily and effectively.

By Emily  / Last Updated June 10, 2020
Why create a bootable USB in Windows 10?
In most cases, when the Windows 10 operating system goes wrong and the PC starts to run slowly or even stop working properly, your first move will be searching online for a solution. If lucky, you can get an effective solution to fix this issue. If not, the last resort should be reinstalling the operating system from the DVD or CD. What if your PC does not have an optical drive, or the original installation DVD is not available any longer?
In this situation, a bootable USB installer is a great alternative, which allows you to reinstall Windows 10 from a USB drive. Briefly, the USB stick is portable and compatible with nearly all desktops or laptops. After all, a USB port can be found on every PC. Besides, installing OS from USB drive is also quicker than from DVD or CD. Therefore, more and more users like to make a bootable USB installer to keep handy.
3 Methods to make a bootable USB drive for Window 10
In this part, we would like to share 3 different methods with you to make a bootable USB flash drive so that you can install OS more flexibly. Without any further ado, let’s get started.
Note: no matter which method you will choose finally, please ensure you have a copy of the required files stored in USB stick because it will be erased in the process. Free AOMEI Backupper is recommended for this backup task.
1. Create bootable USB Windows 10 via CMD
First of all, we will demonstrate how to make a bootable USB using Command Prompt. Download the Windows 10 ISO files from the official site and make sure the USB flash drive has at least 5GB free space.
Step 1. Press “Win+R” at the same time to open “Run” dialogue. Input “cmd” and hit on “Enter” key.
Step 2. When the Command Prompt window opens, type “diskpart” and press “Enter” to launch DiskPart.exe tool. Then execute the following command in sequence.
в–ёlist disk
в–ёselect disk #
в–ёclean
в–ёcreate partition primary
в–ёselect partition 1
▸format fs=ntfs quick (To create UEFI bootable USB, format it as FAT32 with command “format fs=fat32 quick” instead)
в–ёactive
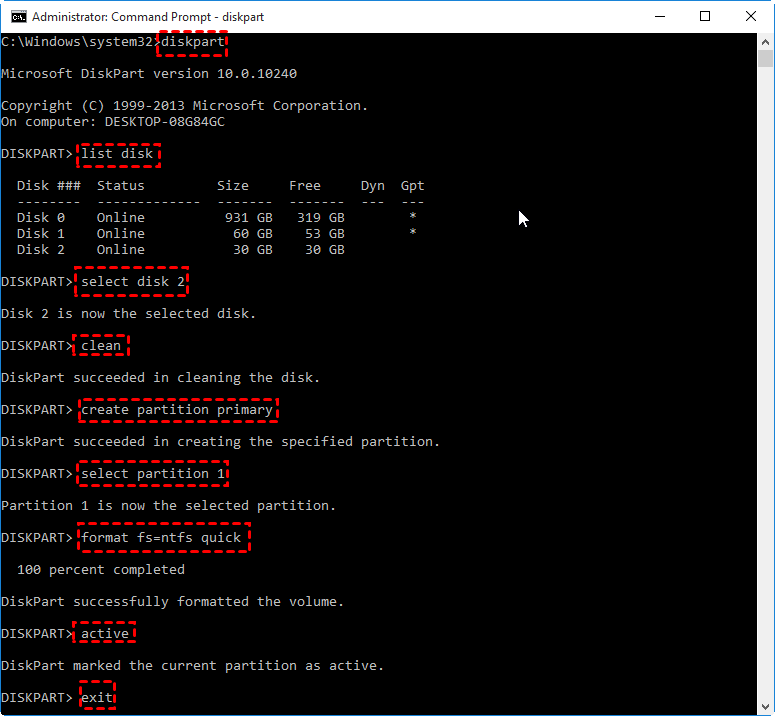
After you format the USB flash drive and set the primary partition as active, type “Exit” to close the diskpart.exe. Then use File Explorer to copy and paste the entire contents of the Windows ISO to the USB flash drive.
What if file copy fails?
If the Windows image file is over than 4GB, surpassing the file size limit of FAT32 file system, you will fail to copy files onto the USB flash drive. Once it happens, do as below:
1. Copy everything except the Windows image file (sources\install.wim) to the USB drive (either drag and drop, or use the following command, where D: is the mounted ISO and F: is the USB flash drive.)
robocopy D: F: /s /max:3800000000
2. Split the Windows image file into smaller files, and copy them onto the USB drive:
Dism /Split-Image /ImageFile:D:\sources\install.wim /SWMFile:F:\sources\install.swm /FileSize:3800
2. Make bootable Win 10 USB via Windows USB/DVD Download Tool
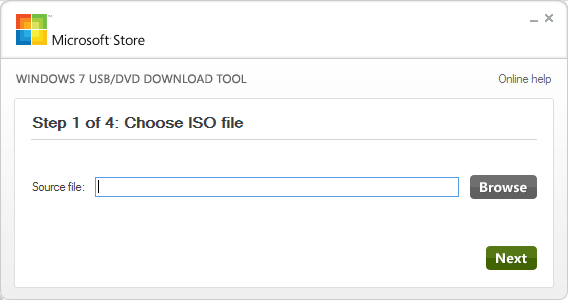
Secondly, you can make use of the Windows USB/DVD Download Tool. It can create a copy of ISO files onto USB flash drive as an installer.
Step 2. Run it. In the Source box, type the name and path of your Windows ISO file, or click BROWSE and select the file from the OPEN dialog box. Click “Next”.
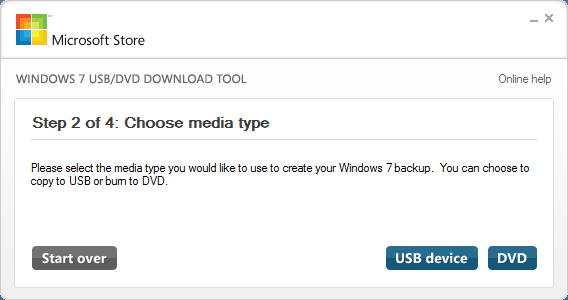
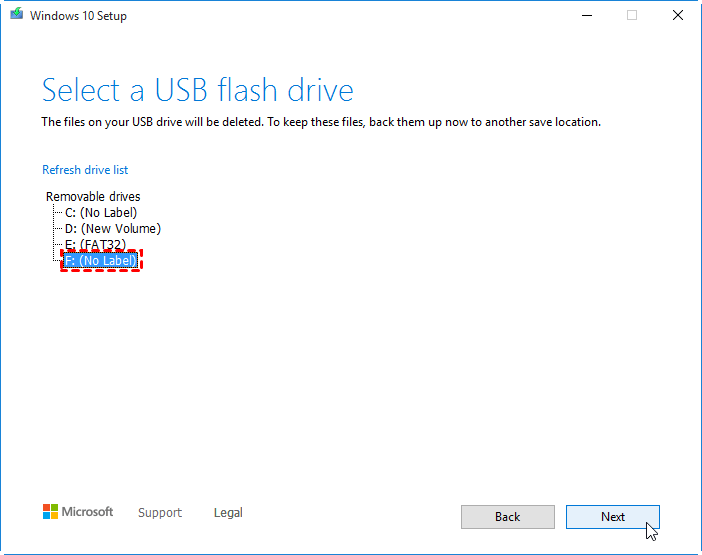
Step 3. Select USB DEVICE to create a copy on a USB flash drive.
Step 4. Choose your USB drive and click “Begin copying”.
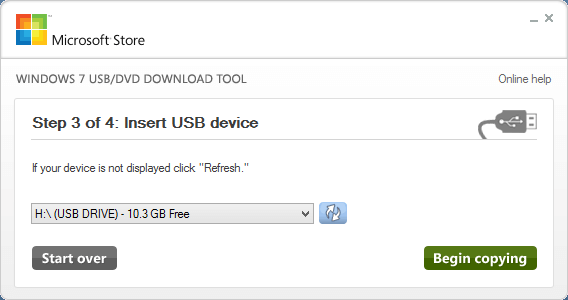
After it is finished, install Windows by moving to the root folder of your USB drive, and then double-click Setup.exe.
3. Make bootable USB via MediaCreationTool
Considering that most users tend to use MediaCreationTool, so here we also illustrate how to use this tool to create bootable USB in Windows 10.
Step 1. Download MediaCreationTool and run it as an administrator.
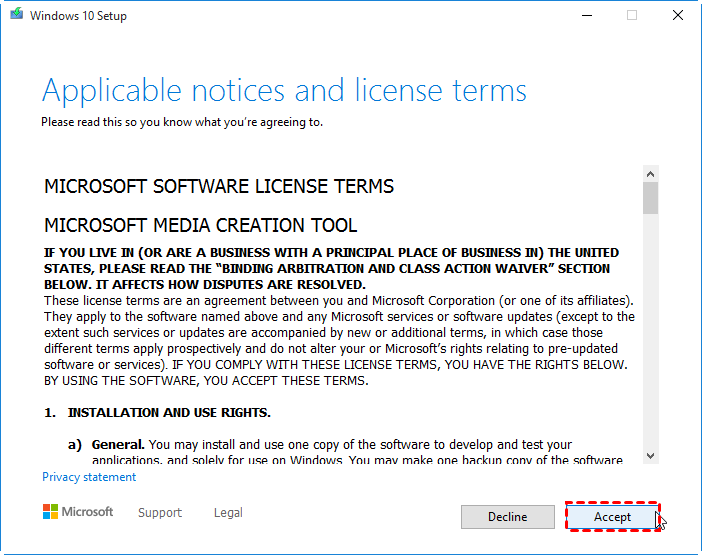
Step 2. Select ”Accept” in the license terms screen.
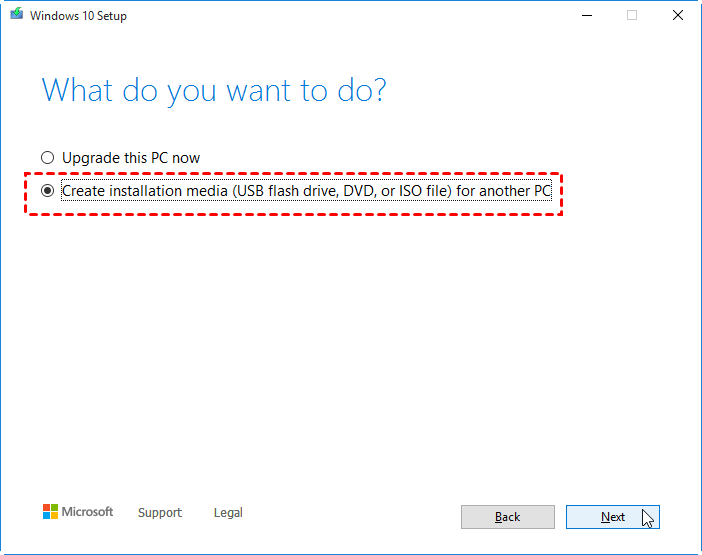
Step 3. Select “Create installation media for another PC”, and then select Next.
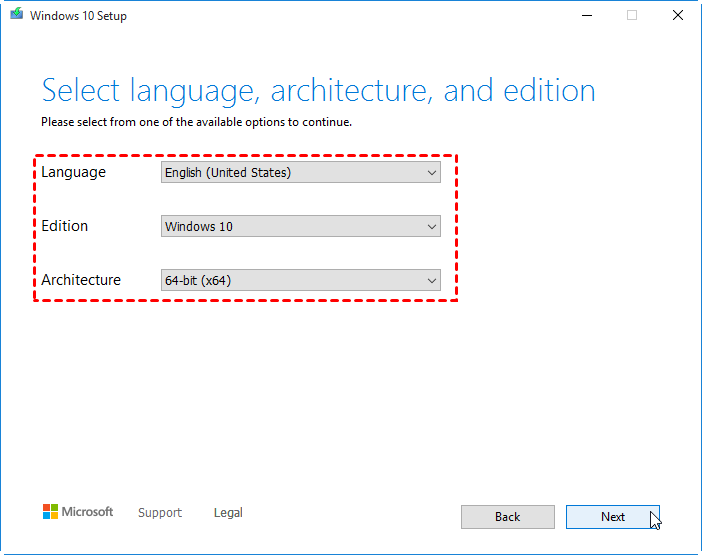
Step 4. Choose the language, edition, and architecture (64-bit or 32-bit) for Windows 10.
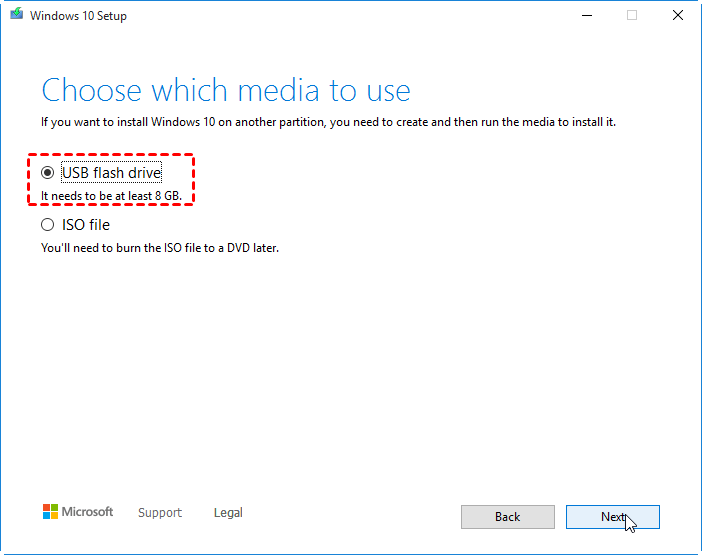
Step 5. Choose ”USB flash drive” and click “Next”.
Step 6. Choose your prepared USB drive from the list, then ”Next”.
Step 7. Once done, the tool will start to download the latest Windows 10 installation files to your device.
When it is over, this data is written to your flash drive and the USB is made bootable with the newest Windows 10 setup.
Further study: create bootable USB to run Win 10 from flash drive
Above content is all about how to make a bootable USB stick to install OS. If you do that for running Windows 10 operating system on another computer with an older operating system, you can run Windows 10 directly through a bootable USB drive. For this purpose, you can turn to the free partition manager: AOMEI Partition Assistant Standard. It is compatible with all editions of Windows 10/8/7 and Windows XP/Vista. With it, you can create Windows bootable USB drive with ISO files. Below is the detailed instruction:
Step 1. Download the freeware, install and run AOMEI Partition Assistant Standard.
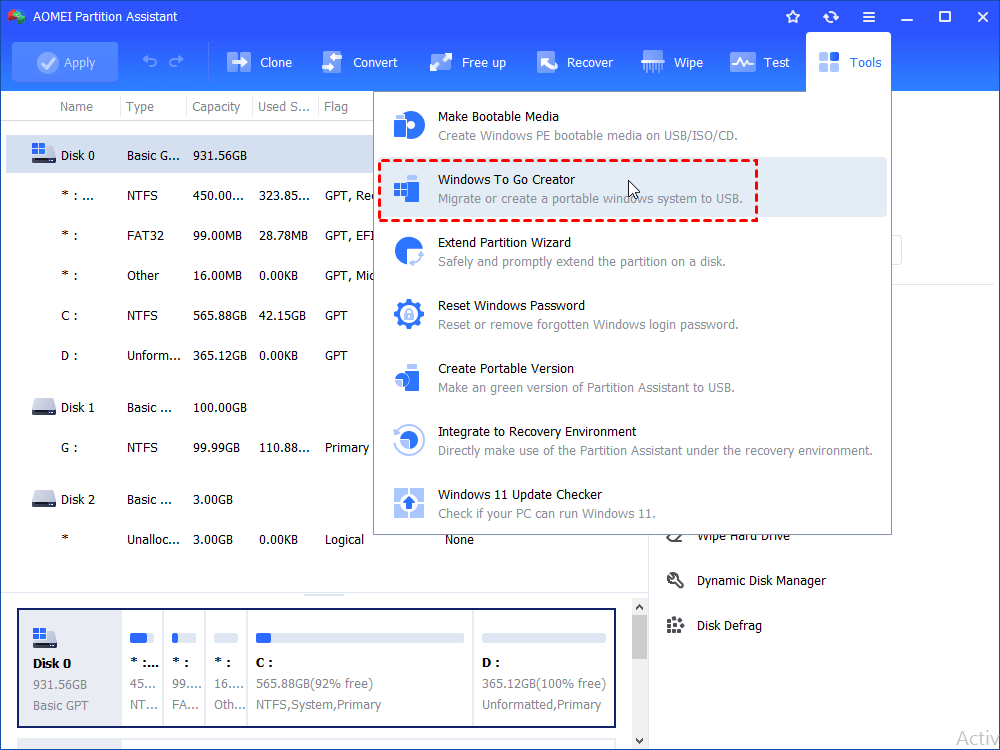
Step 2. Click “All Tools” > “Windows To Go Creator” on the left side.
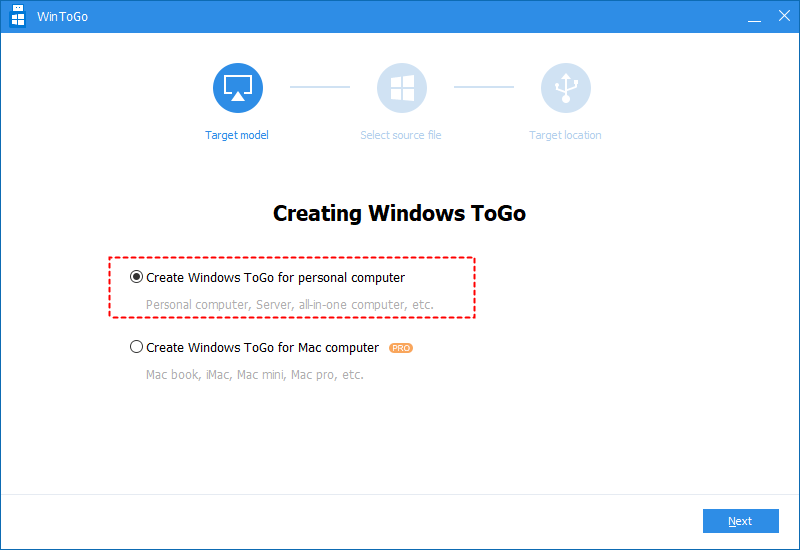
Step 3. Tick “Create Windows ToGo for personal computer”, and then click “Next”.
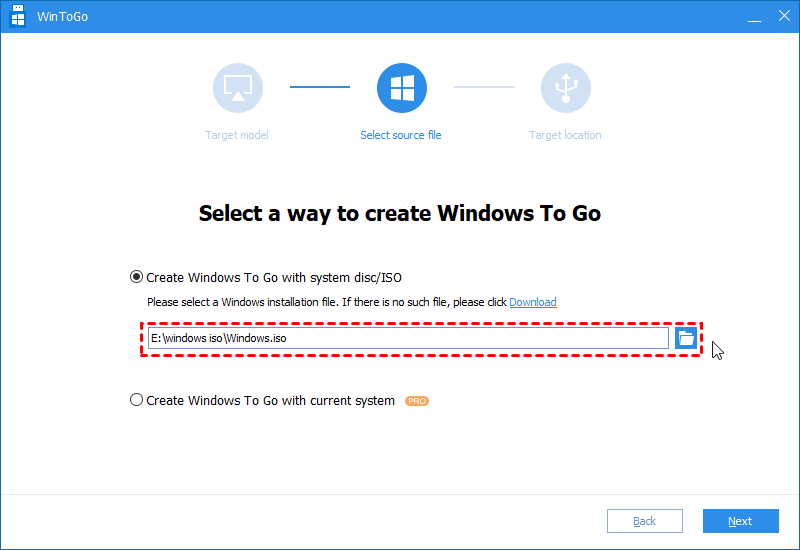
Step 4. Choose “Create Windows To Go with system disc/ISO” and select the prepared ISO file. Click “Next”.
Step 5. Select the USB drive you have prepared and click “Proceed”.
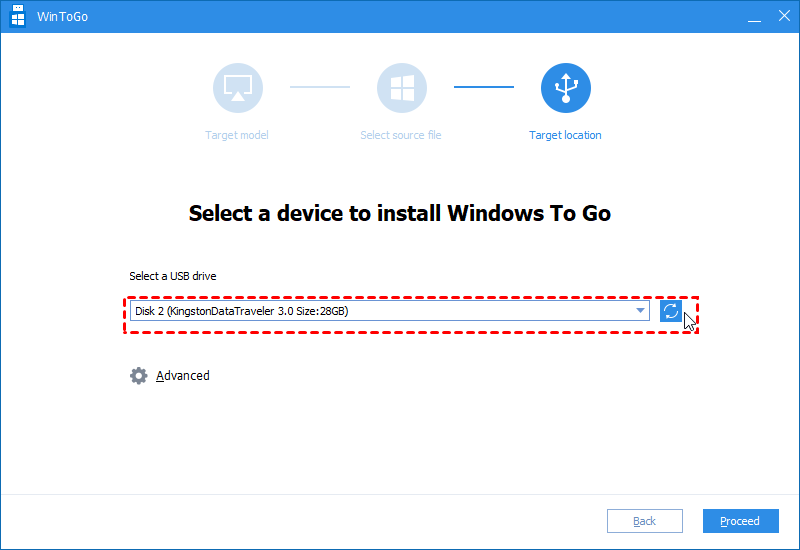
After it is done, you can insert the bootable USB to the target computer, change boot order in BIOS and boot PC from it.
If you want to create bootable USB drive with current operating system installed on your computer, you can upgrade to Professional. That also enables you to run Windows from USB on Mac.
Summary
In this article, we shared 3 different ways to create bootable USB in Windows 10 as an installer, plus an additional way to make a portable boot USB to run OS on any other computers. Choose one according to your specific requirements. If you plan to create a bootable USB to repair boot issues caused by damaged MBR or disk errors, the AOMEI Partition Assistant Standard can also help you a lot.


