- Создание установочного носителя для Windows
- How to Create a UEFI Bootable USB Drive to Install Windows 10 or 7?
- Use Media Creation Tool to Create Windows 10 Install USB Stick
- Using Rufus to Create Windows UEFI USB stick
- Using Diskpart to Create UEFI Boot-Stick with Windows
- Create UEFI Bootable USB Drive to Install Windows 7
- Create UEFI Bootable USB Media with PowerShell
- Create installation media for Windows
- Install Windows from a USB Flash Drive
- What you need
- Step 1 — Format the drive and set the primary partition as active
- Step 2 — Copy Windows Setup to the USB flash drive
- Step 3 — Install Windows to the new PC
- If your Windows image is larger than 4GB
- Create a Bootable USB Flash Drive
- To create a bootable USB flash drive
Создание установочного носителя для Windows
Вы можете использовать установочный носитель (USB-устройство флэш-памяти или DVD-диск) для установки новой копии Windows, выполнения чистой установки или переустановки Windows 10.
Чтобы создать установочный носитель, перейдите на веб-сайт скачивания ПО, где вы найдете пошаговые инструкции. На этом веб-сайте вы можете выбрать версию Windows и создать собственный установочный носитель с помощью USB-устройства флэш-памяти или DVD-диска. Чтобы перейти непосредственно к одной из версий, выберите одну из следующих ссылок:
Windows 10 (Затем выберите Скачать средство сейчас.)
Важно: Создайте резервную копию файлов перед установкой и переустановкой Windows на компьютере. Узнайте, как это сделать для Windows 10 или для Windows 7 и Windows 8.1.
Чтобы создать установочный носитель, необходимо следующее:
Компьютер с надежным подключением к Интернету. Время скачивания зависит от скорости подключения к Интернету.
USB-устройство флэш-памяти или DVD-диск. Необходимо пустое USB-устройство флэш-памяти с 8 ГБ свободного места или пустой DVD-диск (и устройство записи DVD). Рекомендуем использовать чистый носитель, поскольку все его содержимое будет удалено. Если при записи DVD-диска из ISO-файла отображается сообщение о том, что файл образа диска слишком большой, необходимо использовать DVD-носитель с двумя слоями (DL).
Ключ продукта. 25-значный ключ продукта (не требуется для цифровых лицензий). Если вам требуется помощь, см. раздел Как найти ключ продукта Windows.
После создания установочного носителя вы можете сбросить или переустановить Windows. Дополнительные сведения см. в разделе Параметры восстановления в Windows 10.
How to Create a UEFI Bootable USB Drive to Install Windows 10 or 7?
This is a step-by-step guide on how to create a bootable USB flash drive with a Windows 10 or Windows 7 install image for a UEFI computer. We’ll need the following:
- USB flash drive (USB v2 or v3) with a capacity of at least 4 GB for Windows 7 or 8 GB for Windows 10;
- 64-bit Windows install image (32-bit Windows versions won’t boot on the UEFI computer). A Windows distribution could be in the form of the installation DVD or an ISO image file.
Let’s look at a few of the most popular ways that you can create a bootable UEFI USB flash drive for installing Windows 10.
Use Media Creation Tool to Create Windows 10 Install USB Stick
Microsoft’s official tool for creating installation media and ISO images with Windows 10 is Media Creation Tool. You can download the latest version here – https://www.microsoft.com/en-us/software-download/windows10

- Run the file MediaCreationTool2004.exe;
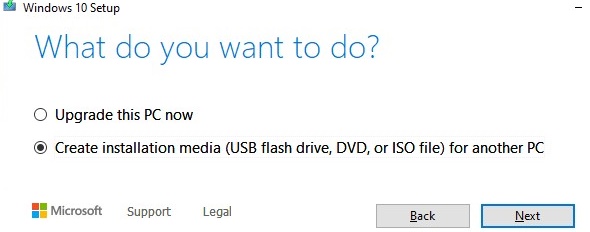
- Select Create installation media (USB flash drive, DVD, or ISO file) for another PC);

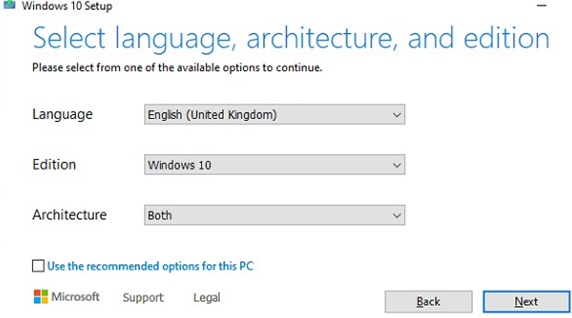
- Select the language, edition and architecture (bitness) of the Windows 10 image that you want to write to the USB drive;
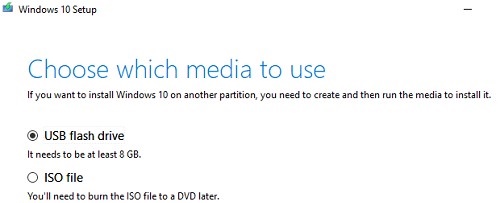
- Then select that you want to write the image to a USB flash drive;
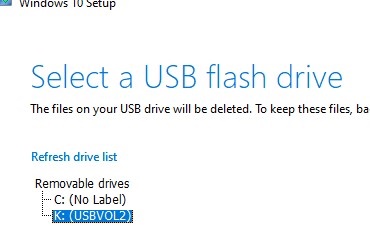
- Select your flash drive in the list of removable devices and USB drives.
That’s all. Click Next -> Next -> Finish and wait until the install Windows image is written to the USB drive.
Using Rufus to Create Windows UEFI USB stick
It is much easier for novice users to create bootable UEFI flash drive for installing Windows using the graphical interface of the popular Rufus utility. At the moment, the Rufus version 3.10 is available on the developer’s website https://rufus.ie . The tool is quite compact (about 1 MB), doesn’t require installation and it’s completely free. In addition, it works much faster than analogs.
Run the Rufus tool with administrator privileges and specify the following settings:
- Device: select your USB flash drive;
- Boot selection: specify Windows ISO image file (you can create an ISO image with the latest Windows 10 build using the Media Creation Tool, see example);
- Partition scheme: GPT;
- Target system: UEFI (non-CSM);
- File system: FAT32.
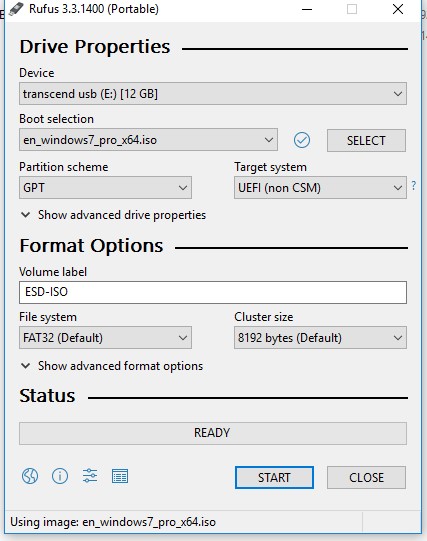
Click START to write a Windows image to a USB flash drive. After 10-15 minutes, your bootable USB flash drive with Windows install image for UEFI computer is ready.
Using Diskpart to Create UEFI Boot-Stick with Windows
You can create a bootable UEFI flash drive with the Windows install image manually. The procedure described below is suitable for advanced users, is performed from the command line and allows you to fully control (and understand) all the steps in the process of creating a bootable USB flash drive.
Step-by-step guide on how to create a boot Windows flash drive for a UEFI system using diskpart:
- Connect a USB flash drive to the corresponding PC port;
- Run the command prompt as an administrator;
- Run the DISKPART tool by typing in the command prompt: Diskpart
- Display the list of all drives in the computer: list disk
- Find the disk that corresponds to your USB flash drive (in our example it is Disk 2) and select it:
Select Disk 2
Copy the contents of your Windows x64 install image to the USB flash drive that you have prepared. You can do it using Windows Explorer, your favorite file manager or from the command prompt, for example:
(where D:\ is an installation DVD or mounted ISO image containing a Windows distro, and F:\ is a letter assigned to the USB flash drive);
This completes the process of creating a bootable UEFI flash drive with Windows 10.
Create UEFI Bootable USB Drive to Install Windows 7
If you are creating an install USB flash drive with Windows 7 for a UEFI computer, you need to perform additional steps:
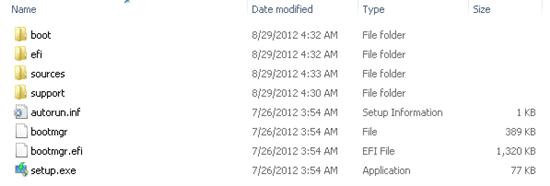
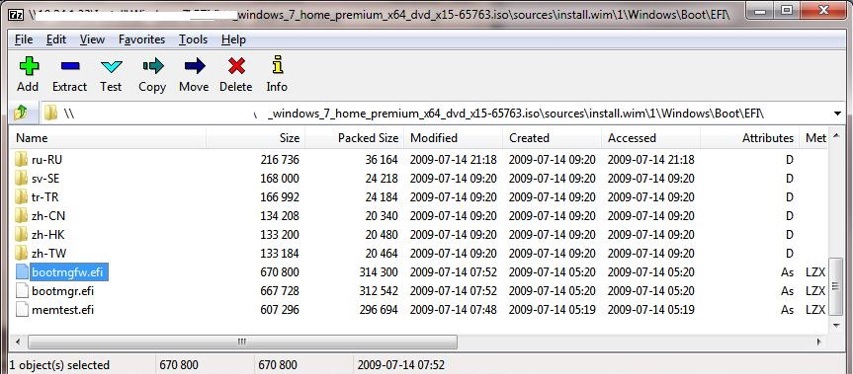
- Go to f:\efi\microsoft\boot folder on the USB flash drive;
- Entirely copy its contents one level up (to the F:\efi\boot directory);
- Copy the bootmgfw.efi file to the f:\efi\boot folder and rename it to bootx64.efi.
Create UEFI Bootable USB Media with PowerShell
You can also use PowerShell cmdlets to create a bootable UEFI flash drive.
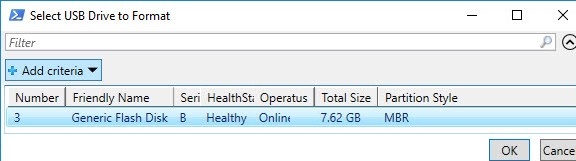
The following PowerShell one-liner will list the connected USB media devices. After you select the flash drive you need, it will be cleaned up, the primary partition will be created and formatted in the FAT32 file system (using cmdlets from the Storage disk management module):
$Results = Get-Disk |Where-Object BusType -eq USB |Out-GridView -Title ‘Select USB Drive to Create UEFI bootable device’ -OutputMode Single |Clear-Disk -RemoveData -RemoveOEM -Confirm:$false -PassThru |New-Partition -UseMaximumSize -IsActive -AssignDriveLetter |Format-Volume -FileSystem FAT32
Mount the install ISO image of Windows 10:
$Volumes = (Get-Volume).Where(<$_.DriveLetter>).DriveLetter
Mount-DiskImage -ImagePath C:\ISO\Windows10-2004×64.iso
$ISO = (Compare-Object -ReferenceObject $Volumes -DifferenceObject (Get-Volume).Where(<$_.DriveLetter>).DriveLetter).InputObject
Because in PowerShell, I could not detect which drive letter was assigned to the mounted ISO image; I had to compare the list of disks before and after mounting using Compare-Object.
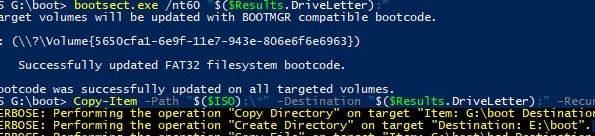
Now you need to go to the Boot directory and copy the contents to a USB flash drive using Copy-Item cmdlet:
Set-Location -Path «$($ISO):\boot»
bootsect.exe /nt60 «$($Results.DriveLetter):»
Copy-Item -Path «$($ISO):\*» -Destination «$($Results.DriveLetter):» -Recurse -Verbose
After the described procedures, you have a bootable USB flash drive to install Windows on a UEFI computer in the native mode. More detailed procedure of Windows installation on computer with UEFI interface will be considered in one of the next article.
Create installation media for Windows
You can use installation media (a USB flash drive or DVD) to install a new copy of Windows, perform a clean installation, or reinstall Windows 10.
To create installation media, go to the software download website, where you’ll find step-by-step instructions. On that website, you can select a version of Windows and create your own installation media using either a USB flash drive or a DVD. To go directly to one of the versions, select one of these links:
Windows 10 (Then select Download tool now.)
Important: Back up your files before you install or reinstall Windows on your PC. Learn how for Windows 10 or for Windows 7 and Windows 8.1.
To create the installation media, here’s what you’ll need:
A PC with a reliable internet connection. The download time will vary, depending on your internet connection.
A USB flash drive or DVD. A blank USB flash drive with at least 8 GB of space, or a blank DVD (and DVD burner). We recommend using a blank USB or blank DVD because any content on it will be deleted. When burning a DVD from an ISO file, if you’re told the disc image file is too large, you’ll need to use dual layer (DL) DVD media.
A product key. Your 25-character product key (not required for digital licenses). For help finding it, go to Find your Windows product key.
After you’ve created the installation media, you can reset or reinstall Windows. To learn more, go to Recovery options in Windows 10.
Install Windows from a USB Flash Drive
Here’s how to create a bootable Windows installation USB drive starting with a Windows .iso file or a Windows Setup DVD.
If you’re looking for an easy way to create a bootable USB Windows installation drive, use the media creation tool.
What you need
- Windows 10 install .iso or DVD
- USB flash drive with at least 5GB free space. This drive will be formatted, so make sure it doesn’t have any important files on it.
- Technician PC — Windows PC that you’ll use to format the USB flash drive
- Destination PC — A PC that you’ll install Windows on
Step 1 — Format the drive and set the primary partition as active
Connect the USB flash drive to your technician PC.
Open Disk Management: Right-click on Start and choose Disk Management.
Format the partition: Right-click the USB drive partition and choose Format. Select the FAT32 file system to be able to boot either BIOS-based or UEFI-based PCs.
Set the partition as active: Right-click the USB drive partition and click Mark Partition as Active.
If Mark Partition as Active isn’t available, you can instead use diskpart to select the partition and mark it active.
Step 2 — Copy Windows Setup to the USB flash drive
Use File Explorer to copy and paste the entire contents of the Windows product DVD or ISO to the USB flash drive.
Optional: add an unattend file to automate the installation process. For more information, see Automate Windows Setup.
Step 3 — Install Windows to the new PC
Connect the USB flash drive to a new PC.
Turn on the PC and press the key that opens the boot-device selection menu for the computer, such as the Esc/F10/F12 keys. Select the option that boots the PC from the USB flash drive.
Windows Setup starts. Follow the instructions to install Windows.
Remove the USB flash drive.
If your Windows image is larger than 4GB
Windows USB install drives are formatted as FAT32, which has a 4GB filesize limit. If your image is larger than the filesize limit:
Copy everything except the Windows image file (sources\install.wim) to the USB drive (either drag and drop, or use this command, where D: is the mounted ISO and E: is the USB flash drive.)
Split the Windows image file into smaller files, and put the smaller files onto the USB drive:
Create a Bootable USB Flash Drive
Applies To: Windows Server 2016 Essentials, Windows Server 2012 R2 Essentials, Windows Server 2012 Essentials
You can create a bootable USB flash drive to use to deploy Windows Server Essentials. The first step is to prepare the USB flash drive by using DiskPart, which is a command-line utility. For information about DiskPart, see DiskPart Command-Line Options.
To create a bootable USB flash drive for use in recovering or reinstalling Windows on a PC instead of a server, see Create a recovery drive.
For additional scenarios in which you may want to create or use a bootable USB flash drive, see the following topics:
To create a bootable USB flash drive
Insert a USB flash drive into a running computer.
Open a Command Prompt window as an administrator.
In the new command line window that opens, to determine the USB flash drive number or drive letter, at the command prompt, type list disk , and then click ENTER. The list disk command displays all the disks on the computer. Note the drive number or drive letter of the USB flash drive.
At the command prompt, type select disk , where X is the drive number or drive letter of the USB flash drive, and then click ENTER.
Type clean , and the click ENTER. This command deletes all data from the USB flash drive.
To create a new primary partition on the USB flash drive, type create partition primary , and then click ENTER.
To select the partition that you just created, type select partition 1 , and then click ENTER.
To format the partition, type format fs=ntfs quick , and then click ENTER.
If your server platform supports Unified Extensible Firmware Interface (UEFI), you should format the USB flash drive as FAT32 rather than as NTFS. To format the partition as FAT32, type format fs=fat32 quick , and then click ENTER.
Type active , and then click ENTER.
Type exit , and then click ENTER.
When you finish preparing your custom image, save it to the root of the USB flash drive.


