- Create your own ISO file from a Windows 7 installation DVD
- Create an ISO File from a Folder in Windows
- Use AnyBurn To Create ISO From The Folders On Your PC
- Create An ISO In Windows 10 Using WinCDEmu
- Use ImgBurn To Create ISO Files From Folders On Windows
- Use a Portable Tool To Create An ISO From Folders
Create your own ISO file from a Windows 7 installation DVD
Technical Level : Intermediate
How to use your or a friends “Retail” version (Upgrade or Full product) of the Windows 7 installation media to create an ISO file. Please note that an OEM DVD will not work, it must be a retail installation DVD.
It can be an Ultimate, Professional or Home Premium DVD which you will use to create an ISO file and then use the ISO to create an installation DVD that gives you a choice of which version you want to install as long as you have the proper 25 character product key code for the version you choose to install.
In other words you can take a Home Premium DVD and use it to create a universal installation DVD that allows you to install Windows 7 Ultimate or any lesser version of Windows 7.
As you may already know the Digital River ISO downloads are no longer available and Microsoft’s web site ( http://www.microsoft.com/en-us/software-recovery ) does not support OEM product keys and often malfunctions (incorrect language) when entering in a retail product key.
With one DVD or USB Flash Drive you can install or re-install any version of Windows that you have a valid product key for. This comes in handy if you have multiple computers and no longer have the recovery medial or your recovery partition is damaged.
Note: Windows 7 Starter edition is only available in 32Bit, so if you need a ‘Starter edition’ installation DVD or USB Flash drive, you need a 32Bit Windows 7 installation DVD.
This is a multi-step process, the first 3 steps will be covered in this article and a link provided at the end of this Wiki will show you how to perform the remaining steps.
Step by Step guide:
Note: During the install skip installing the unwanted bloat ware as follows:
a) Double click on the SetupImgBurm_2.5.8…..exe file to start the installation.
b) Step #2 of 5, decline the offer to install Yahoo.
c) Step #3 of 5, decline the offer to install “Malware Protection Live”.
d) Step #4 of 5 is the actual download of ImgBurn and may if you have a high speed Internal connection appear to be instantaneous.
e) Step #5 of 5, you will be prompted that the download is complete, click on the ‘Install Now’ button.
f) When the Welcome to the ImgBurn Setup Wizard window opens click ‘Next’, Read the License Agreement and ‘Accept’. Click the ‘Next’ button to continue.
g) Choose Components: use the default settings and click ‘Next’. Use the default ‘Install Location and click ‘Next’. Start Menu folder: use the default folder and click ‘Next’. Use the ‘Express settings’ and click ‘Next’.
h) Do not install ‘360 Total Security’ (Choose Custom Installation and remove the check mark from 360 Total Security). When prompted it’s your choice if you want to be periodically notified of newer versions of ImgBurn.
i) When the installation completes click the ‘Close’ button. You will see the ImgBurn shortcut on your desktop.
j) As much as I tried to stop the installation of bloatware I still ended up with “Web Companion” AV software. This may conflict with you current AV software so go to the Control Panel’s ‘Programs and Features’ to un-install Web Companion.
Step #2) You are now ready to convert any Windows 7 “Retail” installation DVD into an .ISO file.
For this article I will use a retail version of Windows 7 Home Premium (64Bit) to create a universal Windows 7 DVD that gives you the choice of which version of Windows you want to install.
Please note that your Windows 7 product key must be for the version of Windows you choose during the Windows installation process.
a) Insert the Windows 7 installation DVD into your DVD drive. Close the AutoPlay prompt.
b) Launch ImgBurn and click on the ‘Create Image file from disc’ option.
c) Verify the ‘Source’ is set to your DVD burner and the ‘Destination’ (where the ISO file will be created) by default is to the ‘Documents’ folder.
d) Click on the ‘DVD — à Folder’ button. This will start the ISO file creation process.
e) The time to complete may take 4 to 5 minutes depending on the speed of your CPU, DVD burner and disk drive. The log file will show the results.
f) Remove the Windows 7 media from the DVD drive.
g) Click the ‘OK’ button and close ImgBurn, this may take a few seconds as the ISO file is created, just wait for the popup Window appears to close out by itself as no action is required on your part.
Step #3) Follow the instructions in the Wiki article named:
Using the ISO file you just created read the instructions in the Wiki article titled: How to create a universal Windows 7 installation DVD or USB Flash Drive to create an installation DVD that includes Windows 7 Ultimate, Professional, Home Premium and lesser versions.
Notes:
Steps 1 and 2 in the «How to create a Universal Windows 7 installation DVD or USB Flash Drive» Wiki article mentions about downloading the ISO file. Since you just finished creating your own ISO file you can skips these steps and proceed to step #3.
Also ImgBurn is already installed so there is no need to re-install it.
When you have completed the steps in this Wiki article you will have an installation DVD that will allow you to choose which version of Windows 7 you want to install.
Create an ISO File from a Folder in Windows
A great tool for distribution or backups
If you don’t already know, an ISO file is a container that can hold a number of files in it. It’s usually used to create backups of your CD and DVD discs. However, you can create an ISO from the folders on your Windows PC as well. There are actually multiple apps that help you do it on your machine.
There are many reasons why you may want to create an ISO on your Windows 10 PC. Maybe you want to keep all of your folders in a single place. Or maybe you want to keep some of your folders handy ready to burn to your discs.
Regardless of the reasoning, it’s pretty easy to create an ISO from folders on a Windows computer. Also, check out the video from our sister site where we walk you through the steps in a short video.
Use AnyBurn To Create ISO From The Folders On Your PC
One of the free apps you can use to create an ISO from your folders is AnyBurn. It’s actually an app that helps you burn your data to your discs but you can use it to create ISO files as well. It has an option on the main interface that helps add your chosen folders to an ISO which you can then save anywhere on your computer.
- Download, install, and launch AnyBurn on your computer.
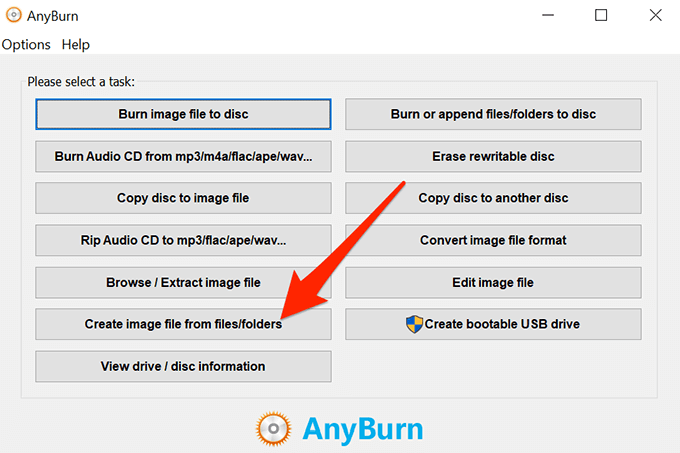
- You’ll find several options regarding creating ISOs on the main interface. Find the one that says Create image file from files/folders and click on it.
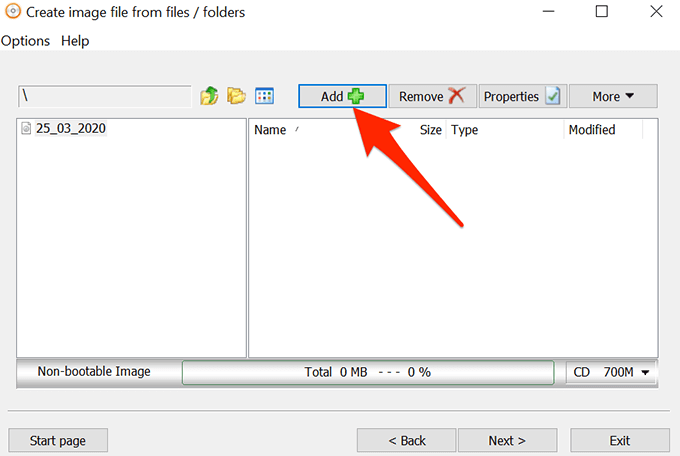
- The following screen will let you choose the folders that you want to add to your ISO. Click on the Add button at the top to add your folders.
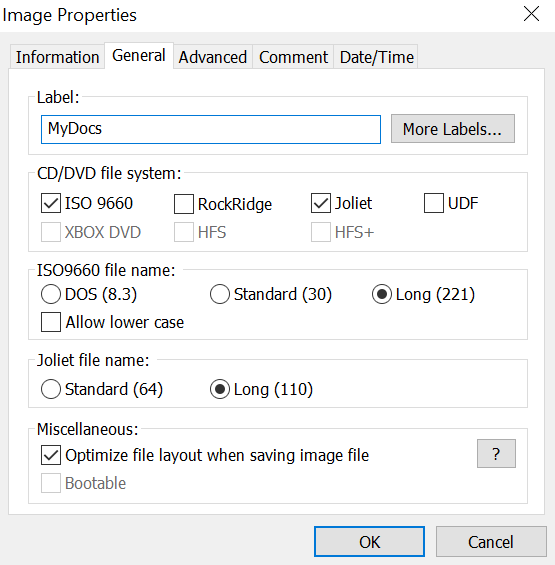
- If you want to specify any custom settings for your file, click on the Properties button at the top. It’ll then let you modify options like the file system for your ISO, file naming standard, compression level, and so on. Click on OK when you’ve configured them.
- Click on the Next button to go to the next screen of the ISO creation process.
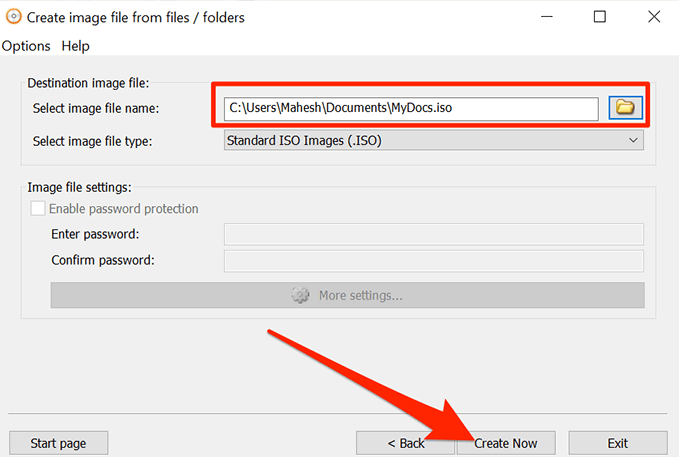
- On the following screen, click on the folder icon to choose the folder where you want to save your ISO. You can also enter a name for your file on the same screen.
- Finally, click on Create Now to start creating an ISO out of your chosen folders.
Create An ISO In Windows 10 Using WinCDEmu
WinCDEmu is an open-source tool that lets you create virtual drives out of various image file formats on your computer. If you have downloaded an ISO file and you want to view its contents, this app can help you mount that as a drive on your machine.
You can use the app to create ISO files from folders in Windows as well, and it actually provides you with the easiest way to make an ISO from your folders. All you basically need to do is install the app and it’ll add an option to your context menu. You can then use that option to generate an ISO from your folders.
- Download and install the WinCDEmu app on your PC.
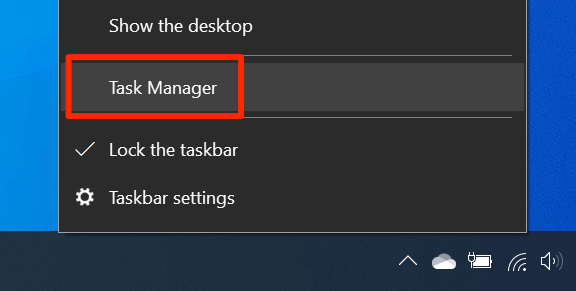
- Right-click on your taskbar and select Task Manager.
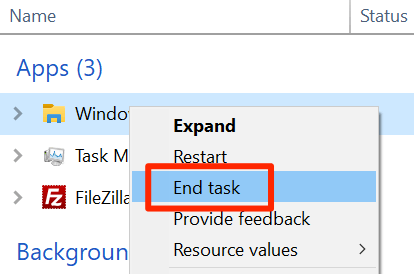
- Right-click on the process that says Windows Explorer and select End task. You need to close the Explorer before you can see the newly added item in the context menu.
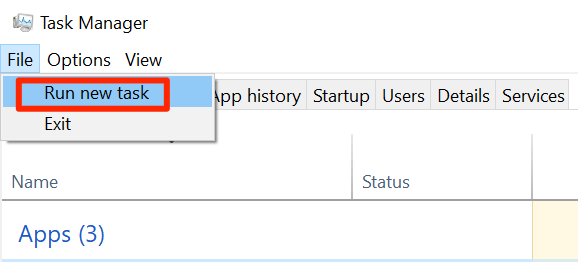
- Click on the File menu in Task Manager and select Run new task.
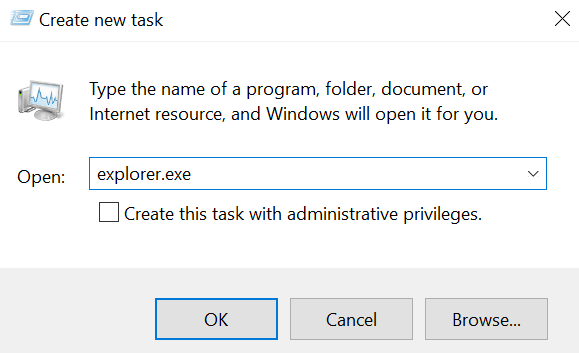
- Type in explorer.exe and hit Enter. It’ll relaunch the Windows File Explorer.
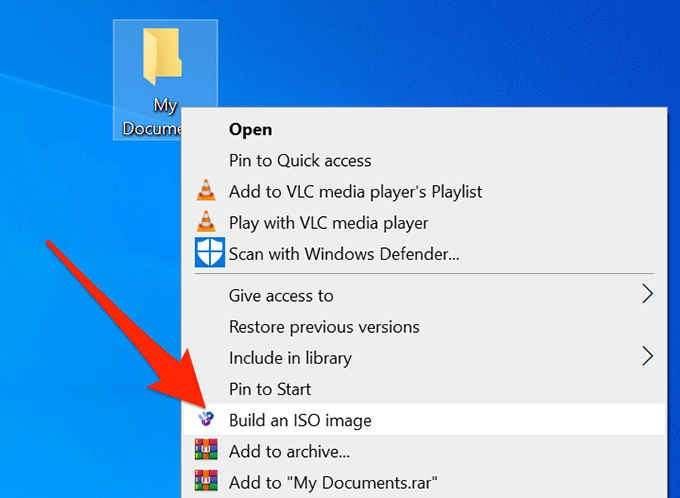
- Find the folder that you want to create an ISO for, right-click on it, and select Build an ISO image.
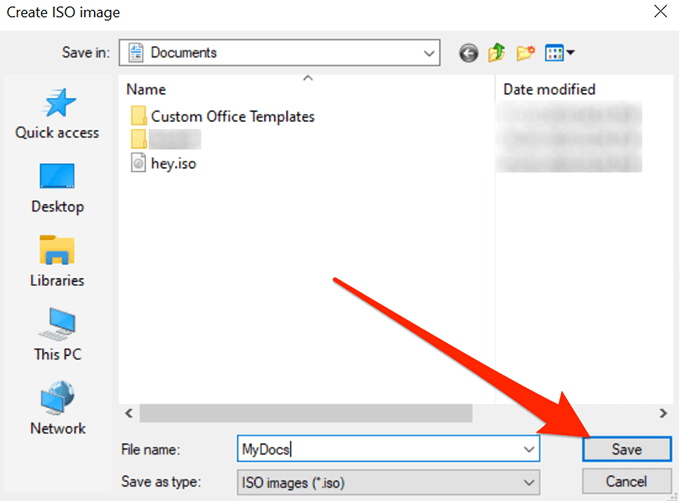
- It’ll ask you to enter a name for your ISO and the location where you want to save it. Enter these details and click on Save.
- It’ll quickly create the ISO for you and let you know when it’s fully built.
Use ImgBurn To Create ISO Files From Folders On Windows
ImgBurn has been a popular app to create and burn image files for a long time. If you’ve ever created a backup of your discs or you’ve burned a disc, you’ll likely recognize the app.
The app can be used to create ISO files from your folders as well.
- Download, install, and open the ImgBurn app on your computer.
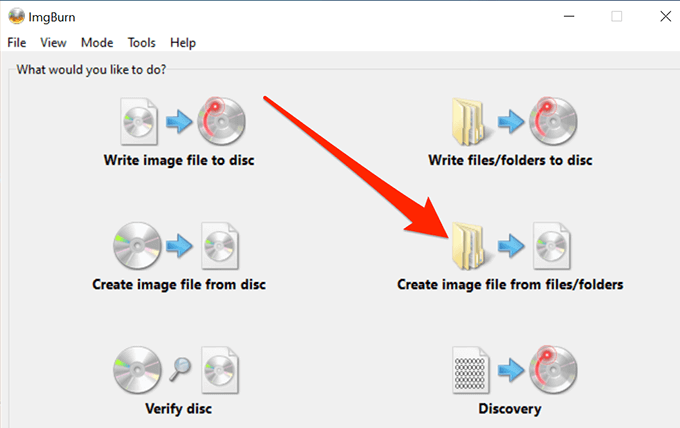
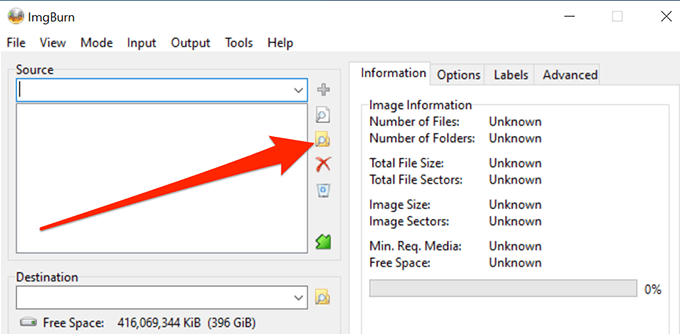
- On the main interface, find and click on the option that says Create image file from files/folders.
- You’ll see a screen that lets you add the folders you want to include in your ISO. Click on the little folder icon and add the folders for your ISO file.
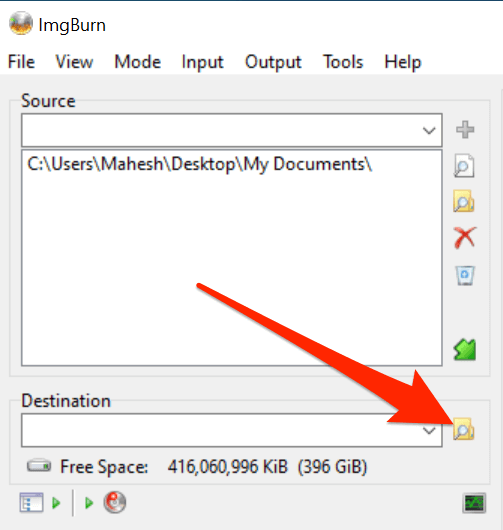
- Click on the tiny folder icon next to where it says Destination and select a name and target folder for your ISO file.
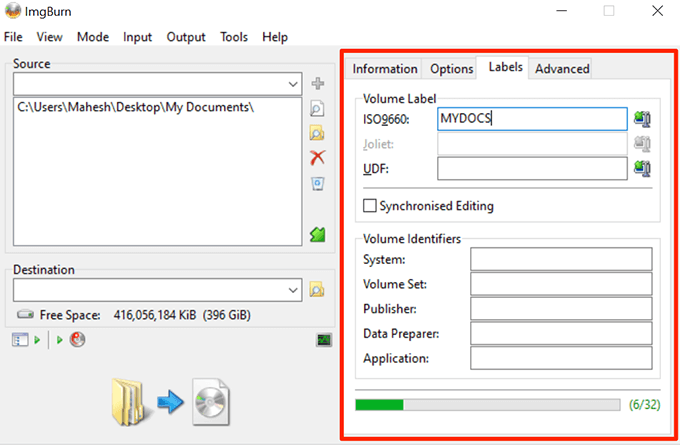
- On the right-hand side pane, you’ll find various options to configure for your ISO. With these options, you can change your image type, enter a label for your image, specify restrictions, and do a few other things.
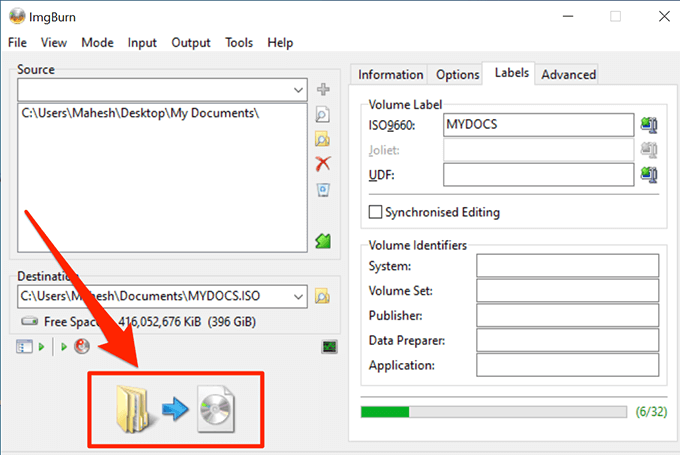
- Finally, click on the large Build button on your screen to start building an ISO file out of your selected folders.
Use a Portable Tool To Create An ISO From Folders
If it’s just a single ISO that you’ll be making and you don’t think you’ll be doing it again anytime soon, you might prefer something that doesn’t require an installation. Folder2Iso can actually help you out as it’s a free and portable tool that helps quickly create ISOs without any hassle.
It works on many versions of Windows including Windows 7, 8, 10, and Linux.
- Download the Folder2Iso app and double-click on it to extract the actual app contents.
- Run the executable file that you extracted from the archive.
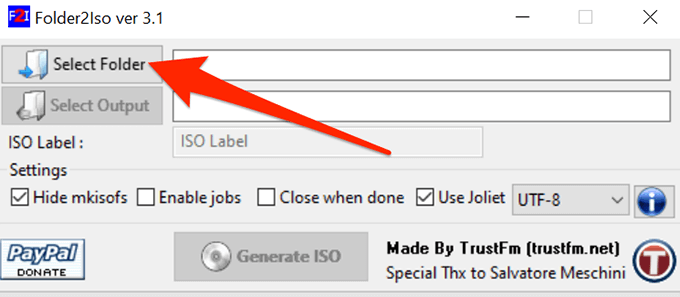
- You’ll see a simple interface with only a few options on it. Click on the Select Folder option and select the folder you want to add to your ISO.
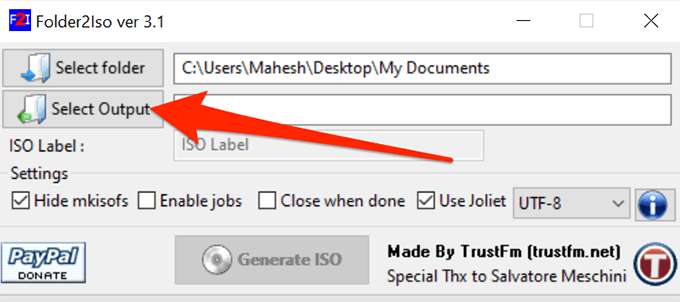
- Click on the Select Output button and choose the folder where you’d like to save your ISO file. Remember you can’t choose the folder that you’ve chosen to include in your ISO.
- You can then specify the extra options available on your screen, if you want.
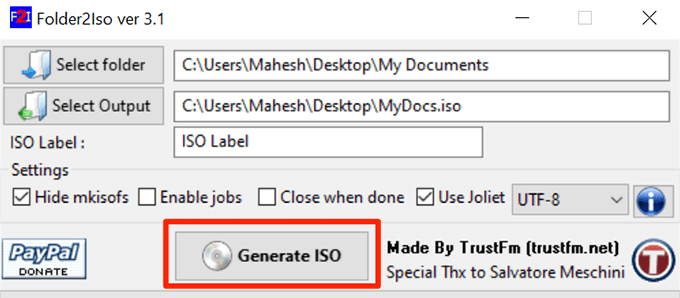
- Click on the Generate ISO button to make an ISO out of your chosen folders.
- The progress bar will go all green when the ISO has been generated.
It’s a good idea to create an ISO from your folders in Windows so you can mount them all as a single drive on your PC. If you have done it on your computer already, let us know what app you chose to do it and why. We await your response in the comments below!
Mahesh has been obsessed with technology since he got his first gadget a decade or so ago. Over the last few years, he’s written a number of tech articles on various online publications including but not limited to MakeTechEasier and Android AppStorm. Read Mahesh’s Full Bio
