- Create a recovery drive
- Back up and restore your PC
- Back up
- Create a system image
- Keeping different versions of system images
- Create a restore point
- Restore
- Restore a backup made on another computer
- Find files that were restored from a backup made on another computer
- Restore files from a file backup after restoring your computer from a system image backup
- How to Create and Restore (Windows 10) System Image to Different Computer
- Can a Windows System Image Be Used on Another Computer
- Preparations:В Get Ready for System Transfer to Different PC
- #1. Confirm New PC Support The Same Boot Mode as Old PC
- #2. DownloadВ Windows Backup Software
- #3.В Prepare an External Hard Drive
- Tutorial: How to Create and RestoreВ System Image to a Different Computer
- #1. Backup or Copy Important Data from Target PCВ to External Hard Drive
- #2. Create and Restore (Windows 10) System Image to a New Computer
- #3. Make Transferred System Bootable on New Computer
- Further Reading: Why Is Windows Backup and Restore Not Recommended
- Windows Backup and Restore vs. EaseUS Todo Backup
- The Bottom Line
Create a recovery drive
It’s a good idea to create a recovery drive. That way, if your PC ever experiences a major issue such as hardware failure, you’ll be able to use the recovery drive to reinstall Windows 10. Windows updates to improve security and PC performance periodically so it is recommended to recreate the recovery drive annually. Personal files and any applications that did not come with your PC will not be backed up. You’ll need a USB drive that’s at least 16 gigabytes.
Warning: Use an empty USB drive because this process will erase any data that’s already stored on the drive.
To create a recovery drive in Windows 10:
In the search box next to the Start button, search for Create a recovery drive and then select it. You might be asked to enter an admin password or confirm your choice.
When the tool opens, make sure Back up system files to the recovery drive is selected and then select Next.
Connect a USB drive to your PC, select it, and then select Next.
Select Create. Many files need to be copied to the recovery drive, so this might take a while.
If you ever need to use the recovery drive to reinstall Windows 10 on your PC, see Recovery options in Windows 10 for further instructions. It’s a good idea to back up your files frequently because the recovery drive isn’t a system image. It doesn’t contain your personal files, settings, or programs.
Need more options for creating a recovery drive?
To download Windows 10 installation media, see Recovery options in Windows 10.
Back up and restore your PC
To learn how to back up and restore individual files on a Windows-based computer:
To learn how to back up and restore in Windows 10:
Back up
There are several ways to back up your PC.
Select the Start button, then select Control Panel > System and Maintenance > Backup and Restore.
Do one of the following:
If you’ve never used Windows Backup before, or recently upgraded your version of Windows, select Set up backup, and then follow the steps in the wizard.
If you’ve created a backup before, you can wait for your regularly scheduled backup to occur, or you can manually create a new backup by selecting Back up now.
If you’ve created a backup before, but want to make a new, full backup rather than updating the old one, select Create new, full backup, and then follow the steps in the wizard.
Note: Do not back up files to the same hard disk that Windows is installed on. For example, do not back up files to a recovery partition. Always store media used for backups (external hard disks, DVDs, or CDs) in a secure place to prevent unauthorized people from having access to your files; a fireproof location separate from your computer is recommended. You might also consider encrypting the data on your backup.
Create a system image
System images contain all of the info on your PC at a particular state.
Right-click the Start button, then select Control Panel > System and Maintenance > Backup and Restore.
In the left pane, choose Create a system image, and then follow the steps in the wizard. 
Note: To create a system image of a drive, it must be formatted to use the NTFS file system. If you save the system image on a hard drive or USB flash drive, it must be formatted to use the NTFS file system.
Keeping different versions of system images
You can keep several versions of system images. On internal and external hard drives, older system images will be deleted when the drive runs out of space. To help conserve disk space, delete older system images.
If you’re saving your system images in a network location, you can only keep the most current system image for each computer. System images are saved in the format of drive\WindowsImageBackup\computer name\. If you already have a system image for a computer and are creating a new one for the same computer, the new system image will overwrite the old one.
If you want to keep the old system image, you can copy it to a different location before creating the new system image by following these steps.
Navigate to the location of the system image.
Copy the WindowsImageBackup folder to a new location.
Create a restore point
You can use a restore point to restore your computer’s system files to an earlier point in time. Restore points are automatically created each week by System Restore and when your PC detects change, like when you install an app or driver.
Here’s how to create a restore point.
Right-click the Start button, then select Control Panel > System and Maintenance > System.
In the left pane, select System protection.
Select the System Protection tab, and then select Create.
In the System Protection dialog box, type a description, and then select Create.
Restore
Right-click the Start button, then select Control Panel > System and Maintenance > Backup and Restore.
Do one of the following:
To restore your files, choose Restore my files.
To restore the files of all users, choose Restore all users’ files.
Do one of the following:
To look through the contents of the backup, select Browse for files or Browse for folders. When you’re browsing for folders, you won’t be able to see the individual files in a folder. To view individual files, use the Browse for files option.
To search the contents of the backup, select Search, type all or part of a file name, and then select Search.
Tip: If you’re searching for files or folders associated with a specific user account, you can improve search results by typing the location of the file or folder in the Search for box. For example, to search for all JPG files that were backed up, type JPG in the Search for box. To only search for JPG files associated with the user Bill, type C:\Users\Bill\JPG in the Search for box. Use wildcard characters such as *.jpg to search for all JPG files that were backed up.
Restore a backup made on another computer
You can restore files from a backup that was created on another computer running Windows Vista or Windows 7.
Select the Start button, then select Control Panel > System and Maintenance > Backup and Restore.
Choose Select another backup to restore files from, and then follow the steps in the wizard. 
Find files that were restored from a backup made on another computer
If you’re restoring files from a backup that was made on another computer, the files will be restored in a folder under the user name that was used to create the backup. If the user names are different, you’ll need to navigate to the folder where the files are restored. For example, if your user name was Molly on the computer that the backup was made on but your user name is MollyC on the computer that the backup is being restored on, the restored files will be saved in a folder labelled Molly.
To find restored files:
Select the Start button, then select Computer.
Double-click the icon of the drive that the files are saved on, for example C:\.
Double-click the Users folder. You will see a folder for each user account.
Double-click the folder for the user name that was used to create the backup. The restored files will be in the various folders based on where they were located originally.
Restore files from a file backup after restoring your computer from a system image backup
After you restore your computer from a system image backup, there may be newer versions of some of your files in a file backup that you want to restore.
To restore files from a file backup that was created after the system image backup was created, follow these steps.
Select the Start button, then select Control Panel > System and Maintenance > Backup and Restore.
Choose Select another backup to restore files from. 
In Backup Period, select the date range of the backup that contains the files that you want to restore, and then follow the steps in the wizard.
How to Create and Restore (Windows 10) System Image to Different Computer
Are you looking for a complete guide to backup Windows 10 and restore system image to different computers? On this page, you’ll learn how to create a system image in Windows 10/8/7 and restore it to a new computer without reinstallation.
So how to do so? Follow the complete guide here for help:
Can a Windows System Image Be Used on Another Computer
Is there any effective way to restore a system image to another computer just as easy as to restore a file image to a dissimilar computer? If a person is savvy about computers, he would definitely say «NO».
The reason is that the configuration settingsВ on another computer may differ from your current PC. Also, the operating system requires the computer to include certain drivers, without which the computer won’t boot successfully.В
SoВ can you create and restore a system image to a dissimilar computer? Yes! With the help of reliable Windows backup software, transferring OS to a new computer is possible.В
Support Windows 10/8.1/8/7/Vista/XP
Preparations:В Get Ready for System Transfer to Different PC
You may want to know what exactly you’ll need to get things ready for system migration to another different computer. Here below is a list for you to know and prepare for this task:
Note that the listed tips are three key points that decide whether you can successfully create and restore a system image to a new computer. Follow to make everything ready now:
#1. Confirm New PC Support The Same Boot Mode as Old PC
The motherboard of your new computer must support the same boot mode as your source computer. You can followВ to check the boot modes onВ both of your PCs:В
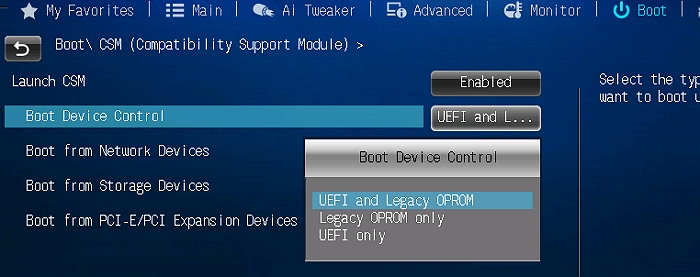
Restart PC and hold F2/F8/Del to Enter BIOS > Go to the Boot Menu and Check the Boot Mode: Legacy or UEFI.В
In a word, the BIOS boot mode in the new computer shouldВ be the same as your current PC:
- BIOS Mode: Legacy — BIOS Mode: Legacy
- BIOS Mode: UEFIВ — BIOS Mode: UEFI
IMPORTANT: If your computer is too old and itВ doesn’t support the UEFI boot mode, you’ll need to switch to a new computer.В Most new computers support both Legacy and UEFI boot modes and you don’t need to worry about it.
#2. DownloadВ Windows Backup Software
Professional system backupВ software -В EaseUS Todo BackupВ can help. Its System Transfer feature can do the system backup and transfer task, making the Windows systemВ bootable on the new computerВ by transferring necessary drivers together.
Support Windows 10/8.1/8/7/Vista/XP
#3.В Prepare an External Hard Drive
It’s also important that you have a big enough external hard drive to save the Windows system image for transferring OS to a new computer. Here are the steps that you can follow to prepare the external hard drive:
Step 1.В Prepare an empty external hard drive with enoughВ space.
The capacity of the external hard drive must be bigger than the system C drive.
Step 2.В Open Disk Management and create two partitions on your external hard drive.
The first partition is FAT32 and the second partition is NTFS (bigger than your system drive).
After making all things ready, you are good to go and follow the tutorial below to start creating and restoring system image like Windows 10 to your new computer now.
Tutorial: How to Create and RestoreВ System Image to a Different Computer
Applies to: Transfer Windows 10/8/7, even Windows XP/Vista, to a new computer without reinstallation.
This part answers the question of «How do I create system image in Windows 10» and «How to restore a Windows 10 backup to another computer». Follow the tutorial guide here to make your current Windows system bootable on a different computer:
In the following, we’ll take Windows 10 as an example to show you the complete process of backing up and transferring the system to another computer.В Let’s start!
#1. Backup or Copy Important Data from Target PCВ to External Hard Drive
As the system transferring process will rewrite everything on the system C drive, which will certainly cause data loss.В
Therefore, if you have important data saved on your target computer system drive, we suggest youВ copy and save them to an external storage device as a backup in advance.В
#2. Create and Restore (Windows 10) System Image to a New Computer
Now, you can apply EaseUS Todo Backup to create a bootable disk, create a system image, and restore the system image to another computer withoutВ limits.
Tutorial: Create and Restore Windows System ImageВ to a Different Computer
Step 1. Create an Emergency Disk to USB
1. Connect an empty USB flash drive or external hard drive (with over than 100GB space) to your PC.
Note: Initialize the USB or external hard drive as MBR, and create two partitions: set the firstВ partition as FAT32 and the second partition as NTFS.В В
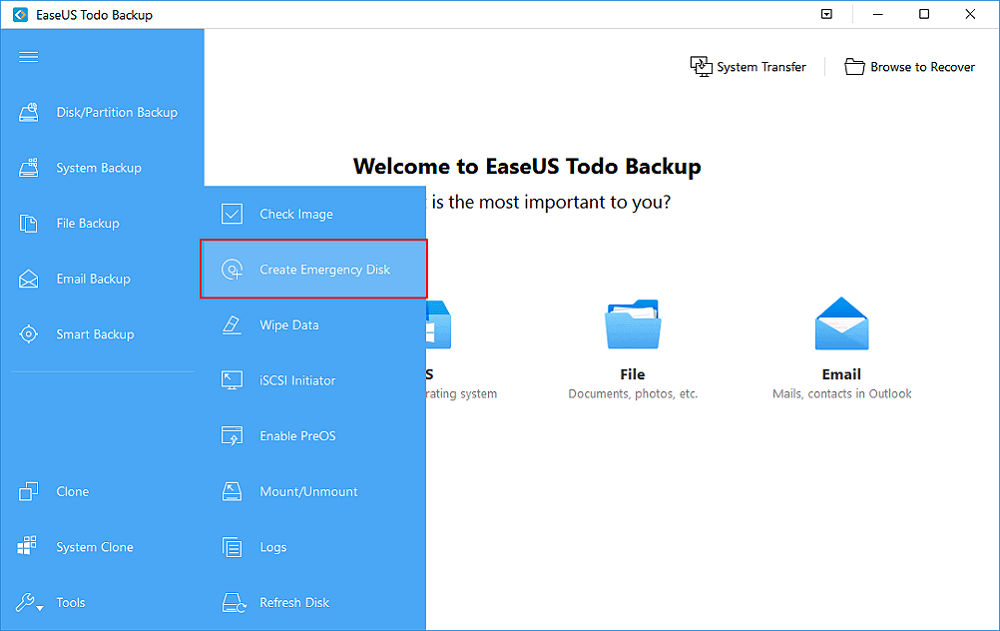
2. Run EaseUS Todo Backup and click «Tools» > «Create Emergency Disk».
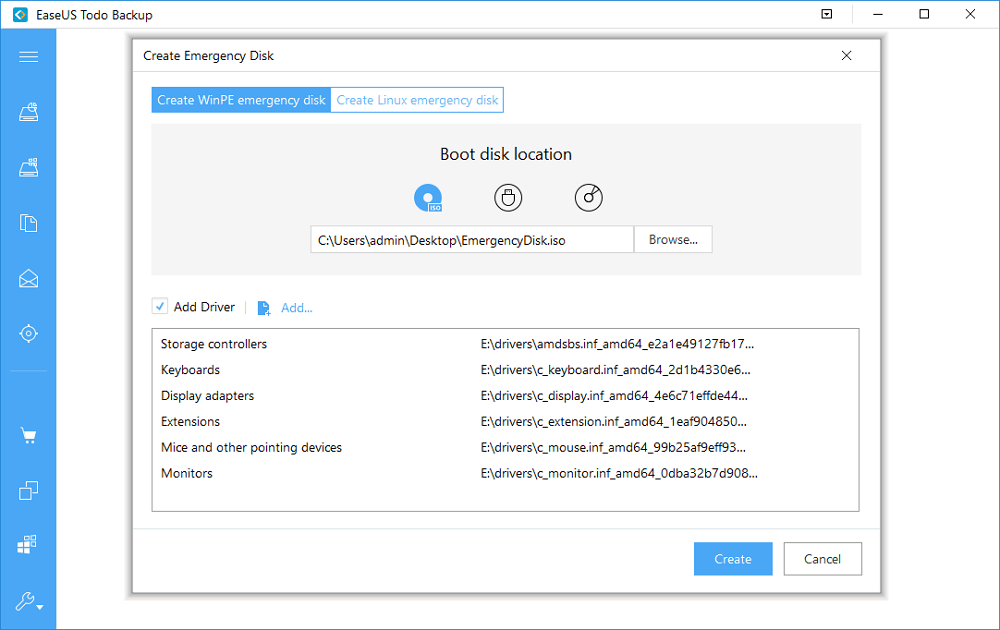
3. Choose USB as the disk location to create the emergency disk and click «Create».
The bootable disk will help you boot computer andВ transfer system image to the new PC.
Step 2. Create System Backup Image on Source Computer
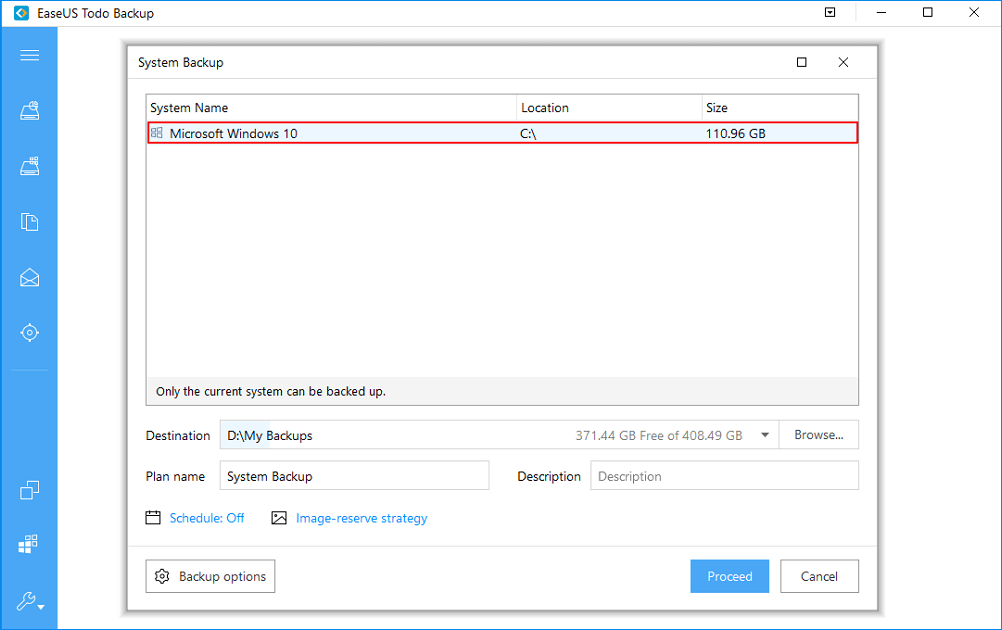
1. Click «System Backup» on the left pane andВ Windows OS will be selected by default.
2. Click «Browse» andВ specify the second partition of theВ USB drive which contains the emergency disk to save system image.
You may also save system backup image to another empty external disk (which must be equal or bigger than the system C drive).
3. ClickВ «Proceed» to start creating a system backup image to the target device.
Step 3. Boot Target Computer from EaseUS Todo Backup Emergency Disk
1. Eject EaseUSВ emergency disk and system backup image USB and connect it to the new computer.
2. Restart PC and press «F2/F8″В to boot into BIOS.В
3. Go to the boot menu and set the computer to boot from the EaseUS Todo Backup emergency disk.
If you want to restore the system image to a GPT disk, you need to change the boot mode to EUFIВ in BIOS. Then your computer willВ enter EaseUS Todo Backup main interface.
Step 4. Transfer System to the New Computer
Note: RestoringВ system image to theВ new computerВ will erase the data on the target disk.В Remember to backВ up the files in advanceВ or use an emptyВ disk to restore the system imageВ to avoid data loss.
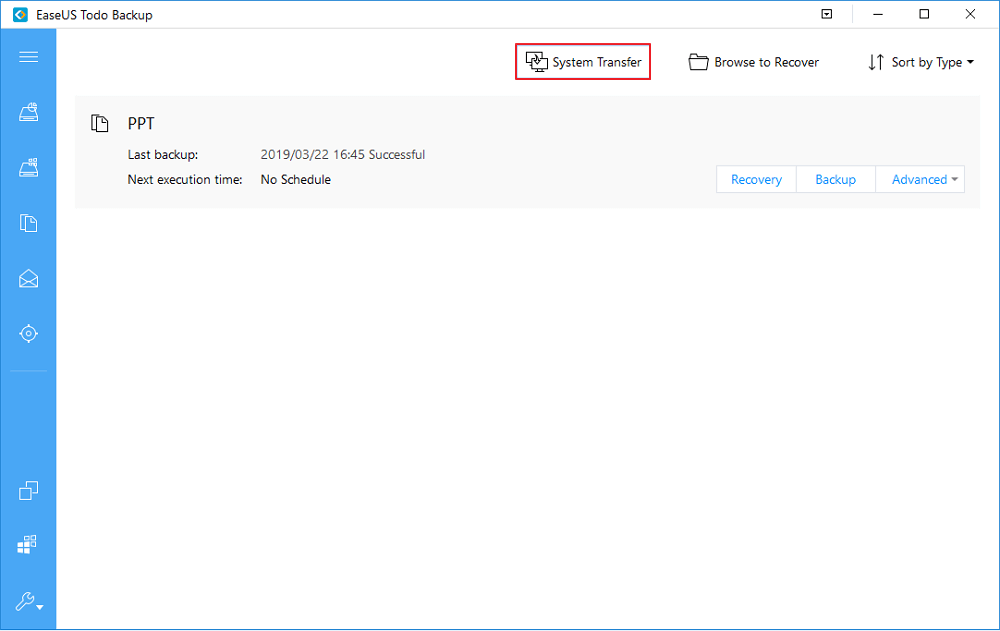
1. On EaseUS Todo Backup main interface, click «System Transfer».В
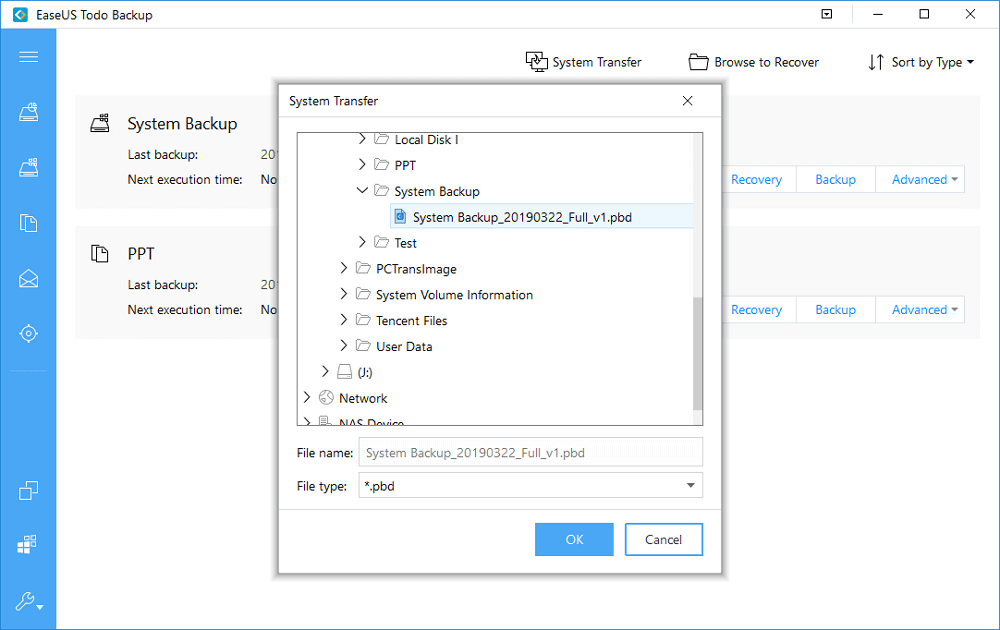
2. Select the system image on your USB external drive and clickВ «OK» to continue.
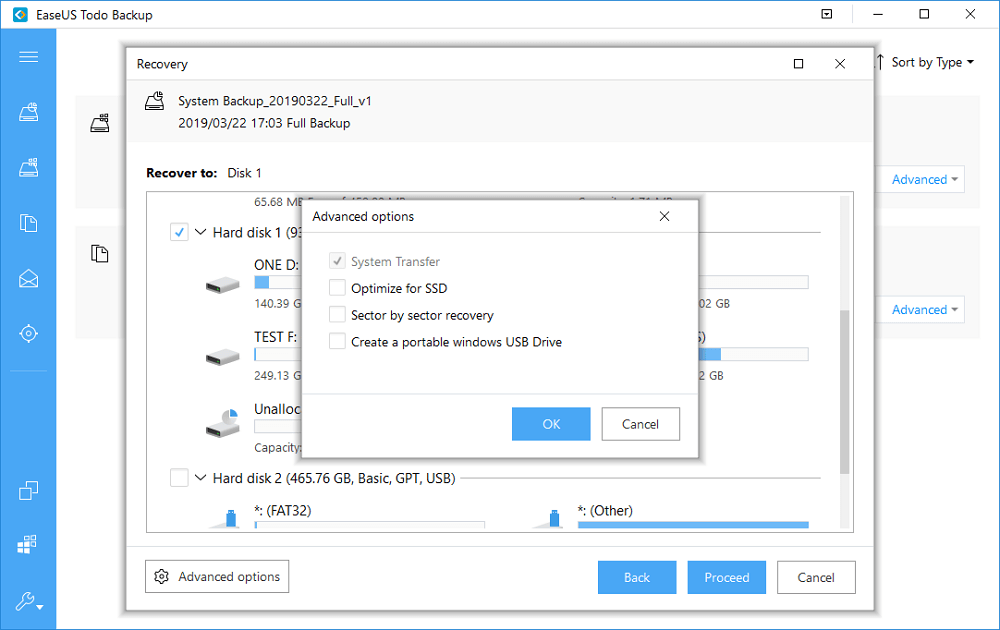
3. Specify the disk to restoreВ system image and tick «System Transfer» in Advanced options. ClickВ «OK» to save changes.
Then click «Proceed» to start transferring the system to a new computer.
Step 5. Restart PC with transferred system
1. Enter BIOS andВ set computer to boot up from the drive with the transferred system.
2. Save all changes and restart your computer.
3. Update all drive drivers and programs to ensure all things will work just fine on the new computer.
#3. Make Transferred System Bootable on New Computer
When EaseUS Todo Backup completes the system transferring process, you have one last step to go. It is to configure the BIOS boot mode on your computer as the same as your old PC:
Step 1.В Restart PC and press F2/F8/Del to enter BIOS.
Step 2.В Go to the Boot menu and find BIOS Mode.
Step 3.В Switch the boot mode as the same as it was on your old PC — Legacy or UEFI.
Step 4.В Save the changes and exit to boot your computer.
Wait patiently and you’ll see that your computer will boot up smoothly with the same operating system on your old PC.
Further Reading: Why Is Windows Backup and Restore Not Recommended
According to some Windows professionals, they prefer toВ create system image via Windows Backup and Restore feature. But why is Windows Backup and Restore not recommended here?
Windows Backup and Restore vs. EaseUS Todo Backup
Here is a comparison table that you may interest in and you will figure out why EaseUS Todo Backup exceeds Windows Backup and Restore:
| Comparison | EaseUS Todo Backup | Windows Backup and Restore |
|---|---|---|
| File Backup | в€љ | в€љ |
| System Backup | в€љ | в€љ |
