- Создание и управление заданиями планировщика из PowerShell
- Управление заданиями Task Scheduler с помощью PowerShell
- Как создать задание планировщика с помощью PowerShell?
- Получение информации и запуск заданий планировщика из PowerShell
- Экспорт и импорт заданий планировщика в XML файл
- How to create an automated task using Task Scheduler on Windows 10
- How to create a basic task using Task Scheduler
- How to create an advanced task using Task Scheduler
- How to run, edit, and delete a task using Task Scheduler
- More Windows 10 resources
- Halo: MCC’s live service elements make it better, not worse
- Microsoft’s Surface Duo is not ‘failing up’
- Here’s what you can do if Windows 10 update KB5001330 is causing issues
- These are the best PC sticks when you’re on the move
Создание и управление заданиями планировщика из PowerShell
Большинство пользователей и администраторов привыкли использовать графический интерфейс консоли Taskschd.msc для создания заданий планировщика Windows (Task Scheduler), запускаемых по расписанию. Однако в различных скриптах и автоматизируемых задачах для создания заданий планировщика гораздо удобнее использовать возможности PowerShell. В этой статье мы покажем, как создавать и управлять заданиями планировщика Windows из PowerShell.
Управление заданиями Task Scheduler с помощью PowerShell
В Windows 10/Windows Server 2016 для управления задачами в планировщике используется PowerShell модуль ScheduledTasks. Список командлетов в модуле можно вывести так:
Get-Command -Module ScheduledTasks
- Disable-ScheduledTask
- Enable-ScheduledTask
- Export-ScheduledTask
- Get-ClusteredScheduledTask
- Get-ScheduledTask
- Get-ScheduledTaskInfo
- New-ScheduledTask
- New-ScheduledTaskAction
- New-ScheduledTaskPrincipal
- New-ScheduledTaskSettingsSet
- New-ScheduledTaskTrigger
- Register-ClusteredScheduledTask
- Register-ScheduledTask
- Set-ClusteredScheduledTask
- Set-ScheduledTask
- Start-ScheduledTask
- Stop-ScheduledTask
- Unregister-ClusteredScheduledTask
- Unregister-ScheduledTask

Как создать задание планировщика с помощью PowerShell?
В современных версиях PowerShell (начиная с PowerShell 3.0 в Windows Server 2012/Windows 8) для создания заданию планировщика нужно использовать командлеты New-ScheduledTaskTrigger и Register-ScheduledTask.
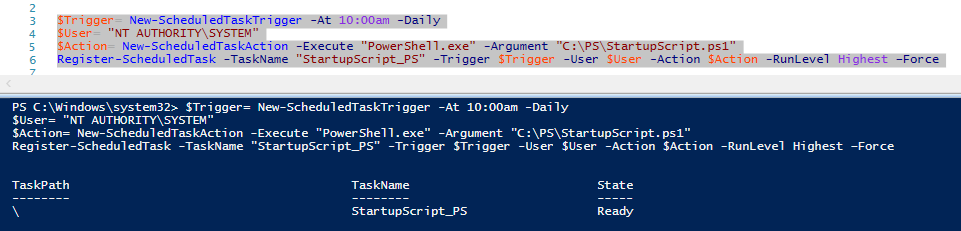
Предположим, наша задача создать задание планировщика, которое должно запускаться при загрузке компьютера (или в определенное время) и выполнять какой-то PowerShell скрипт. Создадим задание планировщика с именем StartupScript_PS. Данное задание должно каждый день в 10:00 запускать PowerShell скрипт, хранящийся в файле C:\PS\StartupScript.ps1 из-под учетной записи системы (SYSTEM). Задание будет выполняться с повышенными привилегиями (галка “Run with highest privileges”).
$Trigger= New-ScheduledTaskTrigger -At 10:00am -Daily
$User= «NT AUTHORITY\SYSTEM»
$Action= New-ScheduledTaskAction -Execute «PowerShell.exe» -Argument «C:\PS\StartupScript.ps1»
Register-ScheduledTask -TaskName «StartupScript_PS» -Trigger $Trigger -User $User -Action $Action -RunLevel Highest –Force
Если задание успешно создано, появится надпись Ready.
Теперь ваш PowerShell скрипт будет запускаться по указанному расписанию. Если на вашем компьютере настроена PowerShell Execution Policy, блокирующая запуск скриптов PS1, вы можете запустить скрипт их планировщика с параметром –Bypass.
Используйте такую строку при создании нового задания:
$Action= New-ScheduledTaskAction -Execute «PowerShell.exe» -Argument “-NoProfile -NoLogo -NonInteractive -ExecutionPolicy Bypass -File C:\PS\StartupScript.ps1″
Откройте консоль Taskschd.msc и проверьте, что проверьте, что в Task Scheduler Library появилось новое задание планировщика.
$TaskName = «NewPsTask»
$TaskDescription = «Запуск скрипта PowerShell из планировщика»
$TaskCommand = «c:\windows\system32\WindowsPowerShell\v1.0\powershell.exe»
$TaskScript = «C:\PS\StartupScript.ps1»
$TaskArg = «-WindowStyle Hidden -NonInteractive -Executionpolicy unrestricted -file $TaskScript»
$TaskStartTime = [datetime]::Now.AddMinutes(1)
$service = new-object -ComObject(«Schedule.Service»)
$service.Connect()
$rootFolder = $service.GetFolder(«\»)
$TaskDefinition = $service.NewTask(0)
$TaskDefinition.RegistrationInfo.Description = «$TaskDescription»
$TaskDefinition.Settings.Enabled = $true
$TaskDefinition.Settings.AllowDemandStart = $true
$triggers = $TaskDefinition.Triggers
#http://msdn.microsoft.com/en-us/library/windows/desktop/aa383915(v=vs.85).aspx
$trigger = $triggers.Create(8)
Получение информации и запуск заданий планировщика из PowerShell
Вы можете вывести список всех активных заданий планировщика в Windows с помощью команды:
Get-ScheduledTask -TaskPath | ? state -ne Disabled
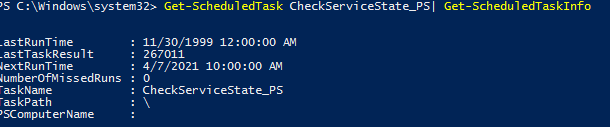
Чтобы получить информацию о конкретном задании:
Get-ScheduledTask CheckServiceState_PS| Get-ScheduledTaskInfo
Вы можете отключить это задание:
Get-ScheduledTask CheckServiceState_PS | Disable-ScheduledTask
Чтобы включить задание:
Get-ScheduledTask CheckServiceState_PS | Enable-ScheduledTask
Чтобы запустить задание немедленно (не дожидаясь расписания), выполните:

Чтобы полностью удалить задание из Task Scheduler:
Unregister-ScheduledTask -TaskName CheckServiceState_PS
Если нужно изменить имя пользователя, из-под которого запускается задание и, например, режим совместимости, используйте командлет Set-ScheduledTask:
$task_user = New-ScheduledTaskPrincipal -UserId ‘winitpro\kbuldogov’ -RunLevel Highest
$task_settings = New-ScheduledTaskSettingsSet -Compatibility ‘Win7’
Set-ScheduledTask -TaskName CheckServiceState_PS -Principal $task_user -Settings $task_settings

Экспорт и импорт заданий планировщика в XML файл
С помощью PowerShell можно экспортировать любое задания планировщика в текстовый XML файл для распространения на другие компьютеры. Вы можете экспортировать задание из графического интерфейса Task Scheduler или из консоли PowerShell.
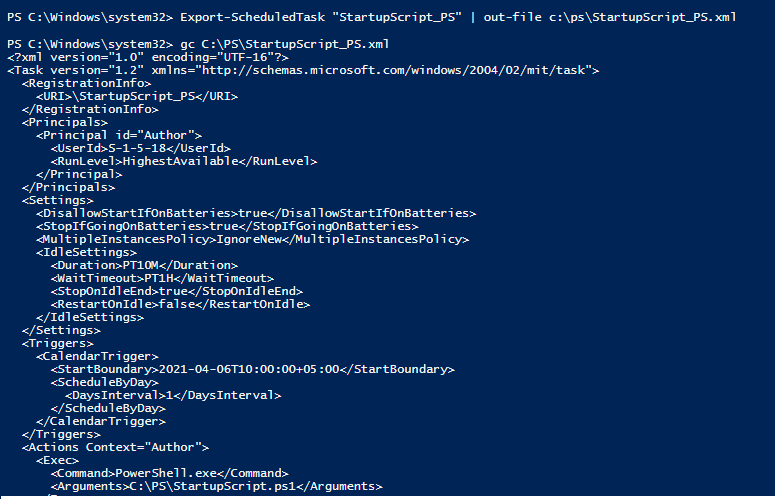
Следующая команда экспортирует задание StartupScript_PS в файл StartupScript_PS.xml:
Export-ScheduledTask «StartupScript_PS» | out-file c:\temp\StartupScript_PS.xml
schtasks /query /tn «NewPsTask» /xml >> «c:\ps\NewPsTask.xml»
После того, как настройки задания планировщика экспортированы в XML файл, его можно импортировать на любой другой компьютер с помощи графической консоли, SchTasks.exe или PowerShell.
Воспользуйте командлетом PowerShell Register-ScheduledTask чтобы параметры задания из файла и зарегистрировать его:
Register-ScheduledTask -Xml (Get-Content “\\Server1\public\NewPsTask.xml” | out-string) -TaskName «NewPsTask»
schtasks /create /tn «NewPsTask» /xml «\\Server1\public\NewPsTask.xml » /ru corp\aaivanov /rp Pa$$w0rd
schtasks /Run /TN «NewPsTask»
Обратите внимание, что в этом примере указаны данные учетной записи, из-под которой будет запускаться задание. Если имя и пароль учетной записи не указаны, то т.к. они не хранятся в задании, они будут запрошены при импорте.
How to create an automated task using Task Scheduler on Windows 10

On Windows 10, Task Scheduler is a tool that allows you to create and run virtually any task automatically. Typically, the system and certain apps use the scheduler to automate maintenance tasks (such as disk defragmentation, disk cleanup, and updates), but anyone can use it. With this experience, you can start applications, run commands, and execute scripts at a particular day and time, or you can also trigger tasks when a specific event occurs.
Task Scheduler works by keeping tabs of the time and events on your computer and executes the task as soon as the condition is met.
Whether you’re trying to use the Task Scheduler to run a task at a specific time or when an event occurs, you can create a task in at least two different ways using the basic and advanced settings.
In this Windows 10 guide, we’ll walk you through the steps to get started with the Task Scheduler experience to automate tasks on your device.
How to create a basic task using Task Scheduler
To create a task using basic settings on Windows 10, use these steps:
- Open Start.
- Search for Task Scheduler, and click the top result to open the experience.
Right-click the «Task Scheduler Library» branch, and select the New Folder option.

Select the Create Basic Task option.
In the «Name» field, type a short descriptive name for the task. For example, Notepad Launcher.

Select the Monthly option.
Task Scheduler allows you to select from a number of triggers, including on a specific date, during startup, or when you or a particular user signs in. Depending on your requirements, you’ll need to configure additional parameters. In this case, we’ll be selecting the option to run a task every month.
Use the «Monthly» drop-down menu to the months of the year that you want to run the task.
Use the «Days» or «On» drop-down menu to specify the days that the task will run.
Quick Tip: Using the «On» setting may be your best option if you’re planning to run a task during a specific day of the week.
Select the Start a program option to launch an app, run a command, or execute a script file.
You can select the Send an e-mail or Display a message option, but these are deprecated features, which means that they may or may not work because Microsoft is no longer maintaining them.
- Send an e-mail: Triggers an email notification with a custom message on schedule, but it requires to specify an email server to work.
- Display a message: Allows to display a text message on the screen on schedule.
In the «Program/script» field, specify the path for the application.
Quick Tip: If you don’t know the path of the app, click the Browse button to find it.
Click the Finish button.
Once you’ve completed the steps, the task will be saved, and it’ll run automatically on the schedule you specified.
How to create an advanced task using Task Scheduler
To create a task using advanced settings using the Task Scheduler, use these steps:
- Open Start.
- Search for Task Scheduler, click the top result to open the experience.
Right-click the «Task Scheduler Library» branch, and select the New Folder option.
Select the Create Task option.
In the «Name» field, type a short descriptive name for the task. For example, PowerShell First Script.
![]()
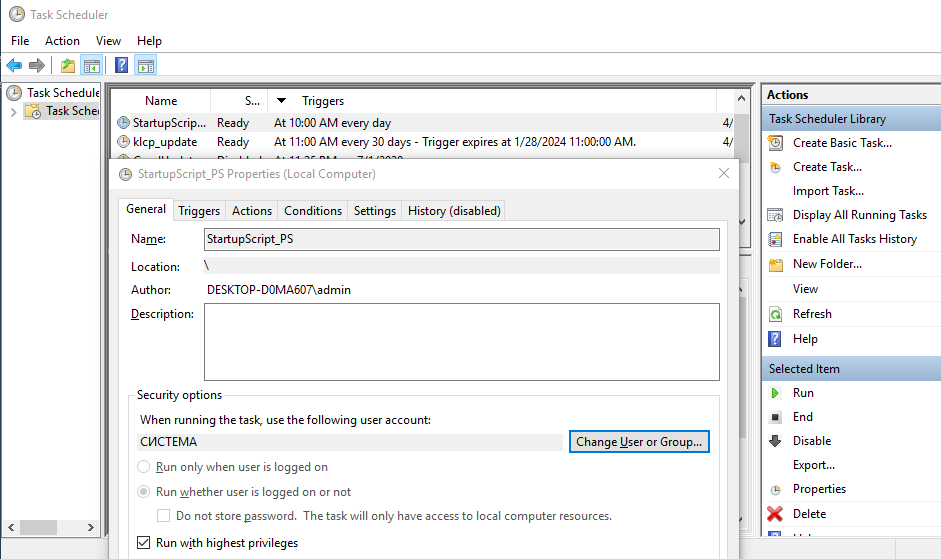
In the «Security options» section, you can configure which administrator account can run the task.
![]()
Quick Tip: If you’re using an account with administrative privileges, the default user should be fine. If you’re running a Command Prompt or PowerShell command, you can select the Run whether user is logged on or not option to prevent the command window from showing up when the task runs automatically, as it’s likely that using the Hidden option won’t work.
Use the «Months» drop-down menu to select the months that the task will run.
![]()
Use the «Days» or «On» drop-down menu to specify the days that the task will run.
![]()
(Optional) In the «Advanced settings» section, you can select options to delay, repeat, stop, and expire a task. The Enabled option is checked by default. (Usually, you don’t want to change these settings unless necessary.)
![]()
Use the «Action» drop-down menu and select the Start a program option.
You can still use the Send an e-mail or Display a message option, but these are deprecated features, which means that they may or may not work because Microsoft is no longer maintaining them.
Under the «Settings» section, in the «Program/script» field, specify the path for the application. For example: powershell.exe .
![]()
Quick Tip: If you don’t know the path of the app, click the Browse button to find it. Also, if it’s a known application like PowerShell or Command Prompt, you only need to specify the file name.
(Optional) In the «Add arguments» field, you can specify arguments to run the task with special instructions. For example: -NoExit -ExecutionPolicy Bypass C:\PATH\TO\SCRIPT\first_script.ps1 .
Using the «powershell.exe» command and the above argument, it’ll run the script named «first_script.ps1.» The argument «-ExecutionPolicy Bypass» ensures that the script runs successfully, and the «-NoExit» argument will prevent the window from closing after running the script. You can learn more about creating a PowerShell script in this guide.
(Optional) The «Conditions» tab includes settings that work in combination with the «Triggers» settings to determine when the task should run. (If you’re creating a simple task, you don’t need to modify these settings. However, you want to make sure the Power settings are configured to your requirements.)
![]()
(Optional) The «Settings» app include additional options that will directly affect the behavior of the task. It’s not a requirement to change these settings, but it’s a good idea to check the following options:
- Run the task as soon as possible after a scheduled start is missed.
- If the task fails, restart every. (Use this option with the default selections.)
![]()
After completing the steps, authenticate with your account credentials, and then the task will run automatically on schedule or event using the specified settings.
How to run, edit, and delete a task using Task Scheduler
Once you’ve created the task, you can use these steps to view, exit, or run it on demand:
- Open Start.
- Search for Task Scheduler, click the top result to open the experience.
- Expand the Task Scheduler Library branch.
- Select the folder with your tasks.
- To run a task on demand, right-click it and select the Run option.
- To edit a task, right-click it and select the Properties options.
- To delete a task, right-click it and select the Delete option.
In the page, you’ll also be able to see all your tasks with information, such as the triggers, when the task run last and when it’ll run the next time.
Alternatively, you can always select the task, and use the Actions pane on the right to quickly perform actions, such as run, end, disable, and edit the job.
While we’re focusing this guide on Windows 10, Task Scheduler has been around for a long time, which means that you can use the same instructions on Windows 8.1, Windows 7, and older versions.
More Windows 10 resources
For more helpful articles, coverage, and answers to common questions about Windows 10, visit the following resources:
![]()
Halo: MCC’s live service elements make it better, not worse
Halo: The Master Chief Collection is more popular than ever, but some fans don’t agree with the live service approach 343 Industries has taken with it. Here’s why those elements are, at the end of the day, great for the game and for Halo overall.
![]()
Microsoft’s Surface Duo is not ‘failing up’
Microsoft announced this week that it was expanding Surface Duo availability to nine new commercial markets. While Surface Duo is undoubtedly a work in progress, this is not a sign of a disaster. It’s also doesn’t mean that Surface Duo is selling a ton either. Instead, the reason for the expansion is a lot more straightforward.
![]()
Here’s what you can do if Windows 10 update KB5001330 is causing issues
In this guide, we’ll show you the steps to get rid of the update KB5001330 to fix profile, gaming, and BSoD problems with the Windows 10 October 2020 Update and May 2020 Update.
![]()
These are the best PC sticks when you’re on the move
Instant computer — just add a screen. That’s the general idea behind the ultra-portable PC, but it can be hard to know which one you want. Relax, we have you covered!


