- Приступая к разработке для Android с помощью Xamarin. Android Get started developing for Android using Xamarin.Android
- Требования Requirements
- Создание проекта Xamarin.Android Create a new Xamarin.Android project
- Создание пользовательского интерфейса с помощью XAML Create a UI with XAML
- Добавление кода логики с помощью C # Add logic code with C#
- Установка текущего времени Set the current time
- Обновлять текущее время каждую секунду Update the current time once every second
- Добавить Хауроффсет Add HourOffset
- Создание обработчиков событий нажатия кнопки Create the button Click event handlers
- Подключайте кнопки вверх и вниз к соответствующим обработчикам событий Wire up the up and down buttons to their corresponding event handlers
- Завершенный файл MainActivity.cs Completed MainActivity.cs file
- Запустите приложение. Run your app
- Установка в Windows Windows Installation
- Обзор Overview
- Установка Installation
- Параметр Configuration Configuration
- Диспетчер Android SDK Android SDK Manager
- Эмулятор Android Android Emulator
- Устройство Android Android Device
- Создание приложения Create an Application
Приступая к разработке для Android с помощью Xamarin. Android Get started developing for Android using Xamarin.Android
Это руководство поможет приступить к работе с Xamarin. Android в Windows для создания кросс-платформенного приложения, которое будет работать на устройствах Android. This guide will help you to get started using Xamarin.Android on Windows to create a cross-platform app that will work on Android devices.
В этой статье вы создадите простое приложение Android с помощью Xamarin. Android и Visual Studio 2019. In this article, you will create a simple Android app using Xamarin.Android and Visual Studio 2019.
Требования Requirements
Для работы с этим руководством вам потребуется следующее: To use this tutorial, you’ll need the following:
- быть под управлением ОС Windows 10; Windows 10
- Visual Studio 2019: Community, Professional или Enterprise (см. Примечание) Visual Studio 2019: Community, Professional, or Enterprise (see note)
- Рабочая нагрузка «Разработка мобильных приложений с помощью .NET» для Visual Studio 2019 The «Mobile development with .NET» workload for Visual Studio 2019
Это руководством будет работать с Visual Studio 2017 или 2019. This guide will work with Visual Studio 2017 or 2019. Если вы используете Visual Studio 2017, некоторые инструкции могут быть неправильными из-за различий пользовательского интерфейса между двумя версиями Visual Studio. If you are using Visual Studio 2017, some instructions may be incorrect due to UI differences between the two versions of Visual Studio.
Вам также потребуется телефон Android или настроенный эмулятор для запуска приложения. You will also to have an Android phone or configured emulator in which to run your app. См. раздел Настройка эмулятора Android. See Configuring an Android emulator.
Создание проекта Xamarin.Android Create a new Xamarin.Android project
Запустите среду Visual Studio. Start Visual Studio. Выберите файл > создать > проект, чтобы создать новый проект. Select File > New > Project to create a new project.
В диалоговом окне Новый проект выберите шаблон приложение Android (Xamarin) и нажмите кнопку Далее. In the new project dialog, select the Android App (Xamarin) template and click Next.
Присвойте проекту имя тимечанжерандроид и нажмите кнопку создать. Name the project TimeChangerAndroid and click Create.
В диалоговом окне Создание кросс — платформенного приложения выберите пустое приложение. In the New Cross Platform App dialog, select Blank App. В минимальной версии Android выберите Android 5,0 (без описания операций). In the Minimum Android Version, select Android 5.0 (Lollipop). Нажмите кнопку ОК. Click OK.
Xamarin создаст новое решение с одним проектом с именем тимечанжерандроид. Xamarin will create a new solution with a single project named TimeChangerAndroid.
Создание пользовательского интерфейса с помощью XAML Create a UI with XAML
В каталоге ресаурцес\лайаут проекта откройте activity_main.xml. In the Resources\layout directory of your project, open activity_main.xml. XML-код в этом файле определяет первый экран, который пользователь увидит при открытии Тимечанжер. The XML in this file defines the first screen a user will see when opening TimeChanger.
Пользовательский интерфейс Тимечанжер прост. TimeChanger’s UI is simple. Он отображает текущее время и содержит кнопки для корректировки времени с шагом в один час. It displays the current time and has buttons to adjust the time in increments of one hour. Он использует вертикальный LinearLayout для выравнивания времени над кнопками и горизонтально, LinearLayout чтобы расположить кнопки рядом друг с другом. It uses a vertical LinearLayout to align the time above the buttons and a horizontal LinearLayout to arrange the buttons side-by-side. Содержимое выравнивается по центру экрана путем задания для атрибута Android: тяжести центрирования по вертикали LinearLayout . The content is centered in the screen by setting android:gravity attribute to center in the vertical LinearLayout .
Замените содержимое activity_main.xml следующим кодом. Replace the contents of activity_main.xml with the following code.
На этом этапе можно запустить тимечанжерандроид и просмотреть созданный пользовательский интерфейс. At this point you can run TimeChangerAndroid and see the UI you’ve created. В следующем разделе вы добавите в пользовательский интерфейс функциональные возможности, отображающие текущее время и позволяющие кнопкам выполнить действие. In the next section, you will add functionality to your UI displaying the current time and enabling the buttons to perform an action.
Добавление кода логики с помощью C # Add logic code with C#
Откройте файл MainActivity.cs. Open MainActivity.cs. Этот файл содержит логику кода программной части, которая будет добавлять функции в пользовательский интерфейс. This file contains the code-behind logic that will add functionality to the UI.
Установка текущего времени Set the current time
Сначала получите ссылку на объект TextView , который будет отображать время. First, get a reference to the TextView that will display the time. Используйте финдвиевбид для поиска всех элементов пользовательского интерфейса с правильным идентификатором Android: ID (который был задан «@+id/timeDisplay» в XML-коде из предыдущего шага). Use FindViewById to search all UI elements for the one with the correct android:id (which was set to «@+id/timeDisplay» in the xml from the previous step). Это то TextView , что будет отображать текущее время. This is the TextView that will display the current time.
Элементы управления ИП должны быть обновлены в потоке пользовательского интерфейса. UI controls must be updated on the UI thread. Изменения, внесенные из другого потока, могут неправильно обновлять элемент управления, как он отображается на экране. Changes made from another thread may not properly update the control as it displays on the screen. Поскольку нет никакой гарантии, что этот код всегда будет выполняться в потоке пользовательского интерфейса, используйте метод рунонуисреад , чтобы убедиться, что обновления отображаются правильно. Because there is no guarantee this code will always be running on the UI thread, use the RunOnUiThread method to make sure any updates display correctly. Ниже приведен полный UpdateTimeLabel метод. Here is the complete UpdateTimeLabel method.
Обновлять текущее время каждую секунду Update the current time once every second
На этом этапе текущее время будет точным для (не более одной секунды после запуска Тимечанжерандроид). At this point, the current time will be accurate for, at most, one second after TimeChangerAndroid is launched. Для сохранения точности времени метка должна быть периодически обновлена. The label must be periodically updated to keep the time accurate. Объект таймера будет периодически вызывать метод обратного вызова, который обновляет метку текущим временем. A Timer object will periodically call a callback method that updates the label with the current time.
Добавить Хауроффсет Add HourOffset
Кнопки вверх и вниз корректируют время с шагом в один час. The up and down buttons adjust the time in increments of one hour. Добавьте свойство хауроффсет для контроля текущей корректировки. Add an HourOffset property to track the current adjustment.
Теперь обновите метод Упдатетимелабел, чтобы он знал о свойстве Хауроффсет. Now update the UpdateTimeLabel method to be aware of the HourOffset property.
Создание обработчиков событий нажатия кнопки Create the button Click event handlers
Все кнопки вверх и вниз необходимо выполнить, увеличив или уменьшая свойство Хауроффсет и вызовите Упдатетимелабел. All the up and down buttons need to do is increment or decrement the HourOffset property and call UpdateTimeLabel.
Подключайте кнопки вверх и вниз к соответствующим обработчикам событий Wire up the up and down buttons to their corresponding event handlers
Чтобы связать кнопки с соответствующими обработчиками событий, сначала используйте Финдвиевбид, чтобы найти кнопки по их идентификаторам. To associate the buttons with their corresponding event handlers, first use FindViewById to find the buttons by their ids. После получения ссылки на объект Button можно добавить обработчик событий к его Click событию. Once you have a reference to the button object, you can add an event handler to its Click event.
Завершенный файл MainActivity.cs Completed MainActivity.cs file
Когда все будет готово, MainActivity.cs должен выглядеть следующим образом: When you’re finished, MainActivity.cs should look like this:
Запустите приложение. Run your app
Чтобы запустить приложение, нажмите клавишу F5 или кнопку отладка > начать отладку. To run the app, press F5 or click Debug > Start Debugging. В зависимости от настройки отладчикаприложение запустится на устройстве или в эмуляторе. Depending on how your debugger is configured, your app will launch on a device or in an emulator.
Установка в Windows Windows Installation
В этом руководстве описаны действия по установке Xamarin.Android для Visual Studio в Windows, а также содержатся сведения о настройке Xamarin.Android для создания первого приложения Xamarin.Android. This guide describes the steps for installing Xamarin.Android for Visual Studio on Windows, and it explains how to configure Xamarin.Android for building your first Xamarin.Android application.
Обзор Overview
Поскольку теперь Xamarin является бесплатным компонентом всех выпусков Visual Studio и не требует отдельной лицензии, для скачивания и установки средств Xamarin.Android можно использовать установщик Visual Studio. Because Xamarin is now included with all editions of Visual Studio at no extra cost and does not require a separate license, you can use the Visual Studio installer to download and install Xamarin.Android tools. (Выполнять действия по установке вручную и лицензированию, которые требовались для более ранних версий Xamarin.Android, больше не нужно.) В этом руководстве рассматриваются следующие темы: (The manual installation and licensing steps that were required for earlier versions of Xamarin.Android are no longer necessary.) In this guide, you will learn the following:
Настройка пользовательских расположений для пакета Java Development Kit, пакета SDK для Android и пакета NDK для Android. How to configure custom locations for the Java Development Kit, Android SDK, and Android NDK.
Запуск диспетчера пакетов SDK для Android для скачивания и установки дополнительных компонентов пакета SDK для Android. How to launch the Android SDK Manager to download and install additional Android SDK components.
Подготовка устройства или эмулятора Android для отладки и тестирования. How to prepare an Android device or emulator for debugging and testing.
Создание первого проекта приложения Xamarin.Android. How to create your first Xamarin.Android app project.
После выполнения действий в этом руководстве ваша рабочая установка Xamarin.Android будет интегрирована в Visual Studio, и вы будете готовы приступить к созданию первого приложения Xamarin.Android. By the end of this guide, you will have a working Xamarin.Android installation integrated into Visual Studio, and you will be ready to start building your first Xamarin.Android application.
Установка Installation
Подробные сведения об установке Xamarin для использования с Visual Studio в Windows см. в руководстве Установка в Windows. For detailed information on installing Xamarin for use with Visual Studio on Windows, see the Windows Install guide.
Параметр Configuration Configuration
Для создания приложений в Xamarin.Android используется пакет Java Development Kit (JDK) и пакет SDK для Android. Xamarin.Android uses the Java Development Kit (JDK) and the Android SDK to build apps. Во время установки установщик Visual Studio помещает эти средства в расположения по умолчанию и настраивает среду разработки с соответствующей конфигурацией путей. During installation, the Visual Studio installer places these tools in their default locations and configures the development environment with the appropriate path configuration. Чтобы просмотреть или изменить эти расположения, последовательно выберите Сервис > Параметры > Xamarin > Параметры Android: You can view and change these locations by clicking Tools > Options > Xamarin > Android Settings:
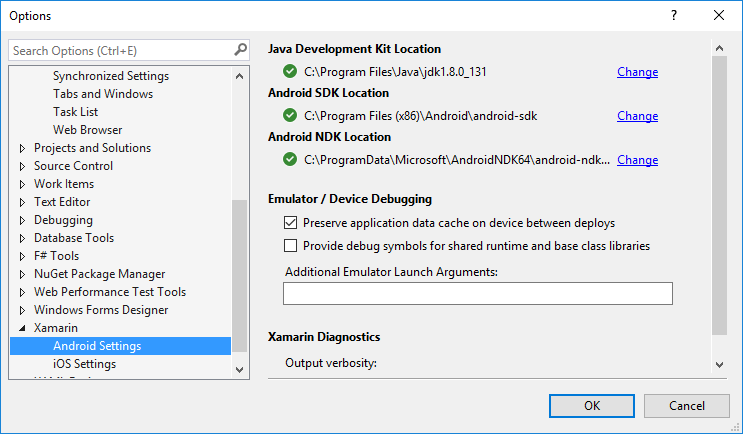
В большинстве случаев эти расположения по умолчанию будут работать без дальнейших изменений. For most users these default locations will work without further changes. Однако в Visual Studio можно настроить пользовательские расположения для этих средств (например, если пакеты Java JDK, SDK для Android или NDK установлены в другом месте). However, you may wish to configure Visual Studio with custom locations for these tools (for example, if you have installed the Java JDK, Android SDK, or NDK in a different location). Нажмите кнопку Изменить рядом с путем, который требуется изменить, а затем перейдите в новое расположение. Click Change next to a path that you want to change, then navigate to the new location.
Xamarin.Android использует пакет JDK 8, который необходим при разработке для API уровня 24 или выше (пакет JDK 8 также поддерживает уровни API ниже 24). Xamarin.Android uses JDK 8, which is required if you are developing for API level 24 or greater (JDK 8 also supports API levels earlier than 24). При разработке специально для уровня API 23 или ниже можно продолжать использовать пакет JDK 7. You can continue to use JDK 7 if you are developing specifically for API level 23 or earlier.
Xamarin.Android не поддерживает пакет JDK 9. Xamarin.Android does not support JDK 9.
Диспетчер Android SDK Android SDK Manager
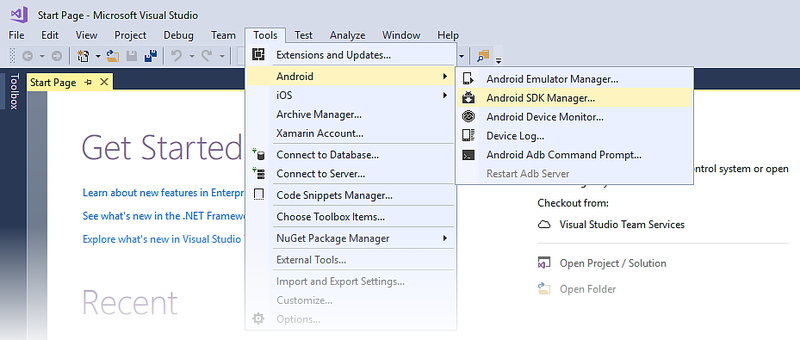
Android использует несколько параметров уровня API Android для определения совместимости приложения в разных версиях Android (дополнительные сведения об уровнях API Android см. в статье Общие сведения об уровнях API Android). Android uses multiple Android API level settings to determine your app’s compatibility across the various versions of Android (for more information about Android API levels, see Understanding Android API Levels). В зависимости от того, с какими уровнями API Android вы будете работать, может потребоваться скачать и установить дополнительные компоненты пакета SDK для Android. Depending on what Android API level(s) you want to target, you may need to download and install additional Android SDK components. Кроме того, может потребоваться установить дополнительные средства и образы эмулятора из пакета SDK для Android. In addition, you may need to install optional tools and emulator images provided in the Android SDK. Для этого следует использовать диспетчер пакетов SDK для Android. To do this, use the Android SDK Manager. Запустите диспетчер пакетов SDK для Android, выбрав Сервис > Android > Диспетчер пакетов SDK для Android: You can launch the Android SDK Manager by clicking Tools > Android > Android SDK Manager:
Диспетчер пакетов SDK для Android установлен в Visual Studio по умолчанию: By default, Visual Studio installs the Google Android SDK Manager:
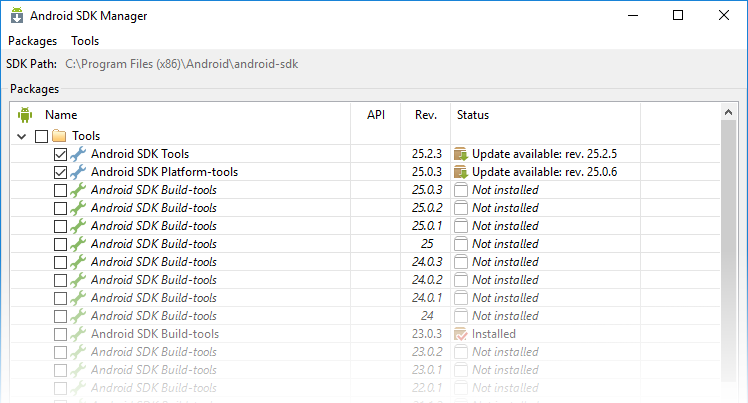
С помощью диспетчера пакетов SDK для Android Google можно устанавливать пакеты инструментов SDK для Android до версии 25.2.3. You can use the Google Android SDK Manager to install versions of the Android SDK Tools package up to version 25.2.3. Однако если необходимо использовать более позднюю версию пакета инструментов SDK для Android, нужно установить подключаемый модуль диспетчера пакетов SDK для Android Xamarin для Visual Studio (доступен в Visual Studio Marketplace). However, if you need to use a later version of the Android SDK Tools package, you must install the Xamarin Android SDK Manager plugin for Visual Studio (available from the Visual Studio Marketplace). Это необходимо, так как автономный диспетчер пакетов SDK Google был объявлен нерекомендуемым в версии 25.2.3 пакета инструментов SDK для Android. This is necessary because Google’s standalone SDK Manager was deprecated in version 25.2.3 of the Android SDK Tools package.
Дополнительные сведения об использовании диспетчера пакетов SDK для Android Xamarin см. в статье Установка пакета SDK для Android. For more information about using the Xamarin Android SDK Manager, see Android SDK Setup.
Эмулятор Android Android Emulator
Android Emulator — это удобный инструмент для разработки и тестирования приложений Xamarin.Android. The Android Emulator can be helpful tool to develop and test a Xamarin.Android app. Физическое устройство, например планшет, не всегда доступно во время разработки, или разработчик хочет выполнять тесты на интеграцию на компьютере до фиксации кода. For example, a physical device such as a tablet may not be readily available during development, or a developer may want to run some integration tests on their computer before committing code.
Эмуляция устройства Android на компьютере включает в себя следующие компоненты: Emulating an Android device on a computer involves the following components:
- Эмулятор Google Android. Это эмулятор, основанный на QEMU и запускающий эмуляцию устройства на рабочей станции разработчика. Google Android Emulator – This is an emulator based on QEMU that creates a virtualized device running on the developer’s workstation.
- Образ эмулятора. Образ эмулятора — это шаблон или спецификация оборудования и операционной системы, которая предназначена для виртуализации. An Emulator Image – An emulator image is a template or a specification of the hardware and operating system that is meant to be virtualized. Например, один образ эмулятора определяет требования к оборудованию для Android 7.0 с установленными службами Google Play на Nexus 5X. For example, one emulator image would identify the hardware requirements for a Nexus 5X running Android 7.0 with Google Play Services installed. Другой образ эмулятора может определять планшет с диагональю 10″ под управлением Android 6.0. Another emulator image might specific a 10″ table running Android 6.0.
- Виртуальное устройство Android (AVD) . Виртуальное устройство Android — это эмуляция устройства Android, созданная из образа эмулятора. Android Virtual Device (AVD) – An Android Virtual Device is an emulated Android device created from an emulator image. При запуске и тестировании приложений Android Xamarin.Android запустит эмулятор Android, запускающий определенное виртуальное устройство Android, установит пакет приложений для Android и запустит приложение. When running and testing Android apps, Xamarin.Android will start the Android Emulator, starting a specific AVD, install the APK, and then run the app.
Можно значительно повысить производительность при разработке на компьютерах с процессором x86, если использовать особые образы эмуляторов, оптимизированные для архитектуры x86, и одну из двух технологий виртуализации: A significant improvement in performance when developing on x86 based computers can be achieved by using special emulator images that are optimized for x86 architecture and one of two virtualization technologies:
- Microsoft Hyper-V – доступно на компьютерах под управлением Windows 10 с обновлением за апрель 2018 г. или более поздней версии. Microsoft’s Hyper-V – Available on computers running the Windows 10 April 2018 Update or later.
- Hardware Accelerated Execution Manager (HAXM) от Intel – доступно на компьютерах с процессором x86 на базе OS X, macOS или более старой версии Windows. Intel’s Hardware Accelerated Execution Manager (HAXM) – Available on x86 computers running OS X, macOS, or older versions of Windows.
Дополнительные сведения об Android Emulator, Hyper-V и HAXM см. в разделе Аппаратное ускорение для производительной работы эмулятора. For more information about the Android Emulator, Hyper-V, and HAXM, please see Hardware Acceleration for Emulator Performance guide.
В версиях Windows до Windows 10 с обновлением за апрель 2018 г. HAXM не совместим с Hyper-V. On versions of Windows prior to Windows 10 April 2018 Update, HAXM is not compatible with Hyper-V. В этом случае необходимо отключить Hyper-V или использовать более медленные образы эмулятора без оптимизации для x86. In this scenario it is necessary to either disable Hyper-V or to use the slower emulator images that do not have the x86 optimizations.
Устройство Android Android Device
Если у вас есть физическое устройство Android для тестирования, настройте его для использования в разработке. If you have a physical Android device to use for testing, this is a good time to set it up for development use. Сведения о настройке устройства Android для разработки, его подключении к компьютеру для запуска и отладки приложений Xamarin.Android см. в статье Настройка устройства для разработки. See Set Up Device for Development to configure your Android device for development, then connect it to your computer for running and debugging Xamarin.Android applications.
Создание приложения Create an Application
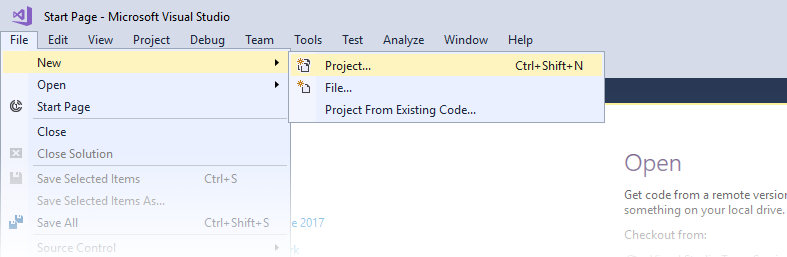
Теперь, когда вы установили Xamarin.Android, можно запустить Visual Studio для создания проекта. Now that you have installed Xamarin.Android, you can launch Visual Studio create a new project. Выберите Файл > Создать > проект, чтобы приступить к созданию приложения: Click File > New > Project to begin creating your app:
В диалоговом окне Новый проект в разделе Шаблоны выберите Android и на правой панели щелкните Приложение Android. In the New Project dialog, select Android under Templates and click Android App in the right pane. Введите имя приложения (на снимке экрана ниже приложение называется MyApp), а затем нажмите кнопку ОК: Enter a name for your app (in the screenshot below, the app is called MyApp), then click OK:


