- ⛑️ 2 способа создания ISO с загрузочного USB на Linux
- Создание ISO-образа с загрузочного USB-накопителя с помощьюGnome Disks
- 2 thoughts on “ ⛑️ 2 способа создания ISO с загрузочного USB на Linux ”
- How to Create an ISO File in Ubuntu 18.04 LTS
- Using Mkisofs utility
- Using dd command in Terminal to build an ISO file
- Using Brasero utility to make an ISO file
- Karim Buzdar
- Ubuntu Documentation
- Introduction
- Why would I want to do this?
- Creating an iso image from a non-music CD or DVD
- GUI (Ubuntu 20.04.1 LTS, Focal Fossa)
- Command line
- Creating an iso image from a music CD or DVD
- Listening the audio tracks of an iso image from a music CD
- How to make a disk image and restore from it later?
- 12 Answers 12
- With dd
⛑️ 2 способа создания ISO с загрузочного USB на Linux
В этой статье мы покажем вам, как создать ISO-образ с загрузочного USB-накопителя в Linux.
Мы объясним два способа достижения этого: через интерфейс командной строки (CLI) и программу с графическим интерфейсом пользователя (GUI).
Создание ISO-образа с загрузочного USB-накопителя с помощью dd.
dd – это широко используемый инструмент командной строки для Linux и других Unix-подобных операционных систем, используемый для преобразования и копирования файлов.
Чтобы создать образ ISO из файлов загрузочного USB-накопителя, сначала необходимо вставить USB-накопитель, а затем найти имя устройства USB с помощью следующей команды df.
Из вышеприведенного вывода вы можете ясно увидеть, что имя подключенного USB-устройства – /dev/sdb1.
Теперь вы можете запустить следующую команду, чтобы создать ISO-образ из загрузочного USB-накопителя, как показано ниже.
Обязательно замените /dev/sdb1 на USB-накопитель и /home/itisgood/Documents/Linux_Mint_19_XFCE.iso на полное имя нового ISO-образа.
В приведенной выше команде опции:
- if – означает чтение из указанного ФАЙЛА вместо стандартного ввода.
- of – означает запись в указанный файл вместо stdout.
После этого вы можете проверить образ ISO, используя следующую команду ls, как показано далее.
Создание ISO-образа с загрузочного USB-накопителя с помощьюGnome Disks
Gnome Disks – графический инструмент, используемый для управления дисками и носителями в Linux.
Он используется для форматирования и разбиения дисков, монтирования и размонтирования разделов и запроса S.M.A.R.T.
Если в вашей системе нет утилиты gnome-disk, вы можете установить ее, выполнив следующую команду.
После успешной установки диска Gnome найдите и откройте его из системного меню или тире.
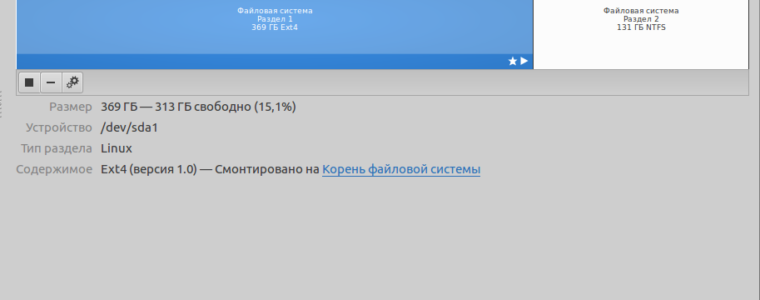
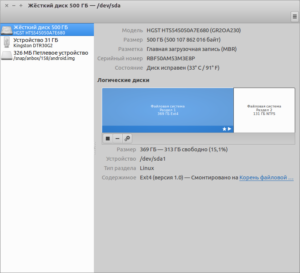
Затем из интерфейса по умолчанию выберите загрузочное устройство из списка подключенных устройств на левой панели, щелкнув по нему и выбрав параметры диска.
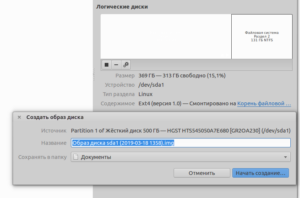
Затем нажмите кнопку «Создать образ диска», как показано на следующем рисунке.
В диалоговом окне укажите имя ISO-файла, его местоположение и нажмите «Начать создание».
Затем введите свой пароль, чтобы открыть загрузочное устройство, и процесс должен начаться, если аутентификация прошла успешно.
Вот и все! В этой статье мы объяснили два способа создания ISO из загрузочного USB-накопителя в Linux.
Используйте форму комментария ниже, чтобы поделиться своими мыслями с нами или задать вопросы.
2 thoughts on “ ⛑️ 2 способа создания ISO с загрузочного USB на Linux ”
Мне вот интересно.. вы сами проверяете что пишите??
Если с помощью dd сделать образ. то он будет читаем только с помощью dd.
В virtual box этот образ не подключишь и на dvd болванку не запишешь.
Источник
How to Create an ISO File in Ubuntu 18.04 LTS
Most operating system and programs especially large one comes in an ISO format containing all required installation files. An ISO file or an ISO image is a perfect representation of all file and folders contained in a CD /DVD. Alternatively, you can say that it is a package all installation files and folder in one single file in an ISO format.
You can easily back up or archive the files and folders into an ISO file. You can make that ISO file to act it as an external drive, make bootable USBs or CD/DVD to later use for installation, save as a backup or distributing it over to someone.
With ISO files, you can:
- Create an installation disc by Burning to USB or CD/DVD.
- Mount as a virtual drive.
- Use for installation of OS or software programs.
In this article, I will describe some ways to create an ISO file in Ubuntu 18.04 LTS.
Using Mkisofs utility
Under Linux, you can create an ISO image from a folder using a command line argument with the Mkisofs utility. You can use Mkisofs to automatically backup the data with the option to exclude some individual files if necessary. It supports wildcards as well.
The basic syntax of the command is:
$ mkisofs -o [filename.iso] [ directory_path]
-o defines the file name of the ISO you want to create followed by the directory you want to backup or store an ISO file.
For instance, I want to create an ISO file from the directory /home/tin/Documents/backup and save it as backup.iso file:

It will create the backup.iso file and save it in the current directory.
Using dd command in Terminal to build an ISO file
Basically using dd command, we can create copies of data whether they are file or folders, partitions, or CD/DVDs. We can also make use of dd command to create ISO files.
The basic syntax of dd command is: Advertisement
$ dd if=[source] of=[target.iso]
If= Tells command from where to input the source data.
Of= Tells command where to define the output.
For instance, I will type the following command to copy and save the contents of the drive as an ISO file named diskimage.iso:

The ISO image named diskimage.iso will be created in the current directory.
Using Brasero utility to make an ISO file
You can use Linux disk burning utility Brasero to create an ISO file. Older versions of Ubuntu include built-in Brasero utility. However, in 16.04 and the newer version, you have to manually install this utility.
To install Brasero, press Ctrl+Alt+T to launch Terminal.
Enter the following command in Terminal:

Once you have done with the installation, open the application.
To open the Brasero application, Press windows key or click on dash icon in the bottom left corner of the desktop to open Dash menu.

Then search for Brasero application by typing its name in the search bar. When the application appears, click on it to open it.

In the Brasero application window, click on the Data project option.

Then click on the + icon to start adding files to the new project.

From the window that appears, select the individual files or directories then click on Add.

You will notice that files are added in the application. Click on Burn.

Choose the location to save the ISO file. Specify the name for the ISO file with .iso extension and click on Create Image.

Once finished, you will be notified that the image has been successfully created.

Hence all above were the different ways using which you can create ISO files. Once you have ISO file, you can save it as a backup, use it as virtual CD/DVD, burn it on USB or CD/DVD and share it with someone.
Karim Buzdar
About the Author: Karim Buzdar holds a degree in telecommunication engineering and holds several sysadmin certifications. As an IT engineer and technical author, he writes for various web sites. You can reach Karim on LinkedIn
Источник
Ubuntu Documentation

Needs Updating
This article needs updating to include the latest versions of Ubuntu. More info.
Introduction
For an introductory explanation of ISO images and burning them see IsoImage.This page details how to create an ISO (.iso) file from a CD or DVD.
Why would I want to do this?
Iso images are useful because they are always available quickly. Two common uses of iso images are:
Creating images of discs that you copy frequently. This means that you can make copies in the future without the source disc — see BurningIsoHowto.
Creating images of discs you use frequently so that you do not have to have the disc in the drive to access them — see MountIso.
Creating an iso image from a non-music CD or DVD
GUI (Ubuntu 20.04.1 LTS, Focal Fossa)
- Insert the CD or DVD.
- Wait for the disk icon to display in the Dock. Your CD or DVD has now been mounted and can be read by Ubuntu.
- Click the «Show Applications» icon in the Dock to display a Search box.
- In the Search box, type «disks», then click the Disks application to open it.
- In Disks, click the «CD/DVD Drive» entry on the left to display the CD or DVD volume. (Don’t touch anything else in Disks unless you know what you’re doing.)
Click the menu icon in the top-right, then click «Create Disk Image. » to display the Create Disk Image dialog, as shown in this screenshot: create-file-rename.png
You can check your new .iso file by double-clicking it to mount it, then browsing it as you would if it were a CD or DVD.
Command line
dd if=/dev/cdrom of=file.iso (assuming /dev/cdrom is where the CD is mounted, and file.iso is the name you want to give the ISO, in the current directory)
Creating an iso image from a music CD or DVD
- Insert the CD or DVD.
- Wait for Sound Juicer to pop-up with the songs on the disc
- Close Sound Juicer
Click «Places» > «Computer» (the menu at the top of your screen)
The icon of the CD can also be found on the Desktop after the disc has been inserted. This icon can also be used for steps 5 — 10.
Listening the audio tracks of an iso image from a music CD
To be completed.
CreateIsoFromCDorDVD (последним исправлял пользователь lauracowen 2020-11-16 15:29:42)
The material on this wiki is available under a free license, see Copyright / License for details
You can contribute to this wiki, see Wiki Guide for details
Источник
How to make a disk image and restore from it later?
I’m a new Linux user. I’ve reinstalled my Wubi from scratch at least ten times the last few weeks because while getting the system up and running (drivers, resolution, etc.) I’ve broken something (X, grub, unknowns) and I can’t get it back to work. Especially for a newbie like me, it’s easier (and much faster) to just reinstall the whole shebang than try to troubleshoot several layers of failed «fixing» attempts.
Coming from Windows, I expect that there is some «disk image» utility that I can run to make a snapshot of my Linux install (and of the boot partition!!) before I meddle with stuff. Then, after I’ve foobar’ed my machine, I would somehow restore my machine back to that working snapshot.
What’s the Linux equivalent of Windows disk imagers like Acronis True Image or Norton Ghost?

12 Answers 12
With dd
dd is the low level utility that you can use to accomplish this task. It’s essentially a low level byte-for-byte copy utility. If you want the «UNIX» way of accomplishing this, then read on.
All references to the file system and hard disks are located locally on the virtual /dev/ filesystem. There are a multitude of «nodes» in /dev/ that are interfaces to almost all the devices on your computer. For example, /dev/hda or /dev/sda would refer to the first hard drive in your system (hda vs sda depends on the hard drive), and /dev/hda1 would refer to the first partition on your hard drive.
The most straight forward way to make a raw image of your partitions is to use dd to dump the entire partition to a single file (remember the OS access the partitions /dev/sda1 through a file interface). Make sure you are on a larger partition or on a secondary drive and perform the following command:
dd if=/dev/hda1 of=./part1.image to backup(repeat for different partitions) dd if=./part1.image of=/dev/hda1 to restore
You can use the exact same command to back up the entire hard disk (replace hda1 with hda ). You can then use any compression program (gunzip, zip, bzip) to compress the file for storage. You can use this same technique to make rote copies of entire partitions to make clones of your computer.
There is one limitation though, when restoring the backup: The partition needs to be the same size (or bigger) as the partition you took the image from, so this limits your options in case of a restore. However, you can always expand the partition after you’ve restored the backup using gparted or parted . The picture gets even muddier when you are trying to restore entire disk copies. However, if you are restoring the backup to the same exact hard drive, you don’t need to worry about this at all.
However, if you want a «friendlier» utility à la Norton Ghost then this suggestion might not be for you.
Источник


