- ТОП 5 программ для создания загрузочных флешек с Linux
- Исходные данные. Критерии отбора программ
- Программы для создания загрузочных флешек
- Ventoy
- Etcher
- Rufus
- WinSetupFromUSB
- UNetbootin
- Ubuntu Documentation
- Outline
- Introduction
- Prerequisites
- Dummy headlines
- Notes about speed
- Notes about size
- Notes about bootability
- The flash hardware
- Creating a bootable Ubuntu USB flash drive from Windows
- Rufus
- balenaEtcher
- Pendrivelinux’s Universal USB Installer
- UNetbootin
- Win32 Disk Imager
- Creating a bootable Ubuntu USB flash drive from Ubuntu
- Install and run Startup Disk Creator alias usb-creator
- UNetbootin
- mkusb — dd image of iso file to USB device safely
- Creating a bootable Ubuntu USB flash drive from Mac OSX
- Test if running in UEFI mode
ТОП 5 программ для создания загрузочных флешек с Linux
Приветствую Вас на сайте Info-Comp.ru! В данном материале мы с Вами рассмотрим 5 популярных программ для создания загрузочных флешек с Linux, иными словами, здесь будут представлены программы, которые позволяют записать ISO образ дистрибутива Linux на флешку и тем самым сделать эту флешку загрузочной, чтобы с нее можно было загрузиться и установить Linux на компьютер, или просто попробовать Linux в Live-режиме.

Исходные данные. Критерии отбора программ
Итак, рассмотрим ситуацию, Вы пользуетесь операционной системой Windows, однако решили попробовать Linux и установить эту операционную систему к себе на компьютер, и, соответственно, ищете различные инструкции по установке Linux в интернете, и в большинстве таких инструкций говорится о том, что сначала нужно создать загрузочную флешку с Linux, и загрузиться с этой флешки, однако процесс создания загрузочной флешки не описан, а в некоторых случаях даже не указаны программы, которые позволяют создать такую флешку.
Поэтому, чтобы Вы имели представление о том, какие программы позволяют создать загрузочную флешку с Linux, я решил в одном материале собрать наиболее популярные программы для решения данной задачи.
При отборе программ я руководствовался следующими критериями, которым должна удовлетворять программа:
Если Вам известна какая-нибудь программа, которая подходит под все перечисленные критерии, но при этом она не упоминается в данной статье, то обязательно напишите ее название в комментариях, чтобы другие посетители о ней узнали и смогли попробовать и сравнить с программами, которые представлены в данном материале.
Программы для создания загрузочных флешек
Ниже представлены программы, которые, на мой взгляд, отлично справляются с задачей создания загрузочных флешек с Linux.
Ventoy
Начну я с одной из самых простых, но в то же время достаточно функциональной программы, которая позволяет создавать не просто загрузочные флешки, но и мультизагрузочные, речь идет о программе Ventoy.

Ventoy – бесплатная программа для создания загрузочной флешки с открытым исходным кодом.
Большинство программ, которые позволяют создавать загрузочные флешки, включая те, которые будут рассмотрены ниже, подразумевают определенные действия с ISO образом, т.е. они его определенным способом записывают на USB флешку.
Однако программа Ventoy работает немного по-другому, и в этом главная ее особенность: нам, для того чтобы создать загрузочную флешку с Linux, необходимо всего лишь установить программу на флешку и скопировать обычным способом ISO образ на эту флешку. При этом мы можем скопировать не один образ, а несколько, и причём не только ISO файлы дистрибутивов Linux, но и другие ISO образы загрузочных систем.
Более того, этой флешкой, после того как она станет загрузочной, можно продолжать пользоваться, т.е. хранить на ней обычные файлы.
Однако, конечно же, и у этой программы есть свои недостатки, например, то, что с некоторыми ISO файлами могут возникнуть проблемы, т.е. не со всех ISO файлов получится загрузиться, но большинство ISO файлов, включая дистрибутивы Linux, конечно же, поддерживаются.
Etcher
Еще одна программа, которая позволяет очень быстро и просто, буквально за 3 шага, создать загрузочную флешку с дистрибутивом Linux – это программа Etcher.
Etcher – это бесплатная программа для создания загрузочных флешек, т.е. записи ISO образов на USB накопители.
Данная программа отлично справляется с задачей создания загрузочных флешек с Linux, как было отмечено, с помощью Etcher можно за три простых шага создать загрузочную флешку, однако Etcher не позволяет создавать мультизагрузочные флешки, как вышеупомянутая программа Ventoy, а также, после того как флешка станет загрузочной, использовать ее как обычную флешку не получится.
Rufus
Бесспорно, самой популярной программой для создания загрузочных флешек уже достаточно долгое время является программа Rufus.
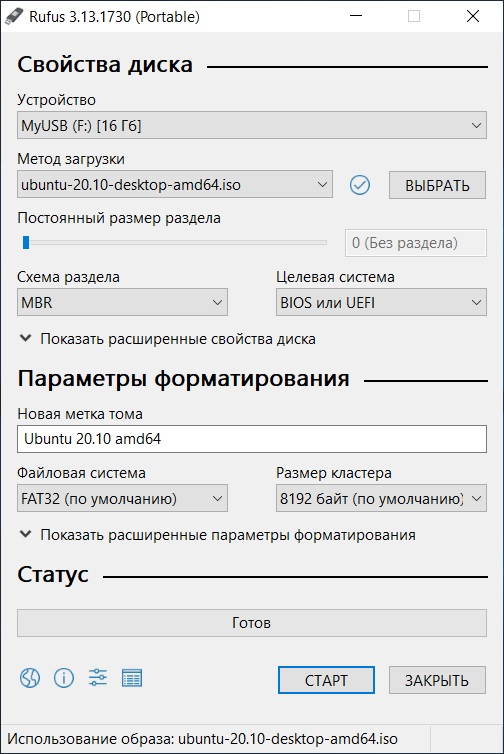
Rufus – это бесплатное приложение, с помощью которого можно создавать загрузочные USB устройства.
Ну и, конечно же, Rufus позволяет создавать загрузочные флешки с Linux, т.е. записывать ISO образы дистрибутивов Linux на флешки.
Преимуществом, и в то же время недостатком программы Rufus, является то, что она позволяет достаточно гибко настроить процесс записи ISO образа на флешку, и поэтому имеет много различных настроек, с которыми начинающие пользователи компьютера просто не знают, что делать
WinSetupFromUSB
Следующая программа набрала популярность за счет своей возможности создания мультизагрузочной флешки, т.е. флешки с несколькими загрузочными системами. При этом она, конечно же, позволяет создавать загрузочную флешку с Linux, т.е. записывать ISO образ дистрибутивов Linux на флешку.
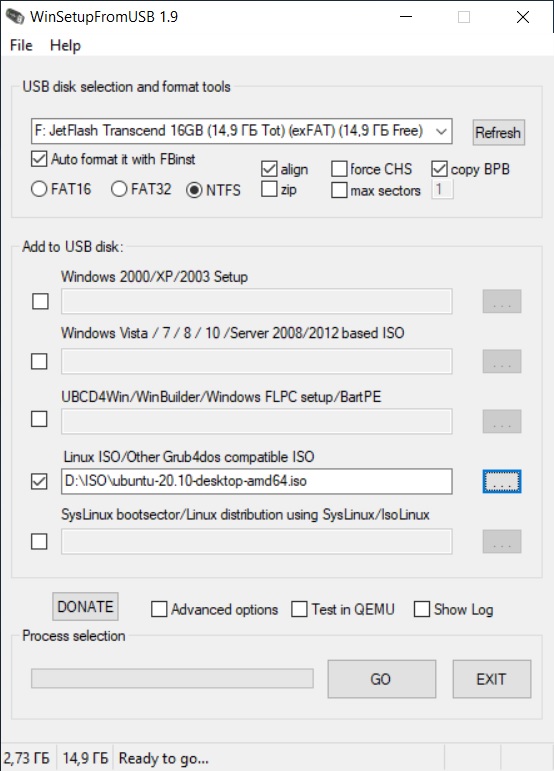
WinSetupFromUSB – это бесплатная программа для создания мультизагрузочных USB-накопителей.
UNetbootin
И завершает данный список программа, которая разработана специально для создания загрузочных флешек с Linux, т.е. она предназначена для записи ISO образов Linux на флешки – это программа UNetbootin.

UNetbootin – это бесплатная программа для записи ISO образов Linux на USB флешки.
Особенность данной программы в том, что она умеет самостоятельно скачивать ISO образы дистрибутивов Linux, т.е. если Вы захотите, Вы можете просто указать, какой дистрибутив Linux и с какой версией Вы хотите записать на флешку, а программа самостоятельно скачает ISO образ и запишет его на флешку, иными словами, Вам не придётся самим искать и скачивать ISO образ нужного дистрибутива Linux. При этом возможность указать конкретный ISO образ, т.е. указать путь к файлу образа, который Вы предварительно самостоятельно скачали, конечно же, есть.
К минусам программы UNetbootin можно отнести то, что она не имеет никаких дополнительных возможностей работы с USB накопителями, кроме записи на них ISO образов. То есть нет возможности отформатировать флешку из программы, или проверить ее на ошибки, все это в случае необходимости нужно делать предварительно другими средствами.
Источник
Ubuntu Documentation
Outline
The general procedure to install Ubuntu (or Ubuntu flavour, Kubuntu, Lubuntu, Xubuntu, . ) from a USB flash drive is:
Get the correct Ubuntu installation file, ‘the iso file’, via this link or Ubuntu flavour via this link. Download the iso file into your running computer (for example into the directory Downloads in the internal drive, not into the USB flash drive that you want to make into a USB boot drive).
Check with md5sum (or another checksum tool) that the download was good.
Try Ubuntu (Kubuntu, Lubuntu, Xubuntu, . ) before installing it.
See also: Installation/FromUSBStickQuick for beginners starting from Windows.
Introduction
Ubuntu can be installed from a USB flash drive. This may be necessary for most new portable computers without DVD drives and is handy for others because a USB flash drive is so convenient. Also, you can configure Ubuntu on the USB flash drive to save changes you make, unlike a read-only CD/DVD disk.
Booting from a USB flash drive created with usb-creator alias Startup Disk Creator and mkusb will behave just as if you had booted from the install CD. It will show the language selection and then the install menu, from which you can install Ubuntu onto the computer’s hard drive or launch the LiveCD environment. Other utilities, e.g. UNetbootin, may create slightly different boot drives or if on UEFI might not work at all with Debian iso files due to a bug
Note: This article uses the term «USB flash drive» alongside USB stick, USB drive, USB device, USB pendrive and thumb drive.
Prerequisites
To create a USB installation device, you will need:
a 4 GB USB flash device/drive/stick. If the iso file is smaller than 2 GB, it is possible to use a 2 GB USB device, at least with some of the methods. Files on this USB device will be erased, so backup the files you want to keep before making the device bootable. Some of the tools require that this USB device is properly formatted and mounted while other tools will overwrite whatever is on the target device. Please follow the instructions for each tool.
an Ubuntu flavour ISO file downloaded from an official web page, ubuntu.com/download or http://releases.ubuntu.com, stored in your running computer (for example in the directory Downloads in the internal drive, not in the USB flash drive that you want to make into a USB boot drive).
Check with md5sum (or another checksum tool) that the download was good. In Linux there is the tool ‘md5sum’. In Windows you can do it with Rufus: click on the circle with a tick mark (more about Rufus here.)
Dummy headlines
After a major remake of this help page the following headlines are kept here because they may be linked to from other web sites. Several other headlines further down in the page are also kept for this reason.
Notes about speed
Notes about size
Notes about bootability
The flash hardware
There is a detailed description at the sub-page /pre
Creating a bootable Ubuntu USB flash drive from Windows
There are various methods available for Windows to create a bootable Ubuntu USB flash drive.
NEVER try to use one of your hard disk drives or partitions in this process unless you really know what you are doing, as data will get erased.
Rufus
Rufus is the tool in Windows that is recommended officially by Ubuntu. A tutorial is available from here.
balenaEtcher
Pendrivelinux’s Universal USB Installer
UNetbootin
Win32 Disk Imager
There is a detailed description at /fromWindows including Rufus, balena Etcher, Universal USB Installer, Unetbootin and Win32 Disk Imager.
Creating a bootable Ubuntu USB flash drive from Ubuntu
Install and run Startup Disk Creator alias usb-creator
The Ubuntu Startup Disk Creator is dedicated to creating USB boot drives for Ubuntu and Ubuntu family flavours (Kubuntu, Lubuntu . Xubuntu).
You can find usb-creator-gtk by typing «Startup Disk Creator» (Ubuntu Desktop) or usb-creator-kde in K-Menu—>Applications—>System—>Startup Disk Creator (Kubuntu). If it is not there, then you can install it using the Ubuntu Software Center.
- Insert and mount the USB drive. Inserting the USB drive should auto-mount it.
- Start the Startup Disk Creator
- In the top pane of the Startup Disk Creator, pick the .iso file that you downloaded.
- If the .iso file isn’t listed, click «Other» to locate and select the .iso file that you downloaded.
- In the bottom pane of the Startup Disk Creator, pick the target device, the USB flash drive. If more than one choice, please check carefully, until you are sure that you will be writing to the correct device.
- After checking that you are pointing to the correct target device, the USB flash drive, you can start the action.
You must enter a password because this is a risky operation. Use the password of the current user ID (the same as for login and running tasks with 'sudo'. Password is not required when installing from a ‘live’ system (booted from a DVD disk or another USB flash drive).
The Startup Disk Creator clones the iso file, which means that you need neither erase nor format the target drive. It will be completely overwritten anyway by the cloning process. The Startup Disk Creator looks like this in Ubuntu 18.04 LTS:
Notes
NEVER try to use one of your hard disk drives or SSDs or partitions in this process unless you really know what you are doing, as data will get erased.
There are bugs that affect the Ubuntu Startup Disk Creator, when you run it in old Ubuntu versions in BIOS mode and try to create USB boot drives with other versions. In the Ubuntu Startup Disk Creator version 0.3.2 in Ubuntu 16.04 LTS, these bugs are no longer a problem, so you can install any version of the Ubuntu flavours from 16.04 LTS and newer versions.
UNetbootin
Download UNetbootin
mkusb — dd image of iso file to USB device safely
If you want to clone from a general image file to a drive, you can use mkusb. It lets you clone to any drive that is not busy, also an internal drive, and there are very obvious warnings to prevent mistakes.
- run in Debian and many linux distros that are similar to Ubuntu and Debian,
- clone from iso files of most Linux distros to create USB boot drives,
- create persistent live drives of the Ubuntu family and Debian, using all available drive space for persistence and/or data storage,
- restore a USB boot drive to a standard storage device.
There is a detailed description at /fromUbuntu including the Startup Disk Creator, UNetbootin and mkusb.
Creating a bootable Ubuntu USB flash drive from Mac OSX
There is a good wiki page about booting with UEFI, and a good tutorial thread, UEFI Installing — Tips.
Test if running in UEFI mode
You may want to test if your Ubuntu flavour is running in [U]EFI mode. An installed system and a live system too is using the directory /sys/firmware/efi, so you can run the following command line,
The following command line is more robust and also easier to understand, so you may prefer it (if you copy & paste and are not bothered by typing a long command line),
Источник


