- Generating self-signed certificates on Windows
- 1. PowerShell 4.0
- 2. OpenSSL
- 3. Makecert
- 4. Selfssl7
- 5. IIS
- 6. Pluralsight
- 7. SelfSSL
- 8. SSLChecker
- 9. Hard core
- 10. mkcert
- Как создать самоподписанный сертификат в Windows?
- New-SelfSignedCertificate: командлет PowerShell для генерации самоподписанного сертификата
- Создать самоподписанный сертфикат типа Code Signing для подписывания кода
- Использование самоподписанного SSL сертификата SHA-256 в IIS
Generating self-signed certificates on Windows

If you do anything with Identity, you’ll know you need certificates — lots of them — and that normally means self-signed to keep the costs down or because you just need it for a short time before you tear down the VM or because you don’t have a PKI infrastructure.
This is for testing, proofs of concept etc. This is definitely not for Production purposes. Use at your own risk.
This self-signed certificate also needs a private key otherwise it’s pretty useless for SSL, token signing etc.
Remember that this won’t be signed by a CA so you need to do this to stop the browser complaining once you’ve generated the certificates.
Note: The “ character displayed by Medium does something funny when you cut and paste and run the command. You need to retype it as a “straight” character.

Just calling out Let’s Encrypt. They provide free CA certificates that support multiple SAN and wildcards. The drawback is that the certificate is only valid for 90 days but they provide an automated renew process. This is a very good option for a quick PoC.
So, what other options do we have?
1. PowerShell 4.0
Running as administrator.
$cert = New-SelfSignedCertificate -certstorelocation cert:\localmachine\my -dnsname company.co.nz
Using “mmc”, we can see the certificate in the local computer store. Although it shows “Client Authentication”, it is valid for “Server Authentication” as well.

Now we can do the normal export function or we can create the pfx file ourselves.
$pwd = ConvertTo-SecureString -String ‘password1234’ -Force -AsPlainText
$path = ‘cert:\localMachine\my\’ + $cert.thumbprint
Export-PfxCertificate -cert $path -FilePath c:\junk\certificate\powershellcert.pfx -Password $pwd
and then double-click the pfx file to import via the “Certificate Import Wizard”. You’ll be asked to input the password you used above.
This certificate is only valid for a year (the default).
If we wanted a three-year certificate, we need:
$date_now = Get-Date
$extended_date = $date_now.AddYears(3)
$cert = New-SelfSignedCertificate -certstorelocation cert:\localmachine\my -dnsname company.co.nz -notafter $extended_date

Now what happens if we need multiple SAN (subject alternative name)?
“-DnsName” specifies one or more DNS names to put into the subject alternative name extension of the certificate. The first DNS name is also saved as the Subject Name.
$cert = New-SelfSignedCertificate -certstorelocation cert:\localmachine\my -dnsname company.co.nz, mycompany.co.nz, minecompany.co.nz -notafter $extended_date -KeyLength 4096

And note the keylength parameter if that’s something you need to change.
2. OpenSSL
Originally for the Linux world but you can get a Windows version from Shining Light. Don’t worry about the Win32 reference and the outdated documentation at the top. Scroll down and you’ll see the latest Win64 stuff.
And help with future work by donating $10 😄. It’s a lot easier than having to compile the binaries!
openssl version -a
gives you the version.
openssl req -x509 -newkey rsa:4096 -sha256 -keyout openssl.key -out openssl.crt -subj “/CN=company.co.nz” -days 600
Generating a 4096 bit RSA private key
…………………………………++
…………………………++
writing new private key to ‘opensll.key’
Enter PEM pass phrase:
Verifying — Enter PEM pass phrase:
The crt file is the same as a cer file. You can use it in Windows e.g. to load a signing key for another claims provider in ADFS.
But it doesn’t contain a private key — that’s in a separate file — and Windows doesn’t like that. See below for steps on combining them.
As far as multiple SAN are concerned, OpenSSL currently doesn’t support a way of doing this via the command line.
I believe this is coming in 1.1.1 via:
extension “subjectAltName = DNS:mycompany.co.nz, DNS:minecompany.co.nz”
At the moment, you need to do this via a configuration file.
[req]
distinguished_name = req_distinguished_name
x509_extensions = v3_req
prompt = no
[req_distinguished_name]
C = NZ
ST = NI
L = Auckland
O = Company
OU = Division
CN = company.co.nz
[v3_req]
keyUsage = critical, digitalSignature, keyAgreement
extendedKeyUsage = serverAuth
subjectAltName = @alt_names
[alt_names]
DNS.1 = company.co.nz
DNS.2 = mycompany.com
DNS.3 = minecompany.co.nz
Save this as “san.cnf”.
openssl req -x509 -newkey rsa:4096 -sha256 -keyout opensll.key -out openssl.crt -days 600 -config san.cnf
To make this available to Windows, you need to combine the private and public keys into one pfx file.
openssl pkcs12 -export -name “company.co.nz” -out openssl.pfx -inkey openssl.key -in openssl.crt
where “company.co.nz” is the friendly name.
3. Makecert
As per the documentation, makecert is deprecated and you should use the PowerShell command as above.
Official documentation is here.
To make a self-signed certificate with a private key, use:
makecert -r -pe -n “CN=company.co.nz” -e 01/01/2019 -sky exchange -sv makecert.pvk makecert.cer
“C:\Program Files (x86)\Microsoft SDKs\Windows\v7.1A\Bin\pvk
2pfx.exe” -pvk makecert.pvk -spc makecert.cer -pfx makecert.pfx
(The path to pvk2pfx is as per my PC. YMMV).
Then install the pfx file.
4. Selfssl7
This used to be my go-to tool for generating self-signed certificates.
The current version runs on .NET 3.5 that is not normally installed on the latest servers and PC’s. You can download the code and rebuild for .NET 4.6 and it will work just fine.
One of the best features for me was that it could do the IIS SSL bindings as well as installing the certificate into the appropriate store.
SelfSSL7 /N cn=company.co.nz /K 2048 /V 3652 /X /F c:cert.pfx
This generates a self-signed certificate using a 2048 bit-length key, without a password in .pfx format (including the private key)
5. IIS
This is one of those hidden features that very few people know about.

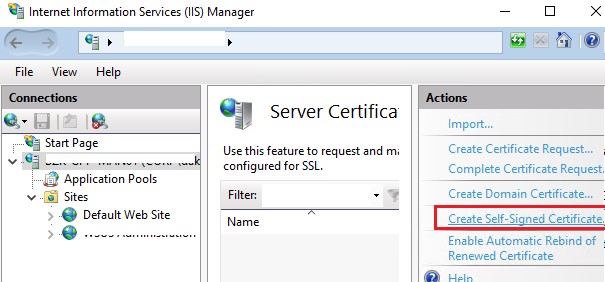
From the top-level in IIS Manager, select “Server Certificates”.

Then click the “Create” on the right.

This will create a self-signed certificate valid for a year with a private key. It is only for “localhost”.
6. Pluralsight
Yes, they are a training company but they also have some neat utilities.

You can create a PFX file directly or you can save directly to a certificate store of your choice.

7. SelfSSL
This is an old-school utility which is available if you have the Microsoft Internet Information Services (IIS) 6.0 Resource Kit.
selfssl /t /v:200 /n:cn=company.co.nz
The /t option saves you a step by automatically installing the new self-signed SSL certificate into the Web server’s certificate store. The /v option specifies the number of days the certificate will be valid.
8. SSLChecker
This is an online utility.

This will generate a self-signed certificate and a private key in the format:
Save the two texts; call the certificate file “something.crt” and call the private key file “something.key” then use the openssl command above to combine both into a .pfx file that you can then import.
9. Hard core
If you are a developer and insist on rolling your own, there are a number of examples around. .NET doesn’t have the required support so you need to use Bouncy Castle.
10. mkcert
mkcert is a simple tool for making locally-trusted development certificates. It requires no configuration.
“mkcert is written in Go, and you can run it with a Go run command”.
If you have another utility you recommend, note it in a comment and I’ll add it.
The traditional way to look at certificates is to “Run mmc”.
Как создать самоподписанный сертификат в Windows?
Большинству администраторов Windows, знакомых с темой PKI, известна утилита MakeCert.exe, с помощью которой можно создать самоподписанный сертификат. Эта утилита включена в состав Microsoft .NET Framework SDK и Microsoft Windows SDK. В современых версиях Windows 10/8.1 и Windows Server 2016/2012R2 вы можете создать самоподписанный сертификат с помощью PowerShell без использования дополнительных утилит.
New-SelfSignedCertificate: командлет PowerShell для генерации самоподписанного сертификата
Для создания самоподписанного сертификата в PowerShell нужно использовать командлет New-SelfSignedCertificate, входящий в состав модуля PKI (Public Key Infrastructure).
Чтобы вывести список всех доступных командлетов в модуле PKI, выполните команду:
Get-Command -Module PKI

Самоподписанные сертификаты рекомендуется использовать в тестовых целях или для обеспечения сертификатами внутренних интранет служб (IIS, Exchange, Web Application Proxy, LDAPS, ADRMS, DirectAccess и т.п.), в тех случая когда по какой-то причине приобретение сертификата у внешнего провайдера или разворачивание инфраструктуры PKI/CA невозможны.
Для создания сертификата нужно указать значения –DnsName (DNS имя сервера, имя может быть произвольным и отличаться от имени localhost) и —CertStoreLocation (раздел локального хранилища сертификатов, в который будет помещен сгенерированный сертификат). Командлет можно использовать для создания самоподписанного сертификата в Windows 10 (в нашем примере), Windows 8/8.1 и Windows Server 2019/2016/2012 R2.
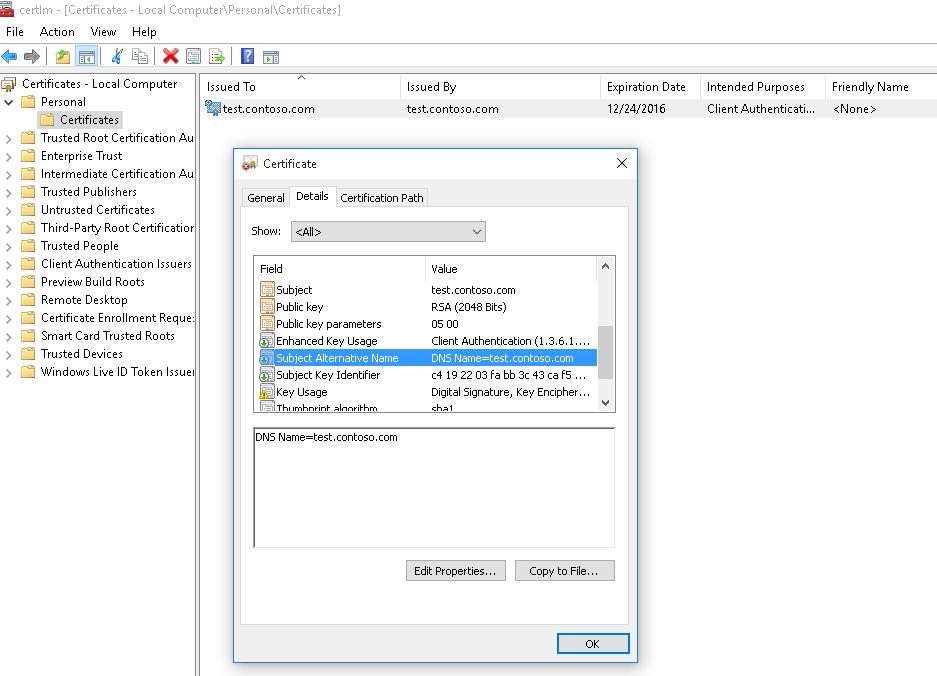
Чтобы создать новый SSL сертификат типа SSLServerAuthentication (по умолчанию) для DNS имени test.contoso.com (указывается FQDN имя) и поместить его в список персональных сертификатов компьютера, выполните команду:
New-SelfSignedCertificate -DnsName test.contoso.com -CertStoreLocation cert:\LocalMachine\My

Directory: Microsoft.PowerShell.Security\Certificate::LocalMachine\My
Thumbprint Subject
———- ——-
2779C0490D558B31AAA0CEF2F6EB1A5C2CA83B30 CN=test.contoso.com
Если вы указали нестандартный криптографический провайдер CSPs (например, с помощью параметров -KeyAlgorithm «ECDSA_secP256r1» -Provider ‘Microsoft Smart Card Key Storage Provider’ ), убедитесь, что он установлен на компьютере (по умолчанию используется CSP Microsoft Enhanced Cryptographic Provider). Иначе появится ошибка:
По-умолчанию генерируется самоподписанный сертификат со следующим параметрами:
- Криптографический алгоритм: RSA;
- Размер ключа: 2048 бит;
- Допустимые варианты использования ключа: Client Authentication и Server Authentication;
- Сертификат может использоваться для: Digital Signature, Key Encipherment ;
- Срок действия сертификата: 1 год.
Данная команда создаст новый сертификат и импортирует его в персональное хранилище компьютера. Откройте оснастку certlm.msc и проверьте, что в разделе Personal хранилища сертификатов компьютера появился новый сертификат.
С помощью командлета Get-ChildItem можно вывести все параметры созданного сертификата по его отпечатку (Thumbprint):
Get-ChildItem -Path «Cert:\LocalMachine\My» | Where-Object Thumbprint -eq DC1A0FDE0120085A45D8E14F870148D1EBCB82AE | Select-Object *

$todaydate = Get-Date
$add3year = $todaydate.AddYears(3)
New-SelfSignedCertificate -dnsname test.contoso.com -notafter $add3year -CertStoreLocation cert:\LocalMachine\My
Можно создать цепочку сертфикатов. Сначала создается корневой сертификат (CA), а на основании него генерируется SSL сертификат сервера:
$rootCert = New-SelfSignedCertificate -Subject «CN=TestRootCA,O=TestRootCA,OU=TestRootCA» -KeyExportPolicy Exportable -KeyUsage CertSign,CRLSign,DigitalSignature -KeyLength 2048 -KeyUsageProperty All -KeyAlgorithm ‘RSA’ -HashAlgorithm ‘SHA256’ -Provider «Microsoft Enhanced RSA and AES Cryptographic Provider» `
New-SelfSignedCertificate -CertStoreLocation cert:\LocalMachine\My -DnsName «test2.contoso.com» -Signer $rootCert -KeyUsage KeyEncipherment,DigitalSignature
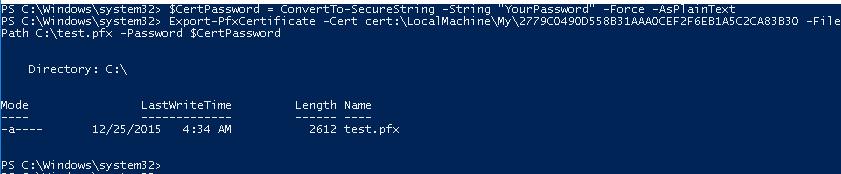
Для экспорта полученного сертификата c закрытым ключом в pfx файл, защищенный паролем, нужно получить его отпечаток (Thumbprint). Сначала нужно указать пароль защиты сертификата и преобразовать его в формат SecureString. Значение Thumbprint нужно скопировать из результатов выполнения команды New-SelfSignedCertificate.
$CertPassword = ConvertTo-SecureString -String “YourPassword” -Force –AsPlainText
Export-PfxCertificate -Cert cert:\LocalMachine\My\2779C0490D558B31AAA0CEF2F6EB1A5C2CA83B30 -FilePath C:\test.pfx -Password $CertPassword
 Можно экспортировать открытый ключ сертификата:
Export-Certificate -Cert Cert:\LocalMachine\My\2779C0490D558B31AAA0CEF2F6EB1A5C2CA83B30 -FilePath C:\testcert.cer
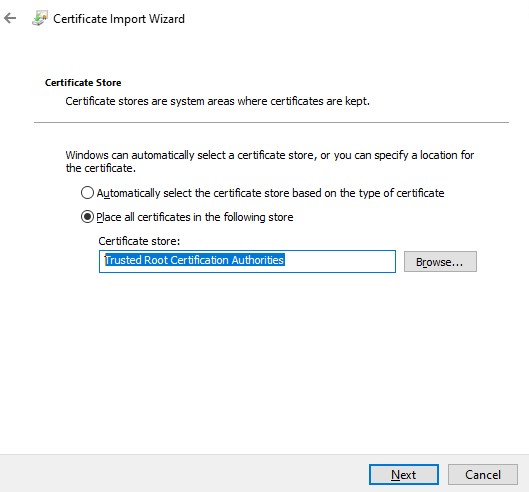
Проверьте, что в указанном каталоге появился cer(PFX)файл сертификата. Если щелкнуть по нему правой клавишей и выбрать пункт меню Install Certificate, можно с помощью мастера импорта сертификатов добавить сертификат в корневые доверенные сертификаты компьютера.
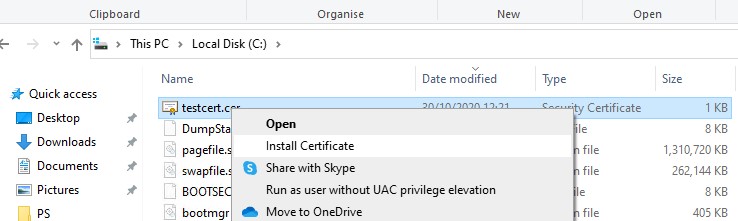
Выберите Store location -> Local Machine, Place all certificates in the following store -> Trusted Root Certification Authorities.
Полученный открытый ключ или сам файл сертификата можно распространить на все компьютеры и сервера в домене с помощью GPO (пример установки сертификата на компьютеры с помощью групповых политик).
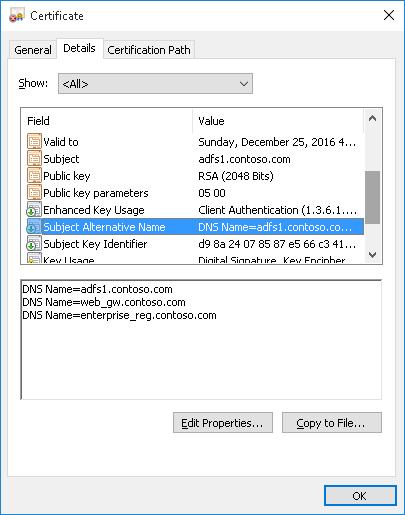
Одной из полезных возможностей командлета New-SelfSignedCertificate является возможность создать сертификат с несколькими различными именами Subject Alternative Names (SAN).
Если создается сертификат с несколькими именами, первое имя в параметре DnsName будет использоваться в качестве CN (Common Name) сертификата. К примеру, создадим сертификат, у которого указаны следующие имена:
- Subject Name (CN): adfs1.contoso.com
- Subject Alternative Name (DNS): web-gw.contoso.com
- Subject Alternative Name (DNS): enterprise-reg.contoso.com
Команда создания сертификата будет такой:
New-SelfSignedCertificate -DnsName adfs1.contoso.com,web_gw.contoso.com,enterprise_reg.contoso.com -CertStoreLocation cert:\LocalMachine\My
Также можно сгенерировать wildcard сертификат для всего пространства имен домена, для этого в качестве имени сервера указывается *.contoso.com.
New-SelfSignedCertificate -certstorelocation cert:\localmachine\my -dnsname *.contoso.com
Создать самоподписанный сертфикат типа Code Signing для подписывания кода
В PoweShell 3.0 командлет New-SelfSifgnedCertificate позволял генерировать только SSL сертификаты, которые нельзя было использоваться для подписывания кода драйверов и приложений (в отличии сертификатов, генерируемых утилитой MakeCert).
В версии PowerShell 5 новая версия командлета New-SelfSifgnedCertificate теперь может использоваться для выпуска сертификатов типа Code Signing.
Для создания самоподписанного сертфиката для подписывания кода приложений, выполните команду:
$cert = New-SelfSignedCertificate -Subject «Cert for Code Signing” -Type CodeSigningCert -CertStoreLocation cert:\LocalMachine\My
Set-AuthenticodeSignature -FilePath C:\PS\test_script.ps1 -Certificate $cert
Если при выполнении команды появится предупреждение UnknownError, значит этот сертификат недоверенный, т.к. находится в персональном хранилище сертификатов пользователя.

Move-Item -Path $cert.PSPath -Destination «Cert:\CurrentUser\Root»
После этого вы можете подписать свой PowerShell скрипт с помощью данного самоподписанного сертификата.
Использование самоподписанного SSL сертификата SHA-256 в IIS
Обратите внимание, что при создании самоподписанный сертификат для IIS через консоль Internet Information Manager (пункт меню Create Self-Signed Certificate), создается сертификат с исопльзованием алгоритма шифрования SHA-1. Такие сертификаты многими браузерами считаются недоверенными, поэтому они могут выдавать предубеждение. Командлет New-SelfSignedCertificate позволяет создать более популырный тип сертификата с помощью алгоритма шифрования SHA-256.
Вы можете привязать самоподписанный сертификат SHA-256, созданный в PowerShell, к сайту IIS. Если вы с помощью PowerShell создали SSL сертификат и поместили его в хранилище сертификатов компьютера, он будет автоматически доступен для сайтов IIS.
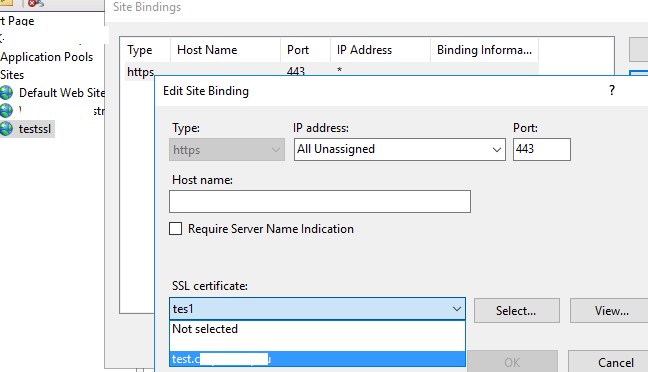
Запустите консоль IIS Manager, выберите ваш сайт, затем в настройке Site Binding, выберите созданный вами сертификат и сохраните изменения.


