- How to create a new sudo user on Ubuntu Linux server
- Steps to create a new sudo user on Ubuntu
- More about admin and sudo group on Ubuntu server
- How to add a new user named vivek to sudo using the command line?
- How to add the user named vivek
- How to create a sudo user on Ubuntu for vivek account
- How to print user account info
- How to test sudo access for vivek user account
- How To Create a New Sudo-enabled User on Ubuntu 18.04 [Quickstart]
- Introduction
- Step 1 — Logging Into Your Server
- Step 2 — Adding a New User to the System
- Step 3 — Adding the User to the sudo Group
- Step 4 — Testing sudo Access
- Conclusion
- How To Add User To Sudoers & Add User To Sudo Group on Ubuntu
- Steps to Add Sudo User on Ubuntu
- Step 1: Create New User
- Step 2: Add User to Sudo Group
- Step 3: Verify User Belongs to Sudo Group
- Step 4: Verify Sudo Access
- How To Create a Sudo User on Ubuntu [Quickstart]
- Steps to Create a New Sudo User
- Related Tutorials
- 🐧 Как добавлять, удалять и предоставлять привилегии Sudo пользователям в Linux
- Что такое пользователь sudo?
- Преимущества использовать sudo
- Добавление, удаление и предоставление привилегий Sudo пользователям Linux
- 1. Добавим нового пользователя Linux
- 2. Предоставление привилегий Sudo пользователям Linux
- 2.1 . Проверка пользователей Sudo
- 3. Удалим пользователей Sudo
- 4. Удалить пользователей навсегда
How to create a new sudo user on Ubuntu Linux server
Steps to create a new sudo user on Ubuntu
- First add the user, run: sudo adduser
- Add the user to sudo group by typing the command in terminal for Ubuntu version 12.04 and above: sudo adduser sudo
- In older version of Ubuntu (version 12.04 and older), run: sudo adduser admin
- Verify it: id
More about admin and sudo group on Ubuntu server
The members of the admin group may gain root privileges. All members of group sudo run any command on Ubuntu server. So just add the user to the sudo group on Ubuntu server. The admin group has been deprecated since Ubuntu version 12.04 and above. Hence, no longer exists or used in Ubuntu 12.04 or above. The reason it works:
# grep -B1 -i ‘^%sudo’ /etc/sudoers
OR
$ sudo grep -B1 -i ‘^%sudo’ /etc/sudoers
Sample outputs:
Let us see some practical examples.
How to add a new user named vivek to sudo using the command line?
Open the terminal or login to your remote server:
$ ssh root@server-name-IP-here
$ ssh root@server1.cyberciti.biz
< root@server:/root>#
How to add the user named vivek
# adduser vivek
OR
$ sudo adduser vivek
Sample outputs:
Fig.01: How to add the new user on Ubuntu
How to create a sudo user on Ubuntu for vivek account
Type the following command:
# adduser vivek sudo
OR use the usermod command to add user to group on Linux:
# usermod -aG sudo vivek
OR
$ sudo usermod -aG sudo vivek
OR
$ sudo adduser vivek sudo
Sample outputs:
Fig.02: Add user vivek to sudo to get administrator privileges
How to print user account info
Verify new user and group membership with the [nicmd name=”id”]:
$ id vivek
Sample outputs:
Fig.03: Show user and group information
- No ads and tracking
- In-depth guides for developers and sysadmins at Opensourceflare✨
- Join my Patreon to support independent content creators and start reading latest guides:
- How to set up Redis sentinel cluster on Ubuntu or Debian Linux
- How To Set Up SSH Keys With YubiKey as two-factor authentication (U2F/FIDO2)
- How to set up Mariadb Galera cluster on Ubuntu or Debian Linux
- A podman tutorial for beginners – part I (run Linux containers without Docker and in daemonless mode)
- How to protect Linux against rogue USB devices using USBGuard
Join Patreon ➔
How to test sudo access for vivek user account
Now user vivek can login using the ssh command command as follows:
$ ssh vivek@server1.cyberciti.biz
Verify that vivek can use sudo command:
$ sudo cat /etc/sudoers
The first time you use sudo command, you will be asked for the password of the vivek account. So type the vivek’s password to gain root access. Any command type with sudo should run with root privileges for vivek account. To gain root shell, enter:
$ sudo -s
Sample outputs:
Fig.03: Testing sudo access for vivek user account
And there you have it. Allowing other users to run sudo on Ubuntu server and granting users administrator privileges.
🐧 Get the latest tutorials on Linux, Open Source & DevOps via
Источник
How To Create a New Sudo-enabled User on Ubuntu 18.04 [Quickstart]
Published on March 23, 2020
Not using Ubuntu 18.04?
Choose a different version or distribution.
Introduction
The sudo command provides a mechanism for granting administrator privileges — ordinarily only available to the root user — to normal users. This guide will show you how to create a new user with sudo access on Ubuntu 18.04, without having to modify your server’s /etc/sudoers file. If you want to configure sudo for an existing user, skip to step 3.
Step 1 — Logging Into Your Server
SSH in to your server as the root user:
Step 2 — Adding a New User to the System
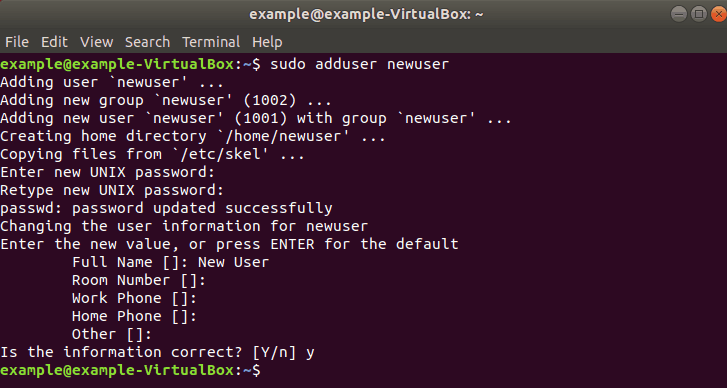
Use the adduser command to add a new user to your system:
Be sure to replace sammy with the user name that you want to create. You will be prompted to create and verify a password for the user:
Next you’ll be asked to fill in some information about the new user. It is fine to accept the defaults and leave all of this information blank:
Step 3 — Adding the User to the sudo Group
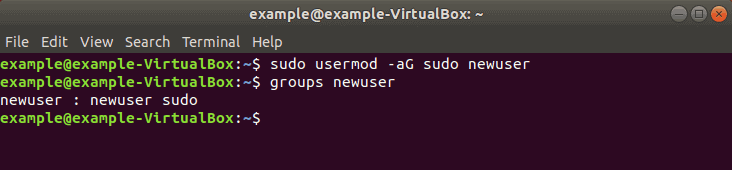
Use the usermod command to add the user to the sudo group:
Again, be sure to replace sammy with the username you just added. By default, on Ubuntu, all members of the sudo group have full sudo privileges.
Step 4 — Testing sudo Access
To test that the new sudo permissions are working, first use the su command to switch to the new user account:
As the new user, verify that you can use sudo by prepending sudo to the command that you want to run with superuser privileges:
For example, you can list the contents of the /root directory, which is normally only accessible to the root user:
The first time you use sudo in a session, you will be prompted for the password of that users account. Enter the password to proceed:
Note: This is not asking for the root password! Enter the password of the sudo-enabled user, not a root password.
If your user is in the proper group and you entered the password correctly, the command that you issued with sudo will run with root privileges.
Conclusion
In this quickstart tutorial we created a new user account and added it to the sudo group to enable sudo access. For more detailed information on setting up an Ubuntu 18.04 server, please read our Initial Server Setup with Ubuntu 18.04 tutorial.
Источник
How To Add User To Sudoers & Add User To Sudo Group on Ubuntu
Home » SysAdmin » How To Add User To Sudoers & Add User To Sudo Group on Ubuntu
The sudo command is the preferred means to handle elevated permissions. In supported versions of Ubuntu, using the sudo command will grant elevated permissions for 15 minutes.
Standard user accounts are restricted from performing sensitive tasks, such as viewing the contents of the /root directory. This prevents the accidental use of commands with massive consequences. It also makes it more difficult for intruders to compromise a system. However, sometimes you need to run an administrative command. Sudo – or Super User Do – grants you privileges to run sensitive tasks.
This simple tutorial will show you how to add a new user on Ubuntu and provide sudo access.

- A system running a supported version of Ubuntu
- Access to a root user account or another account with sudo privileges
- Access to a terminal window/command line (Ctrl–Alt–T)
Note: Linux Sudo Command tutorials also available for CentOS and Debian.
Steps to Add Sudo User on Ubuntu
Step 1: Create New User
1. Log into the system with a root user or an account with sudo privileges.
2. Open a terminal window and add a new user with the command:
The adduser command creates a new user, plus a group and home directory for that user.
You may get an error message that you have insufficient privileges. (This typically only happens for non-root users.) Get around it by entering:
3. You can replace newuser with any username you wish. The system will add the new user; then prompt you to enter a password. Enter a great secure password, then retype it to confirm.
4. The system will prompt you to enter additional information about the user. This includes a name, phone numbers, etc. – these fields are optional, and can be skipped by pressing Enter.
Step 2: Add User to Sudo Group
Most Linux systems, including Ubuntu, have a user group for sudo users. To grant the new user elevated privileges, add them to the sudo group.
In a terminal, enter the command:
Replace newuser with the username that you entered in Step 1.
Again, if you get an error, run the command with sudo as follows:
The -aG option tells the system to append the user to the specified group. (The -a option is only used with G .)
Note: Usermod command is a useful tool for user management. To learn more about its options, refer to our guide How To Use The Usermod Command In Linux.
Step 3: Verify User Belongs to Sudo Group
Enter the following to view the groups a user belongs to:
The system will respond by listing the username and all groups it belongs to, for example: newuser : newuser sudo
Step 4: Verify Sudo Access
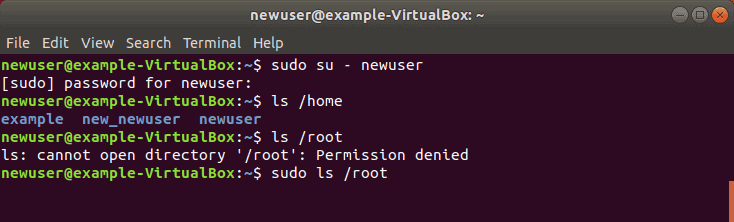
Switch users by entering:
Replace newuser with the username you entered in Step 1. Enter your password when prompted. You can run commands as normal, just by typing them.
However, some commands or locations require elevated privileges. If you try to list the contents of the /root directory, you’ll get an access denied error: ls /root
The command can be executed with:
The system will prompt for your password. Use the same password you set in Step 1. You should now see the contents of the /root directory.
Now you know how to add and create a user with sudo privileges on Ubuntu.
Before sudo, users would log in to their systems with full permissions over the entire system with the su command. This was risky as users could be exploited by tricking them into entering malicious commands. These vulnerabilities were solved by limiting account privileges. However, administrators still had to log out of their account and into an admin account to perform routine tasks.
The sudo command in Ubuntu strikes a balance – protecting user accounts from malicious or inadvertent damage while allowing a privileged user to run administrative tasks. To learn more about the difference between these commands, check out Sudo vs. Su.
Источник
How To Create a Sudo User on Ubuntu [Quickstart]
Published on March 28, 2016
Please refer to our Ubuntu 18.04 version of this tutorial instead.
The sudo command provides a mechanism for granting administrator privileges, ordinarily only available to the root user, to normal users. This guide will show you the easiest way to create a new user with sudo access on Ubuntu, without having to modify your server’s sudoers file. If you want to configure sudo for an existing user, simply skip to step 3.
Steps to Create a New Sudo User
Log in to your server as the root user.
Use the adduser command to add a new user to your system.
Be sure to replace username with the user that you want to create.
Set and confirm the new user’s password at the prompt. A strong password is highly recommended!
Follow the prompts to set the new user’s information. It is fine to accept the defaults to leave all of this information blank.
Use the usermod command to add the user to the sudo group.
By default, on Ubuntu, members of the sudo group have sudo privileges.
Test sudo access on new user account
Use the su command to switch to the new user account.
As the new user, verify that you can use sudo by prepending “sudo” to the command that you want to run with superuser privileges.
For example, you can list the contents of the /root directory, which is normally only accessible to the root user.
The first time you use sudo in a session, you will be prompted for the password of the user account. Enter the password to proceed.
If your user is in the proper group and you entered the password correctly, the command that you issued with sudo should run with root privileges.
Related Tutorials
Here is a link to a more detailed user management tutorial:
Источник
🐧 Как добавлять, удалять и предоставлять привилегии Sudo пользователям в Linux
Что такое пользователь sudo?
В операционных системах Linux и Unix есть специальный пользователь с именем root.
Пользователь root может делать все что угодно в Unix-подобной системе.
Использование пользователя root для повседневной деятельности может быть опасным и не рекомендуется по соображениям безопасности.
Одна неверная команда может разрушить всю систему!
Именно тут «sudo» приходит на помощь.
Оно позволяет авторизованным пользователям выполнять задачи с привилегиями корневого уровня, даже если они не знают пароль пользователя root.
Вот почему важно создать обычного пользователя и добавить его в группу пользователей sudo для выполнения административных задач, когда это необходимо.
Следовательно, этот пользователь может действовать как обычный пользователь и как администратор при запуске команд с префиксом sudo
Преимущества использовать sudo
- Пароль root не нужно передавать другим пользователям.
- Пользователям не нужно знать пароль пользователя root для выполнения административных задач.
- При выполнении административной задачи пользователям будет предложено ввести пароль sudo, прежде чем в системе произойдут какие-либо изменения. Это должно заставить пользователей задуматься о последствиях того, что они делают.
- Права администратора могут быть легко предоставлены пользователям и отменены в любое время, если они больше не требуются.
- Некоторые дистрибутивы Linux, например Ubuntu, по умолчанию отключают пользователя root. Таким образом, нет никакого способа запустить атаки брутфорса на пользователя root. Даже если кто-то попробует, это будет бессмысленно.
- Потому что нет пароля для взлома.
- Что еще более важно, сессия sudo будет отключена по истечении короткого периода времени. На всякий случай, если вы оставили терминал открытым после выполнения команд от имени пользователя root с разрешением sudo, аутентификация автоматически истекает. Следовательно, другие пользователи не могут выполнять никаких дополнительных административных задач. По умолчанию пароль сохраняется в течение 15 минут в текущем сеансе. После этого вам необходимо снова ввести пароль.
- Вы можете за действиями пользователей командной строки sudo. sudo добавляет запись журнала команд, запускаемых пользователями, в файл /var/log/auth.log. Если есть какие-либо проблемы, вы можете посмотреть на эти команды и попытаться выяснить, что пошло не так.
Добавление, удаление и предоставление привилегий Sudo пользователям Linux
Сначала мы создадим обычного пользователя.
1. Добавим нового пользователя Linux
Сначала создайте обычного пользователя, например «ubuntuserver».
Для этого запустите:
2. Предоставление привилегий Sudo пользователям Linux
В некоторых системах Linux, например Arch Linux, вам необходимо установить пакет «sudo» перед созданием нового пользователя sudo.
На сервере Ubuntu и на настольных ОС «sudo» устанавливается по умолчанию.
Пользователь с именем «ubuntuserver» получил права sudo.
Вы также можете использовать следующую команду, чтобы добавить пользователя в группу sudo.
Чтобы проверить, входит ли пользователь в группу sudo, выполните:
Здесь строка «(ALL: ALL) ALL» означает, что пользователь имеет неограниченные привилегии и может выполнять любую команду в системе.
В этом случае пользователь «ubuntuserver» входит в группу пользователей sudo, и теперь он может выполнять все виды административных задач.
Если вы откроете содержимое файла sudoers:
Вы увидите несколько строк, как показано ниже.
- Первое ALL – это разрешено пользователям.
- Второе ALL это владелец. Если вы распространяете один и тот же файл «sudoers» на множество хост-компьютеров, пользователь может выполнять административные команды на всех хостах.
- Третье – пользователь, когда вы запускаете команду.
- Последнее – это разрешенные команды.
2.1 . Проверка пользователей Sudo
Чтобы проверить, может ли пользователь выполнять административные задачи, выйдите из системы и войдите в систему от нового пользователя.
Теперь выполните любые команды с префиксом «sudo», как показано ниже.
3. Удалим пользователей Sudo
Вы можете удалить превилигии sudo у пользователя, не удаляя его полностью.
Вы должны быть осторожны, когда делаете это в системах Ubuntu.
Не удаляйте настоящего администратора из группы «sudo».
В системе должен быть хотя бы один пользователь sudo.
Чтобы отозвать sudo у пользователя, команда будет:
4. Удалить пользователей навсегда
На предыдущем этапе мы удалили только пользователей из группы «sudo».
Но пользователь все еще существует в системе.
Чтобы полностью удалить пользователя из системы Linux, войдите в систему как пользователь root или sudo и запустите:
Если вы хотите удалить пользователя вместе с его домашним каталогом и почтовым спулом, запустите:
Для более подробной информации, обратитесь к справочным страницам.
Источник


