- Инструкция по созданию точки восстановления Windows 10
- Создание точки восстановления в Виндовс 10
- Настройка восстановления системы
- Создание точки восстановления
- Откат операционной системы
- Заключение
- How to create a System Restore Point in Windows 10
- How do I create a system restore point in Windows 10?
- Frequently Asked Questions
- How do I create a restore point in Windows 10?
- Does Windows 10 have restore points?
- Should I create a restore point?
- How to use System Restore on Windows 10
- How to enable System Restore on Windows 10
- How to create a System Restore point on Windows 10
- How to recover using System Restore on Windows 10
- Undo system changes from desktop
- Undo system changes from Advanced startup
- Access Advanced startup
- Undo changes with System Restore
- More Windows 10 resources
- Halo: MCC’s live service elements make it better, not worse
- Microsoft’s Surface Duo is not ‘failing up’
- Here’s what you can do if Windows 10 update KB5001330 is causing issues
- These are the best PC sticks when you’re on the move
Инструкция по созданию точки восстановления Windows 10

Каждый пользователь ПК рано или поздно сталкивается с тем, что операционная система начинает выдавать ошибки, разбираться с которыми просто нет времени. Это может происходить как следствие установки вредоносного ПО, сторонних драйверов, которые не подходят системе и тому подобное. В таких случаях устранить все проблемы можно, использовав точку восстановления.
Создание точки восстановления в Виндовс 10
Давайте разберемся что такое точка восстановления (ТВ) и как можно ее создать. Итак, ТВ — это своеобразный слепок ОС, который хранит в себе состояние системных файлов в момент его создания. То есть, при ее использовании юзер возвращает ОС в то состояние, когда была сделана ТВ. В отличии от резервной копии ОС Виндовс 10 точка восстановления не затронет пользовательских данных, так как является не полной копией, а только содержит информацию о том, как изменились системные файлы.
Процесс создания ТВ и отката ОС выглядит следующим образом:
Настройка восстановления системы
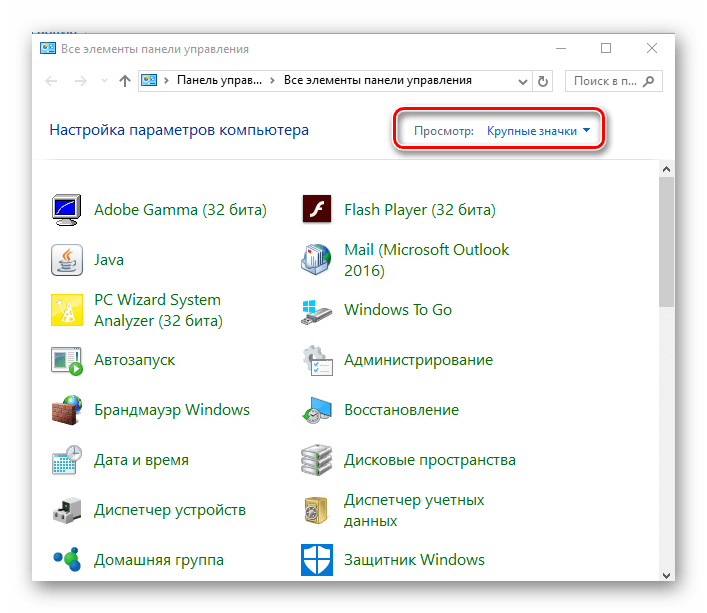
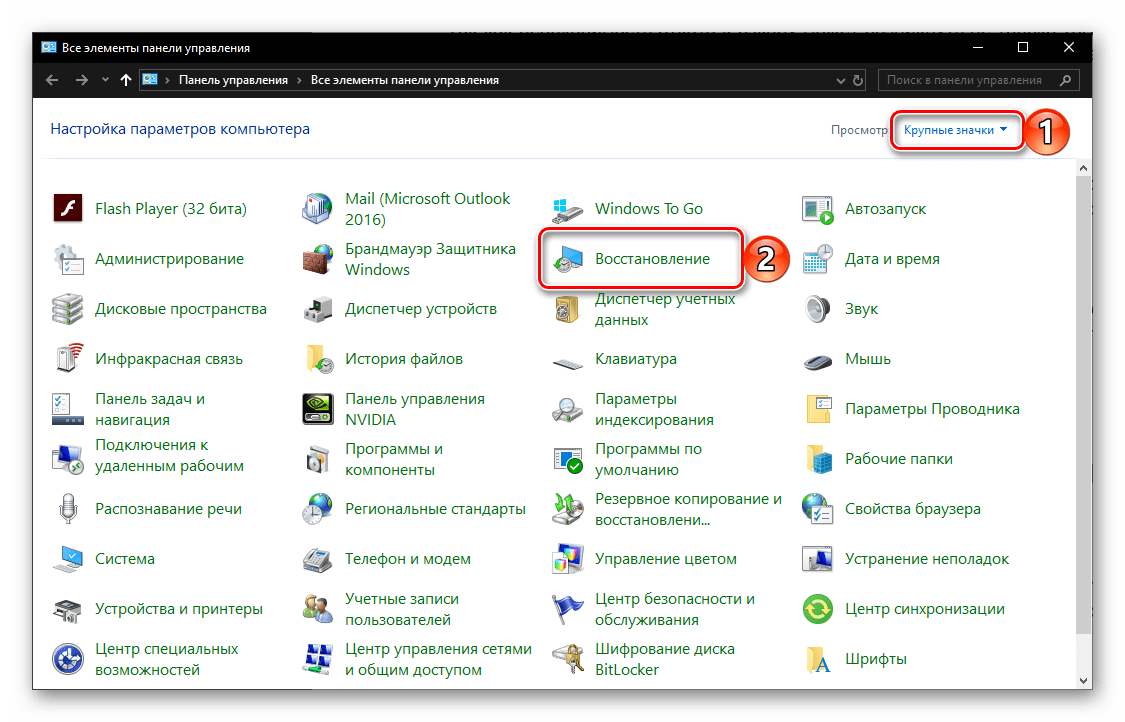
- Кликните правой кнопкой мыши по меню «Пуск» и зайдите в «Панель управления».
- Выберите режим просмотра «Крупные значки».
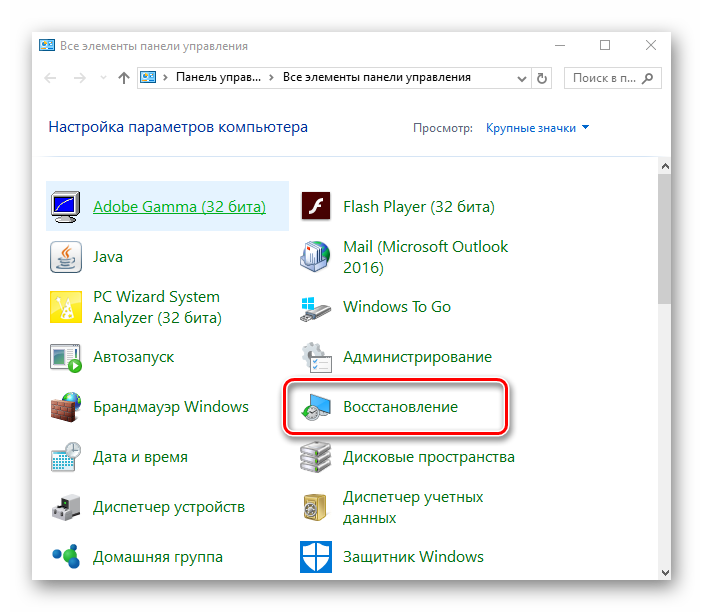
Щелкните по элементу «Восстановление».
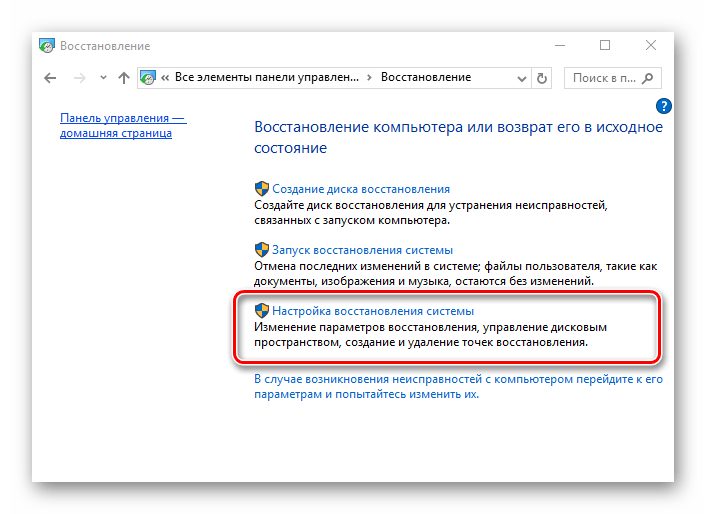
Далее выберите «Настройка восстановления системы» (потребуется иметь права администратора).
Создание точки восстановления
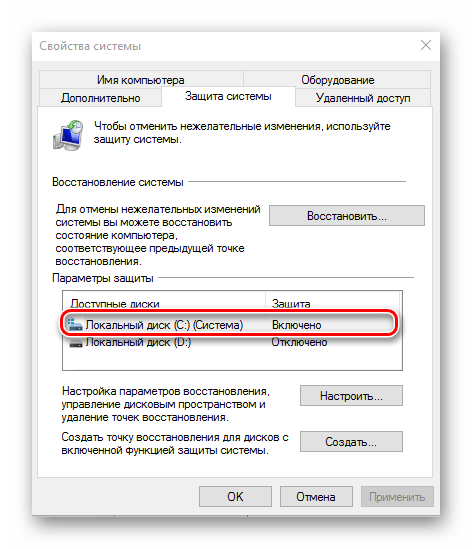
- Повторно перейдите на вкладку «Защита системы» (для этого выполните пункты 1-5 предыдущего раздела).
- Нажмите кнопку «Создать».
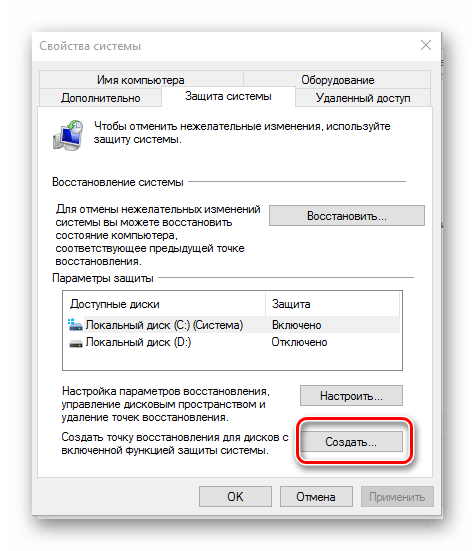
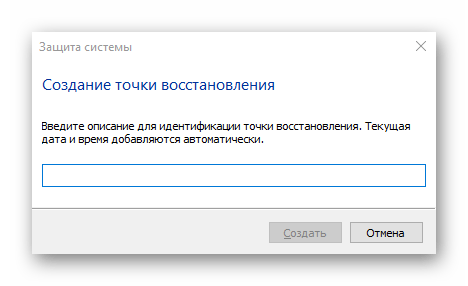
Введите краткое описание для будущей ТВ.
Дождитесь окончания процесса.

Откат операционной системы
Точка восстановления для того и создается, чтобы в случае необходимости к ней можно было быстро вернуться. Причем выполнение данной процедуры возможно даже в тех случаях, когда Windows 10 отказывается запускаться. Узнать о том, какие существуют способы отката ОС к точке восстановления и как реализовывается каждый из них, вы можете в отдельной статье на нашем сайте, здесь же приведем лишь наиболее простой вариант.
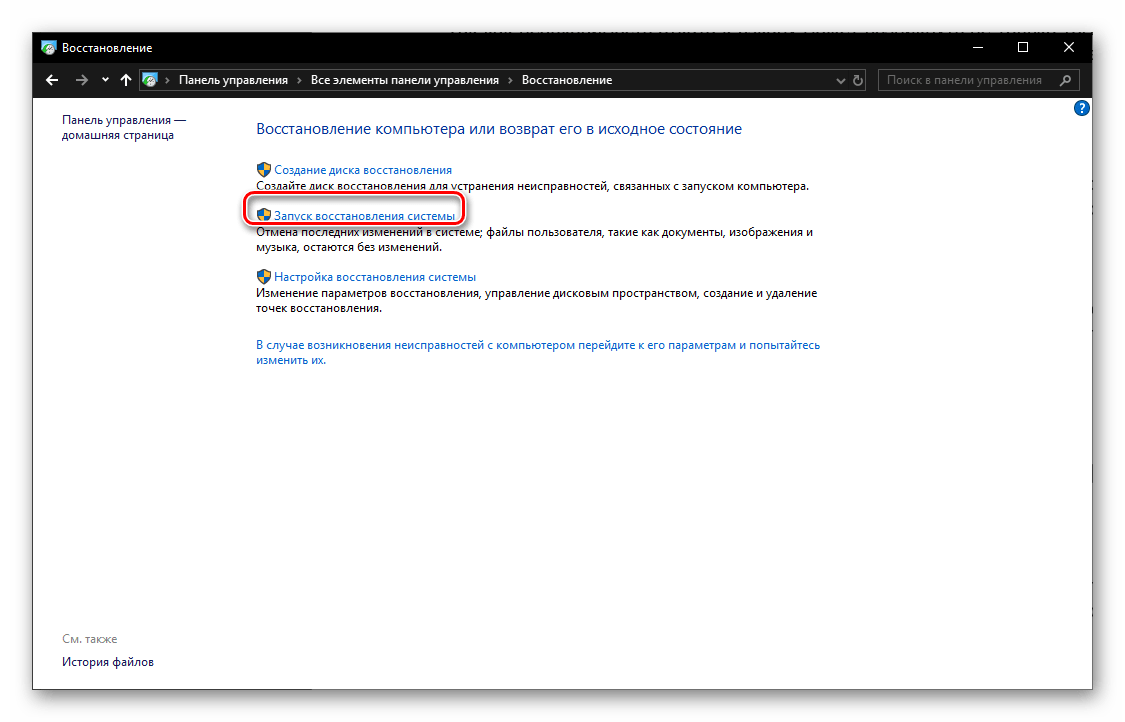
- Зайдите в «Панель управления», переключите просмотр на «Мелкие значки» или «Крупные значки». Перейдите в раздел «Восстановление».
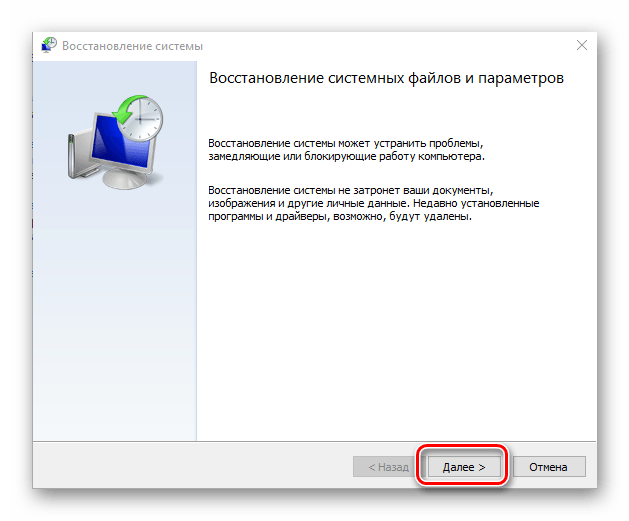
Нажмите «Запуск восстановления системы» (для этого потребуется иметь права администратора).
Щелкните по кнопке «Далее».
Ориентируясь на дату, когда ОС еще работала стабильно, выберите подходящую точку и еще раз нажмите «Далее».

Подтвердите свой выбор нажатием кнопки «Готово» и дождитесь, пока завершится процесс отката.

Подробнее: Как откатить Виндовс 10 до точки восстановления
Заключение
Таким образом, своевременно создавая точки восстановления, в случае необходимости вы всегда сможете вернуть работоспособность Windows 10. Рассмотренное нами в рамках данной статьи средство является достаточно эффективным, так как позволяет за короткое время избавится от всевозможных ошибок и сбоев без использования такой радикальной меры, как переустановка операционной системы.
How to create a System Restore Point in Windows 10

- After you installed all the basic applications that you use regularly, it’s a good idea to create a system restore point. You never know what will happen to your operating system at one point or another and this way, you will easily be able to restore a good working copy in no time.
- Although Windows 10 generates a backup copy of the system every time you install or uninstall an application, at a certain point in time, you might want to create your own restore point and go back to it whenever you wish. It’s very easy to create one. Just follow the step by step guide below.
- In the Systtem Restore section you will find all the articles about this topic, including problems and solutions.
- We have wrote a plethora of tutorials about Windows and the devices that use it and you can find them all in the How to guide category.

- Download Restoro PC Repair Tool that comes with Patented Technologies (patent available here).
- Click Start Scan to find Windows issues that could be causing PC problems.
- Click Repair All to fix issues affecting your computer’s security and performance
- Restoro has been downloaded by 0 readers this month.
Creating a system restore point is always a good thing to do because you never know what will happen to your operating system at one point or another.
In this way, you will easily be able to restore a good working copy in no time.
So, follow the tutorial below and you will find out how to create a system restore in Windows 10 in the shortest time possible.
Most likely, a third party application you install or a virus you got while surfing the internet might cause Registry file error of your Windows 10 operating system.
By having a system restore point, you will be able to resuscitate your system to an earlier point in time thus fixing major OS issues very quickly.
How do I create a system restore point in Windows 10?
Windows 10 OS generates a backup copy of the system every time you install or uninstall an application.
However, at a certain point in time, you might want to create your own restore point and go back to it whenever you wish. Here are the steps to follow:
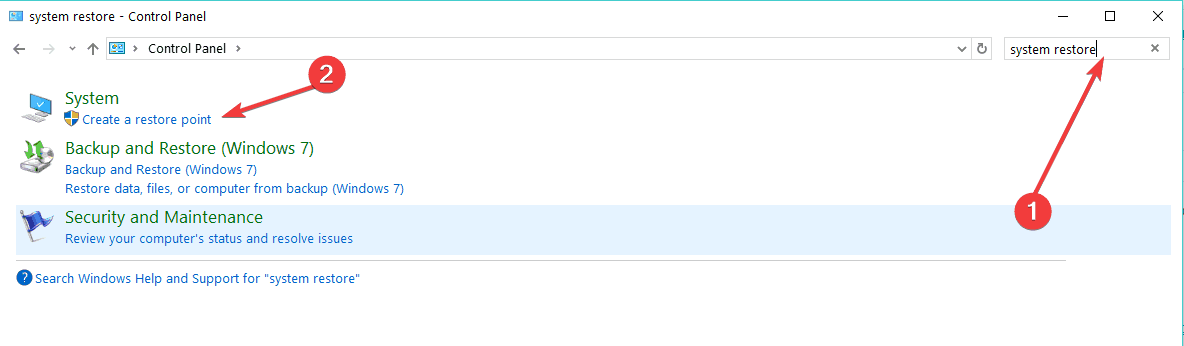
- Directly from the Start screen in Windows 10, start writing the following: Control Panel
Note: Another way to access the Control Panel is by moving the mouse cursor over to the upper right side of the screen and left click or tap on the Search icon from that menu. From the search box write Control Panel without the quotes and left click or tap on the Control Panel icon. - In the Control Panel search box situated in the upper right side of the window, you need to write the following: system restore.
- Left-click or tap on the Create a restore point link situated under the System feature.

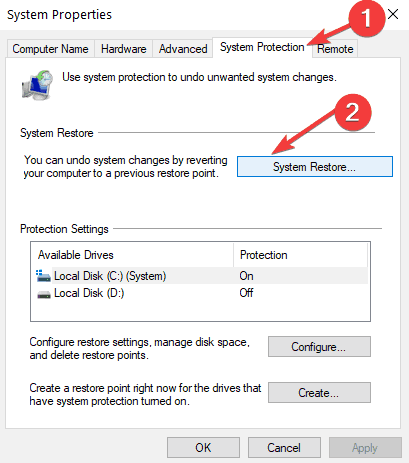
- Now you have the System Properties window in front of you.
- Left-click or tap on the System Protection tab situated in the upper side of the System Properties window.
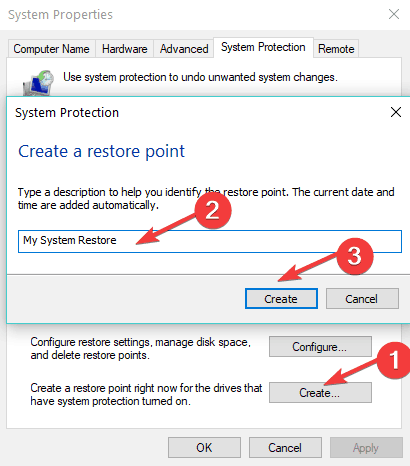
- Left-click or tap on the Create button in this tab.
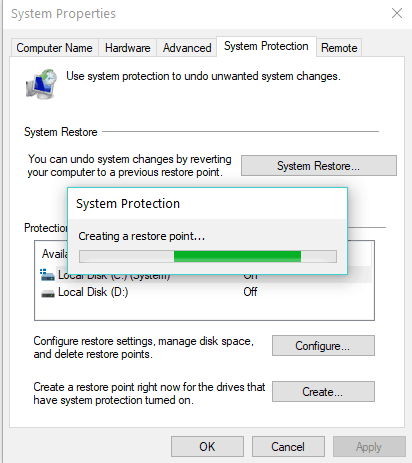
- Now a small window called System Protection will pop up.
- In the box under the Create a restore point topic, you will need to write a name for this backup copy.
- After you gave a name to the restore point, you will need to left click or tap on the Create button.
- Now your Windows 10 system will start creating the restore point.
Note: This process will take up to 10 or 20 minutes. - After the process has finished, you will get a pop-up message which will tell you that the restore point was successfully created.
- Left-click or tap on the Close button in the window above and you are good to go.
- Now if you have any issues with your Windows 10 operating system, you can just go right ahead and bring it back to the restore point you just made in this tutorial.
Once again, creating a Windows 10 Restore Point is very useful.
According to a recent survey, 50% of Windows 10 users confirmed that Windows updates cause various issues on their machines.
In case the latest updates mess up your computer, you can always use your Restore Point to bring your computer back to a working state.
So, I don’t think it can get easier than this. If you followed the steps above in the correct order, I am sure you finished the tutorial in just five minutes of your time.
If you have any additional questions regarding this article, please write us below in the comments section of the page and we will help you further with this subject.
- Download this PC Repair Tool rated Great on TrustPilot.com (download starts on this page).
- Click Start Scan to find Windows issues that could be causing PC problems.
- Click Repair All to fix issues with Patented Technologies (Exclusive Discount for our readers).
Restoro has been downloaded by 0 readers this month.
Frequently Asked Questions
How do I create a restore point in Windows 10?
Type system restore in the Windows 10 Search box and select Create a restore point from the list of results. It’s a little bit more complicated but if you follow our complete step-by-step guide you will get this done in no time.
Does Windows 10 have restore points?
Windows 10 automatically creates a restore point before you make any changes to the system settings or install or uninstall a program. Here’s what you can do if the restore point is not working.
Should I create a restore point?
Yes, it is highly recommended that you create a system restore point before installing new software or anytime your PC undergoes a major change.
How to use System Restore on Windows 10
 Source: Windows Central
On Windows 10, System Restore is a feature designed to create a snapshot of the device’s current working state as a «restore point» when system changes are detected. If a critical problem occurs after installing a system update, device driver, application, or after modifying system settings incorrectly using the Registry or another tool, you can use one of the available restore points to revert the computer to an earlier point in time to resolve the problem without losing your files.
Although this is a handy recovery tool, for some odd reason, System Restore comes disabled by default, which means that you must enable it before Windows 10 can create restore points automatically or you manually.
In this Windows 10 guide, we walk you through the steps to set up System Restore as well as the steps to recover from problems that may be affecting the normal operation of your computer.
How to enable System Restore on Windows 10
On Windows 10, the System Restore feature is not turned on by default, and you must enable it manually using Control Panel.
To enable System Restore, use these steps:
- Open Start.
- Search for Create a restore point and click the top result to open the System Properties page.
- Under the «Protection Settings» section, select the main «System» drive
Click the Configure button.
![]() Source: Windows Central
Source: Windows Central
Select the Turn on system protection option.
 Source: Windows Central
Quick tip: Windows 10 can automatically manage the space, but under the «Disk Space Usage» section, you can also use the slider to specify the storage amount to reserve for the recovery feature. You will also find a Delete button, which you can use to remove all restore points, which can come in handy to free up space or when you want to start over with the feature.
Once you complete the steps, Windows 10 will automatically create a restore point when applying a new update or when specific system changes are made.
System Restore is not a feature you can enable globally. If you have additional drives you want to protect with System Restore, you must repeat the steps on every storage device. However, remember that this feature is available to undo settings changes. It is not a backup solution replacement.
How to create a System Restore point on Windows 10
If enabled, System Restore will create a checkpoint when it detects system changes automatically. However, if you modify the system configuration, you always want to create a restore point manually.
To create a restore point on Windows 10 manually, use these steps:
- Open Start.
- Search for Create a restore point, and click the top result to open the System Properties page.
Under the «Protection Settings» section, click the Create button.
![]() Source: Windows Central
Source: Windows Central
Type a descriptive name for the restore point — for example, before modifying the Registry settings.
![]() Source: Windows Central
Source: Windows Central
After you complete the steps, you’ll have a way to undo changes in the event that something goes wrong while installing a new device driver, app, or after modifying the Registry.
How to recover using System Restore on Windows 10
When something happens after modifying system settings on Windows 10, you can undo the changes by applying a previous restore point. You can complete this task from the desktop or the advanced startup settings if the system does not boot.
Undo system changes from desktop
If you still have access to the desktop, you can revert changes with System Restore using these steps:
- Open Start.
- Search for Create a restore point, and click the top result to open the System Properties page.
Click the System Restore button.
![]() Source: Windows Central
Source: Windows Central
Quick note: If the option is grayed out, then it means that the system does not have any restore point available.
Click the Next button.
 Source: Windows Central
Click the Finish button.
Source: Windows Central
Once you complete the steps, System Restore will return the device to the previous good working state.
Undo system changes from Advanced startup
If the computer does not boot to access the desktop, you can use Advanced startup settings to use the System Restore feature to undo system changes.
Access Advanced startup
To access the Advanced startup environment to use System Restore, use these steps:
- Power on the device.
As soon as the Windows logo appears on your screen, press the power button to interrupt the boot sequence.
Source: Windows Central
After you complete the steps, you can use the steps outlined below to revert system changes with System Restore.
Alternatively, if you cannot access the recovery environment with the above steps, you can start your device with a Windows 10 installation media, and while in the «Windows Setup» experience, click the Next button, click the Repair your computer button from the bottom-left corner, and then use the steps below.
Undo changes with System Restore
To use System Restore from the Advanced startup environment, use these steps:
Click the Advanced options button.
Source: Windows Central
Click on Troubleshoot.
Source: Windows Central
Click on Advanced options.
Source: Windows Central
Click on System Restore.
Source: Windows Central
Confirm the account passowrd.
Source: Windows Central
Click the Next button.
Source: Windows Central
Click the Finish button.
Source: Windows Central
Once you complete the steps, the changes causing the problem will be removed with the previous snapshot bringing the device back to a good-known working state.
We are focusing this guide on Windows 10, but since this is a legacy feature, you can also refer to these instructions if you are using Windows 8.1 or Windows 7.
Although System Restore is a convenient feature to quickly recover from configuration problems, it is not a feature meant to replace a backup solution or an option to reset the computer to the factory default settings.
More Windows 10 resources
For more helpful articles, coverage, and answers to common questions about Windows 10, visit the following resources:
![]()
Halo: MCC’s live service elements make it better, not worse
Halo: The Master Chief Collection is more popular than ever, but some fans don’t agree with the live service approach 343 Industries has taken with it. Here’s why those elements are, at the end of the day, great for the game and for Halo overall.
![]()
Microsoft’s Surface Duo is not ‘failing up’
Microsoft announced this week that it was expanding Surface Duo availability to nine new commercial markets. While Surface Duo is undoubtedly a work in progress, this is not a sign of a disaster. It’s also doesn’t mean that Surface Duo is selling a ton either. Instead, the reason for the expansion is a lot more straightforward.
![]()
Here’s what you can do if Windows 10 update KB5001330 is causing issues
In this guide, we’ll show you the steps to get rid of the update KB5001330 to fix profile, gaming, and BSoD problems with the Windows 10 October 2020 Update and May 2020 Update.
![]()
These are the best PC sticks when you’re on the move
Instant computer — just add a screen. That’s the general idea behind the ultra-portable PC, but it can be hard to know which one you want. Relax, we have you covered!


