- 3 Methods to Create a Bootable Windows 10 USB / DVD Installer
- How to Create a Bootable Windows 10 Disk?
- 1. Using Windows Media Creation Tool by Microsoft
- 2. Using Windows USB / DVD Download Tool
- 3. Create Bootable Windows 10 disk With the help of third party software
- 4. Create Bootable USB disk Manually using command prompt
- Why we need to create a bootable Windows 10 USB drive?
- How to download windows 10 bootable USB or ISO image for clean windows installation.
- How to Prepare Bootable Install Media for Windows 10 — DVD, USB or SD Card
- Creating Bootable Windows XP, 7, 8 & 10 USB Flash Drive Installers
- Guide Index:
- Benefits of USB Install Media
- USB Installer Tools & Successes
- Acquiring a Disc Image (ISO)
- Using Rufus
- Using UNetbootin
- Using Microsoft diskpart
- Using Microsoft Windows 7 USB/DVD Tool
- Using Windows 10 Media Creation Tool
- Windows XP Notes
- Common Problems
- No Bootable Device Detected
- Windows Installer Starts But Can’t Detect Install Media
- Flash Drive Isn’t Using All Available Space
- Windows 10 ‘Something Happened’
3 Methods to Create a Bootable Windows 10 USB / DVD Installer
Bootable disk is required when we need to do a fresh Windows installation. Bootable disk is a disk which contains special files to boot up or startup the computer to start a utility or program. In this case to install a Windows 10 operating system we require a bootable disk to start the installation process of Windows 10.
A bootable disk is not required when we upgrade from older operating system like Windows 7 to Windows 10. But if we downloaded an ISO file to install it on a different PC or for a clean install we must have to create a bootable disk.
Lets learn how we can create a bootable Windows 10 disk.
How to Create a Bootable Windows 10 Disk?
Microsoft has provided official tools to create a bootable disk without using any third party software. We here explain the 3 main methods.
1. Using Windows Media Creation Tool by Microsoft
This is the easiest and most reliable method. The utility automatically downloads Windows 10 and copy the files in USB disk by making it a bootable disk. This method can also be used to download the ISO file only. Follow the below steps.
-
- Download the Windows Media Creation Tool: Click here to download media creation tool.
- Double-click on the downloaded file.
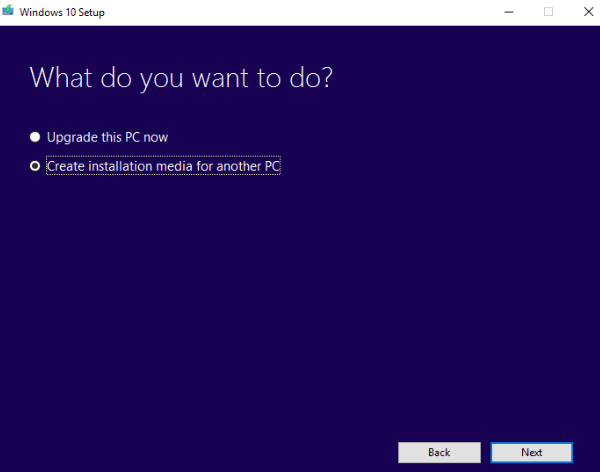
- Select “create installation media for another PC“.
- Select Language / Edition and Architecture as per your requirement.
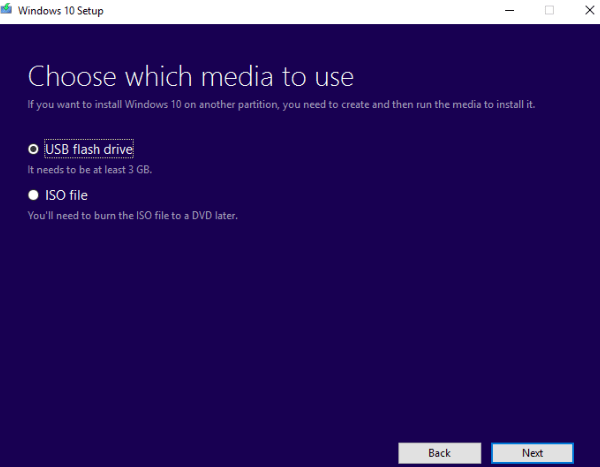
To learn more about it, go to https://www.microsoft.com/en-in/software-download/windows10 - Select USB flash drive for USB or ISO file for DVD.
- Your disk will be ready after the completion of the process. It requires atleast 8 GB of pen drive. Make sure there will not be any important data in the disk as it will format the disk during the creation of the bootable disk.

- Select “USB Flash Drive” option and click on Next.
You can download windows 10 iso file for free directly from Microsoft using this media creation tool. An activation key will be required during the installation process.
2. Using Windows USB / DVD Download Tool
This is an old and still working method to create a bootable media for Windows Installation. The name can confuse you but it is also working perfectly for Windows 10 as well. However, this method requires an ISO image of Windows 10. So first you have to download the Windows 10 iso file.
- This process needs an empty USB stick (Min: 8GB). Quick format the USB drive first.
- Download Windows USB / DVD Download Tool & Install it on your computer.
- After finishing of its installation, Run it.
- It requires ISO image file of the windows. Select the ISO image and start the process. you can download the iso file of windows 10 using media creation tool as mentioned in method 1.
- After completion of the process your bootable USB / DVD installer disk will be ready to use.
- Windows USB / DVD Download Tool to create a bootable disk
- Create Bootable USB / DVD with the ISO File

3. Create Bootable Windows 10 disk With the help of third party software
Though you will not be require to come to this method, but we are mentioning here if there is any issue in running Microsoft tools. Building a boot-able flash drive becomes pretty easy with the use of external software, named Rufus. Here are the essential guidelines when using Rufus for making a bootable Windows 10 flash drive.
- Download Rufus.
- Open Rufus.exe
- When the software launches on the screen, plug in your USB flash drive.
- Find the option Create a bootable USB drive.
- From the menu that follows, select an ISO image.
- Now click on the button next to this menu and click the Windows 10 ISO which you want to install on your computer.
- Now hit Start and the software will begin to create a bootable USB flash drive.
- Once you have developed the USB flash drive, just plug it in and you are ready to install / reinstall Windows 10.
4. Create Bootable USB disk Manually using command prompt
This method is useful for advanced users. Sometimes users only have access to command prompt only and unable to start the Windows. In this case if you have an ISO file you can create a bootable pen drive using this method. Follow the given guidelines carefully as this method is a little complicated:
- Plug in your USB drive.
- Search Command Prompt.
- Run it as an administrator.
- Open the disk management utility using Command prompt.
- For this purpose, type diskpart in the CMD and hit Enter.
- Now type list disk and hit Enter. This will display the list of available connected disks.
- From this list you need to select your USB drive. For this, type select disc # and press Enter (Replace # with your disk number from the list)
- The next step is to clean the USB drive. For this purpose, type clean and hit Enter.
- Now create a bootable partition, simply type Create partition primary and press Enter.
- You need to select the partition you just created. Type select partition 1 and then type active and hit Enter.
- Now format the USB drive by typing format fs=fat32. After this press Enter.
- Assign a letter to your USB drive, just type assign.
- Finally, copy all the files of Windows 10 and paste them in the USB drive. Files can be copied from a Windows 10 disk or by extraction from an ISO file.
And that is all there is to know about the manual creation of a bootable Windows 10 USB flash drive. all the methods are equally useful. If you’re an expert you can use the manual method without taking help of software, but beginners are advised to seek software help to avoid any complications. The best and easy method is using the Windows Media Creation Tool .
Are you still using the Windows 7? Microsoft has ended the windows 7 support.
Upgrade to Windows 10 as early as possible.
Why we need to create a bootable Windows 10 USB drive?
Since the availability of USB drives, the use of CD and DVD has prominently declined. The major reasons behind this are the ease of use, portability, larger capacity and faster copying of data files by the USB drives in comparison to the older methods. All you need is a flash drive with a capacity of more than 4GB, although 6 to 12 GB available space is ideal for storing additional files as well. Create a bootable USB drive and keep it in a safe place that you can use this disk to easily fix the installation issues.
How to download windows 10 bootable USB or ISO image for clean windows installation.
Given above method 1 can be used to easily download the ISO image file. We didn’t found any other direct link to download ISO image for offline purpose. So downloading it using the media creation tool is the only method to get it directly from the Microsoft.
You can also upgrade to Windows 10 for Free using windows 7 license key.
Please share your experience with the creation of bootable windows 10 disk using the below comment box.
How to Prepare Bootable Install Media for Windows 10 — DVD, USB or SD Card
NOTE: These instructions reference Windows 10, but they work just as well if you want to create a bootable copy of Windows 7 or Windows 8.
Technical Level : Basic
Summary
If you performing a new installation of Windows 10, you might need to prepare bootable install media. The Media you choose to install from will depend on certain factors, such as the Boot Scheme used by your computer (BIOS, UEFI) in addition to the storage device (hard disk partitioning layout). Examples of partitioning layout include MBR (BIOS) and GPT (UEFI). In this article, we show you several ways to create a bootable copy of Windows 10 from an ISO file. An ISO file is a digital replica of a virtual disc, which users will have to make bootable on a blank DVD, USB thumb drive or SD card.
Details
Before we begin, you need to have a copy of Windows 10 ISO file. See the following article for instructions how to download a ISO image for Windows 10 using the Media Creation Tool:
NOTE: Microsoft no longer provides direct access to Windows 10 ISO images from the Microsoft Techbench website for computers running Windows 7, Windows 8.0, Windows 8.1 and Windows 10. You can still download the ISO image from computers running earlier versions of Windows such as Windows XP, Windows Vista or alternative operating systems such as Linux or macOS.
After downloading the Windows 10 ISO, you need prepare it, this is especially important for Windows 7 and earlier versions of Windows.
You can use the built in Disc Image burning tool or Microsoft .iso to USB/DVD tool to create a bootable DVD or USB (requires a blank DVD) or Rufus, a third party program that can create a bootable USB flash stick (requires at least 8 GBs).
After downloading the .ISO file, right click it and click Burn disc image
Insert a blank DVD
Windows 8/8.1 users can mount the .ISO file then start the upgrade automatically. Learn more here

Important:
If you are creating a bootable USB thumb drive, make sure the thumb drive is first formatted as FAT32.
Connect the thumb drive
Right click thumbdrive
Make sure FAT32 is selected as the file system.
For UEFI based systems
If your computer is UEFI based, these are normally systems that come pre-loaded with Windows 8 or later, you will need to prepare the ISO file for such a configuration or you will receive an error message during setup. The thumb drive needs to be formatted as FAT32. If you are installing on a hard disks that is 4 TBs or more in size, you need to format the disk using the GPT partitioning scheme. Rufus ensures your copy of Windows 10 is properly prepared to support it.
After downloading Rufus, connect your thumb drive, launch Rufus application, click in the Device list box then choose your thumb drive.
Click in the list box then choose your partition scheme. If you select the ISO, Rufus will automatically select the appropriate options for you. Next, click in the File system list box, then choose FAT32. If your thumb drive is larger than 32 GBs, choose exFAT.
Leave the default Cluster size then enter a label for your thumb drive.
Click the choose disk image icon, browse to where the ISO file is located, select it then click Open.
Click Start to copy the files to the thumb drive.
If you have any files on the thumb drive, they will be deleted.
Wait while the files are copied to your thumb drive.
Close when complete
Open File Explorer, then launch setup to begin the installation.
If you are performing a clean install see instructions how to configure your BIOS or UEFI firmware:
Was this article helpful?
Sorry this didn’t help.
Great! Thanks for your feedback.
How satisfied are you with this article?
Thanks for your feedback, it helps us improve the site.
Creating Bootable Windows XP, 7, 8 & 10 USB Flash Drive Installers

As time passes, more and more PCs are being built without an optical drive. When the time comes to reinstall or upgrade Windows, an issue can arise: Where does that setup DVD go? The answer: On a flash drive. Find out the different ways to get Windows XP through Windows 10 onto a bootable flash drive – and enjoy the speed benefits that come with it.
For a long time, Microsoft didn’t sell Windows install media in the form of bootable USB flash drives. Instead, it prefered to stick to old-school DVD media, despite the fact that many notebooks today are too small to even include an optical drive, and many DIYers are building PCs which forego one on purpose.
However, things have moved on, and for the first time, Microsoft has begun to sell Windows 10 on pre-configured USB drives. Previous versions of the OS (XP, 7 and 8.1), all require the user to create their own bootable USB drive.
Creating a bootable Windows USB drive used to be a chore, but today, one solution can pretty-well suit most people. However, there are times when a flash drive has some quirk that prevents it from working with a particular solution, so for that reason, this article takes a look at five different methods.
Guide Index:
Benefits of USB Install Media
Even if the target desktop or notebook has an optical drive, there are a couple of reasons to consider first creating a USB-based installer. Admittedly, the time and effort of creating the drive might make it best-suited for system builders, but for people like us, who juggle test machines, USB is a no-brainer.
To start, USB media is more durable than disc-based media. Discs can be easily scratched, while well-built USB flash drives can generally handle a bit of abuse. Then, there’s the convenience. Ever walk around with a disc in your pocket? It looks a bit odd.
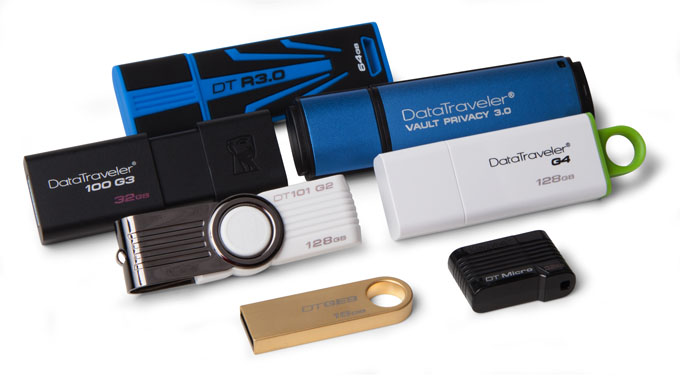
For us, performance and reliability are the key reasons why we’ve opted to use USB-based installers in lieu of discs, especially with USB 3.0 being much more common. Even if a DVD has been burned at the highest commercial speeds, it won’t be able to compete with flash memory which offers far improved IOPS performance (operations per second) – it’s the same reason why SSDs are much faster for booting an OS and loading applications than a mechanical hard drive; the seek times are minuscule in comparison.
While it’s beyond the scope of this article, those who truly want a fast install experience can slipstream USB 3.0 support into the install media, which on current chipsets and an SSD target can allow you to install Windows in under 4 minutes flat.
USB Installer Tools & Successes
Over the course of this article, we’re going to be looking at five different solutions that accomplish the exact same thing: Creating a USB-based Windows installer; if one doesn’t work, the next one should (at least, that’s the hope). To give an overview of what to expect from each solution, refer to this success table:
| Windows 10 | Windows 8 | Windows 7 | Windows XP | |
| Rufus | Yes* | Yes | Yes | Yes |
| UNetbootin | Yes | Yes | Yes | No |
| diskpart | Yes | Yes | Yes | No |
| Microsoft USB Tool | Yes | Yes | Yes | No |
| Media Creation Tool | Yes | No | No | No |
| * Requires Rufus 2.1.6 or later. | ||||
Given the fact that Windows XP has reached end-of-life status and doesn’t officially support installation over USB, we have to outline a number of problems and conditions in order to get it working. Windows XP over USB is still temperamental, and there is a good chance that it just won’t work with your system, so please keep this in mind.
For starters, modern UEFI-equipped machines are not designed to support such an old OS, so chances are that it will not even install, or even be detected in the first place. If the motherboard in question happens to support a legacy BIOS mode, then it might work. Different version of Rufus (explained later) have better luck with the XP process than others. We strongly suggest you skip to the dedicated part of this article that explains the problems with Windows XP and USB support.
What about Windows Vista? Like Windows 7, 8, and 10, Vista too can be installed from USB media with these same methods, but due to that fact that most have moved on from it in favor of 10, it’s not a big focus.
We mentioned Rufus above, and that’s the tool we’re going to lead in here with, as we consider it to be the simplest to use, and the most effective. We discussed the same tool in an article from summer 2012 called ‘Creating a Bootable DOS Flash Drive the Easy Way‘, as it allows for simple creation of bootable MS-DOS flash drives, as the title suggests.
After the look at Rufus, we’ll continue on to UNetbootin, Microsoft’s diskpart (a tool built into Windows), a quick mention of another official Microsoft tool, but one the company no longer promotes for Windows 7 and 8, as well as the latest method, the Media Creation Tool. But first…
Acquiring a Disc Image (ISO)
Some solutions listed on this page require a Windows disc image (.iso) to be present. The exception is ‘diskpart’, as the disc’s files will need to be transferred over manually (it doesn’t matter if they come from a mounted ISO or a drive in an actual DVD-ROM). ISOs are available from a number of sources, but most people will acquire them after purchasing the OS online through Microsoft, or through some other related Microsoft service. If you don’t have an ISO, or a disc for that matter, you’ll need to acquire one from a friend or elsewhere on the web.
If you’re just looking to download Windows 10 as an ISO, you simply need to run the tool listed in step #5, and choose to save as ISO rather than to burn the image to a flash drive. Note that we can’t really provide an MD5 for a Windows 10 ISO, as it changes every time it’s downloaded through Microsoft’s tool. Only the ISOs directly supplied by Microsoft would have static hashes.
There are multiple editions of any given Windows version, but we’re going to list the exact ISOs we used along with their MD5 checksums in case they prove useful.
MD5 Checksums
- Windows XP Pro (Service Pack 3): F424A52153E6E5ED4C0D44235CF545D5
- Windows 7 Ultimate (Service Pack 1): 56A26636EC667799F5A7F42F142C772D
- Windows 8 Pro: 0E8F2199FAE18FE510C23426E68F675A
- Windows 8.1 (MSDN; multi-version): CDADC5A76634651770A365F457702803
Please be careful where you source your OS image from, as most online sources will be pirated copies and/or bundled with extra (sometimes malicious) software. How the image was captured as well will have an effect on how the final boot drive turns out, so stick to official sources where possible.
For those who have a Windows setup DVD, a free tool like CDBurnerXP or ImgBurn can be used to rip it into an .iso file. Other tools exist that accomplish the same thing, but these are the only ones we can personally recommend. For mounting an ISO image, we’d recommend Virtual CloneDrive, as it’s free, and not the “free but a total nag” kind of free.
NOTE: Some anti-virus applications might interfere with the USB creation process due to the autorun properties involved, so if issues are experienced, we’d recommend temporarily disabling the anti-virus until the process is complete.
Using Rufus
Both Rufus and UNetbootin are simple tools for this task, and outside of Rufus’ Windows XP support, both work just the same. However, we prefer Rufus because we find it loads a lot quicker, and feels a bit faster, too. For a great many reasons, this is still our preferred method of creating USB boot drives.
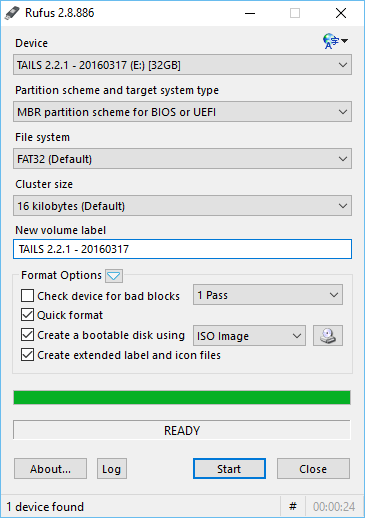
With Rufus loaded up, choose the appropriate device that you want to turn into a boot drive, under the “Device” menu, and make sure that the file system is NTFS (not FAT32). The other options shouldn’t matter too much, although if you’re planning to install Windows 8 as an official EFI OS, you may wish to peruse the options under the “Partition scheme and target system type” menu. For Windows XP, select MBR Partition only.
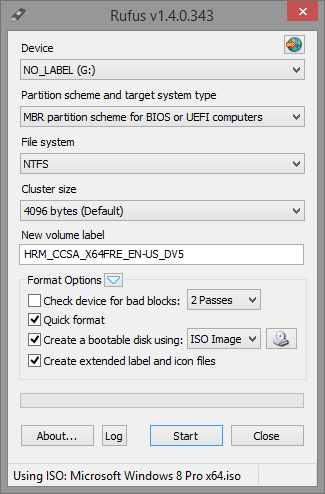
To load the Windows .iso file, the small CD icon to the right of “Create a bootable disk using:” option can be clicked. After perusing the file manager for the ISO image and accepting it, the “Start” button can be clicked to have the tool work its magic. NOTE: As the program will state, doing this will erase all data off of the flash drive – so backup first.
If you have any issues, be sure to check out our Common Problems section below.
Using UNetbootin
UNetbootin is a well-known tool as it’s become a de facto choice for turning a bootable Linux live CD into a bootable Linux live flash drive – for that purpose, it still excels. Little do most people realize, it can handle Windows ISOs as well (but as the table at the top of this page shows, it doesn’t support creating a bootable Windows XP drive).
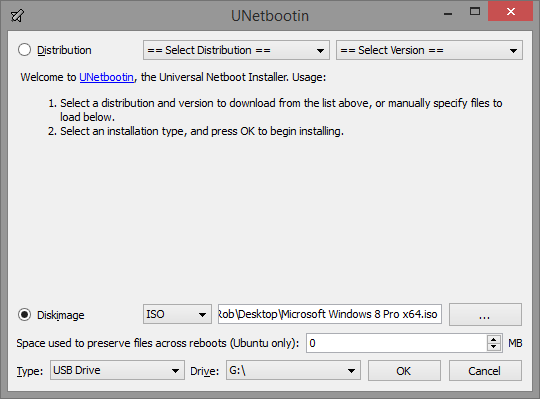
Like with Rufus, the appropriate drive should be selected from the “Drive:” menu at the bottom, and then the “…” button to the right of the largest text field can be clicked to search for and accept the required ISO. At this point, the “OK” can be clicked, and the process will get underway.
Unlike Rufus, UNetbootin doesn’t erase the flash drive first, so data remains intact – however, if you’re repeatedly writing new ISOs to the drive using the tool, it’s recommended you format after each one, so as to not leave unused scrap files around the drive. NOTE: We’d still recommend backing up personal data before writing an ISO to it just in case.
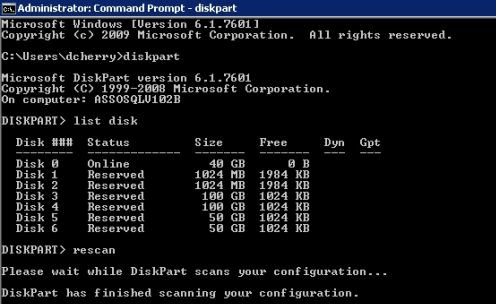
Using Microsoft diskpart
For those who don’t have an ISO, but rather a DVD, diskpart is the solution for you. It does require some command-line usage, but as you’ll see, it’s not too complicated. NOTE: This method will delete the entire flash drive, so be sure to back up personal data first.
To make proper use of diskpart, you’ll need to open a command prompt with administrator rights (head to “Start”, type in ‘cmd’, right-click it, and choose ‘Open as Administrator’). Once the prompt is opened, type in ‘diskpart’ to load the tool, and then ‘list disk’ to figure out which # relates to your flash drive.
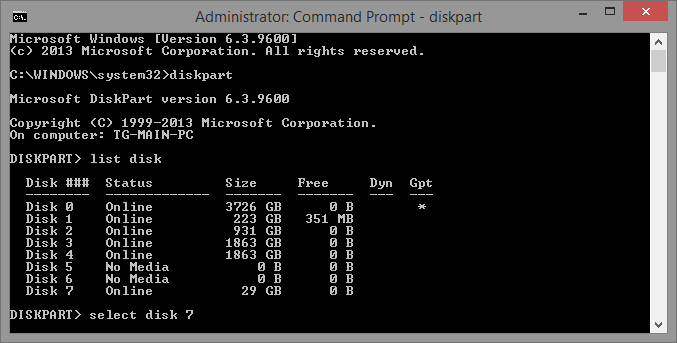
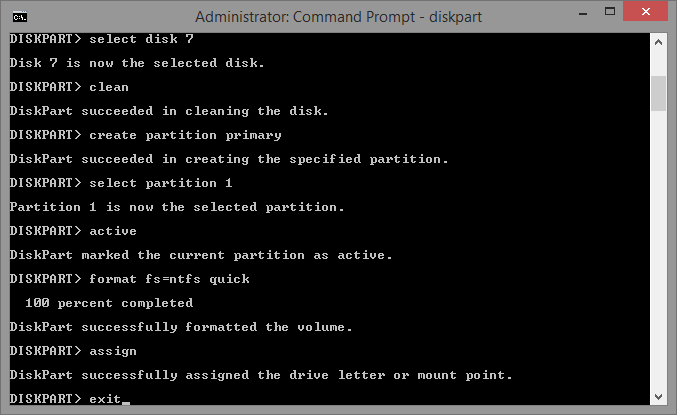
External storage should appear at the end of the list, and in our case, it did (we’re using a 32GB flash drive, which appears here as 29GB). Once the appropriate drive is figured-out, it can be chosen using the ‘select disk #’ command. Once selected, it needs to be wiped clean, have a partition created, and then be formatted. The entire command process is summed-up in this block:
list disk – shows avaialble disks, look carefully for the one that looks like your flash drive
select disk # – change # to the disk (flash drive) you wish to use
clean – removes existing partions
create partition primary
select partition 1
active
format fs=ntfs quick
assign
exit
For those who might want to see this in action, we provide this screenshot:
Note that “quick” can be removed off of the format command to run a full format, but that might take minutes to tens of minutes depending on the drive (as it’s more thorough).

At this point, the Windows setup DVD can be inserted into the drive, or the ISO mounted, and its files copied over to the root folder of the flash drive. After the process is done, opening up the flash drive in the file manager should mirror the contents of the Windows DVD/ISO.
Using Microsoft Windows 7 USB/DVD Tool
After the Windows 7 launch, Microsoft released its own USB creator tool that supported its official ISOs. While the company no longer promotes the tool, it supports at least 7 and 8 just fine, so some might prefer to use it over the other solutions.
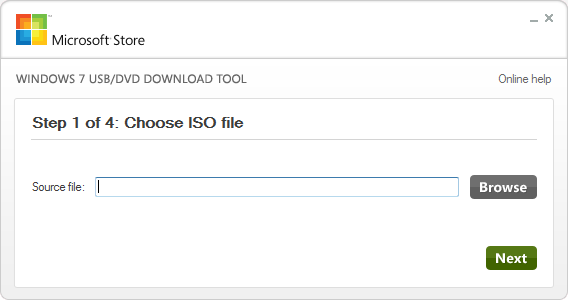
Once downloaded and opened, an ISO must be chosen. After that, the “USB Device” option needs to be clicked (this same tool can also burn straight to a DVD).
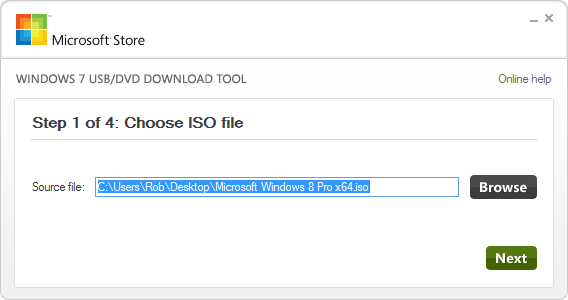
At the last screen, the appropriate flash dive needs to be selected from the menu, and after hitting “Begin copying”, the entire process will be complete after just a couple of minutes.
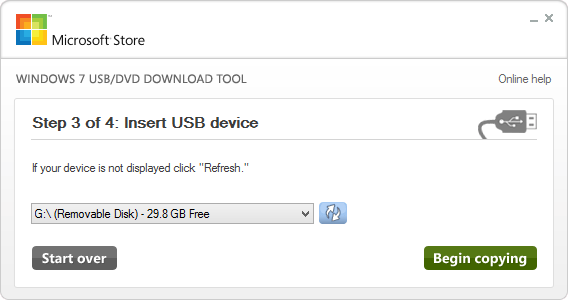
Truthfully, Microsoft’s tool here might be the easiest of them all to use, but because the company isn’t promoting it in any way, shape, or form (note that it’s called the Windows 7 USB/DVD tool, and not Windows 7 & 8 USB/DVD tool), we feel that it’s right to quicker recommend the other (often updated) solutions first.
Using Windows 10 Media Creation Tool
If you plan to install Windows 10 on a new system, use it to recover an existing system, or upgrade a previous install of Windows 7 or 8, creating a bootable flash drive is the first step. Windows 10 is the first Microsoft OS that not only natively supports USB installs, but encourages it and even sells USB drives ready-to-go.
The process with Windows 10 is not much different from Windows 7 and 8/8.1 like above, but is made simpler by the fact that you don’t even need the disk image first, as you can download it directly from Microsoft, complete with all the latest service packs already installed.
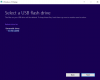
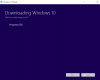
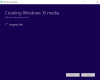
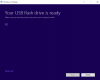
The whole process for creating a Windows 10 bootable USB drive can be done by using the Media Creation Tool; most systems these days will use the 64-bit version, so grab that.
Once you’ve downloaded the tool, run it and you’ll be presented with the media creation process. The gallery below outlines each step of the process for the basic method. There are a few things you might need to check first. Depending on where you plan to install Windows 10, you need to check which version you require, Home or Pro. NOTE: The contents of the USB flash drive will be erased, so make sure you back it up first.
![]()
![]()
![]()
![]()
![]()
![]()
![]()
The version you pick here at the beginning really doesn’t matter, since your license key will determine the version you can use, and the OS will change and configure itself based on that key. The N version of each OS type is for the EU compliant version, but truth be told, there isn’t anything different about it at this time. You can pick 64-bit as well, or both 32/64-bit if you are unsure or plan on using the bootable flash drive on different systems.
The Media Creation Tool can can be used to just download the ISO image of Windows 10, which can then be used with something like Rufus to create the bootable USB drive. This offers the advantage of being able to keep a backup of the ISO image, as well as create multiple boot drives without having to download the image each time. If you run into problems with the Media Creation Tool when it comes to creating the bootable flash drive, you can use the following method.
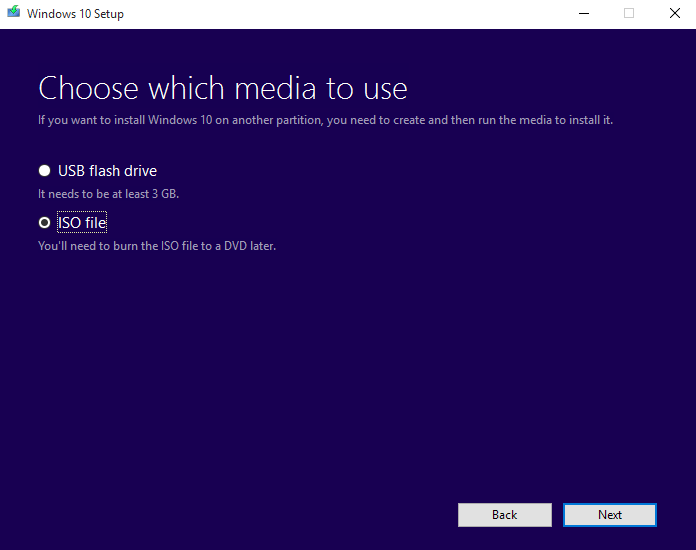
Instead of selecting USB Flash Drive in the Media Creation Tool, just select ISO File instead, choose a location to save the file, and after it’s downloaded, follow the steps outlined in the Rufus guide above. In general, we found this method more reliable than using the Media Creation Tool to create the Windows 10 bootable flash drive, and ther are a number of other advantages to using Rufus as well.
NOTE: When you let the Media Creation Tool handle the entire process of making the USB boot drive, there is a small problem when dealing with USB drives larger than 32GB. The tool will only create a single partition up to 32GB and then completely ignore the rest of the drive, and Windows-based operating systems can only handle a single partition on USB flash drives. If you create the boot drive with Rufus, it’ll use the entire drive, so 64GB and 128GB flash drives will have the full disk space made available.
Windows XP Notes
If you are attempting to use Windows XP on a USB drive, there are a couple of things to bear in mind. First off, we strongly recommend using Rufus (32-bit version) to setup XP on a USB flash drive over the other methods, as its success rate is much better. If installing with Rufus doesn’t work the first time, change the partition mode to MBR for BIOS only. Making XP boot over USB is a little tricky as well, because it’s much more sensitive to the age of the hardware and the system you are using it with.
As far as we know, the 32-bit ISO image of XP is the only compatible version that can be put on a bootable flash drive (success for XP 64-bit was limited). One of the key points though is that you can’t use a USB 3.0 port when installing, even with EHCI mode enabled. We also found that a lot of modern hardware refuses to detect the drive.
If you are using an older system, then you should have better luck booting Windows XP from a USB flash drive. Just be sure that your particular motherboard supports booting from USB in the first place (it’s normally off by default in older system). Check the BIOS boot section and see if USB drives are supported.
Unfortunately, the time period in which motherboards supported USB booting on older hardware is quite short, as anything before didn’t have the option, and anything after (around the time Windows Vista and 7 took off), those boards started the transition over to UEFI, which XP does not support.
A number of systems we have tested this with had very mixed results. Both an older Pentium D system with BIOS, and a i7-2600 with UEFI, couldn’t boot into XP. The USB media does work on a couple of laptops, but with other systems, it just boots up into a blank screen. If checking your motherboard settings for USB boot support and even legacy modes do not work, then you will have to resort to using a CD/DVD. You can read below for some more general advice as well.
Common Problems
No Bootable Device Detected
This can be caused by a number of things. The most common is that your system is not setup to detect or boot from USB devices. You will need to go into your BIOS/EFI and check whether your USB drive is detected at all. If it is, make sure that it’s available from the boot menu. If it isn’t, then some security option may be enabled that prevents booting from USB devices.
As each BIOS/EFI is different, we can not help with specific options, but check various security and boot menus to make sure that USB support is enabled. If everything appears correct, but still can’t be detected, try enabling USB legacy support, or a different USB port, such as a USB 2.0 port instead of USB 3.0.
It’s also possible that the install media, or ISO image you have, does not have the boot information available. Try a different ISO image if at all possible.
Windows Installer Starts But Can’t Detect Install Media
If the installer starts and lets you pick installation options, but an error occurs that either says it can’t detect the DVD or it requests you to insert media with additional drivers, then you need to use a USB 2.0 port.
Windows XP, Vista and 7, do not have native support for USB 3.0 ports. Attempting to install with your flash drive plugged into a USB 3.0 port will result in the above error. Unplug your USB Flash Drive and insert it into a USB 2.0 port, then begin the process again. You may still use a USB 3.0 Flash drive, but not plugged into a USB 3.0 port.
If no USB 2.0 ports are available (such as with more modern systems), then you will either need to go into the BIOS/EFI and enable forced legacy mode or enable EHCI on the USB ports, or you will need to ‘slipstream’ the USB 3.0 drivers into your Windows Install Image.
Flash Drive Isn’t Using All Available Space
This was mentioned previously in the Windows 10 section, but if you are creating a USB boot drive for Windows 10 and your 64GB drive is only showing 32GB available, then you need to recreate your boot drive with Rufus. The Media Creation Tool (MCT) only supports drives up to 32GB, and anything larger will have a second partition made, which Windows can not detect normally (but is still available if you plug it into a Linux machine for example). So download the ISO with MCT, then flash it with Rufus.
Windows 10 ‘Something Happened’
Generic and oh-so-helpful error. If you are using the Media Creation Tool to create the bootable USB flash drive, and it’s failing on the last step, try the alternative (and recommended) method of using the tool to download the ISO image and then use Rufus to create the boot media. If the Media Creation Tool is failing to download the ISO, then this is likely a network issue with either your local machine or Microsoft’s server. Try using a wired/Ethernet connection instead of wireless, or just wait a while and try again later. Failing that, try to download from a different machine if possible.
If you have any questions about any of the steps, please leave a comment below and we’ll help you as best we can.
Update: This article was updated May 2018 by Jamie Fletcher, to include Windows 10 and additional information regarding XP and USB size problems. Originally published December 2013.

Support our efforts! With ad revenue at an all-time low for written websites, we’re relying more than ever on reader support to help us continue putting so much effort into this type of content. You can support us by becoming a Patron, or by using our Amazon shopping affiliate links listed through our articles. Thanks for your support!


