- Способы создания образа iso на windows
- Создание образа на Windows 10/8/7/xp
- Еще одна хорошая программа CDBurnerXP
- Как создать образ ISO в программе UltraISO
- Creating windows iso file
- How do I create an ISO image file?
- How to create an ISO file out of any Windows 10 build
- How to create an ISO file of any Windows 10 build
- Create your own ISO file from a Windows 7 installation DVD
Способы создания образа iso на windows
В этой статье будут описаны способы, как создать ISO из файлов и папок. Для этого будут использоваться бесплатные программы, которые легко можно найти в поиске.
Создать ISO файл в основном представляющий собой файлы программного обеспечения Виндовс – совсем несложная процедура. Достаточно иметь программу и сами файлы.
Создание образа на Windows 10/8/7/xp
Есть удобная программа «Ashampoo Burning Studio Free». С его помощью можно записывать образы, создавать образы из файлов. Работает данный софт на всех современных ОС Виндовс.
Ashampoo Burning имеет удобный и простой пользовательский интерфейс на русском языке.

Если нажать на пункт «Образ диска», то появляются три пункта:
- Записать образ (можно записать уже имеющийся iso файл).
- Создать образ (можно снять и создать образ из имеющегося диска).
- Создать образ из файлов (выбираются файлы будущего ISO и создается).
Нам нужно выбрать третий пункт. Появится следующее окно.
Выбираете формат iso. Далее идет непосредственно добавление папок и файлов для будущего ISO файла.
Можно выбрать путь для сохранения и наглядно видно, сколько весят папки и файлы. Все просто и это не все функции данного софта.
Скачать можно с официального сайта: https://www.ashampoo.com/ru/rub/fdl
Еще одна хорошая программа CDBurnerXP
Она может работать на Windows 2000/XP/2003 Server/Vista/2008/Win7/Win8/Win10 (x86 / x64).
Имеет русский язык и удобный интерфейс, а также поддерживается старой ОС Windows XP.
Несколько шагов для создания образа.
- После запуска выбираем «Диск с данными».

- Далее в следующем окне выбираем нужные файлы и папки. Просто переместите их на правый нижний угол. Затем в пункте «Файл» нажмите «Сохранить проект как ISO – образ…».
Таким образом, проект сохранится и создастся ICO файл.
Скачать можно с официального сайта: https://cdburnerxp.se/ru/download
Сразу скажу, что устанавливайте программы внимательно, т.к можно вместе с программой установить разные ненужные тулбары и прочие… Для этого надо выбирать при установке или загрузке пункты типа «Дополнительные параметры», «Больше опций загрузке». Эти действия касаются для всех бесплатных программ. Тот же Adobe Flash player, при обновлении или загрузке стоит галочка на установке google chrome, поэтому она так часто типа обновляется. Конечно, вы можете устанавливать дополнительные тулбары, браузеры и прочие элементы, это ваше право, но сколько раз я не устанавливал, практического применения я в них не нашел, только засоряют компьютер.
Как создать образ ISO в программе UltraISO
Тоже неплохой софт, она самая популярная для работы с образами. Действия следующие:
- После запуска, внизу выберите нужные файлы и нажатием правой кнопкой мыши можно выбрать пункт «Добавить».
- После выбора в меню «Файл» нажмите «Сохранить»
В поиске его можно легко найти, официальный сайт я к сожалению не нашел.
На этом все, думаю этих программ достаточно для создания ISO образа.
Creating windows iso file

How do I create an ISO image file?
ISO Creator: To be precise, an ISO image is a copy of the data on an optical disc, such as a CD, DVD, or Blu-ray Disc. There are many occasions when you want to create an ISO image. For example, when you need make several copies with the game, you create an ISO image, when you modify a bootable disc, you create an ISO image, etc. And here, WinISO is the best choice due to its powerful and versatile features. Besides, its friendly UI enables you to make bootable ISO, convert ISO to BIN instantly!
Here we will show you how to create ISO image files with WinISO step by step.
Step 1: Getting Started
Free Download WinISO from our official website and install it. It will just take you several seconds.

Step 2: Create a new file
After running WinISO (which serve as an ISO Creator) and click the «New File» button on the toolbar.

Step 3: Add files
Add files or directory into WinISO by right-clicking or pressing the shortcut keys «F3» or «F4».

Step 4: Save
Click the «Save» button and enter in the ISO file name. Then click «Save» to create a new ISO. (Disk space can be saved by utilizing this function.)

With this function, you can save your disk space. WinISO is a CD/DVD/Blu-ray Disc utility tool. Except the function of creating ISO, you can also add, delete, extract ISO image file and burn it to CD, DVD, Blu-ray Disc.
Maybe you also want to find: How to make a bootable ISO?
For more guides, please take closer look here:
How to create an ISO file out of any Windows 10 build


- Download Restoro PC Repair Tool that comes with Patented Technologies (patent available here).
- Click Start Scan to find Windows issues that could be causing PC problems.
- Click Repair All to fix issues affecting your computer’s security and performance
- Restoro has been downloaded by 0 readers this month.
When Microsoft releases a new Windows 10 build to Insiders on the Fast ring, it is usually only available through Windows Update.
This means you can’t find an ISO file of that build, and install it manually while it’s still available on the Fast ring only.
Microsoft usually releases Windows 10 ISO files for commercial versions, or when a certain build enters the Slow ring.
You can download official ISO files for the Anniversary Updates, and for different Windows builds, but you can’t download an ISO file of the latest build released.
However, if you you can’t wait for Microsoft to officially release an ISO file, and have a good reason to download it, and create an installation media, it’s actually possible to do that.
There’s a way to create a ISO file of basically any Windows 10 Preview build you want, but it’s not an official way, approved by Microsoft. So, here’s what you need to do.
ISO files, also called ISO images, represent a single file of an entire DVD or CD. In other words, it is a virtual version of a disc.
This is why ISO files are very useful, eliminating the need to carry data on a piece of hardware. Also, for Windows 10 builds, the ISO format may play an important role.
It is easier for Microsoft to release ISO files for updates, but it happens that you can’t download the official ISO file of the latest build.
How to create an ISO file of any Windows 10 build
When you need to install a new version of Windows 10, or download a new build, Microsoft delivers it to you through a new ESD (Electronic Software Delivery) image format.
This image is known as install.ESD, and Windows 10 downloads it on your computer, every time you install a new Windows 10 release.
To create our custom ISO file, we’re going to take advantage of the install.ESD file. This file is usually stored the hidden $WINDOWS.
BT folder, there’s an easy way to find.
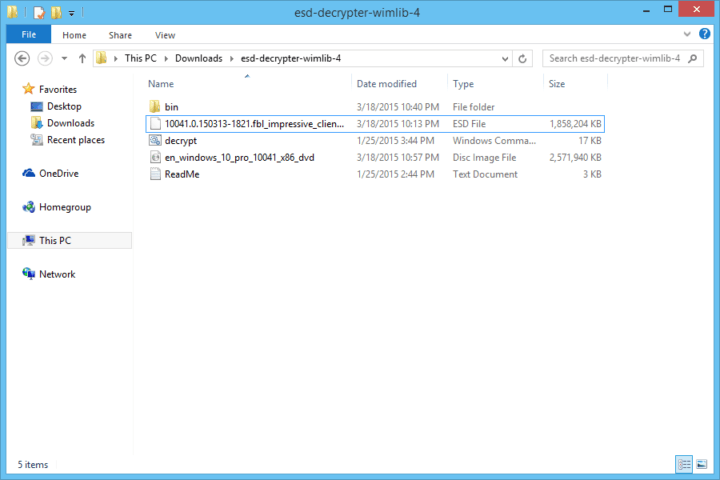
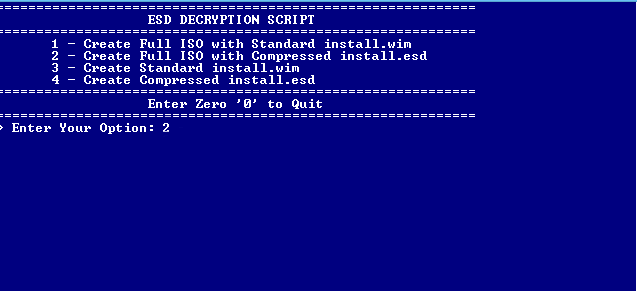
Once you’ve found the install.ESD file, you’re going to need a program called ESD Decrypter, to create your own ISO file.
But first, we have to mention that this utility is a third-party program, so you’ll be using it on your own risk.
Now that we know what’s required, let’s create some ISO files:
- Download the ESD Decrypter (from the link above), and extract it anywhere on your computer
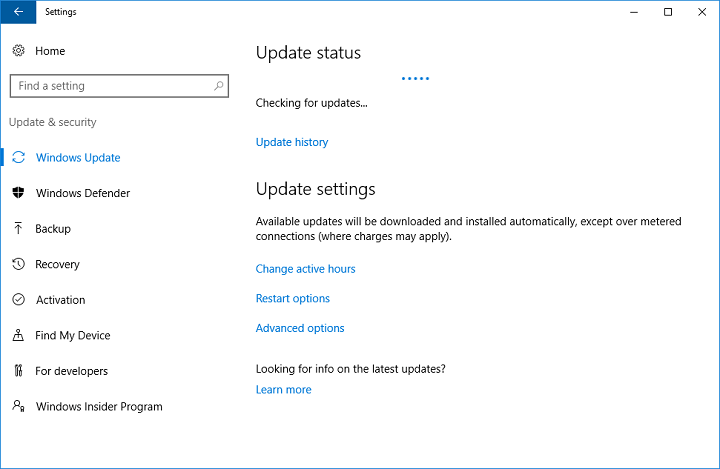
- Now, go to the Settings app >Updates & security >Check for updates
- Let Windows Update download and install the new build
- Once the build is installed, DON’T restart your computer to install it
- Go to File Explorer >This PC, and open a partition on which your system is installed (usually C:)
- Click the View tab on File Explorer, and check Hidden items option to see the $WINDOWS.
BT folder
Open the $WINDOWS.
BT, and find the Sources folder
That’s pretty much it, once you’ve created a ISO file using this method, you can mount it on a USB flash drive, using a tool like Rufus, and install it on your PC, or a virtual machine.
If you have any questions, and comments, please let us know in the comment section below.
RELATED STORIES YOU NEED TO CHECK OUT:
Create your own ISO file from a Windows 7 installation DVD
Technical Level : Intermediate
How to use your or a friends “Retail” version (Upgrade or Full product) of the Windows 7 installation media to create an ISO file. Please note that an OEM DVD will not work, it must be a retail installation DVD.
It can be an Ultimate, Professional or Home Premium DVD which you will use to create an ISO file and then use the ISO to create an installation DVD that gives you a choice of which version you want to install as long as you have the proper 25 character product key code for the version you choose to install.
In other words you can take a Home Premium DVD and use it to create a universal installation DVD that allows you to install Windows 7 Ultimate or any lesser version of Windows 7.
As you may already know the Digital River ISO downloads are no longer available and Microsoft’s web site ( http://www.microsoft.com/en-us/software-recovery ) does not support OEM product keys and often malfunctions (incorrect language) when entering in a retail product key.
With one DVD or USB Flash Drive you can install or re-install any version of Windows that you have a valid product key for. This comes in handy if you have multiple computers and no longer have the recovery medial or your recovery partition is damaged.
Note: Windows 7 Starter edition is only available in 32Bit, so if you need a ‘Starter edition’ installation DVD or USB Flash drive, you need a 32Bit Windows 7 installation DVD.
This is a multi-step process, the first 3 steps will be covered in this article and a link provided at the end of this Wiki will show you how to perform the remaining steps.
Step by Step guide:
Note: During the install skip installing the unwanted bloat ware as follows:
a) Double click on the SetupImgBurm_2.5.8…..exe file to start the installation.
b) Step #2 of 5, decline the offer to install Yahoo.
c) Step #3 of 5, decline the offer to install “Malware Protection Live”.
d) Step #4 of 5 is the actual download of ImgBurn and may if you have a high speed Internal connection appear to be instantaneous.
e) Step #5 of 5, you will be prompted that the download is complete, click on the ‘Install Now’ button.
f) When the Welcome to the ImgBurn Setup Wizard window opens click ‘Next’, Read the License Agreement and ‘Accept’. Click the ‘Next’ button to continue.
g) Choose Components: use the default settings and click ‘Next’. Use the default ‘Install Location and click ‘Next’. Start Menu folder: use the default folder and click ‘Next’. Use the ‘Express settings’ and click ‘Next’.
h) Do not install ‘360 Total Security’ (Choose Custom Installation and remove the check mark from 360 Total Security). When prompted it’s your choice if you want to be periodically notified of newer versions of ImgBurn.
i) When the installation completes click the ‘Close’ button. You will see the ImgBurn shortcut on your desktop.
j) As much as I tried to stop the installation of bloatware I still ended up with “Web Companion” AV software. This may conflict with you current AV software so go to the Control Panel’s ‘Programs and Features’ to un-install Web Companion.
Step #2) You are now ready to convert any Windows 7 “Retail” installation DVD into an .ISO file.
For this article I will use a retail version of Windows 7 Home Premium (64Bit) to create a universal Windows 7 DVD that gives you the choice of which version of Windows you want to install.
Please note that your Windows 7 product key must be for the version of Windows you choose during the Windows installation process.
a) Insert the Windows 7 installation DVD into your DVD drive. Close the AutoPlay prompt.
b) Launch ImgBurn and click on the ‘Create Image file from disc’ option.
c) Verify the ‘Source’ is set to your DVD burner and the ‘Destination’ (where the ISO file will be created) by default is to the ‘Documents’ folder.
d) Click on the ‘DVD — à Folder’ button. This will start the ISO file creation process.
e) The time to complete may take 4 to 5 minutes depending on the speed of your CPU, DVD burner and disk drive. The log file will show the results.
f) Remove the Windows 7 media from the DVD drive.
g) Click the ‘OK’ button and close ImgBurn, this may take a few seconds as the ISO file is created, just wait for the popup Window appears to close out by itself as no action is required on your part.
Step #3) Follow the instructions in the Wiki article named:
Using the ISO file you just created read the instructions in the Wiki article titled: How to create a universal Windows 7 installation DVD or USB Flash Drive to create an installation DVD that includes Windows 7 Ultimate, Professional, Home Premium and lesser versions.
Notes:
Steps 1 and 2 in the «How to create a Universal Windows 7 installation DVD or USB Flash Drive» Wiki article mentions about downloading the ISO file. Since you just finished creating your own ISO file you can skips these steps and proceed to step #3.
Also ImgBurn is already installed so there is no need to re-install it.
When you have completed the steps in this Wiki article you will have an installation DVD that will allow you to choose which version of Windows 7 you want to install.


