- Create a Data Image Using DISM
- How to Create an ISO Image from Your Operating System?
- Main advantages of using ISO image
- Create Windows 10 ISO from the current installation
- Create an ISO image in Windows 7/8/10
- Final words
- Windows System Image Manager Scenarios Overview
- Common WindowsВ SIM Scenarios
- Create a Catalog File for a Windows Image
- Edit an Existing Answer File
- Add Device Drivers to an Answer File
- Add Applications or Drivers to an Answer File
- Add Updates to a Windows Image Offline
- Create a Configuration Set
- Import Packages to a Distribution Share
Create a Data Image Using DISM
To add applications, files, and other resources to Windows during an installation, you can create a data image. By using the Deployment Image Servicing and Management (DISM) tool, you can create additional Windows image (.wim) files that contain only files and applications that you intend to copy to the Windows installation.
Data images enable you to add:
Applications, files, scripts, and other resources to Windows during an installation.
Files, resources, and other data to a partition other than the operating system partition.
NoteВ В Data images must be used only to add new files to a Windows installation. Do not use data images to replace existing Windows files. Overwriting operating system data is unsupported.
Previous methods of transferring data to a Windows installation required the use of $OEM$ folders. These folder structures are still supported, but data images provide an easier and more efficient means of transferring additional data to Windows.
In unattended installations, the Windows image to install is specified by the OSImage setting in the Microsoft-Windows-Setup component. You can add one or more DataImage settings in the Microsoft-Windows-Setup component that represent additional data images that you add to the system. For more information, see the Windows Unattended Setup Reference.
To create a data image
Locate the data that you will create a data image for.
Open a command prompt as an administrator, or boot the computer to Windows PE to open the Windows PE command prompt.
Use DISM to compress your data files to a .wim file. For example:
In this example, everything under the C:\Data\DataFiles directory is added to the .wim file and the .wim file is given the label «MyData». All files and folders under C:\Data\DataFiles are extracted to the root of the drive specified in the answer file.
For more information about how to use DISM, see DISM Image Management Command-Line Options.
Copy the data image to an available location such as another partition or a network share during WindowsВ Setup.
To add a data image path to an answer file
Use WindowsВ System Image Manager (WindowsВ SIM) to create an answer file that contains the path to the data image to install and the location for the installation.
Add the Microsoft-Windows-Setup\ DataImage settings to the appropriate configuration pass for your environment. For example: windowsPE .
Save the answer file and close WindowsВ SIM.
The answer file must resemble the following example:
If you’re specifying a local folder in path , see Path in the Unattended Windows Setup Reference to learn about using relative or absolute paths.
Run Setup.exe, specifying the location of the answer file. For example:
All the files and folders specified in the data image are extracted to the root of the drive during installation. Executable files and scripts are not run when the data image is applied; they are only copied to the drive. You can use FirstLogonCommands to specify commands to run the first time a user logs on to the computer. For more information about FirstLogonCommands , see the Windows Unattended Setup Reference.
How to Create an ISO Image from Your Operating System?
Want a custom ISO image with Windows system and all your personal data included? Learn to create an ISO image from your operating system here.

By AOMEI  / Last Updated October 23, 2020
Main advantages of using ISO image
It is very important to create backups of your operating system in case of computer issues. If the backup is ISO image format, then it is super convenient to restore or employ on other devices. When your system crashes or data get lost, you can quickly roll back to the state where the ISO was taken.
Compared with other image backup format, ISO image format backup has quick a few advantages.
1. The ISO image itself is bootable so you can use it to restore your PC when you have boot issues.
2. It is easy to deploy on another PC.
3. It does not rely on backup tools or cloud.
4. You can view its content by mounting it as a virtual drive. (in Windows 8/8.1/10, you double-click it to mount it).
5. You run the ISO image on a virtual machine.
Create Windows 10 ISO from the current installation
Windows 10 has built-in feature DISM that allows you to capture Windows image under recovery environment. To use it, you need a Windows 10 recovery media or installation disk. With that prepared, you can follow the steps below to capture Windows 10 recovery image .
1. Boot your PC from the recovery media or installation media.
2. If you boot from the installation disc, then you can press Shift + F10 at Windows Setup screen to bring out command prompt. If you boot from recovery media, then select Troubleshoot > Advanced options > Command Prompt.
3. Type the following command and press Enter.
“dism /Capture-Image /CaptureDir:C:\/ImageFile:D:\windows10\install.wim /Name:windows10 /description:2018-01-10
Note: the drive letter may change under recovery mode, so the Windows installation drive may not be C: drive. You need to replace location path “D:\windows10” in ImageFile switch with the target location path where you want to save the custom image. You may also need to replace drive letter C in capturedir switch with Windows system partition.
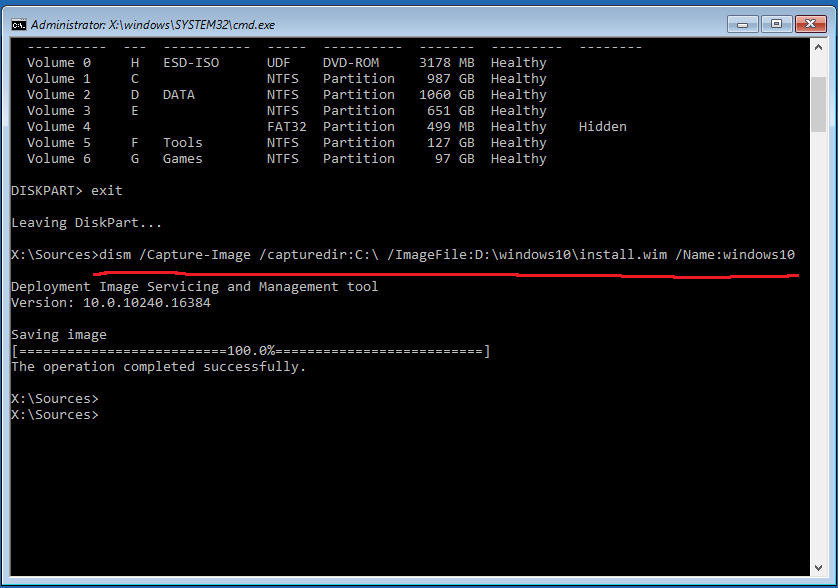
This process might take a while and you cannot turn off the PC during the time. This image file can be used to reset Windows 10 PC. To make it as a bootable ISO image, follow the steps below:
4. Open Windows 10 installation disc in File Explorer. Copy its contents and paste to a folder on your internal or external hard drive. For example, copy them to a folder named “iso-files” located on D: drive. You can also mount a Windows 10 ISO and copy its content.
5. Copy the custom image install.wim created before to the Source folder and replace the original one.
6. Download and install the latest Windows Assessment and Deployment Kit (ADK) for Windows 10. You only need to select Deployment Tools to install.

7. Run the command following command on an elevated command prompt.
oscdimg.exe -m -o -u2 -udfver102 -bootdata:2#p0,e,b[path of the iso-files]\boot\etfsboot.com#pEF,e,b[path of the iso-files]\efi\microsoft\boot\efisys.bin [path of the iso-files][new location to save the iso image of the current windows]
The command is kind of complicated. To make it easy, you can also use free tool as Folder2ISO to create an ISO image out of the folder you created in step 4.
Create an ISO image in Windows 7/8/10
In Windows 7, you can use built-in feature Backup and Restore to create image backup of your Windows 7 of hard drive. You can restore it or mount it as a virtual drive. However, it is VHD formatted instead of ISO.
For regular users who do not need to backup data constantly and do not have many data to be backed up, Windows 7 Backup and Restore is enough. For users who need advanced backup and restore experience, you can use free backup software AOMEI Backupper Standard.
You can use it protect any volumes detected by Windows instead of only NTFS, and you can have more scheduled backup tasks instead of only one.
To create image backup from your operating system with AOMEI Backupper
1. Get it from Download Center or button below, and then install this free backup software.
2. Select System Backup under Backup Tab.

3. To make the steps easier, the program will automatically include required partitions for a full system restore. Just click to pick a destination location to store the image backup.

4. Click Schedule to configure when you want the backup to run if needed. After that, click Start Backup to start the backup.
After the backup is done, you can create a bootable media with a USB drive or CD/DVD. In the event of system unbootable, you can use it to boot all versions of Windows 10/8/7 to restore your PC.
Final words
As mentioned, backing up your computer is important. You can create ISO image from your operating system or create custom system image backup with AOMEI Backupper. All in all, the usage of ISO image is wider, but you need much more effort to create one. What’s worse, you need to this all over again if you want to update the ISO image.
If you use AOMEI Backupper, you can set up a scheduled backup and it will automatically keep your image backup up to date. With its incremental and differential backup feature, you can have multiple image backup versions with a little disk space.
If you want to protect unlimited computers within your company, you can pick AOMEI Backupper Technician. With the inbuilt AOMEI Image Deploy tool, you are also allowed to deploy/restore system image file on server-side computer to multiple client-side computers over network.
Windows System Image Manager Scenarios Overview
WindowsВ® System Image Manager (WindowsВ SIM) creates and manages unattended WindowsВ Setup answer files in a GUI.
Answer files are .xml files that are used during WindowsВ Setup to configure and customize the default Windows installation.
For example, you can use WindowsВ SIM to create an answer file that partitions and formats a disk before installing Windows. WindowsВ SIM also changes the default setting for the Windows Internet ExplorerВ® home page, and it configures Windows to boot to audit mode after installation. By modifying settings in the answer file, WindowsВ SIM can also be used to install third-party applications, device drivers, language packs, and other updates.
WindowsВ SIM does not modify the Windows image itself. You use WindowsВ SIM only to create an answer file. During Windows Setup, the answer file applies the settings to the Windows installation. WindowsВ SIM does not modify the settings in a Windows image (.wim) file.
Common WindowsВ SIM Scenarios
Create a Catalog File for a Windows Image
Before you can create an answer file, you must create a catalog (.clg) file. Catalog files contain all of the configurable settings in a single Windows image and the current values of each setting.
We recommend that you use the 32-bit version of WindowsВ SIM when you create your catalog files. The following table shows the architectures of WindowsВ SIM and the supported Windows image architectures.
| WindowsВ SIM architecture | Can create catalogs for Windows images of the following architecture types |
|---|---|
### Create a New Answer File for a Windows Image
You can use WindowsВ SIM to create an answer file to be used during WindowsВ Setup. You can view all of the components that are available in a Windows image, add component settings to your answer file, and choose when to apply a component setting by adding it to a particular configuration pass.
After you add component settings to an unattended answer file, you can view and customize the available settings for each component. For more information, see Answer Files Overview.
Edit an Existing Answer File
You can use WindowsВ SIM to add components, packages, or other updates to an existing answer file. You can also validate an existing answer file against a Windows image to ensure that the settings in that answer file can be applied to a specific Windows image. An answer file is typically associated with a specific Windows image. By using WindowsВ SIM, you can open the Windows image, open an existing answer file, and then make changes to the answer file.
WindowsВ SIM validates the component settings in the answer file against the settings that are available in the Windows image. For more information, see How to Validate an Answer File.
Add Device Drivers to an Answer File
You can add device drivers during WindowsВ Setup by using WindowsВ SIM. Windows Setup uses the following types of drivers:
- In-box drivers. Windows Setup handles in-box drivers the same way that it handles packages.
- Out-of-box drivers. By using WindowsВ SIM, you can add out-of-box drivers (INF-based) during WindowsВ Setup. Typically, these out-of-box drivers are processed during the auditSystem configuration pass. Your .inf-based out-of-box drivers must be in a distribution share subfolder that is called Out-of-Box Drivers. For more information, see How to Manage Files and Folders in a Distribution Share.
- In-box drivers that are installed with a Windows Installer file. In-box drivers that require a Windows Installer file are added the same way that applications are added.
By using the Microsoft-Windows-PnpCustomizationsWinPE component, you must add boot-critical device drivers that are required for installation during the windowsPE configuration pass. For more information, see How to Add Device Drivers by Using Windows Setup. You can also use Deployment Image Servicing and Management (DISM) to add device drivers to an offline image. For more information, see How to Add and Remove Drivers Offline.
Add Applications or Drivers to an Answer File
You can use WindowsВ SIM to add applications or drivers to be installed during WindowsВ Setup by using a distribution share. You use a distribution share to store all applications, device drivers, scripts, or other resources that you make available during WindowsВ Setup.
You can add more applications, scripts, and other binary files by using a data image. A data image is packaged in a way that is similar to a Windows image. By using the DISM tool (DISM.exe), you can capture a folder structure that contains the resources that you must add to Windows (or another partition on the computer) during WindowsВ Setup. You can specify where the data image is applied by using the DataImage setting in the Microsoft-Windows-Setup component. For more information, see How to Create a Data Image.
You can also use $OEM$ folder structures to place binary files and other applications in specific locations during WindowsВ Setup. Applications are added from distribution shares through subfolders in $OEM$ . You must also add a RunSynchronous setting to the answer file to open the Windows Installer file or the .exe file that installs the application. For more information, see How to Manage Files and Folders in a Distribution Share.
Add Updates to a Windows Image Offline
WindowsВ SIM enables the addition of offline updates to a Windows image. These updates include software updates, device drivers, language packs, and other packages, which Microsoft provides.
DISM.exe is the tool that you use, with or without an answer file, to apply packages to Windows. Any package installation, removal, or modification in the answer file is applied to the Windows image. For more information, see How to Add or Remove Packages Offline.
Packages that exist in the offlineServicing configuration pass are applied to the offline Windows image. For more information, see Windows Image Files and Catalog Files Overview.
Create a Configuration Set
A configuration set is a subset of files that are available in a distribution share that is explicitly called in an answer file. When you create a configuration set, any files in a distribution share that are referenced in the answer file are saved to a specific folder. Paths to these files are updated in the answer file to point to the specific folder.
Configuration sets are smaller, more portable versions of a distribution share. A configuration set is ideal for installations that cannot access a distribution share. For more information, see Distribution Shares and Configuration Sets Overview.
Import Packages to a Distribution Share
WindowsВ SIM imports packages that are not part of a Windows image file to an optional set of folders called a distribution share. You can then add packages to an answer file from the distribution share. To import a package to a distribution share, you must use the WindowsВ SIM tool or the Component Platform Interface (CPI) APIs. For more information, see Distribution Shares and Configuration Sets Overview.
You can also import a package directly into an answer file. The answer file includes a pointer to the path of the package.


